• Happy Weed Appreciation Day! 🌱🌿🌻

Freedom Solo 16'

Brian,
It's looking more and more like a canoe!! My son is in the middle of his first "on his own" build, with some help from the old man. He spent a fair amount of time fairing his keel line cut. He remembers me telling him, when he was maybe 8 years old, that one of my builds had a crooked keel line cut, and I fixated on that flaw for years. Funny what sticks with the kids...

I'm assuming you've got an external keel going on? How far back will it go? I use those same sort of sandpaper sticks to keep a straight keel line! I do like that hull shape.
 
Looks great Brian !
I see you stripped to the very center. To me, that makes filling in those last few strips on the other side difficult ! I've broken a few over the years, with a few choice words uttered !
Now, I stop short a few strips. then when I reach that point from the other side, it's much easier to fit those final strips.

http://i1272.photobucket.com/albums/y390/JimDodd/IMG_0664_zpsebe95zcs.jpg - Click image for larger version  Name:	IMG_0642_zpsibbhiy2z.jpg Views:	1 Size:	131.8 KB ID:	74392
 

Attachments

  • IMG_0663_zpse2hztavu.jpg
    IMG_0663_zpse2hztavu.jpg
    140.7 KB · Views: 1
  • IMG_0664_zpsebe95zcs.jpg
    IMG_0664_zpsebe95zcs.jpg
    166.8 KB · Views: 1
  • IMG_0875_zpsnoed70ce.jpg
    IMG_0875_zpsnoed70ce.jpg
    135.4 KB · Views: 1
Last edited:
Hi Jim,

For me, just depends on what I am planning for the center .. if I have an insert like that, I do the same thing and leave a few on both sides (last Freedom 17 build), on this build the center is just strips.

Fitting the center is a bit fiddily either way .... but for me there is no fiddily champion between the two.

Brian
 
The last strip installed has the cove shaved off ..... this creates an opening that allows a fitted piece to be dropped in place

YPGL4n0pc_gM01TW8S9ZQoIv1pZlz2vdmPISHyS-cKoZa6RZ0SXKkPB31-A5oebEL7xGzO0jGOlO0yWOijZDor19XgnlRwHiBRYntwtQYsyxNaohkXWAYBORQwB_2bj2dr5Q64sy4tbP3orOdg8_yC6iKTdUH1hwq8JISpr5m4vBd__wNwvmne-h4alK3YcjRZa00C4VmylNNZXiWP4PmlpFu8pjdiwuwF49sw731eF5V4SUD7yi3-OhGZYeb9zBYTg62bfHF6KdhNDT3j8u1Hbl2Tfpc3hrQbgaliUjMHh3Py2cPyrSgdOI6UT6Q2sAK5cxek6xXs3T4jGlCteyC1VTr6WO3Y67Tqb9KfF0uRUJKAzMfLHctImi5o159eb35-q95CRxCjfdQOSA33lYOUstIjc72fyL6622JzDYYNZD8LvcuOT9nhFlrWY73Uz_L8Q2sgJfdUKW-0k_1COD1spDo06idAiv1pP1DlhNhnStDV8Tv0n2TMfI0NheIYf_msFjHZv2vlXaXi0JlCyiUDr6U55qG19u-f8Ay-3H34IUlpqasdU1uh0gG-EPGqIYLzBlrNMbKga4l45EDPU7FH0BUGugQzrvWfDf0uVV5g=w673-h896-no


The trick is getting that shape duplicated. The curve is taken off the hull and replicated on a shaping jig

xYAL_SYUFi0Uj-nH9h0R6Tj86GEewuZrCE10gW9VlUEO0WgNAbRiXT-Gx_BYwWaBK72B4YJlL2j1dyQf87ohFEcPr2qLZXqsSKO-WJousFjS7gMCXtTyu26EitKPzA4ep2qtCKi60xQ40BxAfE5ehoI9xDHn6PRWlVLKUSqxK8q5zv0jiBjzxF_fdteyoTNjKFU-6wK1tWGv7gAc6nymoKEVbenQgy2GlUR2QDPFlyQRVaKAC9MoLLt4CS2uDZjXXJ_2JJo6ZLCTIB4DePdiNN-5Xp1x6LpsJ9S2e58iot8lgYUKjF8nofo_VW72Yf5l4qu2jQ_RdvR9UziTJs6MhaS4TaWVucdA1jfoWlQ8JTy1_bfd3Yi4b7iuHtsgWjkMoqmdJDimVdvLL9kM6ryL2_TcZbsVWXpLzEhS2rVp2LMCjh1g-OY3OXlzRC26MJ20sDXoxNrpknZEy33nh-pW1b0l76n4vmRqZ8APVTt4AWdgRROMKZKopWVpSu3soeU33RFihu4CkF2RTOOfk_Qbu9o5qVhYyWwZk1vf8ErTTwk7-aPMpgPBiQKoTKoSykx6N-y6ELqy3_22qaxNErARPvNLHviG9LeaT6zWp8cLow=w672-h896-no


The last strips glued and fixed in the jig. I had a scrap piece that was the perfect size, so the jig base is the same length as the opening, so to get the center line, you can just draw a line between the end blocks, this sets the center line and takes the guess work/fitting out of half the opening (the centerline is done).

1gP9vV-sD89yvTFm8U0L_qYDQ6Z34c3NFNNf2-ZrLNSMe_ZqzIIkvCEAi6cuq7zR3vhEaDp3qtqmPRucdXB7h87MJIfp-wxQzf80jVa4u0Rx-ZUdqVBY7mg_ZQ7vV_A8mO5D_MhO5BTSxElhAZ9cJlJJf0r38J0LcXOJXjah0zfXnWNWIKrjq-udmDUqw-NGB8JBCTxCUhR0Z1BEpGmSiXGZ4K8o88gPOJBPVRWwypEhJZn0yh8vf-FMZXpUFJJHxtOe59RAQuDwEb4qcKarH7j2_l13X0UhSF30lS_cD2RT4QyFOS7Vwcmp3Gq5nDexc5Y2bXz42bIDVfo6b2WAtPIQf_0969uIVDaE46aVCyqMiXT06QYIXtZsOinQOpKO7As7mKdh8h6LMK63Aasf00V64nSzkS14XMeSOklduYZjwJzZbE9X9ewVtJ2MKF40lX8gSKPcZxr1lwp6CVCOg-9ebvaBQQgbGnVsibPEtRug8yX0gvP4AcOOQGU7T294UX-udPTC3R4-7LeXc5ND-MK4Df0GJ49XnIcgt-6UZnFSOFt2pCPFUlJuyisCRLcB0q4xyzy5OSXSSwd0GVF49NV2qGMou3URge0HN-El1A=w672-h896-no


Glue up completed, Just need to cut the centerline side (chisel,plane, sanding block), then patiently on the curved side ... sand a bit, fit a bit, until the insert is as close to a perfect fit as I could get.

JWsw7tnWo5nJ1rzTEmjrrijFZFsu1buK24KIxM1tDOD7WIyxythz-DaDB-sajGyygPuyyVIGnJf2rSly5CWI5CPki0RWse5oG85W1SLxVOQIeXzPdO2PKez0WQA5h8srwARK66BK_fWZOeu5yLnes-kefDa2Az_DUphbVRF5g1vlkBdWoNzXDJDEJZL2SiCbeHZfboKCyEw5X8f7qBbm1uK_sUS4AhGyP5DRxLLtnfnX_nZY_pAWJ-FhPqW8pPSoXTZOUiGNHSpdzmmN2qoSMRBqvLRrC1w4gxEvBEKmP9qkI3-TVyH1OFbSWWt-qXCa8g3tblPv-jRou09zGxk6f9uFtIkacfvLYeLlbyCN10RO_wgJb6biCHqIoe_Hx1dYjea93R9uENpNGjT3eG_Cu5Fq6YdfajY-jUQAhi4aVlqc2shHG-HhlXAyTkMqrwX6VMYSOzVu4xcResk0UoByiLBU0lOFZknMVAWeNxuuAh5eMnFN9cMkVJ7PA4jfJXiz5dnr4VoNLJk-tTXD1jwpJyU5d5QOVqbztS2xDQQ-16SlsyebBvnAbHXpKLTurt-ccfg5OqEiRWOX3lAGtevcM185by_goxVcVZUG0ykoKQ=w672-h896-no


Fitted in place, I lucked out, the center line was straight and after a few sanding adjustments, the piece dropped in and was a suitably tight fit

LYqfqjtaspUX4eZi_0kFEInp-RwTYoVSAsI7MucCWXu954OCd9AHBiHFaIwvAEG5jLCpxvLNBcexh2U2XEQboD9akNrjWoB8bMlbQafSBu4kY-dLHq9AHznfcyL2gVUrC3JdI0ymlbsQoJhJX_Wp3V8VujdajVkEcsBwsntr4sIRFlYaqpPfL0G9GNhlmeDpSgkue7e9qu4xLMu8LzPbr3jggbnBuWRvhWNazj9y7sUTZw4qkbp8f02hfgN6iTQPMqJCVF5uw-TERiL3qzlX1wjbE21RhnP9NDUtQBIgDpfvo5lh-L6A1nOhsMmQMTsPiIUgWOodfk2O8VXr5jcRDWlI5I1fgoORTvklddVoI8mqO01WenEPUPYKElPu0nilmKDySg6LVdnIquJSZk9m3gMNPOaFVqqzc-jKzVz9pESL4vakofOZP43u879sJcPA-Ay7PBkkFVR5NmfYP7N1jtWfmzD7nWhcnTPDC2nyvJjgFM_-G_YQi_KbFHzrKimo2HgURBT2Czp5dvMPeWceT3Nve5FLbHZVu7rbG9V8jyXXuB2IaUjhNGqZ0EEgU2M1rl5gCIhgeZQBPb7ZU8gMtMn08Cw1TXdapcJqOy0XVQ=w672-h896-no


Just as I was fitting this last piece in, the wife came out to see how it was going. She was excited and said she couldn't wait to see the hull sanded up, I didn't have the heart to tell her that I still have to fit couple of strips on the bow and stern for the last bit of the sheer ... the bow strips may need to be steamed, there is quite a bit of torque required to fit those ... but that is tomorrows challenge.

Brian
 
Brian,
I like that shaping jig, what an elegant solution! I've never even considered leaving out those last few strips on each side...I like it.
Looks like you'll be sanding and glassing soon.
Are you glassing all by your self?
 
SG,

If I plan a center feature ... I do as Jim suggested ... leave room on both sides ...this is the center of my last build (Freedom 17)

The center space, with strips on both sides omitted
042Qo_LQy5F0ZGDf4mqCkW2VpV4gdAxV998-8pJLG5SpsBtgA73lVHrhBOgx08yLHCpy5iN_7AOaR8s5UaeFVXzg2OaoqQiQaN6WfrTwZrPCJnwCGoqIwK_32-vERMLJXFnM-silMZIlK7zx5i8c9qLOyUSaPT0ydgXOTCZNi0MT278mhitm24qwE9xJK8DgbODF3TachuFfLeSOlvjiN8YANKW6MXepEU8NlqPopGtM6uCIYs7B7ERACNXf3iMSN1PCXl3dkP_PN0Y1kasuYMxbzt3GOWgAjuGRwLPdm1SzLpFslpewZEuTSFW4pJDQRAomo-vDPnXjKw9fOChbeU7e2nrboEdkC2_fsile_938TMRZyXym8aADXpU3rMoWPl366PI6yqZTnFIYpCUDqaG4KRJghpyGdgalpf0VaPTWUxrPL0LExC2SxZMV8bG_yDyvEcNfW2xq76y63ILLOVsz7XCsMOi8wvCAnOkgBJjfuxr8sIFhHdqRrbNaHkXpjKOeLxPFgGNew0t6ha53Z-BhyDHJhbb7NCTXjkoTC9Nz1t24Bj7-ZH_AGpZXIU1BVgZ4LSmATSgXKM9k94LyS3VYed7v2ti163Xv3VNcZqtpso0qSHT9-u8-Ovv7JVnQuq17KkHCAFY-gnXVg_9oo8leTbP7Ck7_xdA=w809-h1078-no


The feature, I found fitting it together was easiest with the final shape already done

sPHIpuJhs_lp57qz1vr-hVN53Dyg2SY4iICJn5HEn8PMydDfsa9ewB3_e_Yx4E1VXz3G3UUWFoGEfzYoxXKGjT9C9cx5JcU7u3Y7n5t0b02BY6BKICImPYXgTScdXzkbA8eguwJzTblYgEi5lr886382eq2Qbkrz2PmLRPQnhwRs8dFlWi9Y_Ut_QbvvYyZ6YyAEKJdsncb9JInI-8mkDwlk0wZLk0_QetJ2SWtGfP1xZfz4Tt-X6m5sySTdubDR0ZkLfQ24oqdsj4ws6yCYt-yr1V_kG1VJauDJE9Ggris-dr2A4IEsDFc0EdnS7BMcHbuKJYBnUEX0fMSI6z1J_k2FNT0NRB-b6UTqqrZ-RKkPz5Ggf1ypM-S6RYGuP5l6qPm-ha7WEhjhgJSpCfyLsR83k2gaDnwXHcHQrjM4E8bTAxj0KBdknuBclHr3tJakWhP-lVTtur92waO6UPWGnHULdQVZ0eHZPQPpWIpnmkwM699vD5hupqFtUFyAF6RT91Yjcl67U3s-NHnIkwaRCvpxPhSD8ypkmaqzFovec5EcCThcmfYrbeMUvvIvp3kAMMHo0Ov2q8_3fQpmzFtI17ZnEFxSppnFX_XHuv0hmNJmXdilQ_XTotUNPWQHFIVLENkq01tU_bkAqFHB82j3AndpkjmuZAKS6XI=w809-h1078-no


I like help when I glass, my son has been great about coming over and helping at that stage. He has already agreed to come over again (he's good at it now) when I am ready ... I do have a few logistics, for winter glassing, to work out .... but that is the plan.


Brian
 
Seems like I've seen that hull before !

Heat the shop as high as you can, and warm the resin !!!!

This time of year, I often WARM the resin with my Wife's OLD hair drier, when I'm mixing a cup.

Good luck glassing !!!

Jim
 
Hi Jim,

Not too concerned with the heat (shop and resin), i have a good handle on that ... what I am chewing over is mixing the epoxy. The resin part is pretty safe, but the hardener is toxic, so normally I just dispense and start the mixing outside, that isn't going to be an option in the winter. Once it is mixed it is fine, but it's that in between that has me thinking ATM.

Brian
 
I can smell the resin curing in my shop for maybe a week after. If your shop is attached to your house, I'd be tempted to seal it off.
I understand your concerns. I know of people that glass in their basement. Not me !

Jim
 
I had a great Christmas and not so much time to work in my shop, but I have made some progress.

There is some preparation required for the outer stems, 1) they have been tapered to 3/8"on the bottom side and 2) the new shape required an "on-the-fly" mod, the angle of the strips on the top side of the boat are wider than the 3/4" allowance, I just added a little width and shaped the inside to fit the inside to the stem shape. The rest will be taken care of during the shaping process.

gU-y0bwLQOWY2tYfoNlc2sKJjTxJ1XzZgDc5yK4VTVs49P9JQ6XV6ARIoXnKKNpn88fKpKQOfaFGtogBHGiVf_4g8jBDn-ntL31tYggbgCX59dMnojoVgj-GgS3gbh4AzRhzbz6hHAhHJTScr6i0yVbp4x2inyADWBCyplCR4ZEYI9EQqv1HGRzJDn53ypMVrgn4dZoHv8U9bBjAbKs5rI-SX8ufbdtrTC-RnihSeXJWndu1fbyZ1O9yuFOrqr4S8_za1C-xbNc7UQhyugcyPKCx--rqCuf9Xhdu2fm19RphhkP_zfHNVxQOKaGI2Pqs6kb_nEbzFFUBhzZv0VzVJaL0z3XA0WrAEa2Vm2MKl3sPizyryOVhqt0t87O1Y7vodPEqcCZq6Ss9dHBgbZRYuMRGwxto2A4N1roSadPEA2E-bAkHvTlAemmTC2j_q6Eq8uR6NTdU1WWvSyfIW94zoaTBNqBpexTGLQ4j0kiDnlGzEhJXhHvtH93OdRHUOeVzVLzW-H6hK9bhDan_hJEc71bsLja1sLxnlG5NjAtmKZKSFd8BrsPEKm0HQ4Tni-oNoKd4A8vHx8c-5nH2He6ZZC2rV3BVEBSPyPG1ClI=w809-h1078-no


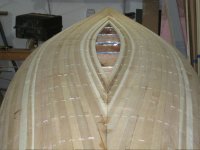
It's time to fit the outside stems, here the end strips have been sanded flush and square to the inner stem.

osj5_spUHGfvZRasLWvTPE2ZrScEm02ly_KH2iKCecEpdlmA05hrRPxS85WiZ9rVTkGqZGpgIGxUtsMyJPOA9_RXPSGd7LGC1ewlIXOm81fBlCISikr8iZND74YO35v6Hs38h3psdz7awP77kDy_ofEB_im2Y8op9ieQB5a4BubxqrTpZKRkAFQzY94EdVQjpwib7mFsxooWdhiYGMfpOS481FtxBH3NFinG9yNCdWy-W5pocUPtTW6wrOE66NTwOTxbNyHBuywZQK3DOUo5uD7YXNwQw2xkdSqOBBz_NaVu2hZjG-lt6--cLnbh0TOKF2sFc2966X0WPc-H1OJuI-jjJ8Z-Z7s_ke0-MERDii1VjFygfYXRchUZbuogmvJyv92ySjTj_N5svp5QUN1nQ-z4mAmOvbrUxj2mmJm2d1ugXGz2aKf3jeh11McnhgjqDQdJxh6pWtU4ezCbP06nhMd1v7mHq9km37vGz7_Z4KtFQWNhS-SpnJzoZvxUStfphNizgbgtqL6tfjq80gluvqUJ3yav2EIwPF-eG0JZYXw1HQY_JL45EeCASR8XvNnAELY3WBYrfjncE8P4WEMUuqXFZ5fr_78rm4cy-9I=w809-h1078-no


Actually fitting the stem is a back and forth operation for me, fit a bit, sand a bit, repeat till it's close. Once it's close I trace the outline of the stem shape onto the hull (no... the sanding never ends, there is more sanding and fitting). Once that shape is traced, I carefully chisel and sand it out flush with the inner stem.

19u4eMNt4wcIBMzGNO1fsOmJavfdEL0H_kA17EtuQWmZdFxvnb7XljNyfO0curqgwcPbos3e5N0CnAs_dtJXjhrQSWjIecfrhnLwH6pflCDLuFPpg9QYRvYfP3V0r9RkTdCMMYzy7QwyUzrodkkANNJ7K5Ux9c7cL1uD2p1F-ZuvoezBFcMR9YNJ4vVUAyXnnwZ4Jp1Ry_tJ7fiZVP_hu6d3yS6e6EhB43oL9qyyieY01F8622fC_v3LNV9kkVuiWrffajbFWh4U3lSrmyG4GXvxCKmCtkuJ7LOvNbbupb6r2IOd3m9aSHK-79oN_ah-lugl6yBwxwUFWpV0RBwoJ8awJQHWtEHxr3KBJtM1e-5dtvZG_6Bn3DdsSK_j2VIJ9uqg3BivoiQDUw6qHkf1JcyMG8O8ca5lRGbg6yu4meGb9-QHqeYUHxAFIqutj0fsA7BHZ68ML_y83GF2UNyiFy0xYlIEnoecxQdM9JPhcOZVFZcg-G6TkYDXggLtzxa6H9k4Izo6AcykIyd88ZU2AoOWssme-TCXXQ-Xbmu0bDMlPW3ZiElAn2rFv2jhRSmD98P8kZlW2zR8-Lz-Idv7pgimD_zB7_EELhJKls0=w1438-h1078-no


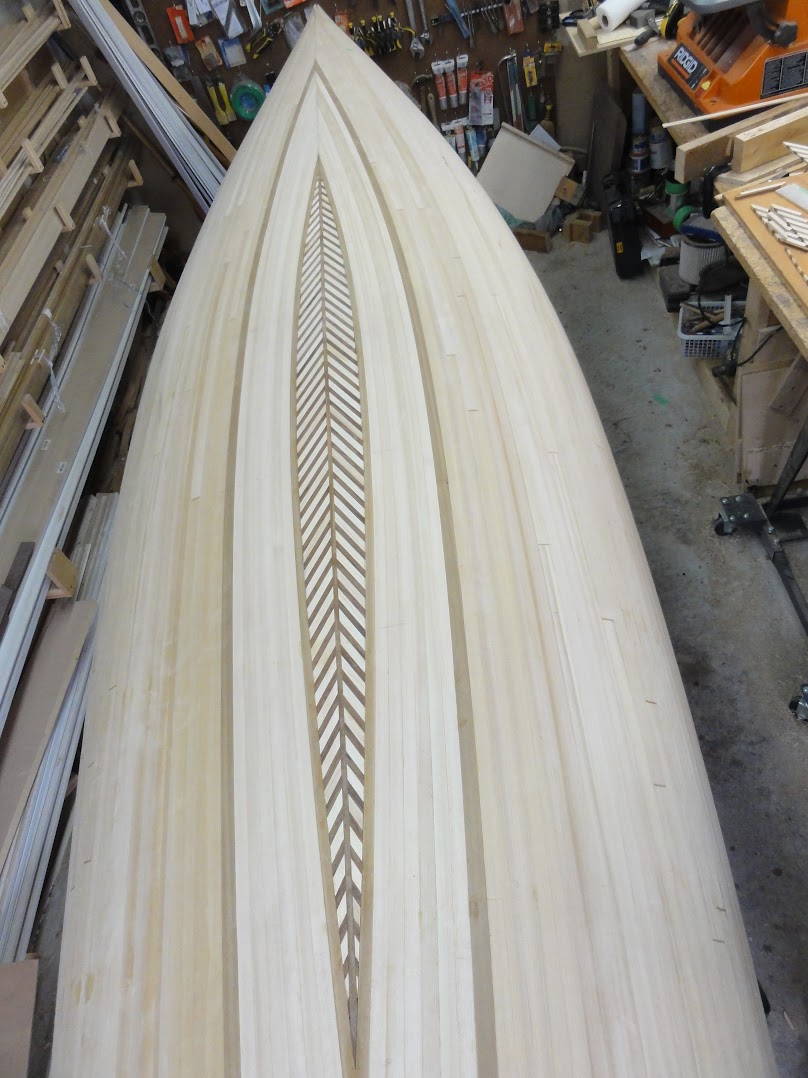
A top view so the idea of the taper is clear.

So0LYhB3afNPWQrVzXB7zegdnRUpuIBDj6x70bnPErNFgcAp62nR2ZpwYrDfhBDCbMjHV7GVUoqiqPCGRMf6Ddj3UgNVhqrL9j3ePw-Aemtv6ed6Zvllub7j7M2DL8odOEPDnaiTyjOAVv9CMKJzfAPsZdln55BCFAXjONOzJbrT1I7GN6h2allHvellKE37AykpfMHzDOwAWmcn9DN4PIDtmpr0qT4L1OqeRpRLJw7Y9ubtyPiZyn-iLqn1n9idYAxKavby03ttat-XU_WHNmAf-QEsc9_zF_yepYh-hEHCHF9QBPhSXSPbsY393CuMVOEoJQzrk3wyUkyiwbPP4mfPCmXcGMDQJSj-fFMi9cEsaPBoqZmhIkkCOmL8MGklt9a6YNDK3MUdyqiEgOSAopHg2blUAvXzN-JimGL0yB5VAlnzQfKJgKO5Ll96Aeiv6ehAnuTEw9Ga95M9ofQEj8O3JSVqKTZaQ4qBTCZhV6C5t1obLlUeLDYDVixWsJNhPqczwMiLhzAg3juUJw77sfjihlBp5gG2o9zND-lHkyPfbauyYllyUHpvh9jX8hJHE4eYNeKAuqDSoH1eeq73LmTGifbJvY2k83BdUCI=w1438-h1078-no


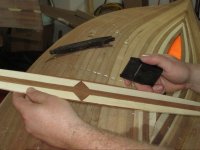
The stem (glue in area only) and the prepared stem area on the boat are saturated with epoxy, making sure the strip ends get all they can absorb .... the remaining epoxy (I prepare a double shot) is then thickened to the consistency of peanut butter and spread over the areas already saturated. The stem is then fitted in place and fastened/clamped in place. Run a finger (wear a glove ... epoxy on skin = BAD) along the joint edges to 1) remove excess 2) create a small fillet at the joint ... excess set epoxy is a pita to remove.
I lucked out here, the shape meant it just needed to be pulled in and cinched a bit ... sometimes fastening the stems can get complicated.

2wqq3hZtpIeiFWM42zNlC1l1_wT166mCeTUKDj0BR4Q2xXFFL4VvXeu-BjZ-fIGijZcI_K0hsnCZsGeY_bewD5-XdjQgolzVJMFdlx_wvA1pjyKgJpC2qTQfvdlsb5Jf710aFWPPS45gxb_V5EbwRA9ogy199vvAyavEpoET76AEEZqaUNwezgyXiOjA4uEI6_iW3qrKkpWxpSFRt314Tj23PrqCIsLz5jmyBR-uBNHkAbgijBb22y5Kj8oVgL8NgZ2TNxXSz41XJ8qcNinX7uhm2drDTVnMGNQPLXwvkx8TutzC6d_JBaykUjP7S5hMLrrlpWOSPI5nISW7qsN8axzwHAZSf8Bx73Pirb-6p383Vhpj49mbyuLRCXIS-VvP5gDnzoM1LRDl3z7ZumPoYRB-o1yIX3Qlq-p-lAeLrJdCGDkI2fEgzkrGEUO6A52YuNFStUBUUnKg7g_x7B3VI1mLU-nbUzqUkcHvy5gAslMa26RvOYK1yCwc6ok5zJDhbArqwRGw893Zj1EbMrxGFRH6V1lFaQvsnF5JjH7k5QEQdaUj7fJ5q6SFVMmbmElLcU3WxowIFoL2qWevEQVw24MNy368hspToSPAyjw=w1438-h1078-no


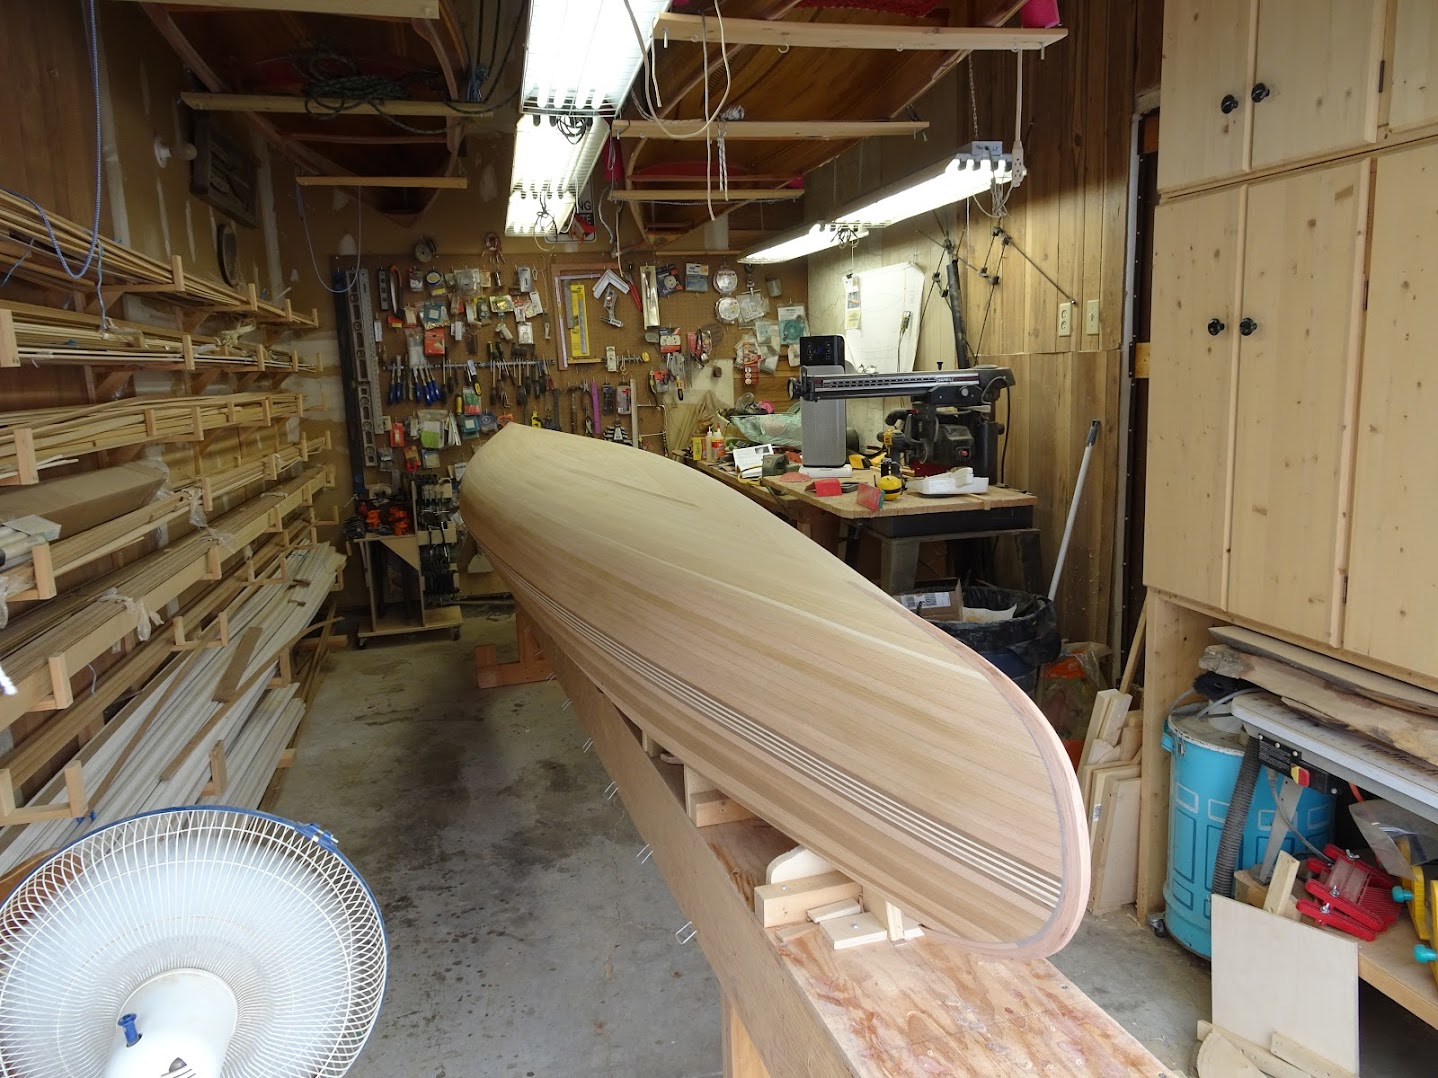
Shaping is done mostly with the spoke shave, but a plane also gets involved at some point.

2tTRwJ1hCuXkUkDd-pQd7fYWCXQ5u00XUW1j1-x7kHaOiWSgUuQb1WprLy7Rw4QhLVWCZl5JhnRAU1CHZUUyyYMDUgqvQAHaJkx5gSCcj5aHGqbNljWzxhUCFII_NPVidaeWlSSvlivsgH8CwjI_Or78RAR7MPwIz-CSVk5DkepehAmSJ-FnXPrcVsNk64KGG6dATxAwOpbjgNiVr4Xaor5lR2Qd0ULLT1vk7cYpeTUloVSRRSgDojDq0Bwh23ed7slE1SzRs6OpnR50PvqTBT8FMLveBrRhyyFTL-W7V-MQvLGRDMEch0CUjvusQ2dxkrVm28xWSah0zo0cRe5HAahRS5-lVcyt216llLii2jxelwPANzdcb14W7mDgl7H0cy-omq1t6PPXa_Z9yvYfyj5nzkY1xMxuVDwFGaef45ABaYBcsrqgq0wbRJD0Yi6tpQVw8dhOtQc1xa5m56EZ4Ns__ETtcwnZ9N-qgxNRyAI9fJKVjTwBsFEtEA4U7SuTT8nsiwN2jJtqa50u_VIuAli9FTlLdzUhzLePMQucaucvYuHyF4ZNYEIpWWzBo9gdHVlcxXvS2rv78xjS2jOrqksFVajNoKCYJ5euDRM=w1438-h1078-no


Sanding is next, but it is very messy and doesn't translate well to photos ... I used 60 grit in a ROS for initial shaping .... going carefully, 60 grit will take a lot of wood if you aren't careful. I only use it to get the high points off. Then I use a block sander to level the entire surface and move on to 80 grit for the rest of the initial sanding.

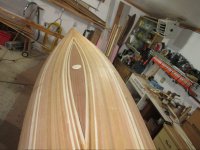
This is what she looks like now
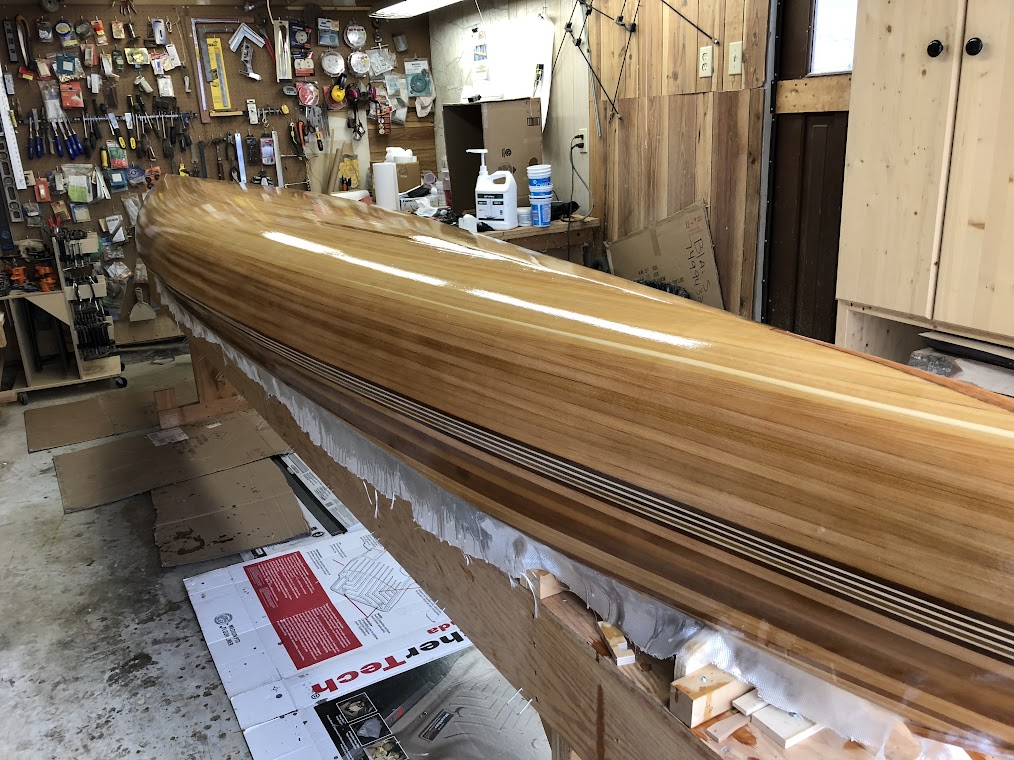
WC7IXo89NXFjoWCPQqIaaBbZ_ogw18NcyUVnJ_lwCLW7ra0Djdwl4PB5Ic1RNrCo1CVR4uY7z2uP77UyhLb7ZXbg0XJBiOaHvPzHxlGmG12hUwim1BeAn5RDTZpk3V8pGxc_ddOchb3qsG7G9rmvCAgnFd6yhHuod3tEndJQ06u3JDNTHSQLuEkRzDm0V8j57kzFrGT5z8HiXkcJAYFN7Tq3MrtGKvbri-vjFia1zBEqL7y3YSNWqZj-UOOkEFasN_VmrEoSrYmW17zFp4__iAjgY0dC0dg-Xp4w3gZ659K6OIxA8l_gNhJaTuWsl93zl6B4iQEmZT_IQA57naqUwe613W0kL-68Au0cCJ1_BC-Rt5_0eaA8m-Y4lnhsMGHCqOChwdiGN4bHF7gdUPkLBsgNFx2-cYVEQpmeqNW-hod75xwo9j6qtHjMBPwPdyN3eUWnof4gWtVRq7K3Q8FPoZnZpbIYHudfLdJ9zWvkq5nYYUQoLhRd-Ub-pzSN3iuxSHngkwOIVowiIv33oI8iktYREYB2x4hQ2CNImneWBo6ttdjVO4S5B5IApVpQAwkyl1wcnoAqmEfwfQ8_RKEuyCzVx9gQl1dDl-zFBiY=w1438-h1078-no


And wetted out

baul4DnjwclTa6abRRUapzaSXuPduh5dxg5o4v9DcOlZq75E-QAzA-03SPciqdx_hbrMsTyOJ_PyxKnaSzcYQkrp4JeDkfCm9CVifDV6CgA5b1zhjdvp8lWyac_dYelVnwcTMEmMUqyEG2A3n7zLAZquIjOZ7yHXwd-qD4ir4N-O2LvH0nRrurAMNM1L84dq07bZbDM4kjvoN7mTvYvfgCRI3tKYvDb7LTuTeiCj_bTuq9AaQcsSmN2TyQPklFMdENkhZgVwwSYO1LgoUJwtz-1HxefPadJRpbPFiO93gDqdg-T6z-LH0F102KrmS9aZ5YI5wO4bUpoimfWflDSC3rwKrCo-m4tn0A5c-8-kiAwfHF7n5M19BTLNsGXiLm1_eIq8-hJVAeHTdkJHrMcRVEuqM0ZMQMd5r3uIzqnuXtHonGU1FfidLfoZDaTvBOys6C-4tD-X5ISNIxB2b0rrM_rnjTo3IxtDr020phnAWCTDNHWh83ptIEhdO2AGHes5ViLQBB0ryqSCy-nRjWUVAhXGc02Msz-L8nC9Yv5CkKBRIbZuc--C1f0HyqhApEbIxELccSwp9OAfrpwcgaBLZWiGCPzzvRGo4O2MxHU=w809-h1078-no


The just need to run over the hull with 120 grit, vacuum and it's ready to glass. I need to get a clear day to go get the glassing kit and also figure out how I am going to actually do the glassing in the winter ... it's doable, I just usually wait till spring, but I want this done ... so I will be pondering.

Brian
 
Brian,
The first bunch of photos had me wondering how well those stem pieces would blend...your last photo really shows how nicely it all works together! While I am a stemless sort of guy, I gotta admit your stem build is very attractive...no lust here, just sincere admiration.
 
Looks Great Brian !
That Recurve stem, really makes it a challenge !
It appears there is still a flat on the stem. Maybe for a brass band ?

HEAT is the real secret to Winter glassing
I'm waiting on a January Thaw, to sand outside.:rolleyes:

Jim
 
Last edited:
SG,

TYVM


Jim,
Good eye , I will be shaping that with the final sanding (hopefully today), no band, just 2 layers of glass (watching weight).

One thing the recurve does is make it difficult to get under that area and shape it to fit the top "look". After stewing on that for awhile, I decided to just leave it, finish the glass and deal with that area when I flip the boat.

Brian
 
We finally had a warmer day forecast at 2C ... so I planned the glassing. The shop warmed up to a balmy 24C and this was the picture, out the front door, in the morning ...

WechZK4k7hYcXZdSAtaGrAEljEeb8nc6ImWZM703sJbl1wJ_lxl70qqHVki58HeazhEmJyGzypU-Yc21dN-YHZeXy25rDM76A7R_va-AukD18GJoA6pz1WQIqUwINiIh8IcnNUF8DcqtZT5kSC1SREyDyMHNtGXPG04cLJeZRYYyeJFmDeRN2DGa_mxS79EUKPA24Mthv-w1GR8T8LyvDbGdTI2q9oR8v_VAFhFDzvetQNm7Clwk08A53PaHFd2d-0lirFoX7G8ck2yhzqP9qcMZNM2AxfYdBHa6gRQp68NiUbaMudBPXoBjjKff6ye5d5hULZrayfX-MBng4A5SFOTepOYIMHv3Cg9w9ercD0vO37fez2Db7dpyDIo_58jrCitGjAVFvYRlKc7ZQFCn-fCLVnJQ4JcPfjKW2xYZvkjhQ_PGOCNSkLVJOtDLD7BwG6aYHdGTSEwqoDSBvWGq-dEcSr9z3fdh9GzAxwg-I_aj1cKhl-eRZ7nP7IObJPyqTI2knt__0wDipt9jPbmYJdIUtg39L-FjrS76etJO9d_m3G23rRwHJLjEEaRmZaNviVbLk5zoOPaUqnQPONOa6_7bGR3vk3lSC2wg0VY=w1014-h761-no


The glassing went well, this was this morning

z0sHDXHHKSYKSiNQ8h0hh3m8fn48wzAJYkK95bYGoEsAZnreRRd9TbPfz_CUKB7-T1NVWDrR6iiUfXwrlkvlEp1MSzG6Dakms3jbmHpq6QeVWE9Uk9e63Rhev55Bf8yl_UG_d_gECER1kBBhzNupzw2gWcZvjAheqR5LZbQfvGUQG2Y0d7Osp4SGBmdYKdMNynJzB-vD51nnlAsUNWi57j3t16eZ0MvTCwtjffuniCr-L-sJ3ErGPOcy3mRYG1EEn_QlO58neKaIFgzzpwqZOAYr8_hu4_65BIqNRAV4wxPbSnxLpt_VaHnWw9gfuV8Pp1IqQ2qKRWiDa3ex7acVVmwjkMo_-t5eKEc_qvwchzvGuVdbEiLwYIBDByxo7fmCH-Rh4x9qdLiL75p_KrX4Iejm2A4MyfswmFTWd0D1Kib81Vozkj2wuN8pCw9xGL4opPXE3bhIYlpndudbcmpstmfS-wppoedHJn6uuO69SreG9QLKF2ryv4TqGWZzv-4bevizSe4wULY67lBmfVSEjOu_M4eJ_k3LJk1WzlLV-m5YtAhF_dWkB-UtDzI3pWRfUUwEf0nby3I-HEc_wknP-EQGsjN31f7S8RkkJII=w1014-h761-no


I have a few places to cleanup before sanding, my neighbour came over to help glass, he did an amazing job for a first-timer, only messup was one I managed, but that should be rectified with the cleanup.

The stems will be final shaped and 2 layers of glass after the boat is taken off the molds. With the stem recurves, i felt it would be easier to do the shaping and glassing when I could get at the top and bottom of the stern/bow.

On vacation for a few weeks, so the curing will be done when I return and I can get on to sanding and the release from the molds.


Brian
 
Looks great Brian !

Did you use a Squeegee or foam rollers ?

Jim
 
lol, Jim you are making me dizzy posting on both forums.

I apply epoxy with a roller ... just works for me, I know some folks prefer a brush ... but I don't always conform. The actual squeegee-ing is per CC ... I just don't like putting epoxy on with a brush.


Brian
 
lol, Jim you are making me dizzy posting on both forums.

I apply epoxy with a roller ... just works for me, I know some folks prefer a brush ... but I don't always conform. The actual squeegee-ing is per CC ... I just don't like putting epoxy on with a brush.


Brian

Sorry ! But I was also thinking that not everybody subscribes to both forums. And I thought it was good to share !
Thanks !

That is how I apply. I really like the Cigar type rollers now. For some reason, I have a better control.
 
Hey, I'm feeling left out!! I'm a two forum guy, but likely not the same two...
I use 9" foam rollers for wet out, but only for the more vertical sections. I prefer to pour the resin directly onto (or into) the hull and squeegee it around. Only use the roller where it's too cumbersome to squeegee. The foam rollers absorb, and waste, quite a bit of resin. And they can entrain tons (OK, not tons) of air in the resin.
A buddy of mine likes those little cigar rollers, but for me, they don't hold enough resin. I spend more time in the tray than on the boat! I do cut the 9" foam rollers into 3" sections, for smaller spots or more control.
For covering coats, I always use foam rollers, but try to barely roll, so's not to entrain air in the resin.

Finally, Brian, your latest build is looking real fine...
 
Back
Top