• Happy National Nurses Day! 🛌👩‍⚕💉💊🎉

Fixing bubbles under fibreglass

Joined
Sep 4, 2019
Messages
178
Reaction score
97
Location
Ontario
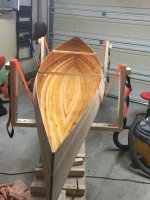
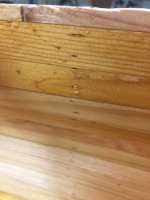
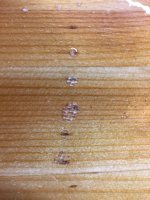
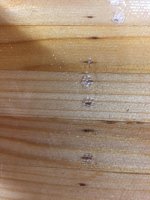
So just finished laying up the inside football on my cedar strip canoe - main inside layer yet to come. It's my first build, and I filled the staple holes in the outside before glassing, as (despite everything I read) I thought I could camouflage them a bit. While I now have sort of beige staple hole marks instead of resin colored ones, the difference is pretty marginal so I decided I would not bother filling them when I did the inside. Seems that was a mistake, as I got lots of outgassing around many of the staple holes on the inside (I assumed that since they were already filled under the exterior coat I would be covered for this, but apparently not), leaving a bunch of small bubbles under the glass here and there. Squeegeed most of them out before everything set up, but still quite a few left.

I just did a base coat over the rest of the inside to head off more bubbles when I lay the full inside glass, so I think I will be covered there. But is there anything I can do to get rid of them under the football glass before I put on the main layer? There are maybe 20-30 scattered around the hull - none are very big, and the football overall is solidly glassed. I can live with them but if there's is a quick fix before I go any further with the glass (eg some "surgical" sanding that won't be obvious once the next fibreglass layer is on) I would appreciate anyone's thoughts/experience in this.

Thanks all
 
An once of prevention, is worth a pound of cure !

I'd live with it, and chalk it up to Lesson learned.

Don't walk away from curing epoxy !

Warming the hull, with a hair drier, as you see the out gassing, and then tip with a foam brush, cures 95% of out gassing. You have to be there to catch it.

Trying to correct those little bubbles isn't worth it in my book !

Jim
 
Traveler,

Sorry I don’t have an answer for you, but can you post some pictures? Might help newbies (like myself). Hopefully some of us can learn from others mistakes.

Hope you can get it fixed!

Thanks,
-Terry
 
Bummer, on a repair of a truck topper I once drilled the bubbles that formed and injected resin with a glue syringe. It was a PITA and made little difference in the cosmetics or structure really. Unless they are big enough to crack or break open under a pressure point, like Jim mentioned not a critical issue really
 
Yeah, looks like I will just live with it - kind of what I figured but had to ask, thanks all for your feedback. Funny thing Jim, I was reading your thread last night on your Pearl build, and somewhere in there you wrote that you had decided not to do a pre-coat before glassing, but then next post you said you had changed your mind and did one afterall. I did just the opposite - had thought of doing one early this morning, but I figured since I had done the outside already there wouldn't be an issue (aren't I the clever guy). From here in, my first question before tackling anything on this boat is going to be WWJD (what would Jim do?).

Here are some photos Terry - if it helps, happy to take this bullet for others working their way through this. The first is of the canoe after I did the full pre-coat (nothing special about the woodwork but for me it is nice to see the colours finally pop), the next two are of a couple of spots where bubbles formed around the staple holes under the football layer, the last one is of a bubbling staple hole further up the side with just the pre-coat on it - unlike the others this can be just knocked down when I scuff up the hull for the second layer of glass, but it illustrates how tenacious this problem can be if you just wing it like I did.

Anyway, thanks for taking a look - I will no doubt be back with more questions as I try and finish this up.
 

Attachments

  • IMG_0966.JPG
    IMG_0966.JPG
    271.8 KB · Views: 1
  • IMG_0971.JPG
    IMG_0971.JPG
    251.5 KB · Views: 1
  • IMG_0968.JPG
    IMG_0968.JPG
    295.5 KB · Views: 1
  • IMG_0969.JPG
    IMG_0969.JPG
    363.5 KB · Views: 1
Correction - looks like the second photo is the one with the bubble coming through the pre-coat up higher on the hull
 
Thanks for sharing Traveler. I decided to go stapleless for my first build and after seeing this, I am glad I’m doing it that way.

The build itself looks really nice though!

Seeing this really makes me even more nervous about the glassing aspect.

Thanks for sharing,
Terry
 
Outgassing doesn't occur just at staple holes, under the right conditions it can occur anywhere. On my current build, I had a heck of a time with outgassing, I think because of rapid temperature change. I had to rush off to work just as I finished the wet-out, and by the time I got back, it was too late to correct the bubbles. As Jim said, vigilance is the key. Fortunately, repairing them is fairly easy, but tedious. I just cut them out and sand them down and put new glass over the area, a patch sort of deal. Injecting epoxy into the bubble might sound good, but that glass is probably still going to be compromised, and if it is in a high wear area, such as the bottom of the inside hull, the glass will probably separate at some point.
 
Yes, memaquay makes a good point - no staple holes do not translate into no bubble problems. They will show up outside the staple areas as well. As I said, I was able to squeegee most out (could actually hear them pop as I went, like bubble wrap in some places along the staple lines), but the rest are too small and scattered to be any sort of integrity issue, just cosmetic. Disappointing, but I am already chaulking this boat up as a learning experience for my next one - this one will still look fine from 5 or 6 feet away, be nice and light, and get me where I want to go. As Jim points out, pre-coating, vigilance, maybe a heat gun or hair dryer close by will make all the difference. And if you can get a helper with the glassing, especially if it is your first time, it will also make a difference to at least your stress level - I doing it on my own, and moving around like a mad man at times.
 
Traveler, looking at your pics and the previous "10 pound challenge" post, it does look like your epoxy may have been left a little thick, after squeegee.

Saturating the glass/wood is important, but that squeegee step is also quite important, it drives the cloth right up against the wood, for max strength, and also gets rid of most of the bubble issues. When the epoxy starts to kick, you need to keep squeegeeing until the cloth almost looks like there is only enough epoxy left to keep it wet looking. Of course, doing the epoxy solo doesn't leave a lot of time to be vigilant, so getting that extra pair of hands in there is also a really important item to try and remedy.

I am not a fan of precoating, as it just seems a lot of extra work and IMO really wouldn't have prevented most of the bubbles in the posted pics. However, staying with the hull and making sure the excess is gone, until it is too far along to work with, then you can walk away until it is time to add the filler coats. As an aside, if the bubbles are smaller than 1/4" it is probably better to just leave them alone... larger can be repaired/filled by drilling a small hole (just through glass) on each side of the bubble, fill using a dropper or syringe, then slapping some tape over the holes to prevent it running out.

When to do the glassing also requires some planning, don't plan the glassing around your day, plan the day around glassing. If you can manage it, having the temperature falling during glassing is the ideal (or at least not changing much). So if you have an unheated shop, a cool night, a warm day ... the boat will start cool and warmup as you glass, there is lots of air in the wood that will be expanding, setting the stage for out gassing. Warming the hull before you start (think heater under hull or warm the shop overnight) can also be useful in preventing out gassing.

In the end though, being vigilant during that "kick" phase is always going to be the most important tool for fixing issues that are much harder to deal with later.


Brian
 
If these are your largest bubbles I think its just a cosmetic issue. Youll be the only one who knows about them.

I didn't do any pre coat on my last 2 builds and had just minor issues with outgassing. As others have mentioned, having the temperature of everything falling as the epoxy is kicking is the key. Picking the right day and time of day is important if you dont have a temperature controlled building.

I heated up the shop as much as possible, upper 70's F, and placed a couple space heaters under the hull. After I put on my first few cups of epoxy I turned off the heaters. The hull will now start to cool. As soon as I'm done with that first coat, I turn down the heat in the shop. I make frequent checks on things until the epoxy has set up enough for the first fill coat.

One advantage to pre coating might be for first timers who are worried about starving the cloth of resin, especially on the outside of the hull.

Mark
 
Traveler,

I don't build canoes, but that's a beautiful shaped hull. I think you should finish trimming that thing out and paddle the heck out of it, bubbles be danged. You can put that on a bumper sticker if you wish. Good luck and enjoy the rest of your build.

Barry
 
Thanks for these additional points. Just finished sanding (again) and setting up the cloth to do the full inside glass starting tomorrow am, and will definitely take on this advice. On pre-coating, I don't have enough experience to have a firm opinion but I do note that when I filled the staple holes on the outside with putty I did not get any bubbling from the staple holes like I did in the inside. I do have some small bubbles scattered around, but not so many and they are not in any way concentrated around the staple holes like on the inside.

At the same time, I did not pay a lot of attention to heat in the garage when I did the football - temp was around 68F when I started, I just let the heater run as I went and when I was about half way through it had reached around 75F, at which point I turned it off (mainly because I was getting uncomfortably warm) and continued to finish. Will be more methodical about it tomorrow, and won't start until I hit at least 70F, and then will turn off the heat. And I will watch closely afterwards (although still doing it solo so as before I expect that the first sections will be pretty well setup by the time I finish putting fresh epoxy on the last one). So will be taking a "belt and suspenders" approach - happy I did the pre-coat and will be careful about the heat cycle and vigilance afterwards.

Cruiser, you could be correct about my epoxy thickness after squeegee - my biggest problem with the outside was streaks remaining afterward, probably because I wasn't thorough enough with the squeegee afterwards. I tried to pay more attention to this with the football (with some success I think at least in terms of leaving streaks). I am sure I don't have the technique down, but I cranked pretty hard on it when I did the football yesterday, especially when I started noticing the bubbles. Won't be shy about leaning into it tomorrow as I go.

As this will only be a wet out coat (not going to do any fill coat on the inside) I am thinking of using a roller instead of brush to apply before I squeegee, just to keep the initial resin layer down and the squeegeeing more manageable - any red flags around this?
 
It really isn't about "cranking " it hard, think of it more as doing more strokes, the epoxy will squeeze out a bit at a time. A hard stroke will just start shifting the FG, which you don't want, trust me.
 
A suggestion;
Since you plan to leave the stems open (possibly), and you're working alone, glass the stem areas separately from the rest of the inside. You'll have plenty enough to do just wetting out and squeegeeing, the stems take a long time to wet out thoroughly and cleanly. That's valuable time that you need to use to squeegee. You could do the stems first or not, doesn't matter.
I do all of my hulls on the inside with a short 3 or 4 inch roller, followed by the squeegee.
 
Thanks stripperguy - I laid a bias piece over the stems at the same time as I glassed the footbal a few days ago. After feathering the edges yesterday, now I just have the carry the full layer along the sides of the stems only to just cover the seam of those pieces (about 3-4 inches out from the ends). I think this is what you mean here? Good to hear that a roller would be suitable - I will be going that route.
 
Just to close the loop on this - put the full inside glass on today. Went pretty well, thanks in large part to the tips received here, by far the most important of which was to spend a lot of time monitoring and fixing issues before they become problems. Not perfect though, and there was still an amazing amount of outgassing from staple holes (very little elsewhere) that I had to constantly stay on top of, even though they were pre-coated and I watched the heating situation (started at 70F and was down to 68F by the time I was finished, over four long hours later). Overall not a showcase finish but I am definitely satisfied - funny how high expectations naturally move to find equilibrium with limited skill sets. Thanks again for all the help here.
 
Yeah, looks like I will just live with it - kind of what I figured but had to ask, thanks all for your feedback. Funny thing Jim, I was reading your thread last night on your Pearl build, and somewhere in there you wrote that you had decided not to do a pre-coat before glassing, but then next post you said you had changed your mind and did one afterall. I did just the opposite - had thought of doing one early this morning, but I figured since I had done the outside already there wouldn't be an issue (aren't I the clever guy). From here in, my first question before tackling anything on this boat is going to be WWJD (what would Jim do?).

Here are some photos Terry - if it helps, happy to take this bullet for others working their way through this. The first is of the canoe after I did the full pre-coat (nothing special about the woodwork but for me it is nice to see the colours finally pop), the next two are of a couple of spots where bubbles formed around the staple holes under the football layer, the last one is of a bubbling staple hole further up the side with just the pre-coat on it - unlike the others this can be just knocked down when I scuff up the hull for the second layer of glass, but it illustrates how tenacious this problem can be if you just wing it like I did.

Anyway, thanks for taking a look - I will no doubt be back with more questions as I try and finish this up.

Outgassing.

A blow drier and a foam brush at the right time, would have cured this !

I really like rollers and a foam brush, over squeegees ! These old hands don't manipulate squeegees like they used to !

Again ! Lesson learned ! Next time !

Jim
 
Back
Top