• Happy Weed Appreciation Day! 🌱🌿🌻

DIY No-Sewing Spray Covers

The stern spray cover was easier than the bow, largely because I already had a template. There is something to be said for the ease of making a partial or even two piece cover for a symmetrical canoe and using the same size template/cover for bow and stern*; making the Visqueen template with all those weirdo end angles and ears takes longer than cutting the fabric and ironing over the hems.

*Or not. It is just possible, I suppose, that when I first reguwaled the Independence that I made it just a wee bit Swede-form along the stern sheerline. The duplicate cover fits securely, but has a bit more pucker on the below-outwale overlap. Still easier than making a new template for a teeny bit of difference.

Also, when seating the button caps on the cover be aware of any floatation tank interference. Those snaps at the stern float tank end were close.

I did not leave the shipped-folded red Oxford cloth rolled for long, just a couple days, but even that was enough to take the creases out. Roll ‘em if you got ‘em. Visqueen template material too.

Laying the fabric out on the table I quickly realized something; the red Oxford cloth I had leftover and used to make the bow cover was not actually 2 yards in length, but considerably less (I never actually measured that leftover cloth.) Had it been 2 yards I could have made both covers from that quantity of material.

PC030027 by Mike McCrea, on Flickr

Same DIY routine as before, no need to yaddayaddayadda repeat all those words.

I made the stern cover paddle pocket smaller, for a reason. A frugal reason; I had a \_/ piece of leftover red Oxford cloth and didn’t want to cut that odd shape from the larger 2-yard remains, which, as-is, would be enough to make another partial cover.

Because there is no thwart with webbing loops on machine screw ends below the stern cover, as on the bow section, I added two mini SS D-rings per side. Between the webbing loops on the machine screw ends, the mini D-rings backing up the spray cover studs and the Northwater double D-rings G/flexed to the floor that combination provides ample tie down points, I’m not planning to tie in floatation bags and run whitewater with the FreeFIRE, someone already did that.

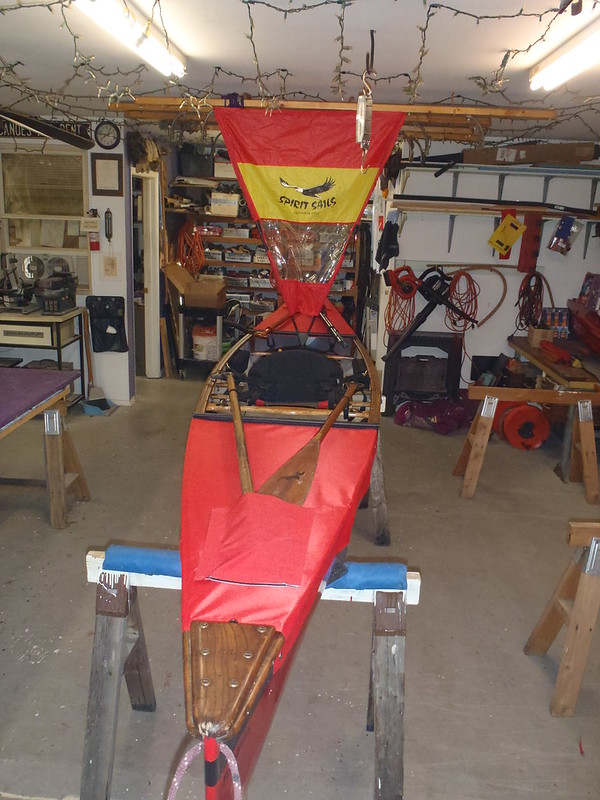
All dressed up and nowhere to go.

PC050048 by Mike McCrea, on Flickr

PC050049 by Mike McCrea, on Flickr

PC050051 by Mike McCrea, on Flickr

Actually I do have somewhere in mind to go, couple places in fact, but in a few days, after the Dual Lock acrylic adhesive on the hull pieces has had time to fully cure, I want to remove the covers and paint a bead of black pigmented G/flex around sides and top the Dual Lock on the stern and, hull flipped over, the remaining bottom edge both bow and stern. Belt and suspenders, in for a penny and all that.

I am jonsing to paddle the refurbished FreeFIRE (nee Independence). I remember the Indy as being speedy for a 6.48 length-to-waterline canoe, and surprisingly stable for a canoe with 28.5” gunwales.

I know it will now be more comfortable, more efficient in the wind, better appointed and, I hope, a mystery to some fellow canoehead who sees it and wonders “What boat is that?”
 
Did we get multi-quote turned on? Yes.

Here is what vBulletin says on the admin page:

“Multi-Quote Enabled
If this option is enabled, an additional button will appear on posts. A user may click as many of these buttons as they wish. Once they click a reply button, the content of each of the selected posts will be quoted and shown in the reply window.”
 
Great stuff, Mike. Lots of tips born of experience. Really helpful in cogitating several winter post-holiday projects.

I compiled and summarized some of your tips on spray covers, for my future reference, and made a few comments. Might as well post it:

Roll visqueen, heat-sealable fabric, etc., onto lengths of pipe to remove the creases.

Mark the location of the carry handles and thwarts. Avoid seating snaps directly behind the end of a thwart.

Any of the heat sealable fabrics, even pack cloth, are most likely to begin a tear at some single ply unfolded edge. Make a sizeable hem for doubled-over durability.

The fold over heat sealed hems will become peculiarly shaped with angled material, and needs thought/adjustment.

The fabric only adheres heat sealable side to heat sealable side, and I will need to fold over and iron the 1” hems on the ends. I would not have understood that without Mike's helpful picture, thanks.

Mike said he really doesn’t want to sound like Santa’s sleigh coming downriver. If he did, he have the proper bright red Santa color for it.

May need to thicken the material for the snaps. Little squares of 1” Gorilla tape, perhaps.

Run a bead of E-6000 or gflex around the edges of tape squares or Dual Lock.

Seating the studs in the material requires an anvil and flaring tool Not deeded when ordered from Cooke.

The heat sealable material needs to be resting on something soft like not so heavily corrugated cardboard for ironing.

Use a Sharpie the same color as the material.

Automotive bulb weather strip for drip guard on spray cover.


Acrylic adhesive on dual lock is works well.

Consider mini d-rings as backing for rivets.

Someone, possibly Doug, owns a Bell Roy Roy?! That someone has lots of canoe spray cover material available in his heated shop. That someone apparently enjoys supervisory commentary while working in his shop, among other things.
 
Great stuff, Mike. Lots of tips born of experience. Really helpful in cogitating several winter post-holiday projects.

I compiled and summarized some of your tips on spray covers, for my future reference, and made a few comments. Might as well post it

Dave, that was a savings of 7000+ words ;-)

One previously unmentioned correction to what I had written; I tried using a red Sharpie on the red fabric and couldn’t see the marks well enough to cut the material along the template lines. I do now recall that seeing black Sharpie on the dark blue/purple material was difficult, and may try yellow Sharpie with next time with that dark fabric.

I’ll add another correction. I finished painting the bead of G/flex around the Dual Lock on the hull this morning and, preparatory for a trip later this week or next, went to roll up the covers to store them in an old chair bag, as with the covers I made for the Freedom Solo.

They rolled fine until I got to the paddle pockets and then would roll no further. The pieces of Dual Lock, seated together holding the paddle pockets to the covers, are stiff as a board and impossible to roll. I could remove the paddle pockets before rolling the covers for storage, and reattached them each time at the put in, but that sounds like a PITA.

Fortunately I had not yet beaded them with E-6000, and will be removing that Dual Lock “solution”. It was a waste of Dual Lock anyway; there is as much in total length of Dual Lock on the paddle pockets as on the rest of the covers and hull.

Harkening back to Chip’s experiments gluing vinyl D-ring pads to that heat sealable fabric I will pick up some of what worked best in his tests, Loctite Vinyl, Plastic and Fabric Glue, remove the Dual Lock and simply glue the paddle pockets on the covers.

https://www.canoetripping.net/forums...abric-to-vinyl

Thanks Chip, the covers will be a lot easier to transport when I can roll them up and store them in an old camp chair bag.

Dave, I’ll be curious about your post-holiday plans for using that heat sealable fabric, and again this year will offer a yard or two as one of the Canoe Tripping raffle prizes. dang shame the site administrator can’t take his chances as a raffle participant.

EDIT: I have the accumulated instructions saved as a Word document. I must be getting more succinct, only 7069 words. So far, bawahahaha.
 
Last edited:
To throw my three cents in (note the inflation here) how about a silver metallic Sharpie? Or a silver metal marking welding pencil, although it would wear down pretty quickly so you would want to make a fine line.

Lance
 
Mike, I appreciate the effort and detail you put into these outfitting posts, as I am sure the rest of the community appreciates as well. The pictures are invaluable, and I do not find you wordy. You write a lot of words because you have a lot of worthwhile information to impart. Not much fluff in there.

I have a lightly used spray cover from Cooke, for a Magic, that I bought cheap several years ago. The winters rocket by and I don't get to it. I have three rivet guns (two too many), and I was wondering which nozzle to use. I remembered something about a special nozzle from when I put the Cooke cover on my late-great Prism decades ago. Your pictures jogged my memory. The Magic cover project is ahead of a homemade heat-seal cover for the Flashfire. I hope to do the magic cover on one of these bitterly cold very low humidity days.
 
To throw my three cents in (note the inflation here) how about a silver metallic Sharpie?

I almost wrote “yellow or silver”, but having not tried a metallic-colored Sharpie on dark material didn’t want to suppose. I found a gold Sharpie, apparently unused and forgotten, in the box of paint pens and Sharpies and tried it on a scrap piece of the dark blue/purple material. Worked like a visible charm.

I have a lightly used spray cover from Cooke, for a Magic, that I bought cheap several years ago. The winters rocket by and I don't get to it.
The Magic cover project is ahead of a homemade heat-seal cover for the Flashfire. I hope to do the magic cover on one of these bitterly cold very low humidity days.

With a Cooke Custom Sewing cover the installation of the studs on the hull is little more than an hour’s work, and a low humidity winter day is the perfect time to install one. Doing the stud location marking and installation CCS instructs “Do not install when humidity is over 80 percent”.

Both of our Cooke covers were installed below that 80% humidity level, but in dry desert use I still have to wet the Penobscot cover down to more easily align the sockets with the studs.

A couple notes about the button caps, sockets and studs. If your existing Cooke cover has brass I would use brass, if nickel plated I’d use nickel plated. CCS may at one time have offered stainless steel snaps.

I have caps, sockets and studs from CCS and from two other sources (hardware store and ordered on-line). All parts have essentially the same dimensions, but I have learned not to mix and match; unpaired sockets still attach to the studs and hold, but not with the confidence inspiring snap of a mated pair.

If you need to buy studs for the Magic from another source I’d pop rivet one on a scrap of fiberglass or Lauan or etc and make sure the socket seats well on the differently sourced stud.
 
OK, Mike, you've spurred me on. But, it will take me way more than one hour!

I found one of the stashes of snap button rivet hardware.

Snaps one side:

Click image for larger version  Name:	brass snaps other side im.jpg Views:	0 Size:	221.8 KB ID:	119882

And then the other:

Click image for larger version  Name:	brass snaps im.jpg Views:	0 Size:	245.1 KB ID:	119883

Too many guns:

Click image for larger version  Name:	Three rivet guns IM.jpg Views:	0 Size:	271.2 KB ID:	119884

Skinny nozzle for snaps:

Click image for larger version  Name:	Skinny rivel nozzle IM.jpg Views:	0 Size:	347.0 KB ID:	119885
Rivet and washer:

Click image for larger version  Name:	washer and rivet im.jpg Views:	0 Size:	299.3 KB ID:	119886
 
OK, Mike, you've spurred me on. But, it will take me way more than one hour!

I found one of the stashes of snap button rivet hardware. OK, Mike, you've spurred me on. But, it will take me way more than one hour!

I don’t know about “way” more than an hour. Maybe two, even if you go slowly.

Looks like you have everything you need except some duct tape and a Sharpie. And perhaps some of those little mini SS d-rings; I used the better quality marine stainless, the Freefire was worth using high quality materials. Between the webbing loops on the thwart machine screw ends and the mini D-rings that provided plenty of tie down points near the sheerline.

I have spare copies of Cooke’s instructions for fitting the covers, including helpful installation and care & use suggestions. If you like just send me an e-mail with your postal address and I’ll mail you a copy. (DougD can provide my e-mail address if needed)
 
I never really warmed up to sea kayaks although I have built one and did some overnight trips in the salt water. The spray skirts were great, keeping the lower body out of the weather and protecting the gear below decks. I like to bring dogs, Coleman stoves and coolers so I went back to canoes. The thought of a spray skirt on a canoe is a great idea. In the West summer weather is pretty clear, so I rarely see one. For wetter country I would be all over this post.
 
I like to bring dogs, Coleman stoves and coolers so I went back to canoes. The thought of a spray skirt on a canoe is a great idea. In the West summer weather is pretty clear, so I rarely see one. For wetter country I would be all over this post.

Ppine, not just for pluvial conditions. Western rivers are often windy, and somehow, no matter how serpentine, usually blowing upriver (why is that?). Covers, even partial covers, definitely help in the wind.

On beating sun desert rivers another cover benefit is realized, not warming up to, but cooling down by. From a spray cover discussion elsewhere:

One that is often overlooked, that was a pleasant surprise to me; on hot sunny summer days, or when paddling desert rivers, the covers can actually keep things underneath cooler. The ambient water temperature is often colder than the beating sun temperature, transmits through the hull and is trapped inside by the covers.
I do not know if that is as true with full covers completely closed, but it is absolutely the case with my partial covers, and I suspect also with a full cover rolled open-cockpit back.

It's very true with the full cover.
We keep our cold food behind the stern seat for just this reason. it's exposed to the cold water on 3 sides instead of just one in the middle of the canoe.

That chill transmission is true even with my foam core Royalex canoes, with a composite canoe even more so. Hey look, my Snicker’s bars in the blue barrel didn’t melt, and the water in the dromedary bags is still cool, not flavorless tea temperature..

Custom covers or partial covers could easily include a dog opening, and on hot summer trips a canine companion might appreciate a cool, shaded hideaway in the canoe.

Another benefit for easily sunburned Scotsmen; a cover, even just partial covers, provides some shade on trips for my pale feet, ankles and calves. I’ll wear a broad billed neck drape sun hat, and long sleeve UV protective shirt, but danged if I’m wearing long pants or knee-high boots when it is sunny and hot.

Spray covers, not just for spray or rain.
 
All of your points are well taken for the use of a spray cover. Great idea but I have never used one.

I use a wet towel on a cooler for warm weather. Sometimes I keep a wet towel across my legs while paddling.
Skin cancer is for real after a life in the outdoors. I now wear long nylon pants to paddle, with a long sleeve shirt. I even add gloves and a face covering for long days on the water. Exposed skin is vulnerable in the bright sunshine of the West, on the water, sometimes at elevation especially for longer trips. A brimmed hat of course and shoes not sandals.
 
Sometimes I keep a wet towel across my legs while paddling.
Skin cancer is for real after a life in the outdoors. I now wear long nylon pants to paddle, with a long sleeve shirt.
Exposed skin is vulnerable in the bright sunshine of the West, on the water, sometimes at elevation especially for longer trips. A brimmed hat of course and shoes not sandals.

Evaporative cooling works well in low humidity conditions. Back east, at least in the mid-Atlantic region and further south, the summertime humidity is sometimes in the 80-90% range; if you put a wet towel across your legs in August it will still be wet in September. Maybe more wet, you’ll sweat like the dickens and long nylon pants will be stuck to your legs.

I thought about the lightweight, long sleeve UV protective shirts I wear when paddling on sunny summer days. That fabric is spec’ed as 95% UV protective. I got a couple yards of that UV fabric and had a friend hem the edges, making a couple 3’ x 4’ “lap blankets”. They are long enough to cover my bare legs while in the canoe on sunny open water lakes and bays back east or desert river trips out west.

P5030961 by Mike McCrea, on Flickr

And, if no shade is available, or I just want a more scenic view than from under the tarp, in camp as well.

P5101059 by Mike McCrea, on Flickr

I was initially concerned that my legs would be hot or sticky underneath; quite the opposite, much cooler with that UV shade and some air movement, so the “lap blanket” isn’t stuck to my legs like nylon pants. If it clouds over much easier to take off than long pants too.

That UV protective material is very lightweight and packs down tiny, the lap blankets are each stuffed in a mini-ditty bag the size of a softball and weigh 6oz.
 
preparatory for a trip later this week or next, went to roll up the covers to store them in an old chair bag, as with the covers I made for the Freedom Solo.

They rolled fine until I got to the paddle pockets and then would roll no further. The pieces of Dual Lock, seated together holding the paddle pockets to the covers, are stiff as a board and impossible to roll. I could remove the paddle pockets before rolling the covers for storage, and reattached them each time at the put in, but that sounds like a PITA

Fortunately I had not yet beaded them with E-6000, and will be removing that Dual Lock “solution”. It was a waste of Dual Lock anyway; there is as much in total length of Dual Lock on the paddle pockets as on the rest of the covers and hull.

Harkening back to Chip’s experiments gluing vinyl D-ring pads to that heat sealable fabric I will pick up some of what worked best in his tests, Loctite Vinyl, Plastic and Fabric Glue, remove the Dual Lock and simply glue the paddle pockets on the covers.

The bad-idea Dual Lock securing the paddle pockets to the covers peeled off cleanly (with some effort), leaving no residue behind. There was sufficient stickem left on the removed pieces that I saved them for some less critical application.

The Loctite Vinyl, Fabric and Plastic adhesive was the answer to adhere the paddle pockets to the covers. Speced as waterproof and having “a peel strength of 17lbs per linear inch” it will no doubt securely hold the paddle pockets to the covers.

I glued the paddle pockets to the covers, clamped the glued edges down with boards and let them sit overnight. Unclamped the next day the pockets were immovable.

Satisfied with that Loctite success I now have an idea for making DIY lash straps to secure the shaft ends of paddles to the covers; two 5” circles of heat sealable material, ironed together, parallel 1” slices cut I I, feed a length of double sided Velcro through the slices and Loctite the circular pad to the spray covers in the shaft appropriate locations.

The same solution could be used for making DIY painter line lash straps on the stems of the covers. All features borrowed from Cooke Custom Sewing covers; “Imitation is the sincerest form of flattery that mediocrity can pay to greatness.” (Oscar Wilde)

FWIW the Dual Lock on the covers will roll, but not very tightly. Both covers, with paddle pockets permanently attached, now fit inside an old camp chair bag, which will allow easier transport than carrying them around like giant pizza slices.

While it works, augmented with a few snaps for Dual Lock alignment, to secure the covers to the hull I would not use Dual Lock for most spray cover applications. Next DIY cover will use only snaps, spaced 12” or so apart.
 
Thanks, Mike for the update. I could lend you a framing nail gun to tack the Dual Lock back on. I'm thinking that 2-3/8" hot galvanized ring shank nails will do the trick....

Or not.....


Lance
 
I'm following this carefully as I plan to install 2 part spray deck on the raven in building. Wider spacing of the snaps makes sense.
 
I'm following this carefully as I plan to install 2 part spray deck on the raven in building. Wider spacing of the snaps makes sense.

Buried in the excess verbiage above is an explanation from a conversation with Dan Cooke about the snap spacing on CCS covers, essentially that the snaps are spaced 8” apart to better withstand the tug and pull of a paddler in a spray skirt tunnel and, presumably, better withstand implosion from large waves.

If you are planning full 2-piece covers for the Raven, with a skirt/tunnel, I’d opt for that proven 8” spacing.

The custom partial covers CCS made for our Wenonah Wilderness and (soloized) Penobscot are partial covers bow and stern, for rain, splash and paddle drips, leaving an open center “cockpit”.

The snaps-only cover I DIY’ed for a Freedom Solo was a similar design open-cockpit partial cover, and I used 10” snap spacing, which has proven amply secure for my purposes.

The next DIY cover, for the FishFinder, will likewise be partials. I won’t know the actual snap spacing until I have made the Visqueen template; it will be at least 10” spacing, if not 12”

The fewer-snap benefit on such partial covers is simply that, few snaps. Fewer snaps to fasten and unfasten when putting the covers on and taking them off, fewer snaps to unfasten when folding back a portion of the cover to access gear underneath.

If you do opt for open-cockpit partial covers for the Raven I recommend a simple flat center cover that can be snapped across the open-cockpit section in camp.

P2180693 by Mike McCrea, on Flickr

That center storage cover extends several inches past the drainage baffles at the ends of the partials, and the baffles prevent overnight rain from ending up in the canoe.

Below was the morning after a night-long deluge. The nylon covers are saggy wet, but there was no water inside the hull. Note: it helps to position the canoe on a sideways slant, so that collected water drains off the sides.

PA060100 by Mike McCrea, on Flickr

Being able to leave the covers on in camp, and not flip the canoe over, leaving all the paddling gear dry inside the hull, ready to go the next day, is a boon for my purposes. I have not had much luck with gear beneath an overturned canoe staying dry in sideways rain, and if camp is 100 yards from the landing I’d rather not schlep all my paddling gear to and fro each day.
 
Thanks Mike, I misspoke, I meant that I plan on leaving the cockpit open so I guess it's two partial covers. I agree that a flat cockpit cover for camp is a great addition.
 
I meant that I plan on leaving the cockpit open so I guess it's two partial covers. I agree that a flat cockpit cover for camp is a great addition.

Partial covers are much easier to DIY than a full cover with a skirt/tunnel. You do lose the complete coverage for rain or large waves crashing over the decks, but I’m in raingear when it rains and most of the open hull is covered, with the water draining over the sides and not into the bilge. When waves threaten to crash over the decks I’m (usually) carrying around that rapid, or scurrying to shore to get off that wind tossed lake.

I’m not a skirt/tunnel fan, for several reasons. I move around in the canoe a lot, and a skirt seems restrictive. It is easier to get into an open cockpit, and easier to exit or, oopsie, wet exit. And, mostly, I like having ready access not only to the utility/sail thwart up front, but also to my day gear stored behind the seat.

I’d rather not have all of my day gear under the seat, or worse between my legs/feet. The partial stern covers on all of our canoes end 10 or 12 inches behind the seat, leaving an open area so I can reach behind and grab a day pack or small cooler.

I just finished cutting the templates and marking/cutting the heat sealable Packcloth for the FishFinder covers. Two templates; the stern cover is 8” shorter than the bow cover. And the bow cover is several inches shorter than I first calculated; I realized I needed a gap between the utility fishing thwart and cover to allow the reels to hang down in uncovered space in front of that thwart.

That could have been a major design booboo, but it somehow occurred to me that I oughta set the rods in place before designing the covers.

If I could offer one single piece of advice about DIY’ing covers it is “Go slowly and thoughtfully. Cut the template, walk it over to the canoe and tape it in place to check your design work. Same for the cut out material, check the fit before you hem it and check again before the buttons and sockets go on”. Slow is smooth, smooth is fast.

(And, um, don’t seat the buttons and sockets facing in the wrong direction)

In another moment of serendipity the / angle cut I had left on the roll of Packcloth from cutting the Freedom Solo cover exactly matched the template /_\ for the FishFinder, and of course the angled cut for the bow material matched the reverse angle for the stern. Long way of saying “Don’t bother squaring up the angle cut ends left on the fabric, it might come in handy next time”. Another cover, custom tapered dry bags, wait and see.

The Fishfinder is symmetrical, so it was easy enough to make the bow template and cut the fabric, then shorten the template by 8” and cut the stern fabric; I could use the same oddly shaped _\ ironed-hem cuts on the stern deck plate end, and just re-cut the fold-over pattern on the wide end.

I may have found a simplified template pattern. Or may have effed it up, I really won’t know for certain ‘til I iron the hems; if it works, yippie, much easier pattern. If not, I can fix it.

I can’t start ironing and setting studs today, or likely for a couple days, got a couple other things to finish first.
 
jffdejongh (that’s a mouthful – Jeff?) , Chip, Doug and others thinking of DIY’ing partial covers, not be belabor the point, but a couple more things in favor of ending a partial stern cover short of the seat.

Our stern partials end just shy of the stern thwart, mostly for, as above, retrievable storage space behind the seat, but also because:

That open area leaves the webbing loop tie downs on the machine screw shank ends accessible, the lateral bungee across the stern thwart available and, more importantly, I clip my throw bag around that stern thwart. I’m not sure where/how easy it is to get to a throw bag while wearing a full cover and skirt.

Having needed, or at least wished I’d had, a throw bag on a couple trips I now bring one every time, even solo. heck, I keep a loaner throw bag in the truck; I’d like my companions to be able to throw me a line if I’m swimming.

That truck spare isn’t just a loaner; I was a non-paddling bank-side spectator to a capsized trio, washing downriver all of 30 feet away one cold March day, and vowed always to have a throw bag in the truck.

EK_0009 by Mike McCrea, on Flickr

Would have been a lot easier if I had simply hauled one or two of them to shore with a throw bag toss.

The throw bag doesn’t take up any room buckled that stern thwart, isn’t dangling at my feet or ankles, and isn’t sopping up water in the bilge. And, in some places, a throw bag or “heaving line” is mandatory equipment (think Canada, PFD, bailer/bilge pump, whistle/signaling device, throw bag/heaving line). Some US locales/rivers likewise.

Mandatory of not, I want a throw bag handy.

Kinda like habitually putting my seat belt on, even when just going to the top of the driveway, I feel naked in a boat without a throw bag.
 
Back
Top