Well, I have decided to start a thread about my canoe build. I have been thinking about doing this for a long time now, but really didn’t have the forum to do it. Now I do…
First, the history…This build was started about 20 years ago. Yep, that’s right, 20. No, it’s not a typo. You read it right. I’m really not sure what I was thinking at the time; I had started a custom furniture business two years prior, and was trying to put my new bride through Vet school. Not exactly a free schedule and that was even prior to kids. It was started in my second shop, and has been moved 3 other times beyond that, all while in pieces. At one point a friend made up a sign and posted it on the side of the canoe that said “S.S. Minnow” I guess he got tired of seeing the massive gaping hole in the bottom where I hadn’t finished the stripping. A lot of the time, the boat lay dormant in the corner under blankets quietly calling out to me. It longed for water. I guess though, in many ways it has travelled many miles without ever having seen a drop of water.
My time is still very limited with a business, 3 kids, and a disabled wife, but I’m hell bent to finish this in time for next season. We have long cold winters here in Southern Ontario, and my garage is not heated, so the plan is to try to get as much done as possible while the weather is good. It will then have to go on hold for a bit.
The design...This is the Hiawatha 15 model from the ever popular Canoe Craft book. It caught my eye one day in a book store. I happen to have the 1983 edition if any of you would like to purchase this vintage copy when I’m done. It has been read more times than I can count. I’m not sure what the newer editions have in them, but my version just has a table of offsets to draft out the forms. At the time, I don’t believe that Bear Mountain boats offered plans, so it was just a matter of following this book, almost to the letter.
In case you are interested, here are some of the specs, and blurb about this canoe. It is taken directly from the Bear Mountain web site.
Hiawatha 15
A light displacement easy-paddling canoe
• Length 15'
• Maximum beam 33.5"
• Beam waterline 31"
• Beam gunnel 33.5"
• Bow height 21.5"
• Centre depth 12.25"
• Draft 4.25"
• Displacement 320 lbs.
• Wetted surface 24.2 sq.ft.
• Weight to immerse 115 lb/in
• Prismatic coefficient 0.525
• Weight 40 to 50 lbs.
• Keel-less or shoe keel
This traditional looking Bear Mountain design has a sheer-line and bow profile reminiscent of the early 'Canadian' style canoe. Below the waterline, the hull is a more up-to-date shape for paddling efficiency. The hull is a shallow arch with a moderately flat keel-line that flows into a shallow vee to become a fine deep vee at the bow for directional stability, speed and maneuverability. The vee is carried as far back as possible, acting as a keel, it contributes to directional stability without sacrificing maneuverability.
The Hiawatha is a general purpose recreational canoe of light displacement, designed in the tradition of contemporary American cruisers, achieving its optimum waterline shape when paddled level, rather than heeled over. A good solo canoe, it is also very fast and responsive with a double blade paddle.
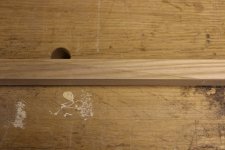
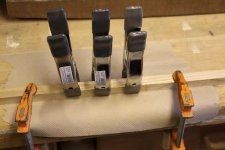
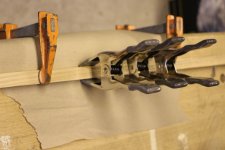
Ok, so fast forward to today. I am ready for the fiberglass. It has been block planed, sanded with 80, then 120 grit paper on a flat sanding block (by hand), and finally 120 grit with a DA sander. I chose to laminate hard maple strips for the outer stem bands. This is actually my second attempt at the outer stem bands. The book instructs you to glue up the inner and outer stem band at the same time on the bow and stern forms. I did this, but when it came time to fasten the outer stem band in place, after stripping, it had sprung too far out of shape to be useable. So, I just glued them up in place. Brass screws and maple plugs complete the glue-up. The outer stem bands were shaped with a combination of block plane and belt sander. I know that the use of a belt sander sounds a little scary to most, but I have learned to tame the beast. I use the big 4” x 24” monster. It’s an arm workout in itself .


My apologies for the pictures not showing a better angle of view. This is a single car garage that just barely fits my canoe, bench, table saw, and a little walking room. It’s a little full. To work on the side that is close to the wall, I just push the whole thing over.
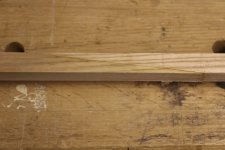
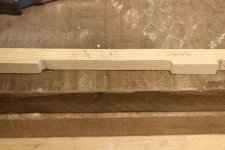
Generally, most builders try to use an accent strip or two a few rows up (down) from the starter strip. I chose instead to use some furniture inlay to create a similar look as a nod to my custom furniture days. It comes in 36” lengths and comes in all kinds of widths and thicknesses. Mine is 3/8” wide by 3/32” thick. Inlay doesn’t take a great deal of fine work or great skill to pull it off. I just set up my hand trimmer router with a 3/8” straight bit, and ran it along a long straight edge temporarily clamped in place. The depth was set for just a hair LESS than the thickness of the inlay. It gets epoxied in place before the final sanding.
If you look closely, you can just make out the pencil line of the final shape to be cut off the top edge once flipped over. I hope it isn’t too much of a radius for the gunwale material to bend. It may have to be steamed. We’ll see when I get to that point.
My hope is that you’ll get something out of this thread. I’ll do my best to inform and entertain. Stay tuned.
Momentum
First, the history…This build was started about 20 years ago. Yep, that’s right, 20. No, it’s not a typo. You read it right. I’m really not sure what I was thinking at the time; I had started a custom furniture business two years prior, and was trying to put my new bride through Vet school. Not exactly a free schedule and that was even prior to kids. It was started in my second shop, and has been moved 3 other times beyond that, all while in pieces. At one point a friend made up a sign and posted it on the side of the canoe that said “S.S. Minnow” I guess he got tired of seeing the massive gaping hole in the bottom where I hadn’t finished the stripping. A lot of the time, the boat lay dormant in the corner under blankets quietly calling out to me. It longed for water. I guess though, in many ways it has travelled many miles without ever having seen a drop of water.
My time is still very limited with a business, 3 kids, and a disabled wife, but I’m hell bent to finish this in time for next season. We have long cold winters here in Southern Ontario, and my garage is not heated, so the plan is to try to get as much done as possible while the weather is good. It will then have to go on hold for a bit.
The design...This is the Hiawatha 15 model from the ever popular Canoe Craft book. It caught my eye one day in a book store. I happen to have the 1983 edition if any of you would like to purchase this vintage copy when I’m done. It has been read more times than I can count. I’m not sure what the newer editions have in them, but my version just has a table of offsets to draft out the forms. At the time, I don’t believe that Bear Mountain boats offered plans, so it was just a matter of following this book, almost to the letter.
In case you are interested, here are some of the specs, and blurb about this canoe. It is taken directly from the Bear Mountain web site.
Hiawatha 15
A light displacement easy-paddling canoe
• Length 15'
• Maximum beam 33.5"
• Beam waterline 31"
• Beam gunnel 33.5"
• Bow height 21.5"
• Centre depth 12.25"
• Draft 4.25"
• Displacement 320 lbs.
• Wetted surface 24.2 sq.ft.
• Weight to immerse 115 lb/in
• Prismatic coefficient 0.525
• Weight 40 to 50 lbs.
• Keel-less or shoe keel
This traditional looking Bear Mountain design has a sheer-line and bow profile reminiscent of the early 'Canadian' style canoe. Below the waterline, the hull is a more up-to-date shape for paddling efficiency. The hull is a shallow arch with a moderately flat keel-line that flows into a shallow vee to become a fine deep vee at the bow for directional stability, speed and maneuverability. The vee is carried as far back as possible, acting as a keel, it contributes to directional stability without sacrificing maneuverability.
The Hiawatha is a general purpose recreational canoe of light displacement, designed in the tradition of contemporary American cruisers, achieving its optimum waterline shape when paddled level, rather than heeled over. A good solo canoe, it is also very fast and responsive with a double blade paddle.
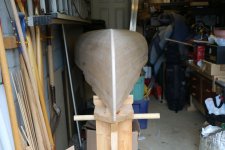
Ok, so fast forward to today. I am ready for the fiberglass. It has been block planed, sanded with 80, then 120 grit paper on a flat sanding block (by hand), and finally 120 grit with a DA sander. I chose to laminate hard maple strips for the outer stem bands. This is actually my second attempt at the outer stem bands. The book instructs you to glue up the inner and outer stem band at the same time on the bow and stern forms. I did this, but when it came time to fasten the outer stem band in place, after stripping, it had sprung too far out of shape to be useable. So, I just glued them up in place. Brass screws and maple plugs complete the glue-up. The outer stem bands were shaped with a combination of block plane and belt sander. I know that the use of a belt sander sounds a little scary to most, but I have learned to tame the beast. I use the big 4” x 24” monster. It’s an arm workout in itself .
My apologies for the pictures not showing a better angle of view. This is a single car garage that just barely fits my canoe, bench, table saw, and a little walking room. It’s a little full. To work on the side that is close to the wall, I just push the whole thing over.
Generally, most builders try to use an accent strip or two a few rows up (down) from the starter strip. I chose instead to use some furniture inlay to create a similar look as a nod to my custom furniture days. It comes in 36” lengths and comes in all kinds of widths and thicknesses. Mine is 3/8” wide by 3/32” thick. Inlay doesn’t take a great deal of fine work or great skill to pull it off. I just set up my hand trimmer router with a 3/8” straight bit, and ran it along a long straight edge temporarily clamped in place. The depth was set for just a hair LESS than the thickness of the inlay. It gets epoxied in place before the final sanding.
If you look closely, you can just make out the pencil line of the final shape to be cut off the top edge once flipped over. I hope it isn’t too much of a radius for the gunwale material to bend. It may have to be steamed. We’ll see when I get to that point.
My hope is that you’ll get something out of this thread. I’ll do my best to inform and entertain. Stay tuned.
Momentum
 And I know nothing about welding, or engines. Wood is my thing.
") I have decided on ¾” X ¾” for both inwale and outwale. I have also decided on scuppers. Now before I go any further, I know some of you are not fans, and some are of the infamous scupper. Please don’t hold it against me if you are not in favour, and for those who are, I hope I do them justice. More on that later…
I have decided on ¾” X ¾” for both inwale and outwale. I have also decided on scuppers. Now before I go any further, I know some of you are not fans, and some are of the infamous scupper. Please don’t hold it against me if you are not in favour, and for those who are, I hope I do them justice. More on that later…