• Happy Weed Appreciation Day! 🌱🌿🌻

What tools and equipment are needed for a canoe building, repairing and outfitting workshop?

Glenn MacGrady

Administrator
Staff member
Joined
Oct 24, 2012
Messages
4,966
Reaction score
2,952
Location
Connecticut
Starting from nothing, please advise what tools and equipment are necessary or desirable to stock a workshop for building, repairing and outfitting wood/canvas, wood-strip, and other canoes.

For me, in my old age of diminished canoeing, creating such a workshop is about a 10% possibility. But it is far more of a reality for numerous other canoe hobbyists in the future.

If I cleaned out my full basement, which has exterior access and a large but empty work surface, I would have plenty of room to repair and outfit my canoes or build new ones out of wood. But I have few relevant tools and equipment, none powered.

So, what tools and equipment would one need as a bare minimum to build and repair wooden canoes and canoe parts, and outfit various canoes? Beyond the bare minimum, what would one need for a well-stocked workshop?

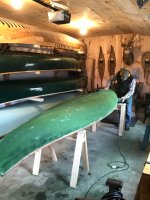
Show pictures of your shop and tools if available.
 
I have only built strip canoes and boats, and composite canoes, so I can't speak to older wood/canvas sort of hulls.

Bare minimum to build a stripper:
Adequate physical space
Adequate light in that space
Adequate heat while laminating
Various hand tools...screwdrivers, hand saw, sanding blocks
Stapler

This assumes you purchase your strips are purchased precut, as well as whatever materials for the trim.
This also assumes your a masochist, of sorts.

In reality, a person would need the 1st four of the above list and:
Band saw/scroll for cutting out forms
Table saw/circular saw, band saw for cutting strips
Router/shaper for bead and cove, cutters for same
Electric or air stapler, or a multitude of Jimmy Clamps
Small block plane
Hand saw for trimming stems (assuming stemless construction)
Random orbit sander for the outside, disc sander for the inside
Power drill, maybe a drill driver too
A clean flat surface for mixing resins, could be temporary

That's about it, you could add other tools like thickness planer, jointer planer, chop saw, etc to make life easier, especially for the trim, but not really necessary.

Oh, and more important than any tools or equipment, is the desire to work and the ability to accept mistakes, and a tad of perseverance to see the build through to the end.
Without the desire, you'll never start.
Without the acceptance, you'll quit after the first error.
Without the perseverance, you'll regret walking by that unfinished project.

I would assume that repairing and outfitting have similar needs...
 
Without the desire, you'll never start.
Without the acceptance, you'll quit after the first error.
Without the perseverance, you'll regret walking by that unfinished project.
This^.
Random orbit sander for the outside, disc sander for the inside
Not sure what is the difference between a random orbit and a disc sander? I use a random orbit for both outside and (with a thick interface pad) the inside as well.

When building a stripper, the thing you spend the most time doing is sanding. Sand the hull fair on the outside. Sand fair on the inside, sand the fiberglass/epoxy outside. Sand the fiberglass/epoxy inside. Sand lightly between coats of varnish. Sand, sand, sand.

When people ask me whether it is hard to build, I tell them, "Not really, but you better enjoy sanding." Since it is the thing you spend the most time doing on a stripper, I say get the best random orbit you can afford and make sure it has good dust collection. Makes life a lot nicer. The Festool line of Rotex random orbit sanders are, in my opinion, the best, because they can remove stock fast in Rotex mode and do very gentle sanding in the normal mode. And there's close to zero dust when hooked up to a dust collector.
 
Last edited:
I have no experience with stripper canoes, but I have worked on a lot of wood canvas, royalex, kevlar and fiberglass canoes in my shop(s).
I really don't have a lot of tools, my current table saw is an old Craftsman I paid $50 for, does the job with a sharp blade. I have a mediocre skill saw, a decent belt sander, a decent 1/4 sander, a jig saw, a couple of battery powered drills and two electric drills. I have a small finish router and RO sander but rarely use them. I have 8 bar clamps and eight 2 1/2" C clamps. I also have 4 long clamps (4-5'). A good shop vac and hand tools like hammers, both rubber and metal, all sorts of screw drivers, a few hand saws, a good mask, and a good assortment of foam brushes and rollers. A vise and some saw horses too.
For wood canvas canoes a tack puller, utility knife, small hammer for tacks and a decent clinching iron. For canvasing I have a come along, 2 chains, two home made canvas clamps, a carpet puller to work the canvas, and an electric staple gun.

I have a well stocked Craftsman rolling tool cabinet for working on cars and equipment with lots of hand tools/air tools which help sometimes when working on canoes but not really necessary.

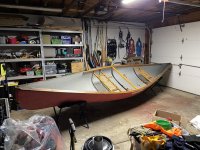
I enjoy a nice atmosphere and heated shop with good lighting.

IMG_2438.JPG

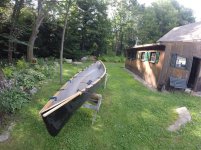
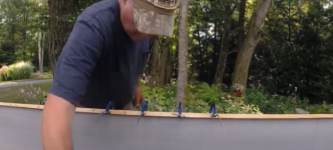
Being able to work outdoors is nice.
GOPR0336.JPG
 
A Good pocket knife, is essential ! I always have a Swiss Army Tinker in my pocket ! If not I feel Naked.

Space to work. I'd not build out side, unless forced to.

Clamps, I think I have enough now, but it took me years to accumulate them !
A 15 amp Skilsaw. Cuts my strips and gunnels. A Diablo 24T 7 1/4" blade.
A Band saw is a great aid for a bunch of other tasks.
I built for years with a corded drill. You would have to pry my "Cold Dead Hands" off my Cordless drill now days !
A 3M canister dust mask, Black canisters are rated for epoxy.
A Good Japanize pull saw. I remember my first. I just bought the blade, and made my handle. I still use it. It still cuts paper thin Ash slivers !
Another compliment to the Japanize wood working tools is the Shinto Saw rasp ! It is two sided. Course and Fine. Works on wood or fiberglass.
Several planes. I use a small plastic body razor plane, available from Master Air screw. It's a Razor plane. They used to be cheap. $10 now. Too much.
Safety glasses.
Tape.
Glues.
Foam paint brushes.
Those are pretty mandatory for me.
I'm sure I left out some.
 
Aside from what has been mentioned...

Wood:
  • I've only built 2 strippers, but neither has been bead and cove. I used a Lee Valley Miniature Shoulder Plane combined with Guillemot's Robo-Plane on the first one. I found the latter of the two to be largely unnecessary and used only the shoulder plane on the second. I just lean it against the form and plane until the gap between the plane's base and last strip disappears - eyeballing the part between forms. It's surprisingly easy.
  • I really like using my stationary, 12" disc sander* for sneaking up on the form lines after rough cutting them with either a jig or band saw.
  • I have a Stanley No. 4 plane that I resurrected and use for gunnel scarfing.
  • A small mitre-box and back saw for bevelling the "butt" joints between strips.

Epoxying:
  • cheap chip brushes - at least one per "event" (I'd say one per "coat" but there are times when interim attention may be required).
  • autobody mastic applicators/squeegees/whatever they're called
  • old clothes/shoes (you will get epoxy on them and then they are toast)

*Several years ago I picked up a Shopsmith Mark V with the bandsaw attachment. It makes a great sanding station and you'd be hard-pressed to find a less expensive, infinitely variable speed drill press (that can also do horizontal boring). The band saw is "meh". My point is that I get good use out this space saver and they can be had for very little. I do have a dedicated cabinet saw, so that part is not useful for me.
 
Several years ago I picked up a Shopsmith Mark V with the bandsaw attachment. It makes a great sanding station and you'd be hard-pressed to find a less expensive, infinitely variable speed drill press (that can also do horizontal boring). The band saw is "meh". My point is that I get good use out this space saver and they can be had for very little. I do have a dedicated cabinet saw, so that part is not useful for me.
Lol, I almost added "get a Shopsmith Mark V" to my list of useful tools for building a canoe. Now that scratchypants brings it up, I will now proseltize for it.

First the disclaimer: they aren't for everyone. Above all else, to use a Shopsmith you need the ability to plan your work ahead carefully or you will be endlessly frustrated changing back and forth between the various set ups. This is the most common complaint about them. The next biggest complaint is that you need to relearn how to use some of the tools -- most notably the table saw, which I describe below. But once you understand how it works, the Shopsmith is an incredible tool. They pack an unbelievable punch in a small amount of space. And you can do excellent, accurate work on them.

Saying it makes a "great sanding station" is a gross understatement. A lot of people will buy a used Shopsmith and cut them down to length just to set them up as sanding stations. Completely stepless variable speed sanding is, obviously the way to go for sanding and the belt sander and drum sander attachments are great tools that are as good as any on the market and better than most.

But where the Shopsmith truly beats all the competition in the sanding department is as a 12" disc sander. For starters, you have the ability to have separate discs with different grits mounted on them that can swapped out in a matter of seconds. No more changing paper to go between grits or using the wrong grit for the job because you don't want to waste the paper already on the disc. Then there's the tilting table, which is enormous by disc sander standards. And the table has both a real miter gauge and, even rarer, a back up fence (the table saw rip fence). Why would you want a backup fence on a disc sander? Because on the Shopsmith you can unlock the disc and move the sanding disc in and out relative to the work piece during sanding operations and can further pre-set the amount of travel with a depth stop. So, if you back up the work piece with the fence, you now have the ability to disc sand multiple parts to identical, pre-set lengths or widths with absolute, 100% repeatable accuracy. As far as I know, there's no other disc sander on the market you can do this with and until you use and understand this feature and its possibilities, you don't know what you've been missing with your ordinary disc sander. Then there is the conical disc. Trying to explain to the uninitiated what this weird-looking disc does and how it does it is hard. But you know how a disc sander leaves those semi-circular swirl marks across the grain? Well, with the conical sanding disc, there are no swirl marks. The sanding takes place in a narrow, straight line in the direction of the grain. You have to see it to believe it. You can use it edge joint figured woods without tear out and even to edge sand/joint plywood without without dulling/ruining you jointer blades.

As scratchypants mentioned, it is an excellent drill press and one of the few in-home horizontal boring machines out there (horizontal boring is so easy and convenient I rarely use the normal drill press). And it's a very good lathe, too.

Now for the table saw. This is the function most people can't abide on a Shopsmith. The primary complaint about the Shopsmith as a table saw is that, unlike most table saws where you raise and lower the arbor to control depth of cut and tilt the arbor to make bevel cuts, on the Shopsmith you must raise or lower the table to control depth of cut and tilt the table to make bevel cuts. All table saws operated like the Shopsmith until Delta invented the tilting arbor saw. But most people have never operated a table saw that works like the Shopsmith and the very idea of it seems to petrify a lot of people. I must admit, the first time I did it, I thought I would probably injure myself. But once you get used to it, it becomes second nature and works just as and as safely as a tilting arbor saws.

The other big complaint about the Shopsmith table saw is that a lot of people think it is underpowered. Depending on when it was built, the motor is either .75 horsepower or 1.125 horspower. But while it does not have the horsepower of a big cabinet saw, because there is an inverse relationship between torque and rpms and because the Shopsmith is a variable speed table saw, one can dial down the rpms which conversely cranks up the torque. This simple trick allows even the .75 horsepower units to outperform most job-site/table top saws and allows the 1.125 horsepower units to generate more torque than table saws with much greater horsepower (but fixed rpms). But if you need a 3 horsepower (or bigger) cabinet saw, the Shopsmith isn't it.

As for the band saw attachment, I'm not sure why scratchypants rates it only as "meh." It has worked flawlessly for me within its design limitations (6" resaw capacity/12" throat capacity). I have used it to cut strips that were so uniform right off the blade that they were ready to go directly to the router table for beading/coving without any sanding or planing. I also used the band saw to cut my station forms and yokes. Again, stepless variable speed is a useful function for a band saw to cut different species of woods, plastics (and even non-ferrous metals).

Finally, these things are built like tanks and last forever. I am on the Shopsmith Forum and I see people using Shopsmiths Mark Vs made in the 50s when they were first introduced (and an earlier version called the 10ER that were built in the late 40s) and that were passed down from their fathers/grandfathers. Even cheap, used, rust-bucket barn finds on Craigslist can be easily restored, usually just with elbow grease. But spare parts are widely available

Again, they aren't for everyone but they pack a heck of punch in a small workshop.
 
Some of the larger power tools may/are not really be needed .... some are more of a "nice to have".

The band saw/Scroll saw/Table saw are easily replaced by a jig saw and a good circular saw, with minimal impact on either ease of use or results

A caveat to this larger power tool opinion ... is that it is dependant on your wood source ... if you intend to source "rough" lumber, then to process that you would likely want to consider a decent planer and power saw to do the initial wood processing

If you have a large workspace and a hefty budget, you can go ahead and buy large power machines to fill the workspace and make life somewhat easier.

However, forms cut with a jigsaw and sanded to shape are just as accurate as those done using "larger machines". Using a circular saw to cut strips is much easier than ones done with a "larger saw" .... in some cases it is much better to use and will cut accurate strips where a larger saw will fail (FYI gunnels are just strips).

Generally the only power tools you actually "need" are an ROS, Drill, Jig saw, and if you want to make your own strips add a Circular saw and router and router table .. I do have a Rigid oscillating Tabletop sander that I use a lot and is one of the few larger power tools that may straddle that line between need and want for usefulness in the shop

Short list of hand tools would be short plane, spoke shave, chisel set, sanding block, pull saw, measuring tape, carbide scraper, fixed ruler, pencil/markers. You would also need some sort of portable support items, like saw horses and of course something like a strongback is also ways useful for a variety of tasks and project laydowns.

Shop supplies will depend on what you are actually doing ... several glues, some epoxy, sandpaper grits for your sanding needs, variety of nails and screws .... generally, I don't really recommend going too far with pre-purchasing too much "shop supplies", rather when you do jobs and need something, buy "extra" for the shop if you think you may use the product again, this way you build up the shop supplies of those things you use regularly and not stuff you may never use.

Once you have the basics ... you will add knickknacks, doodads and thingies that seem like a good idea or are actually very useful, in no time you will have most items you need close to hand and the supply runs will be mostly supply maintenance.

The big thing to keep in mind, is that we all see a shop as personal workspace and each shop then tends to reflect it's owners interests and project types. A shop setup for cabinet making will have all the tools to build a canoe and contain equipment that can be used to perform all of the construction steps for the canoe. This does not however mean that that equipment is "required" to construct a canoe.

The "need" part of your question is really the most important guide to what will be in a canoe build/repair and outfitting workshop, aside from the power sander mentioned, no large power tools are really needed for what you want to do, just good hand power tools and good hand tools should cover off almost anything you are likely to want to do in that type of shop.


Brian
 
My experience is with wood/canvas construction. First Nation and Native American peoples did some very beautiful work with an axe, crooked knife, and awl. All the required work can be accomplished with a minimal number of hand tools. Power tools greatly speed up the different processes, but keep in mind, they also accelerate costly mistakes. Much more opportunity to correct something using a hand plane. A power router not so much. Best to start with a few tools and add as needed rather than collect a large number, many of which, may seldom or never be used.
 
How many clamps to put new wood gunwales on a 17.5' canoe -- composite canoe, if it makes a difference?
 
How many clamps to put new wood gunwales on a 17.5' canoe -- composite canoe, if it makes a difference?
You should have asked yesterday when I was replacing the wood gunnels on a 16' Explorer. I didn't count the clamps while I was doing it, but just verified I have 17 c-clamps now sitting in the bottom of the canoe and I believe I used 16 of them per side of the canoe. One clamp was applied on either side of the center screw and then one clamp every 12 inches or so, which is roughly every other screw (the Explorer screws were spaced 6.5" on center). You might get away with fewer by clamping as far as you can with your clamps, screwing, removing clamps and repositioning, but I'd be afraid of not getting a fair curve even with the shearline there as a guide.

Also, it may depend a little bit on not just the length but also the shape of the canoe. The Explorer is kind of wide in the center and has high stems relative, so the gunnels are bending in two different directions. A relatively narrow cannoe with low stems would create a relatively straighter line for the gunnel to follow and that might require fewer clamps.
 
I like to clamp every 3" or so, so it is somewhat dependent on the canoe length. The good news is that spring clamps are often on sale and are perfectly fine for the job ... I have enough 3" C clamps to do this as well, they got replaced because the spring clamps are a lot easier for most jobs, but not all jobs, so the C's still get used, just not as often

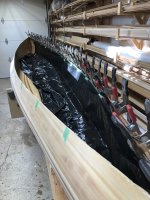
IMG_1993.jpg
 
How many clamps to put new wood gunwales on a 17.5' canoe -- composite canoe, if it makes a difference?
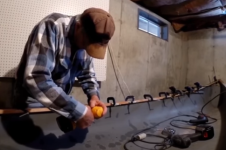
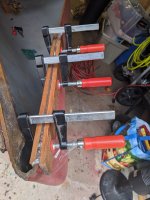
I used to think I needed a lot of clamps,

clamps 2.PNG

but now I can get away with 4 small C clamps. I start in the middle and work my way towards the ends, just make sure you have enough gunnel material overhanging the ends (the more overhang, the better to work the shearline curve)
I use screws, no glue.

clamps.PNG
 
Last edited:
but now I can get away with 4 small C clamps. I start in the middle and work my way towards the ends, just make sure you have enough gunnel material overhanging the ends (the more overhang, the better to work the shearline curve)
I use screws, no glue.
Same as Robin. No glue on WC canoe gunnels. Just take your time.
 
I’ve only ever done one-piece “uniwale“ gunwales (for 3 canoes so far). If you go that route you don’t need to spend a small fortune in clamps because a half dozen or so strips of duct tape will do the trick (but you will need a table saw or a solid router table to cut the groove)
 
Last edited:
I’ll ponder my list, limited to repairing and outfitting, not building from scratch, and to “other canoes”. To me “other canoes” are Royalex or composite, or even poly.

Starting from nothing, for basic repairs and outfitting on RX or FRP canoes, most of Stripperguy’s list, especially adequate space, light and heating (or cooling in summer southern climes), and eliminate the immediate need for block planes, band and table saw and other machinery; a hand saw and coping saw will make the cuts needed. A file or rasp to shape ends or round off edges.

In sanders I would add a 1” tabletop belt sander to the RO sander, and even those are not mandatory with enough elbow grease. A drill, and a drill index of various sized “bits”. A couple clamps.

And what Scratchypants listed. Chip brushes; if you do a lot of epoxy or contact cement work best bought in quantity. If there is need for large painting or epoxy work same for foam “cigar” rollers and foam brushes.

Beyond that, for repairs or outfitting, it is mostly materials. Epoxy, varnish, contact cement, sandpaper, wood for new thwarts and carry handles. New seats if needed, although those are easier ordered from Ed’s Canoe or Essex. Machine screws/nuts/washers, sized in proper length for the above. Maybe some minicel or other geegaws as desired; D-rings, lacing eyes, rope for painter lines, some webbing for tie down loops on the ends of machine screws.

I’ve never built a canoe from scratch, and never will, but I have resurrected a couple dozen dumpster destined derelicts, the first few done with nothing more than the usual Harry Homeowner collection of tools.

It is hard to find a repair shop to tackle that kind of simple refurbishment at a reasonable cost, and most of the work is fairly simple straightforward with a hull already there.

Glenn, I have to ask, with your interest in this topic are you pondering DIY repairs to the weather beaten canoes stored under your deck?
 
Glenn, I have to ask, with your interest in this topic are you pondering DIY repairs to the weather beaten canoes stored under your deck?

Mike, as I said in my OP, there's a small chance I might like to fit out a small workshop to do work on some of my canoes, mainly replacing wooden gunwales, for which it seems impossible to find a willing repair person in these parts. However, the main thrust of the topic is to advise future builders/repairers/outfitters as to what kind of tools and equipment will be needed if they are thinking of embarking on one or more of those hobbies.
 
Mike, as I said in my OP, there's a small chance I might like to fit out a small workshop to do work on some of my canoes, mainly replacing wooden gunwales, for which it seems impossible to find a willing repair person in these parts. However, the main thrust of the topic is to advise future builders/repairers/outfitters as to what kind of tools and equipment will be needed if they are thinking of embarking on one or more of those hobbies.
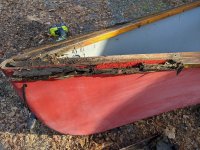
I've been doing largely the same...I have an old Royalex Keewaydin Canoe with rotted out gunwales. I haven't needed too many tools so far, but the former owner used a silicone caulk on the gunwales that has been hard to remove. Still - I have most of it off and have been repairing the cold cracks as I go.
IMG_0602sm.jpgPXL_20201107_140506166sm.jpgPXL_20211017_172940714sm.jpg
 
Building, repairing and outfitting may have very different tool and equipment requirements. I’ll skip building, a task I will never undertake.

Repairing, at least repairing modern materials canoes, doesn’t typically need a lot in the way of tools and equipment beyond the usual Harry Homeowner stuff, provided you are not making your own gunwale replacements from wood. Yeah, a power saw, router and RO sander would be nice, but all of those equipment needs can be accomplished with hand tools and elbow grease.

Drill, clamps and screws to install ready-made wood gunwales. If pop riveting new vinyl or (two-piece!) aluminum gunwales, especially on multiple canoes, a battery operated or 110v corded pop rivet gun would be a godsend.

Outfitting an intact canoe that doesn’t need major repairs is even easier, and less tool and equipment intensive.

I appreciate the pride of craftsmanship that comes with building your own canoe, but there is satisfaction with resurrecting a derelict or just outfitting a canoe for the intended use. When I see someone in a factory stock canoe, or even a rec kayak, needlessly uncomfortable or inefficient, I can’t help but think “If you would just install X you would be so much happier”
 
Back
Top