• Happy National Garlic Day! 🧄🚫🧛🏼‍♂️

Yet another JW Kite

Joined
Jun 20, 2018
Messages
32
Reaction score
15
Location
Auke Bay, AK (ADK at heart)
I suppose I am looping the world in a bit late on this, and perhaps breaking a few etiquette rules in the process. If so, feel free to send along any necessary correctional criticism.

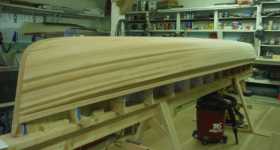
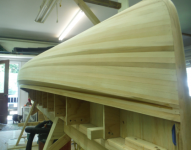
I am several months into my first cedar strip build - a John Winters Kite. My one previous build was a Platt Monfort SOF Snowshoe Lassie, which is great for an easy-going flat water jaunt, and for dragging through the woods. However, I wanted something a little more substantial for the bay in front of our home and the rivers out the road. I also enjoyed the first building process nearly as much as I enjoy paddling. Those factors, coupled with the need to keep myself busy on Juneau's many rainy days, motivated this second build. It will surely not be the last.

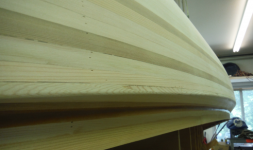
Please excuse the several faux pas you will notice early on: I made the (possibly royal) mistake of skimping on the strongback... I know, I know - stupid! Although it seems to have not warped or bent, I am sure I will regret that. The ripping and milling process was a bit of a learning experience for me, too. As such, the strips weren't as close to perfect as others. Finally, I am sure it was a bad call to hop on the canoe after fixing the last strip in place but I was pretty excited. No known damage form my enthusiasm. :)

photo9930.jpg

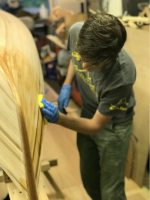
I have sanded the outside, added the fillet, and will hopefully be glassing this weekend or next. I figured this is a good point to start asking advice.

I am not extremely skilled at social media, etc, but will try to be consistent about sharing progress. I am not building very fast, though, since I am working and schooling full time.
 
Last edited:
Welcome!

It is great to see another builder join the ranks! This is a great place to share ideas and ask questions.

looks like you have made decent progress already!

Make sure to to take lots of pictures of your progress and share them with the class, because as they say, a picture is worth a thousand words.
 
Mr. Rock,
Let's see some more pics, especially near the sheer with the crease.
IIRC, Alan built a Kite a while back...
I have built two of them, sort of. The 1st one was a stripper (of course). The second one is a carbon copy of the first.
I've found the Kite to be a very comfortable dual use hull, it's not the fastest boat on the water, but you'll stay dry and upright in Class II and then some. Maneuverable, too.
I'm curious why you chose a Kite, it took me quite a while to choose that particular design.

And don't sweat the details too much, overall you're gonna have a versatile hull that's easy to look at. Any flaws, real or perceived, are generally magnified for the builder and barely noticeable to the observer.
So, c'mon, let's see it with some glass and resin on it!
BTW, I have been paddling in the ADK's for way over 50 years now, and it just keeps getting better.

Lastly, you probably already noticed that there's an abundance of building experience here, take advantage of it.
 
Thanks much, Sven!

Stripperguy,

Funny you should ask why I chose to build a Kite, since yours played into my reasoning! I built the SOF mostly out of nastalgia. I grew up in Saranac Lake, and have been in Alaska for several years. Leaving my beloved home broke loose in me a renewed love for ADK history. After a visit to the Adirondack Museum, and after reading Contested Terrain, Forever Wild, The Adirondacks (Schneider), and others, I took a special interest in Nessmuk and Ruston. Being that Ruston though his Wee Lassie was the prime design for the curious paddler, I had to have one. However, once I built it, I realized it is a bit twitchy and flimsy for most anything Alaskan, and couldn't take much of a load. So, I started the search for more os a multi-use use boat - something I could portage (for when I land back in the ADKS), yet something that can handle the inland waterways and rivers around Juneau. I have actually been trolling this forum for quite a while, and stumbled upon your album from building your stripper kite. I also scoured dogbrain's writeup a few dozen times for details. I have searched for pics of Alan's, but haven't been able to find any. Another (perhaps novice) reason was that I love the look of a dramatic tumblehome. That love was largely inspired by your DY special. Fortunately, that played well into my desire for something that would be solid and keep me dry in the Bay. Finally, because I had access to other builders' experience with the Kite, I felt a little safer about jumping in.

My wife got me the plans for Christmas last year, and that was that!

Here are some shots of the current status, as well as the sheer. I still need to sand the fillet. I think I am otherwise ready for glass.


I am a bit apprehensive about glassing, since it seems to be the step where the most swift irreversable damage can be done. I have never worked with fiberglass or any other composite, but an excited to learn. If there are any traps to avoid, please let jump in and let me know. I have sanded it down to 120, and my glass and resin arrived from Raka yesterday. I am using their 127 resin and the non-blush harder (350). I am doing 1.5 layers of 4oz glass on the outside, and a single 4 oz. on the inside. I will reinforce the stems, also with 4oz. I am hoping that will be sufficient. I changed my mind the day after ordering, but it was too late to swap it with 6oz by the tie I called. The $100 shipping was a killer, but there is nothing cheaper in town.

I am planning to glass as-is. Does anyone have input on prep? I was't sure if perhaps I should first wipe it down with a solvent or something before glassing. Also, is it safe to wet out two layers at ones (the football and the full sheet)?

Thanks for the welcome and the advice. I am so grateful for all the info I have already been able to glean from the folks on this forum, and look forward to learning much more!
 

Attachments

  • photo9932.png
    photo9932.png
    218.3 KB · Views: 5
  • photo9933.png
    photo9933.png
    217 KB · Views: 5
  • photo9934.png
    photo9934.png
    216.6 KB · Views: 5
Last edited:
I forgot about Dogbrain's Kite!
I regularly wet out 2 layers at once, but always do a seal coat first. I've found that the bare wood can suck resin out of the cloth during the wet out, and sometimes results in a starved laminate.
Others have no issue without a seal coat. As for your laminate choice, I would add another half layer inside. As you may know, when the hull accepts a load from the outside, the inside sees a tensile load, so this is the area for adding some strength. That particular hull had geometries in its favor, that crease will stiffen the sheer dramatically, and the shallow arch helps strengthen the bottom.
As for any trepidation when you wet out, you're right to proceed carefully. An oops at that step is difficult to recover from.
I would suggest you do a test panel to practice and perfect your wet out skills. Take your time and don't be in too much of a rush to get the boat in the water. An extra week or so in the build will be nothing compared to the years of enjoyment you'll have with your finished Kite.

And your stripping looks great! Nice crease, nice stems. Just wait til it's glassed, that cedar will overwhelm your senses!
BTW, I'm just heading out for a weekend at Long Pond, first wilderness canoe trip for the grandkids...
 
Excellent! I will get some more glass for the inside. I have been trying to glean some of this info from everyone else's threads. I probably should have piped up sooner. For seal coating, do you use a roller. squeegee, or otherwise? I am assuming it is the same ratio of resin to hardener. Also, do you let it cure completely and sand before laying on glass, or is it preferable to wet out the glass on top of a tacky seal coat?

Thanks for the compliments, btw. The pictures, sanding, and filler hide many a mistake!

I envy your weekend plans. As much as I am in awe of Alaska, I am in love with the Adks.
 
I am a relative beginner at strip building, but I will share my two cents with you since some of my beginners struggles are fresh in my mind.
I would seal coat with a foam roller of some sort. Make sure you clean the hull thoroughly with vacuum and denatured alcohol before applying epoxy.
Try to glass over the seal coat within 24 hours.
This one is very important: Make sure your mix ratios are very accurate, I'm pretty sure all raka epoxy is a 2:1 mix ratio. The epoxy will not set up if you use too much hardener. I can verify this!
Beginners note: If I could do my first build over, I would probably only wet out one layer at a time. Do full layer first then come back about 12 hours later and put the half layer on. My reasoning behind this is that its easy to get areas in your two layer wet out that are semi starved and the glass will not "disappear" like you would expect.

Don't forget: Heat is your friend when glassing. 80 degrees seems pretty much ideal (hull/epoxy/ambient)

Last suggestion I have is to have a trusted helper you can rely on to accurately measure and thoroughly mix your resin for you.

Good luck with your glass!
 
Last edited:
Thanks, Sven! This is great advice. I am thinking I will do some experimenting tonight, and perhaps seal coat tomorrow or Sunday. Maybe I should wait a week and do more research and experimenting...I don't know. I am planning on using the clear cup method for getting my ratios right. I will pre-mark them and my buddy will be my mixer.

When wetting out the layers, is there a reason you do your half layer second? Is that typical?
 
Well, on my first build I did both layers at the same time inside and out and I wasn't satisfied with how it turned out. In my experience it seems to take more time and effort to get both layers "fully" saturated. I found that while making things with only one layer at a time it is much easier to get the cloth to "disappear". I think that most of the builders on here do both layers simultaneously in an effort to save time/steps in the process. I tend to nit pick my own work, and am my own worst critic. I personally don't think I will ever do a double layer on the outside of a hull again, but that is just my mileage so far. In the grand scheme of things, it will take a couple extra hours, but I feel it will yield a finished product that is far superior aesthetically speaking. When I look at my time sheets from both of my builds, an extra couple hours doesn't bug me as much as the visible flaws in my first build.

I must add that on the inside of the hull I will probably always bury my half layer under my full layer for the simple fact that it saves a bunch of time in not having to feather edges of the half layer.
Also it is more difficult to make the inside of the boat look "nice" in regards to fairing it.

for the curious folks out there, I kept a fairly accurate log of my hours on my current build and I am at the point where I pretty much just need to varnish the hull, and it has taken me about 150 hours.

first build was closer to 200
 
Mostly personal preference. Jim Dodd actually created a thread on this. This is one of those topics that will show lots of difference in opinion. My reasoning is basically the same as Jim's. Some of the other builders on here will bury it for the same reason I like to on the inside of the hull. It saves a little time, the sum of which I believe to be negligible When considering the overall structural integrity of the finished hull.

here's the link to Jim's thread
 
Welcome to the club Blackrock. One tip, make sure and round off that sharp edge at the knuckle otherwise the glass won't lay flat. I would also do one layer of glass at a time. Mark
 
Just a couple of points ...

Since you mentioned you have sanded the hull to 120, did you wet the hull to raise the grain? Once that is done another light 120 sanding is done (just checking).

Also IMO a sealing coat is quite a bit of extra work for no real gain and possibly a weaker hull in the end (look for a few threads on the topic, it is quite a contentious topic).

As far as burying the second layer .... there is a fairly good reason (other than those mentioned) to not bury the half layer under the full layer. If you draw out how the layers will be arranged on a piece of paper (I am a visual type of person, I need to see it), then try and feather the raised edge where the buried glass ends, it becomes quite clear you can't feather that edge without going into the full layer ... this will weaken the whole layer at that point. If you put the partial layer on top and then feather, you never get close to the full layer and achieve full strength across the hull ..... IMO burying the half layer may save some work, but it is more likely to create weak areas in the hull ..... since you are adding the second layer for strength, it doesn't seem to be a good idea to then add built in weaknesses. Even if you leave the edge visible, it will create an area of sharp change in the direction of the FG threads which also creates a weakness ... any sharp transition of threads under load will create a weaker area.

Also, with that knuckle to contend with, the 4 oz cloth (even if you had second thoughts) was a better choice as it will conform easier around the sharp bend easier.

And lastly, I would never have the stones to climb/sit on a hull like that .... just lets you know how strong these hulls are once they are closed.


Brian
 
Looks great. I thought about building a kite a while back but ended up doing decked canoe instead.

All good points above. Agree with brian on the second layer too. Only exception would be if you were painting the hull and were able to fair the edge of the under layer so the top layer wouldn't have to jump the gap. Then you'd have a continuous layer of glass and wouldn't risk cutting through it while fairing. Which is another thing, make sure you fair the wood well because 1 layer of 4oz glass is not going to give you much margin for error.

Another thing is I've used 4oz s-glass on the deck of my build and would only caution to be careful handling the hull off the forms, especially while scraping and sanding the inside. With the shouldered tumblehome and hull radius that kite hull will be a lot more rigid over all than my deck was, but after popping mine off the form it was flimsy enough that I went ahead and put another 4oz layer on to not risk cracking the glue lines while scraping and sanding. The 4oz glass is strong and flexible enough, but the cedar strips and wood glue seams won't take the same stress. You should be fine with that hull, just be careful anywhere the hull flexes easily until both sides are glassed.
 
So I decided to join the seal coat camp. I suppose my motivation was primarily to delay fiberglassing, since it still terrifies me - perhaps more so after doing the seal coat. This morning I sanded the fillet, did some final fairing, then wiped down the hull with denatured alcohol. My buddy, a photographer and leatherworker showed up for moral support and a second pair of hands. Seal coating seems to have gone well, I think. We did have one catastrophe when the resin started setting in the pan. The stuff gets pretty warm! There is certainly evidence of the mistake but nothing too major. Smaller batches and faster working after that.

There are some small bubbles, and I don't think they will make their way out. I tried the hairdryer trick, but it just made more bubbles. There are also some spots that seem to have soaked up a lot of resin and look dry. I revisited them a couple times, and they still look a bit dull. I am hoping the actually glassing will shine those spots up.

As for the bubbles, is it wise to lay glass over it tomorrow as is, or should I wait longer, sand, and then do glass?

here are some pics. Its difficult to get good ones because of the lighting and layout of the shop.
I will try to get some of the bubbles too.


photo9944.png
photo9945.png

And, here is one from Friday morning out in the Bay. :)

photo9946.png
 

Attachments

  • photo9943.png
    photo9943.png
    264.7 KB · Views: 0
  • attach82419.png
    attach82419.png
    264.7 KB · Views: 1
Last edited:
I would recommend scraping those bubbles, and glassing before the resin starts to cure.

do not rush it. There is nothing wrong with a sanding before glassing, it just adds a little time to the process...but you will possibly sand through the seal coat in some places, which kinda defeats the purpose of a seal coat. do not fret. You can make it happen!

When applying fiberglass, having the various materials near the same temperature and then letting temps drop will help prevent bubbles from forming in the first place.
 
Agree with Sven, the seal coat needs to be fully sanded before applying next layer, the sooner the better. One of the reasons I don't do this is that you will now have a mechanical bond to your seal coat, whereas applying all together means they are chemically bonded, which is much stronger. having said that, "stronger" is a relative term and the mechanical bond is plenty strong.

When I do glassing, i clear out everything from my shop and get all the glassing stuff out and setup a station to support that job.

When you are using the epoxy, the single most important thing to do after mixing is to get the epoxy on the boat ..... the mixed epoxy is exothermic and since it is fairly viscous, the heat is retained and starts to build up fast if it is left in a thick layer (i.e. a mixing cup).... heat is what the epoxy uses to setup, so it will kickoff much faster. Getting it on the boat and spread some will give you max working time as the heat can't build fast in a thinner layer ...... so get it on the boat fast and then worry about moving it around.

Also, don't worry too much about getting it looking good during application, work at getting it spread and on the boat ... the squeegee step takes care of the excess. Having a second set of hands to mix and time and assist is the best arrangement .... and you should really think of it as more of a requirement than a nice to have.


Brian
 
I've been on a river clean up for a little over a week, and BAM another builder pops up ! Love it !

Welcome aboard Rock !

You have gotten some great advise ! One of the reasons this site is SO good !

Bubbles are a pain, and yes a hair drier creates more, but once the hull is warmed up, hit those bubbles with a brush, and they Usually disappear . After the fact, they are hard to fill ! Just sand, and blow any dust out of the holes with compressed air, then count on the varnish to protect.

I know you will enjoy the Kite, and I'm betting you will build more !

Jim
 
One other thing ! OK maybe more !

I noticed you Herring boned your Football strips. I did this on my first canoe, nearly 30 yrs ago ! It really teaches you about strip fitting.

I've found Elmers MAX to be about the best for filling staple holes ( staple holes, probably the major source of your bubbles)

​​​​​​​ How did you cut your strips and did you bead and cove them ?

Shipping cloth and resin has gotten out of line ! Someone is filling their pockets somewhere !

Lastly, glassing has always been the Scariest part of building a stripper !!! You have done well !
Watch out for the bubbles on the inside. Wetting out the inside, while the temps are falling is a great aid. If not possible, warm the hull before rolling on the inside coat.

Good Luck !

Jim
​​​​​​​
 
Back
Top