• Happy National Paranormal Day! 🔮👻👽

Yet another JW Kite

Thanks Sven, Cruiser, and Jim. All your advice has been extremely helpful!

This morning I sanded down the entire hull. It definitely took care of the bubbles. I definitely should have gone straight to glassing after seal coating. I think sanding sort of rendered useless the seal coat.

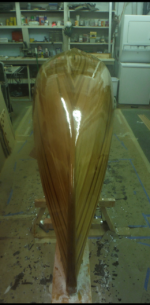
My wife volunteered to be pinch hitter, since my buddy who was going to assist was unavailable. So we glassed today! I am sure glad I had her help, and would surely have messed something up if I tried to go it alone. Everything seems to have gone well. The knuckle really slowed me down, and as a result I didn't get a perfectly even wet out before things started getting goopy. I am not horribly concerned, though. Everything is sufficiently wet out, and there seem to by no bubbles yet. I think it helped to crank the shop temp up to 80F, and let is drop a bit about half way through. Yesterday I was working at 75. My staple holes weren't really filled by the seal coat - at least not after sanding. I noticed they seem to absorb resin out of the glass. It seems that no amount of resin would change it. The glass is definitely wetted by the resin, but not as much as elsewhere. I tried to capture the issue in a picture below.

Click image for larger version  Name:	 Views:	1 Size:	225.2 KB ID:	82502

Click image for larger version  Name:	 Views:	1 Size:	230.0 KB ID:	82503

Click image for larger version  Name:	 Views:	1 Size:	234.0 KB ID:	82504

Stable holes, any advice?:

Click image for larger version  Name:	 Views:	1 Size:	206.6 KB ID:	82505

We will be doing the second layer in an hour or so.


Jim,

I cut my strips on my table saw. My options were somewhat limited, as far as reasonably price clear-ish cedar. I ended up getting a bunch of 18' 1x2 planks and ripping them down to quarter inch strips. I did bead and cove. It was the first time I really used a router, other then messing around, so they weren't perfect. Everything has worked out better then expected for the most part, though. The herring bone football strips was really visually appealing to me, but it really stretched my abilities. It was difficult to get the angles just right, especially with the bead and cove, and I was rushing to close the hull because I was excited. not the greatest combination. I ended up having to do a bit of back filling with epoxy where gaps formed. Similar situation on the two-piece stem.

As for your suggestion about filling the holes. How I wish I had done so! It didn't seem typical to do so, so I left them. I think that may have been a mistake.
 
Last edited:
Yes, filling staple holes IS important. Otherwise they wick the epoxy way from the cloth, as your pic notes.
If you fill your staple holes and any gaps, there really is NO need for a seal coat !

Another tip, too late now, is wait about 4-6 hrs after the wet out, and start applying Fill coats.. After the first Fill coat, wait an hour, and apply another Fill coat. Keep this up, until the Weave is totally filled. You will have the best luck following this method ! Usually 3 Fill coats does it. I always end up getting up late at night, to apply that last fill coat !

Bead and cove works best stripping past center on one side, cut the center line, and then fill in from the other side. There is a minimal amount of strip fitting, and it works great with bead and cove.

I've been to Alaska once, and absolutely loved it ! Had I been there, I would have gladly helped you glass your hull !
I've glassed a lot of canoes myself. But an extra set of hands is by far the best !!!

The knowledge you've gained on this build, will serve you well on your next !!

Again, Good Luck !

Jim
 
Last edited:
Man, I really got ahead of myself this weekend, and made some very avoidable mistakes. I think I was a bit blinded by the time crunch and unknown, and misinterpreted the process a bit. I ended up doing the second layer of glass last night, and didn't allow much time before I had to hit the hay. The first layer seemed to be in good shape, and it seemed best to keep going. Unfortunately, I bunched up the half layer pretty bad when I rolled it onto the hull. It stuck to the first layer bad. I will not roll out the glass on the sticky hull in the future. After many attempts at getting it to lay flat, I decided to just go with what I had, rather then further beat up the glass. I probably shouldn't have done that. I made some of those wrinkles permanent. After many attempts at getting everything flat, I decided to just let it be, and hope things pan out okay. As a result, I have a couple types of wrinkles to contend with. There are some small creases near the center of the football, and an overall waviness to much of the football, which may have been the result of adding fresh resin too late in the game.

I will post some pictures later. It's difficult to capture the issues with my camera and the lighting. I am wondering if sanding into the cloth of the second layer would be a mistake? Also, I didn't get my fill coats on. Is it safe to sand the whole surface after a couple days, and do fill coats?

From here on out, I am going to slow down and ask questions before moving forward...

Jim, Alaska is indeed an amazing place! It would have been incredible to glass with your help. I could have have avoided these mistakes!
 
Last edited:
Mr Rock,
I just got back from a few days camping on Long Pond (ADK's) and saw all these posts.
Awww...but you should be able to sand some glass and add more fill coats to hide most of your oopses.
Leaving your hull bright will distract from any laminate flaws, perceived or real. If you were painting the outside, you wouldn't have the camouflaging effect of you grain and wood color.
Read and heed Jim's advice, he's built more hulls than most of us, I think.
A test panel would have given you an indication of how the entire process would have been. But even so, now you're experienced. And yeah, it's not a good plan to lay cloth on wet or even tacky resin.
 
Just a suggestion .... if you have ripples and creases, don't try and sand them out. If you don't have a good carbide scraper, invest in one (they aren't expensive) .... I have several and use the one with a 2" flat blade the most. Use the scraper to do all the initial leveling and flattening of the affected areas, I suspect with a little patience, none of what you see now will show up at the finish.

Once flat, you will have likely cut through the cloth at the creases .... so I would put a thin coat of epoxy on just those areas to seal everything back up. This is an extra step that I have been told several times (lol, thanks Jim) isn't strictly required, but I feel better doing it and it isn't very much effort and produces a better final finish IMO.

Brian

X2 ! Scrape, don't sand !!

Jim
 
BlackRock - thank you for posting all your progress and questions! This is getting me interested in maybe straying from my composite world to a wooden one. I am really amazed at your and every strip builders craftsmanship with these canoes.

The football is always a bear to get on - as soon as you lay it down it just sticks and cant be readjusted unless you peel it off and try again. Forgive my naivete, but couldnt you use a chisel to cut out the wrinkles after it hardens? That has been my go-to for these situations followed by a little fairing but not sure if that is the best method.
 
The carbide scraper as mentioned is certainly the way to go. For the irregularities the OP has experienced I'd use a 2-2.5" tool with a forward knob. These afford excellent control and you'll find it rather easy to fair the surface.

In my building experience I've found the carbide scrapers so useful I have all three of the Bahco sizes in my tool box.

https://www.amazon.com/Bahco-Premium-Ergonomic-Carbide-Scraper/dp/B000288LP6?th=1
 
Thanks Holmes, your post just pointed at where Lee Valley likely sources their scrapers ... we are on the same page

http://www.leevalley.com/en/wood/page.aspx?p=20094&cat=43456,43390&ap=1

also have this one for tighter areas and square places

http://www.leevalley.com/en/wood/page.aspx?p=20095&cat=43456,43390&ap=1

When you use the scrapers on epoxy, don't try and remove material too fast with a lot of pressure, use some ... but be patient and let the scraper do it's thing, the epoxy is tough by design, that's why you put it on, medium pressure and patience gives it a chance to do a better job IMO.


Brian
 
Thank you all (again) for your great advice! Scraping has commenced! I have two scrapers - one 2-inch carbide-tipped with a forward handle and the second, I have been told, it a leather hide scraping tool. I do not believe the latter is carbide, but it has remained very sharp and has been extremely helpful along the way.

Last night I scraped the worst of the creases, and they flattened out right away with ease. No issues. I worked on the ripples along the football. Those areas, being that they are more roller-shaped (sort of looks like brains), hold a bit more resin, and will require more patience. I moved to the transitions from the half layer and stem reinforcement to the full layer, and smoothed them out a bit. All went well there. I will have more time to work on it today, and will hopefully be ready to move on tomorrow.

Moving forward (after more scraping), I plan to lightly sand the entire hull with 150 or 220 grit on the ROS, and then do two or three fill coats back-to-back. At this point, the glass has only been wet-out, not filled. I know it is not preferable to have allowed several time to pass between wet-out and filling. I have certainly learned some lessons this week! However, I am wondering if it is safe to sand the glass in its current state (without any fill coats)? Will I be able to rough out the hull without damaging the glass?

Also, when I was scraping I noticed a couple places where resin ran down the side of the hull on the first layer of glass unnoticed and I neglected to spread it around. In those areas, the run is essentially serving as a thin strip of fill coat. I am wondering it it would be better to scrape those little runs before sanding and fill coating, or just leave them alone and then sand over the entire hull at once?

Jim, I came to the same conclusion concerning bead and cove strips and the herringbone football. It was fun and interesting, but there were somewhat unavoidable (at my skill level) flaws. Epoxy filler seems to have taken care of the flaws, though, and it still looks pretty good. The last strip presented the greatest challenge. I think I tried to make a strip with a bead on both sides, which obviously didn't work. I ended up carving out the existing coves, and squeezing in a strip with flat edges.

Thanks again, everyone, for jumping in when I got in the deep waters. Your advice is incredible valuable to me!

Stripperguy, how was the trip at Long Pond?
 
Last edited:
Any sanding or scraping will thin your unfilled glass, and rob it of strength ! I realize, you probably already did. Depending on how much you removed, you can scrape and add a patch if necessary. After things are cured, and sanded, those patches should become near invisible under varnish. No need to put on more resin, and then sand again.

Manufacturers recommend waiting a week to sand. Uncured resin dust, in your lungs, or on your skin isn't good ! Avoid !

Here you can see the second layer, and two Bias strips scraped. Sanding and vanish will make them disappear !

IMG_2381_zpsi4xdt9ce.jpg
 
I would scrape down those drips before adding any more resin.
The family trip to Long Pond was great...we climbed Long Pond Mt, paddled to Pink and Little Pink, twice, and the grandkids caught some nice smallnouths.
Some photos over in the photo section.
 
After much-a scraping and sanding this week, I was able to move on today. I just wrapped things up after the third fill coat. I am very pleased with the outcome, especially considering where things were a week ago. I have a little bubble action going on, but have been able to work many of them out with a hairdryer and brush. I discovered I was introducing the bubbles with the roller, since it had dry spots when I started rolling on resin.

Still monitoring for bubbles as it cures. Here is the current state:


Oh, I added 6 oz. stem reinforcements, too.
 

Attachments

  • photo10017.png
    photo10017.png
    224.3 KB · Views: 3
Mr. Rock,
It's hard to tell for sure from the photo, but it sure looks like you fully recovered from your wrinkly dilemma.
I would assume you'll wait a few days to finish sand the outside, then pop it off the forms? Then comes everyone's favorite pastime: sanding the inside! We're talking goggles and a good filter/respirator...Oh, and some hearing protection too.
And are you in the fill the weave on the inside club? Or are you in the wet out the inside only club?
For my purposes, I only wet out the inside, leaving the weave fully exposed. Adding more resin will make your boat heavier and more slippery underfoot, while marginally increasing the strength.

But it's your boat and your build...whichever club you're in will be right for you, hopefully.
Oh, and it's looking really, really nice!!
 
Stripperguy,

I think the wrinkle dilemma is wholly in the past. In the scarping/sanding process, I had to cut into the outer layer of glass in a few places to smooth it out. Im hoping that won't be a problem strength-wise later on.

It has been beautiful here, and when it is beautiful in SE AK, one is obligated to go out and enjoy it. So, I will sand when the sun goes away - which is a short-term guarantee around here. I am surely excited to get it off the forms, though. I am tempted to pull it off before sanding, just to see it in the sunshine. I know better, though. I am well acquainted with the respirator/glasses/plugs combo. Love it... I have some clear ski goggles for low light days, which I may end up using for sanding. I don't really want to pack them with sawdust though. I may regret that come ski season.

I do not plan to fill the weave on the inside, but have yet to completely abandon the possibility of one fill coat, mainly for looks. I have to order come more glass for the second layer on the inside. I am pondering getting 6 oz, and using is for the full layer, and the 4 oz. I have as the second layer. I wish I used 6 oz on the outside.

Thanks!
 
Great progress!

It seems like you have persevered through the difficult times so far, and learned a lot in the process. Sometimes learning the hard way is the best way...

6 oz full and partial 4 oz on the inside and outside is my preference.

The most important place to beef things up is on the inside.

If you can hook up your sander to a shop vac for the inside sanding it makes a world of difference. Not only does it help with the amount of airborne dust, but also helps the sander do its job a little more efficiently.

Your build is looking great!
 
Mr Rock,
As Sven mentions above, the place to beef up the hull is on the inside. As loads are imparted on the hull from the outside, the hull will deflect, with the outside in compression and the insdie in tension. As you may know, fiberglass has its highest strength in tension...
 
Yes, to Sven's advise, hooking up a shop vac ! I've always taken my canoe outside to sand, especially in a relative small shop. Lately I've been using a shop vac attached for sanding, and yes it's a Big improvement. A Variable speed sand is also a big help ! Most sanders are Too fast !

Jim
 
Will chime in , since you are starting on the inside .... I like to start with a set of scrapers and get the inside of the chine leveled before I start any sanding.

You can also setup a holding jig to get the boat up on its side, this makes the whole operation a lot easier IMO .... this is what I use, but figure something that will work for you ... the idea is to get it up on it's side

3ZoPZs8jAubWylcoprV5fBoDhGXF8EhPDBp-FjXDaCh1x4LkS85rfL4uYaB48AN8W7BcII5-jePVb6M58CyQKGQiGRkvjI6pYiNsjhCTIHTb8DquOY4UN8Q9h7ZIIJriuRQlasOHwn6ezFYRCVnEI5NQxHSOcOFFcU-EKHwxeUVOJfwr8F8PN7L0nt-BruwOH6bgZ0mtHALl8-W5cxwjUeRN9WhxQvHfbTqDifS5n6Ug3Bdp5cJoEj9cHHu8iaZ-RxxgLSew2JxPy7qIhZ1-IwkX7SYizGHU0qtIhK98h4Sxy3CtTqIHlq0MHqFg6LJrtID0sf2EeOiaVjq5pyAWFyNIL2obVe0if-SRpG_lAj8Fs7dx8YHMq5fisOTdbw_2c-k9Y-_IuDTCrpHpU2BavApGnR2UMGT_YN0QYydUdUjDs191BlDHTjVG86JBfu5kYs_YpCpNFNt9RtykM5NM4P5pvnRr-kLtfLkE5MPpxrB0M1Rp4W8QjGnk-bmzZi7IweUi0OqYXgBDuJGanIOWjKimcwOcHiXZlaPjyx8bb57SnWbVuvbABWqCppQc-Pnrxwm7KOUexmZCham_Z4uEAIl1T66-SI0F1MWYLQY1CUUg5gZzoOdgmcp7eU3gtQ6PEe1wLdiWBhGbE6VI0nK8P_vkYBJG18YK=w1434-h1075-no


Just flip it around when you get half done.


Brian
 
I quit using scrapers or anything of the sort on the inside (and outside too for that matter) unless there's a small specific area that needs it, which is unusual. I start with 50 grit on my random orbital and then move to 60 grit. That should get things pretty good and now I go over it feeling by hand to see where the trouble areas still are, usually in the chine. I'll put a foam interface pad on the sander and concentrate on these areas. Anything I just can't get with the orbital I'll take care of by hand with sandpaper wrapped around a bottle or something to match the curve of the hull. I stop at 80 grit. Sometimes I'll go to 100 but I just can't see a difference after 80 grit and figure the rougher the surface the better the adhesion.

Sometimes I'll use a chisel or scraper in the stems but most of the time I use a somewhat firm handheld hook and loop sanding pad that uses the same discs as my orbital. I probably spend 2 hours sanding the inside.

Connecting your sander to a vacuum makes all the difference in the world. Cedar dust makes me cough and gives me a runny nose with just a little hand sanding. I wear a respirator when doing that. With the orbital connected to a vacuum I can sand for hours without any sort of mask and no issues. Dust doesn't build up in the bottom of the canoe or float all over the shop. When I'm done working in the shop I don't even have to blow myself off with compressed air. In the last week I've sanded a few small projects where there is no dust collection setup and can't believe how messy it is.

Alan
 
Back
Top