• Happy Weed Appreciation Day! 🌱🌿🌻

X canoe build

Joined
Jun 12, 2014
Messages
3,906
Reaction score
1,258
Location
NW Iowa
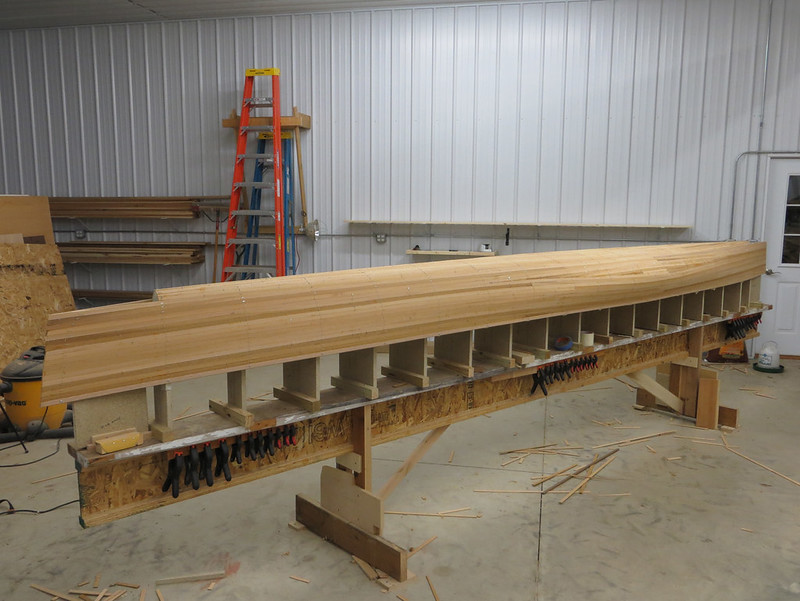
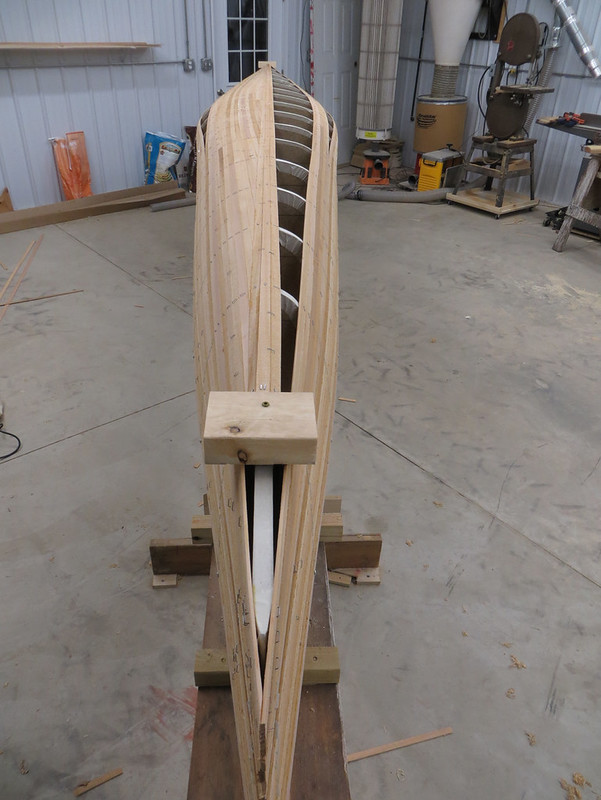
I don't know what to call it yet. I might call it a POS once it hits the water. Trying my hand at designing my own canoe. It's meant to be a workout/racing boat and not much else but more user friendly than something like C1 marathon. Oh yeah, and the dog will be able to fit in the bow as well.

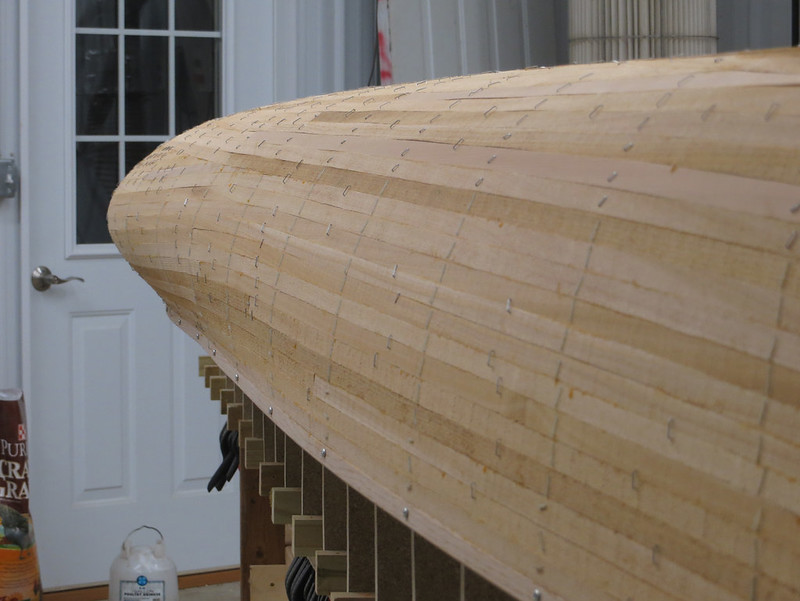
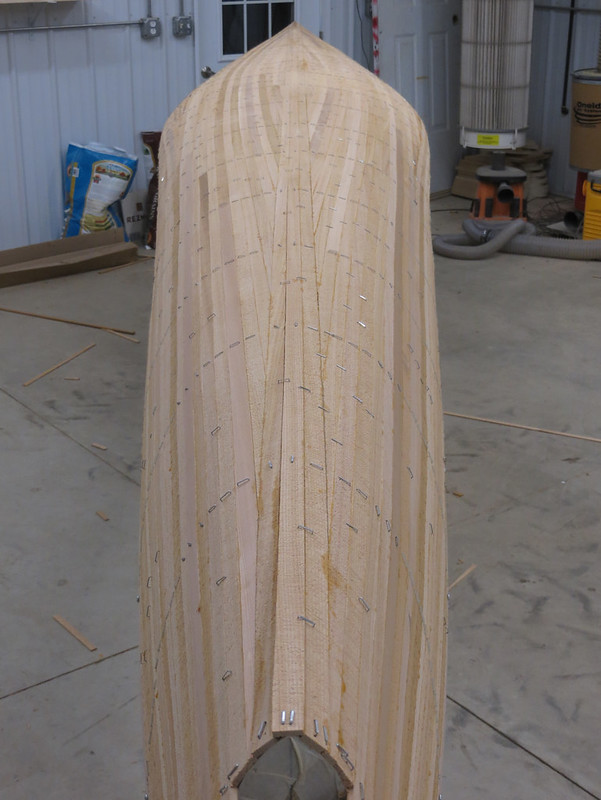
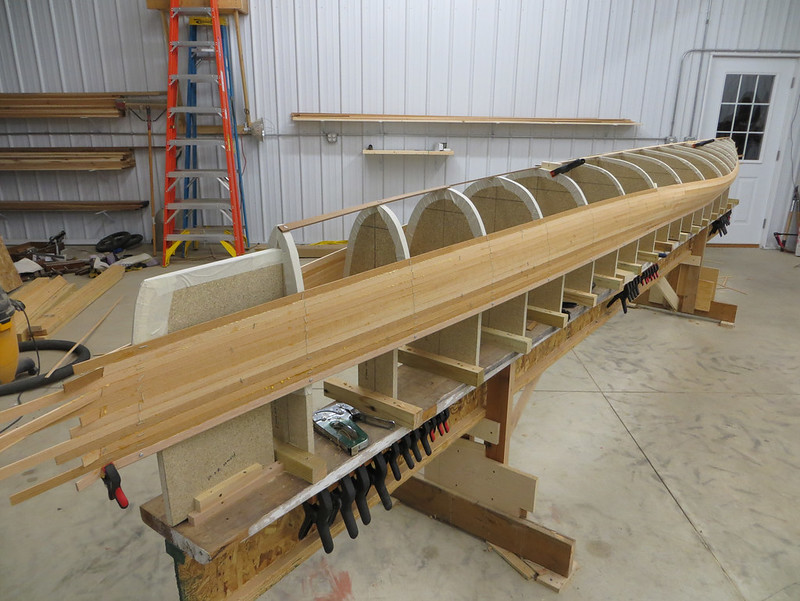
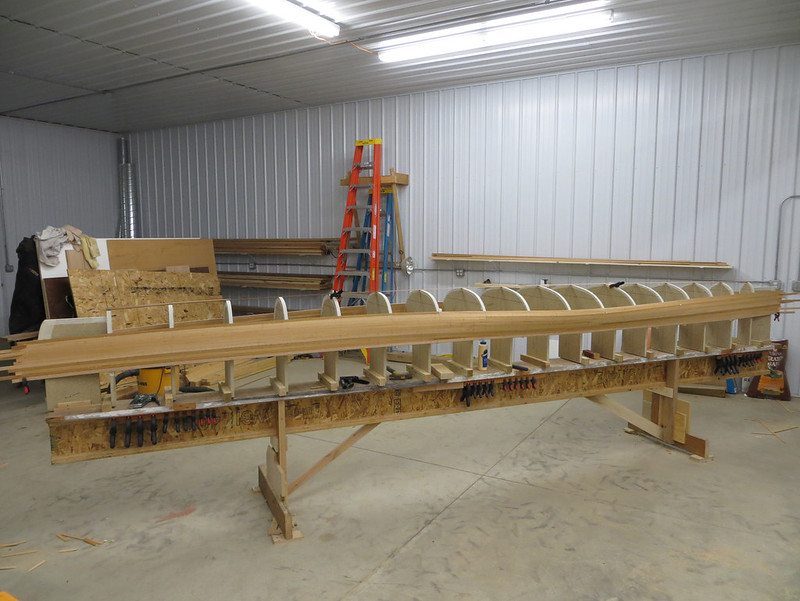
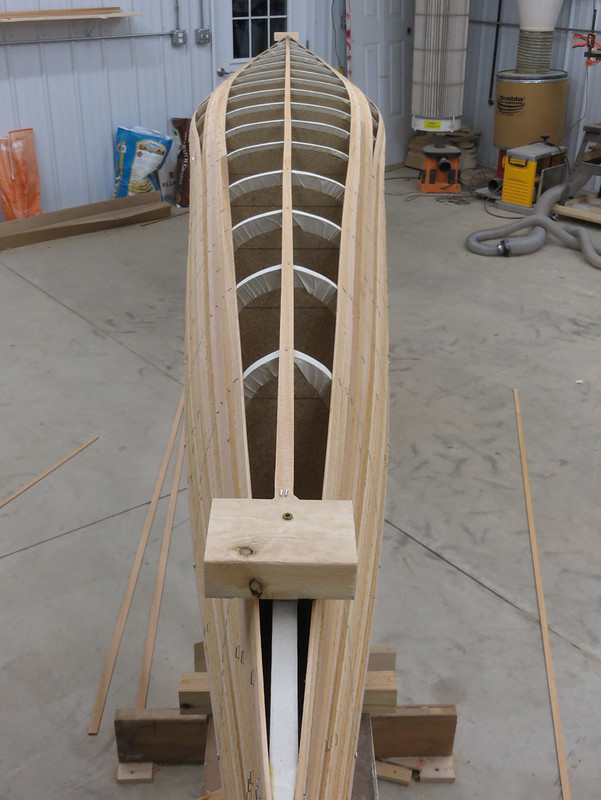
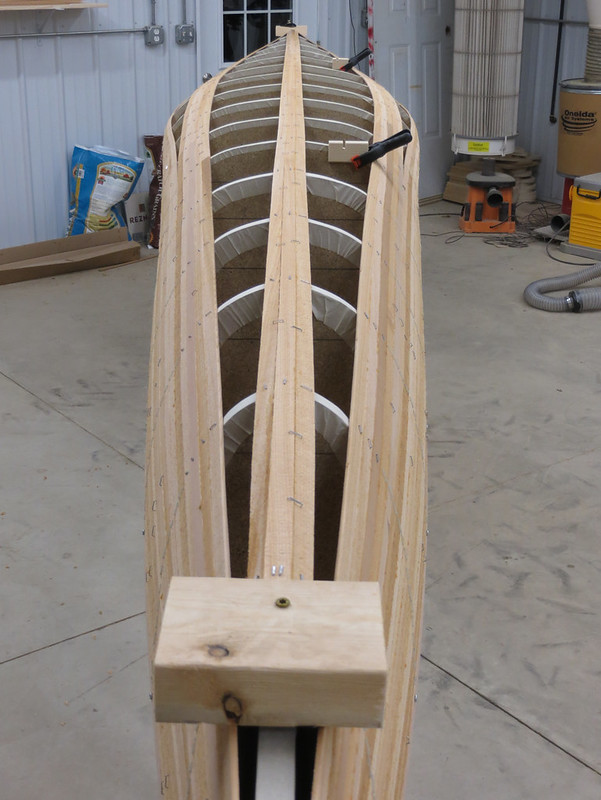
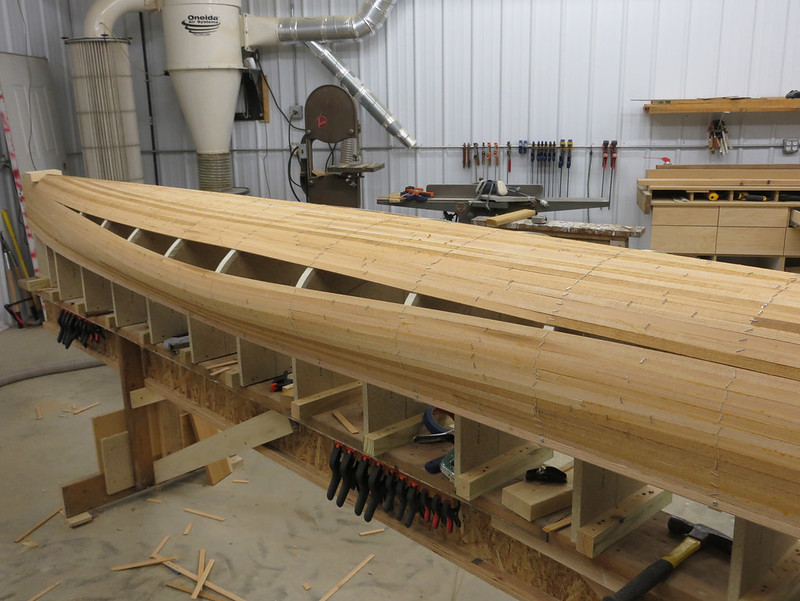
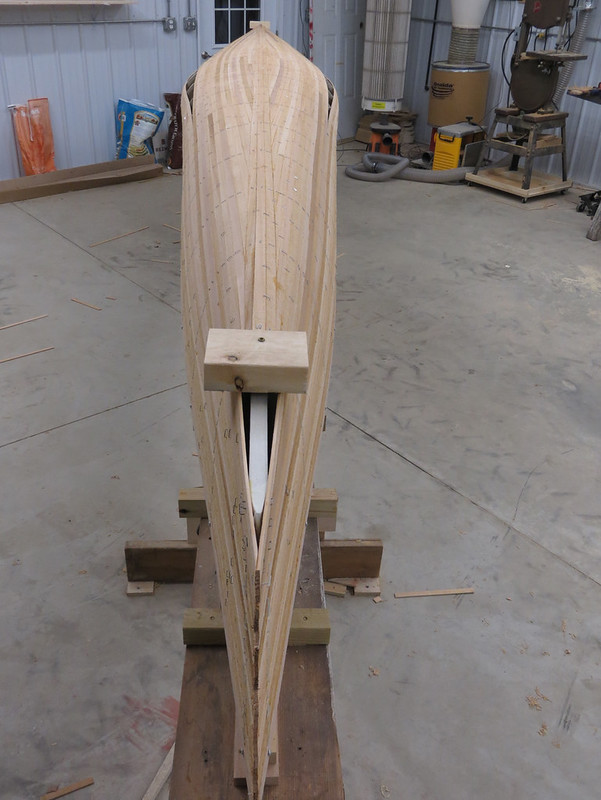
Solo. 18.5' long. About 23.5" at the water line with 200 pounds total weight (including the boat), about 27" at the widest and 21.5" at the gunwales if I remember correctly. Around 1.5" rocker in the bow and .75" in the stern depending on where you measure. I'm expecting low primary stability but pretty firm secondary. We'll see what happens.

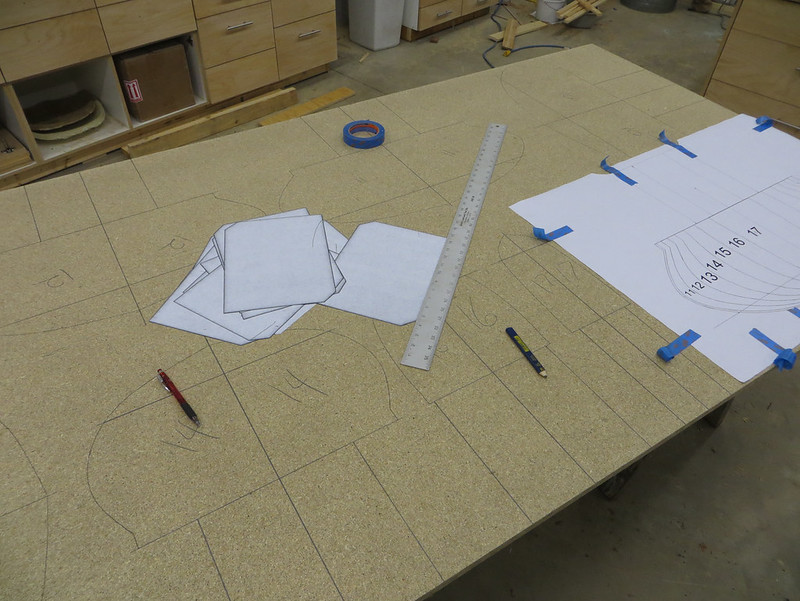
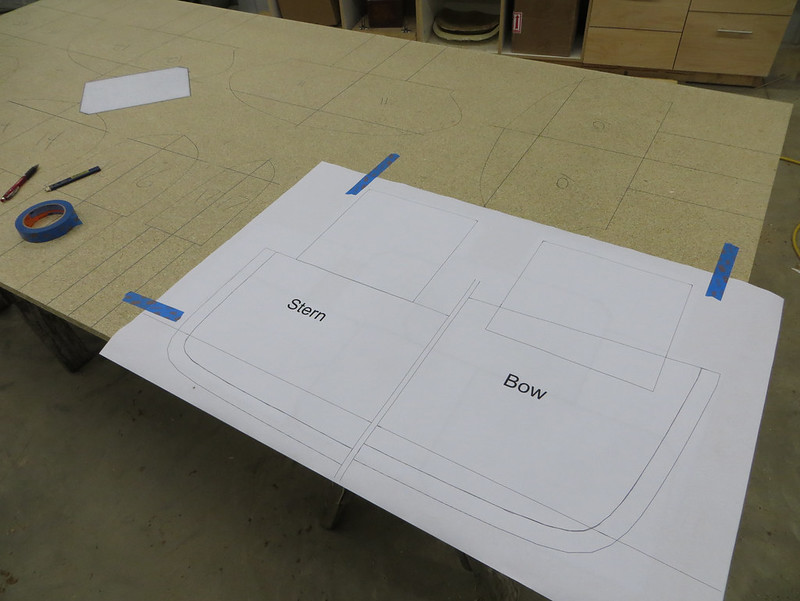
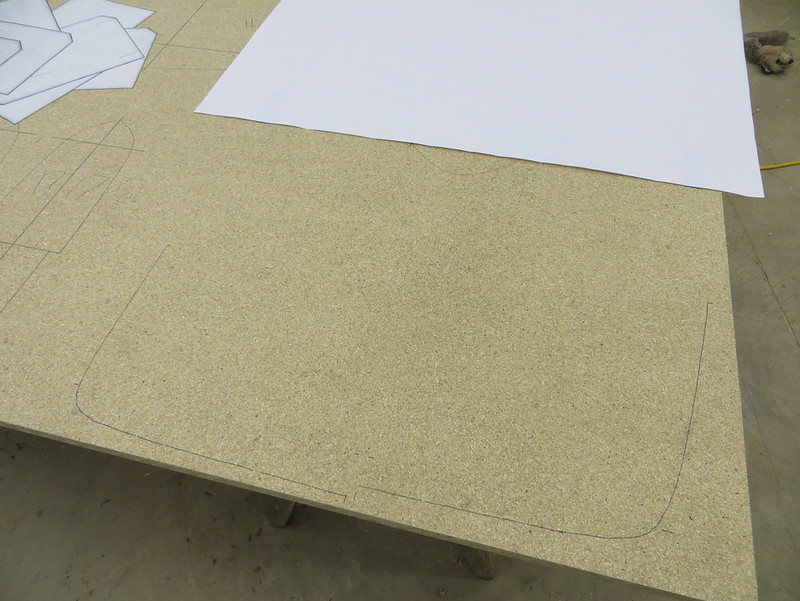
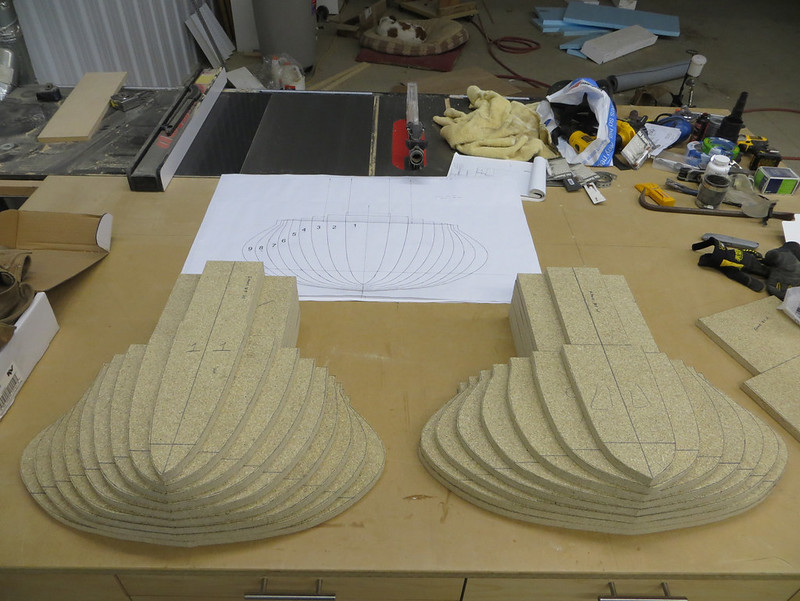
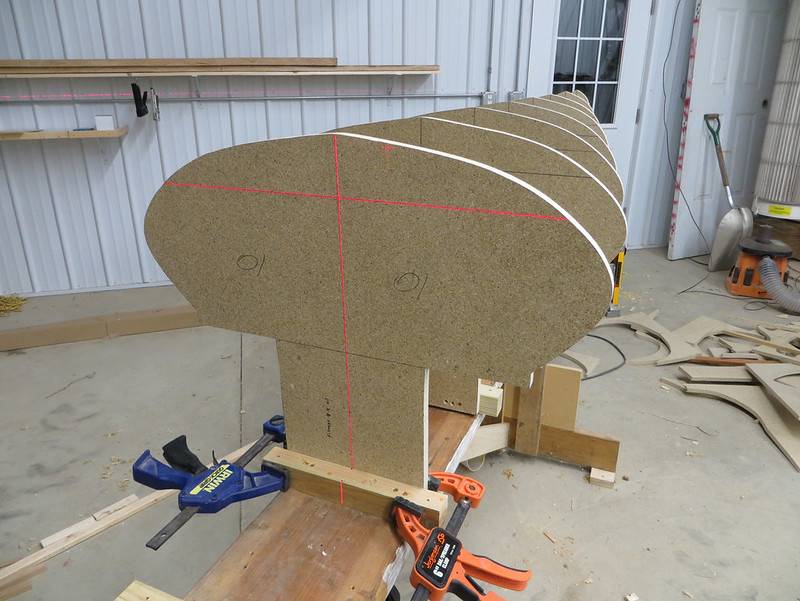
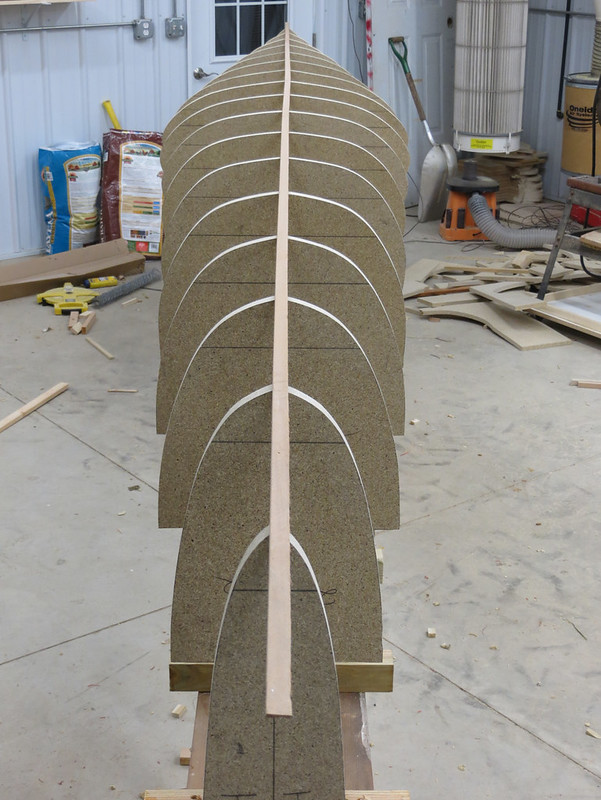
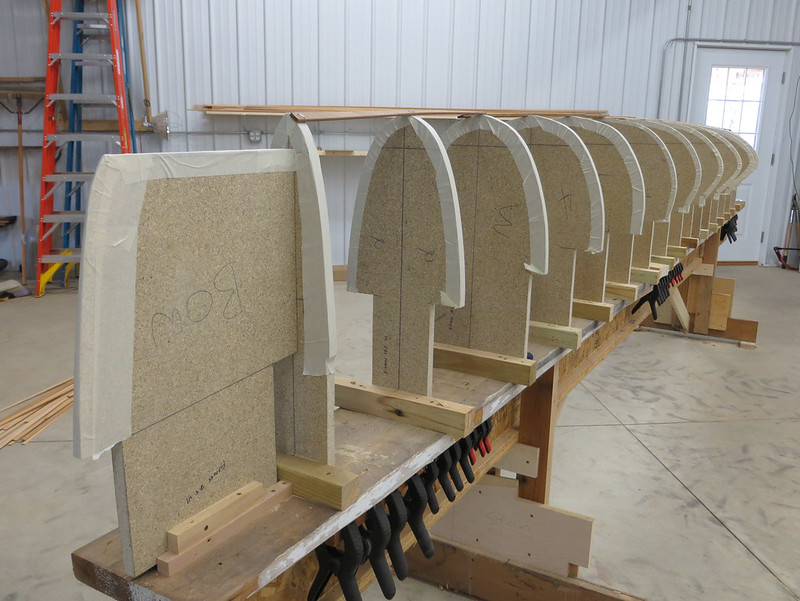
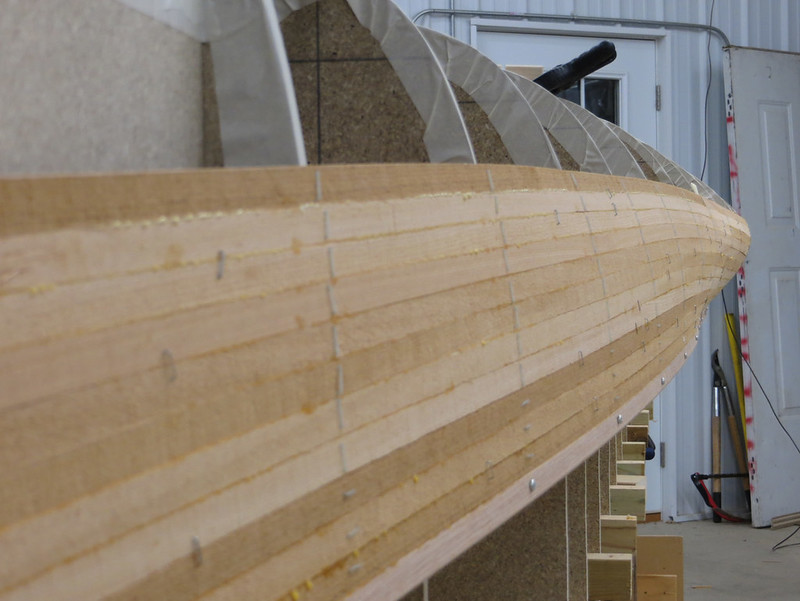
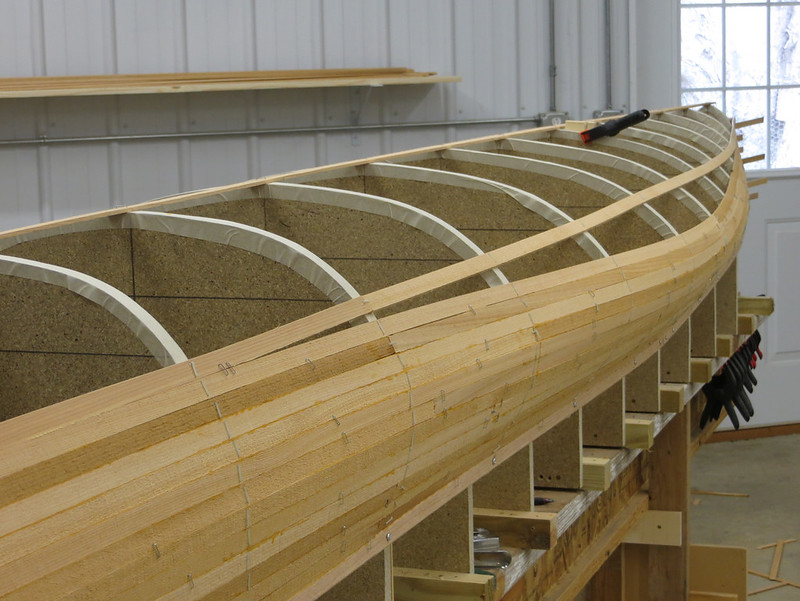
Got prints of the forms made last night and managed to get the stern sections transferred to particle board. Finished transferring the rest tonight and got the forms cut out on the bandsaw. Tomorrow I'll sand and hopefully get them on mounted to the strong back.

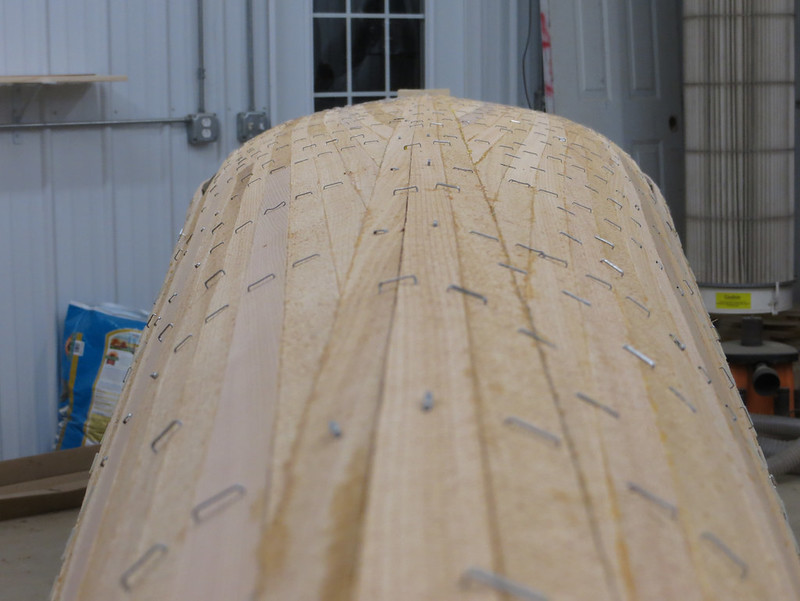
For the first time I used carbon paper for the transfer and I liked it. I thought it went pretty quick and the lines were nice and dark. I only traced the curvy lines. All the straight ones were just marked on each end and then joined with a straight edge after the paper came off. 8 1/2x11" was the biggest carbon paper I could find locally so I just used multiple sheets and it worked fine. Took a few sections to get a system down but after that all was good.


20141104_001 by Alan Gage, on Flickr


20141104_002 by Alan Gage, on Flickr


20141104_003 by Alan Gage, on Flickr


20141104_004 by Alan Gage, on Flickr


20141104_005 by Alan Gage, on Flickr


20141104_006 by Alan Gage, on Flickr

Alan
 
Cool. Eager to see this build evolve.

I used carbon paper on my last build, too. Worked like a charm.

What are you going to strip it with? The boat almost sounds like a long skinny Magic :)
 
Sanded forms tonight. Last time I used my oscillating orbital sander and while it worked well (especially nice since it's connected to the dust collection) it didn't leave the smoothest edge and had a tendency to dig in and leave divots if you weren't careful. On my wish list is a nice edge sander but since that's not going to happen for a while I thought I'd try improvising:


20141105_001 by Alan Gage, on Flickr

Didn't work too bad. It would have been entertaining had it shaken loose from the clamps but it stayed tight. I think I liked it better this way than clamping the forms and holding the belt sander by hand.

Once they were sanded I started setting them up using the laser again:


20141105_002 by Alan Gage, on Flickr

From the bow:


20141105_004 by Alan Gage, on Flickr

And the stern:


20141105_005 by Alan Gage, on Flickr

I won't lie, I'm pretty excited to see it finally taking shape in real life rather than on a computer. Lines look good so far and it seems fair. A couple sections towards the stern that need just a little shaved off the top to get a smooth keel line. I'll check it over better tomorrow and mount the stem forms. Hopefully get strips cut too.

Alan
 
dang....you already caught up to me!! Looking good, are your strips made? Are you going 1/8" or thicker?
 
dang....you already caught up to me!! Looking good, are your strips made? Are you going 1/8" or thicker?

Not having a life has its benefits. I'll cut the strips tonight. I went 5/32" on my last build and will probably go for that again.

Alan
 
Looks fantastic so far Alan. It's so nice when you can take something from the screen to real life, and it actually works. Nice

Are you sure you're not a filthy rich philanthropist type with money to burn and more time on you're hands than you know what to do with?

I'm looking forward to following along. It won't be long before you have your own fleet. Maybe that was your plan all along???
 
5/32" is awefully close to 0.14" that I'm using on my build. I feel a little better now.
 
5/32" is awefully close to 0.14" that I'm using on my build. I feel a little better now.

That was my second build. I used 1/4" on my first. I was a little nervous too. When I popped it off the forms it felt like a half cooked spaghetti noodle. Glassing the inside made all the difference.

Alan
 
Got the strips ripped tonight. Six 1x4s gave me somewhere north of one hundred full 5/32" strips and a lot of shorter ones (some small pin holes in the boards). They're 12' each so that should give me enough. This was my first time using the bandsaw to rip strips and it took a while to get a rhythm going. The first couple strips were wasted but eventually I got the hang of it. I used a small wood block to keep the board pushed against the fence and I found it actually worked best to put the pressure a ways behind the blade rather than just in front of it as with a table saw. This seemed to help keep the board running straight with less wobbles. There seemed to be more thickness variation than I got when using the table saw but not bad. I don't think it will cause any problems.

Tomorrow I'll cut the bead and cove and hope to start stripping Saturday.

Alan
 
Well the beads and coves are cut. What a great job to be done with.

As I was setting up the out feed table I inadvertently made myself a time saving device:


20141107_004 by Alan Gage, on Flickr

I screwed a long piece of plywood to the bottom of the router table and set it on the sawhorse. Knowing the strips might have a tendency to wander I clamped boards to either edge to keep things going the right direction. After running a few strips through I realized that I didn't need to set each strip aside when I was done with it, I could just leave it laying in the trough. I could let a dozen or so strips build up and then move the whole bundle off to the side at once. Much nicer than doing it one at a time.

Took about 3 1/2 hours to do the whole load. Probably 130 pieces if you count all the short ones. This wood isn't as good of quality as what I used for my last build and some of the pieces suffered some pretty bad tear out and might not be usable. Most turned out fine though.

Other big news for the night was that the cats got introduced to the shop in an effort to relieve some of their boredom. It was a hit! Lots of new places to explore.


20141107_003 by Alan Gage, on Flickr

Tomorrow the stripping begins!

Alan
 
I'm thinking you should just simply call this build the AGX. I can just see it now hanging in all the canoe outfitter locations around the world.

Great to hear your progress so far, and to be honest with you, I half expected that we would have seen a post in the middle of the night stating that you had stayed up and finished all of the stripping on the hull (wink)

Seriously though, you have made some great progress, and am looking forward to your next progress report.

Momentum
 
Great to hear your progress so far, and to be honest with you, I half expected that we would have seen a post in the middle of the night stating that you had stayed up and finished all of the stripping on the hull (wink)

Don't think I didn't think about it! :) I'm trying to be a good boy and pacing myself to keep from burning out but I'm not always very good at that. Especially this time of year when I don't have anything else to do.

Finished cleaning up shop after making a mess milling the strips and started stripping today. I've been mulling over what to do with gunwales and I decided not to use any in the traditional sense. Instead my starter strip at the shear is oak that tapers from just over 1/4" at the top to 3/16" at the bottom where it meets the cedar strips. Cut a bead on each edge. One to give a rounded edge to save my knuckles and the other to join with the cove on the cedar. I was surprised to find that even those skinny oak strips weighed 1.75 pounds! The same length of cedar strips weighs over a pound less.


20141108_006 by Alan Gage, on Flickr

Of course there wasn't a staple that would touch that oak. Tried my pneumatic brad nailer and crown stapler and while they would drive the fastener in a test piece I was unable to remove it. So that left screwing. I predrilled holes as I was worried the oak would split if I didn't so I'll have some ugly holes to fill but it's just a test hull anyway. Screw the aesthetics, just get it done.

The turn at the bilge is pretty severe, more so than the other hulls I've build. In hindsight I should have cut some narrower strips for this section. After milling mine came out at 11/16". I think 5/8" or narrower would have been better in that area.

I'm trying composite staples for the first time. I'm not sold on them yet. The stapler is unable to drive them flush and while they seem to stick fine in the forms they don't hold well in the cedar, allowing it some freedom of movement. The head also tends to break off when driving them. It requires a special stapler at about $50 to drive them and I wasn't willing to buy two so I'm still using standard 1/4" staples between sections to keep the strips tight and in line with each other. If I was using 1/4" strips it probably would drive them flush but at 5/32" they're staying proud by a fair amount.

Anyway, enough talking. Here's the pics:

Bow and stern forms attached:


20141108_003 by Alan Gage, on Flickr

Partially stripped:


20141108_007 by Alan Gage, on Flickr


20141108_008 by Alan Gage, on Flickr


20141108_009 by Alan Gage, on Flickr

Alan
 
More stripping today. There was getting to be a pretty hard curve in the center of the boat and the cedar was starting to complain. Don't know if this was the right thing to do or not but it's what I did. I'll come back later and fill it in.


20141109_001 by Alan Gage, on Flickr

Also ran my strips along the keel differently than I usually do. I wanted to try and avoid the twisting that usually occurs there. There's also a pretty pronounced V at the first two forms, not quite so much at the rest. I ran one strip centered down the keel line. Of course it can't bend to that V shape so it just hangs over on the edges. Then I ran another strip on either side and butted them in to the center strip at an angle. I think (hope) when it comes time to sand the hull it will shape fine.


20141109_005 by Alan Gage, on Flickr


20141109_006 by Alan Gage, on Flickr


20141109_007 by Alan Gage, on Flickr

I'm also trying composite staples for the first time. The advantage being that you don't need to pull them out. When you're done just sand them down with the rest of the hull and you have filled (though not color matched) holes. But as you can see from the above pictures I've gone back to regular staples. I wasn't very happy with the composite staples for a few reasons:

They have a thicker profile than steel staples. This means they have a tendency to split the strips if close to an edge, which they usually are because of the wider crown. It also gives some hellacious blowout on the backside of the strips. The shrapnel then wedges between the strip and form, lifting it slightly. Steel staples seems to just squeeze they're way through the strip. These blow their way through. I'm a little scared to see what it's going to look like on the inside when I flip it.

Very rarely are they driven flush. This wouldn't be so bad if they held tight in the cedar but they don't (because of the big hole they blow). This lets the strips move a little. Maybe if I was using 1/4" strips they'd drive flush and maybe I should have bought something shorter than 9/16", which I didn't even think about. Just bought that length out of habit. They do hold tight in the particle board forms though.

They have a tendency to break when driven. Sometimes one leg and sometimes both. And because of the issue above with extra thickness it starts to get messy driving extra staples in the same area.

Now all that being said they must work in some applications. I believe that's all Nortwest Canoe in St. Paul uses anymore, and they build a lot of canoes. But they also use 1/4" strips (which might help with splitting) and I believe they're also using a pneumatic gun as well. But for the time being I'll stick with regular staples.


20141109_008 by Alan Gage, on Flickr

And here's where it ended up for the weekend:


20141109_009 by Alan Gage, on Flickr


20141109_010 by Alan Gage, on Flickr


20141109_011 by Alan Gage, on Flickr

Alan
 
Got the bottom closed in tonight. Very exciting to finally see the hull take shape and to get a look at the waterline profile. I'm happy with how it looks so far. No unexpected humps or bumps yet.

Still need to close in the "grins" on the sides. I'll try and button them up tomorrow but it's surprising how long it takes to strip once you get down to the fiddly bits like this. I think I had 3 hours or maybe a little more in just closing up the one side this evening.


20141110_001 by Alan Gage, on Flickr


20141110_002 by Alan Gage, on Flickr


20141110_003 by Alan Gage, on Flickr

It's been cat approved!


20141110_005 by Alan Gage, on Flickr

Alan
 
Your cat is thinkin', "Humans... what curious creatures."

More like, "Why are't you petting me?"

Brrr! I was really hoping to get this done before the water froze so I could test it out but it looks like I might have to travel for that to happen. All the ponds froze over last night and the lakes can't be far behind. Forecast doesn't show it getting above 28 for the next 10 days with lows in the single digits and low teens. I suppose I can safely unload all the paddling gear from my car now.

But I do have a friend a few hours south of me, which makes a big difference in Iowa, that I need to help with some sheetrock as well as see his new baby so perhaps he can find me some open water and I'll bring the canoe along. Hoping to have it in the water, or at least ready for the water, in 2 weeks.

Alan
 
Alan,

Great stuff, man. I was wondering about those synthetic staples...I wonder no more. Based on your evaluation, I'm out!! No fake staples for me.
The hull is looking scary fast, do you plan to build more than one? Would you start your strips somewhere else next time?

These build threads are the only thing that keeps me going just now. Between my work (which is exciting, but absorbs much time) and my rental property rehabs, I have time to view these threads and that's it!! So, please keep moving along, if only for the sake of my remaining sanity!
 
Very interesting looking! Makes me want to get heat in my garage. I'm hoping to get more active on my build soon, I have been very busy lately. Mine will be the exact opposite of yours. Your's will be light - mine heavy. You - modern - mine traditional. Should be a good juxtaposition, except i probably won't even have my first strip on before you are finished. You - fast - Me - slow.
 
Alan,

The hull is looking scary fast, do you plan to build more than one? Would you start your strips somewhere else next time?

I imagine there will be at least one more, unless this hull turns out to be all I need/want, which I'm not expecting. I think I would strip it differently but exactly how I'm not sure yet. If nothing else I probably should have ran that "straight" strip a couple strips earlier. Of the two others I've stripped (Kite and Barracuda) this was certainly the most difficult, though not overwhelming by any means. It was a good learning experience. Probably not a good starter boat.

These build threads are the only thing that keeps me going just now. Between my work (which is exciting, but absorbs much time) and my rental property rehabs, I have time to view these threads and that's it!! So, please keep moving along, if only for the sake of my remaining sanity!

Well here I was all set to take the evening off and curl up in front of the fire with a nice book. I had no idea what I was doing was so important! So instead I trudged out to the shop and finished the stripping. Just kidding, you know I wouldn't take a night off. ;)

Makes me want to get heat in my garage. I'm hoping to get more active on my build soon, I have been very busy lately. Mine will be the exact opposite of yours. Your's will be light - mine heavy. You - modern - mine traditional. Should be a good juxtaposition

Yes, very different boats. The traditional hulls certainly do have an aesthetic appeal, I'll be watching with interest. My next two, though still not truly traditional, will be more so than what I've built so far. A solo and a tandem. Both beefier and heavier. One will be donated to the nature center for their yearly fundraiser so it needs to accommodate inexperienced paddlers and the other will be for river tripping; both upstream and downstream travel.

The big heated shop is easy to get used to. I can't imagine going back and building in a dark corner of my dad's shop where I built my first stripper or in the very leaky and very cold shed on my property where I built the cabinets for my house one winter. Thankfully it was a mild winter. I had a wood stove for heat but I could only get the shop 20 degrees above ambient temp. So if it was 20 outside it was 40 inside, which was the limit of my finger dexterity.

Now back to the boat at hand and a fully stripped hull! Just need to add the bow and stern shoes and it will be time to start sanding.


20141111_003 by Alan Gage, on Flickr

All I had to do tonight was fill in the holes on the side, which though small in area took a lot of fiddling. On the first side I filled it in from bottom to top, just like the rest of the boat. But that meant the strips had to follow that fairly tight curve and fitting seemed to be more work than it should have been. So on the other side I stripped from the top down, which meant I was working against a fairly straight strip and only had to deal with the curved one for the last strip, which was really not big deal. It seemed easier on the second side and did indeed go a little faster. Very exciting to see it all closed in!


20141111_002 by Alan Gage, on Flickr

The next two photos are interesting. The first shot is from the bow and the second from the stern. They really illustrate how asymmetrical the hull is. I didn't change the focal length between shots but it was a fairly wide angle so that does exaggerate things a little.


20141111_006 by Alan Gage, on Flickr


20141111_005 by Alan Gage, on Flickr

Alan
 
I'm curious... is the bump in the boat the seating station primarily or does it help with stability as well? Without it, I imagine it would be like trying to sit on a log in the water, difficult to keep it from spinning over.
 
Back
Top