For this build, glassing is the area I have spent quite a bit of time researching, pondering and generally trying to get a good handle on the whole process. The point of taking another long look at how it works, is simply the goal of reducing weight and understanding the where and why of weight in the canoe.
Probably the biggest single influence for the overhaul of my glassing procedure and process came from Laughing Loon Custom Canoe and Kayaks (Rob Macks) Shop Tips video: https://laughingloon.com/epoxy.html
If you ever read this Rob, I really appreciate the article, it quite literally changed the way I see glassing.
To be able to wrap my head around the process, I broke it down to 3 layers ...
1) the part that absorbs into the hull
2) the layer of glass and epoxy
3) the fill coats on the top.
If you make the assumption that in any given application, if the glass layer and fill coats are done well, these become more or less constant weights, based solely on the depth of the glass/epoxy and fill coat layers. It follows that the only variable weight becomes the part that absorbs into the wood ... that will be a function of excess epoxy on the wood being available for absorption into the wood substrate.
In a typical wet layup, the wood is allowed to absorb as much epoxy as it can hold, that is simply a byproduct of keeping the glass wet to prevent the glass being starved of epoxy. In a dry layup, the wood is precoated/sealed prior to glassing and offers the opportunity to control the amount of epoxy used for the process. There are limits to this as well, manufactures suggested application rates seem a little scattered for seal coats used with composite layups.
That is the thinking, now for an example of how I see this working.
I decide that I need to save weight on a canoe build and opt to move from 6 oz to 4 oz glass,with a wet layup, what can I expect?
The epoxy will still absorb into the wood unchanged, so no change in Layer 1 weight, the fill coats still get aded so no change in layer 3 weight. So that leaves the glass/epoxy layer, obviously the glass will be lighter, but it will also have less depth, typical 6 oz cloth is 8 mil thick and 4 oz is 6 mil, so less epoxy will be required. The model I created gives a estimated weight for a 47 square foot hull (this build) at 2.5 pounds for 4 oz cloth and 3.4 pounds for 6 oz, a savings of ~.9 pounds. The estimated weights for fill coat is .9 pounds and the wet layup wood layer at ~ 1.7 pounds.
This suggests that half of the composite coating weight is from the fill coat (Layer 3) and epoxy absorbing into wood (Layer 1), which explains why reducing the cloth weight never achieves the type of weight savings you might expect.
In the past I have been of the opinion that precoating is a waste of effort, it requires allowing the epoxy to set before the glass can be laid out, which means sanding would be required and the loss of the chemical bond portion of the epoxy adhesion to the hull. Unfortunately, after reading the above post, something became quite clear ..... I started with a 5:1 epoxy and stayed with that epoxy because it worked and I was comfortable using it ... 5:1 epoxy requires sanding between coats, if you miss the tack stage and you pretty much need to do that, because trying to wrestle cloth on a tacky surface isn't going to pretty. This is the experience I had in my toolkit, so a seal coat meant more sanding, cleanup and a bond reduction ... clear cut reasons not to do a precoat.
The Laughing Loon link uses a System 3 Epoxy, which has a 72 hour recoat regime, which is a very big departure from what I thought I knew and reminded me that there is always new stuff to learn. This makes a precoat quite easy, put it on in the morning, then do the glass later in the day ... stay up later for a fill coat or just do it the next day, the reduction in stress for the whole operation was remarkable compared to the strict regime my previous epoxy required.
So, in short, I am going to use a precoat on this build, to hopefully save further weight.
On to the glassing, I am using 4 oz S glass and System 3 SilverTip Epoxy with both fast and slow hardeners, all new to me.
Since I intend to add 2 rub strips at bow/stern I get them cut on the bias before I start

The mix station is setup to weigh each epoxy batch, the precoat will use the fast hardener. System 3 suggests using .5 fluid ounces per square foot of hull, this looks like too much for the hull to absorb, so I am defaulting to putting on just a solid coat like I was painting and not going back for any dry spots.

The precoat went on so easy and dried with a light sheen, fairly certain enough was applied, the good news is that the applications ended up weighing in at ~.85 pounds, meaning that about .9 pounds of weight was saved using the precoat.
The glass was draped with a few extra inches of cloth at each end. I am using the slow hardener to get a water clear finish and give me max time for working, about an hour. The wetout was quite straight forward, using a 7" 1/8" foam roller, I did middle to end one half, other half, then repeat on far side, trimmed ends back about 1/2: shorter than the ends and applied the rub strips. Went back over quarters with squeegee and called it a night.
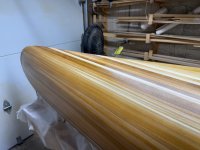
This is next morning, I am pretty happy with the initial coat


you can see the rub strips in this shot

the leftover epoxy in the tray released quite easily and looks to be glass clear, my regular epoxy has a haze to it, but this is just crystal clear.

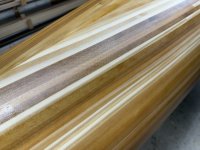
the rub strips next morning

and after feathering and a light sanding to blend

then it was on to 2 fill coats, using fast hardener and the 7" roller. I find this epoxy tends to form a bit more, the bubbles break quickly, but I adopted a do 2 feet, tip off with a foam brush, 2 more feet, tip off ....
You never know exactly how the wood will look until you get that full wetout done, the white cedar got a lot darker than I thought it would, but I really like the shading,


I figure that swapping to 4 oz S glass and using the precoat have saved me almost 1.8 pounds, compared to a 6 oz wet layup ... on paper it looks like the 4 oz S glass should be fairly close in performance compared to the 6 oz E glass, albeit, their is a price to be paid for that performance ($$$).
The glass on this 17' hull is about .75 pounds less than the glass on the last 15' hull ... so it looks promising that the goal of not increasing the boat weight from last time, is potentially on track, but it is early days yet, but I am still optimistic.
Brian
Probably the biggest single influence for the overhaul of my glassing procedure and process came from Laughing Loon Custom Canoe and Kayaks (Rob Macks) Shop Tips video: https://laughingloon.com/epoxy.html
If you ever read this Rob, I really appreciate the article, it quite literally changed the way I see glassing.
To be able to wrap my head around the process, I broke it down to 3 layers ...
1) the part that absorbs into the hull
2) the layer of glass and epoxy
3) the fill coats on the top.
If you make the assumption that in any given application, if the glass layer and fill coats are done well, these become more or less constant weights, based solely on the depth of the glass/epoxy and fill coat layers. It follows that the only variable weight becomes the part that absorbs into the wood ... that will be a function of excess epoxy on the wood being available for absorption into the wood substrate.
In a typical wet layup, the wood is allowed to absorb as much epoxy as it can hold, that is simply a byproduct of keeping the glass wet to prevent the glass being starved of epoxy. In a dry layup, the wood is precoated/sealed prior to glassing and offers the opportunity to control the amount of epoxy used for the process. There are limits to this as well, manufactures suggested application rates seem a little scattered for seal coats used with composite layups.
That is the thinking, now for an example of how I see this working.
I decide that I need to save weight on a canoe build and opt to move from 6 oz to 4 oz glass,with a wet layup, what can I expect?
The epoxy will still absorb into the wood unchanged, so no change in Layer 1 weight, the fill coats still get aded so no change in layer 3 weight. So that leaves the glass/epoxy layer, obviously the glass will be lighter, but it will also have less depth, typical 6 oz cloth is 8 mil thick and 4 oz is 6 mil, so less epoxy will be required. The model I created gives a estimated weight for a 47 square foot hull (this build) at 2.5 pounds for 4 oz cloth and 3.4 pounds for 6 oz, a savings of ~.9 pounds. The estimated weights for fill coat is .9 pounds and the wet layup wood layer at ~ 1.7 pounds.
This suggests that half of the composite coating weight is from the fill coat (Layer 3) and epoxy absorbing into wood (Layer 1), which explains why reducing the cloth weight never achieves the type of weight savings you might expect.
In the past I have been of the opinion that precoating is a waste of effort, it requires allowing the epoxy to set before the glass can be laid out, which means sanding would be required and the loss of the chemical bond portion of the epoxy adhesion to the hull. Unfortunately, after reading the above post, something became quite clear ..... I started with a 5:1 epoxy and stayed with that epoxy because it worked and I was comfortable using it ... 5:1 epoxy requires sanding between coats, if you miss the tack stage and you pretty much need to do that, because trying to wrestle cloth on a tacky surface isn't going to pretty. This is the experience I had in my toolkit, so a seal coat meant more sanding, cleanup and a bond reduction ... clear cut reasons not to do a precoat.
The Laughing Loon link uses a System 3 Epoxy, which has a 72 hour recoat regime, which is a very big departure from what I thought I knew and reminded me that there is always new stuff to learn. This makes a precoat quite easy, put it on in the morning, then do the glass later in the day ... stay up later for a fill coat or just do it the next day, the reduction in stress for the whole operation was remarkable compared to the strict regime my previous epoxy required.
So, in short, I am going to use a precoat on this build, to hopefully save further weight.
On to the glassing, I am using 4 oz S glass and System 3 SilverTip Epoxy with both fast and slow hardeners, all new to me.
Since I intend to add 2 rub strips at bow/stern I get them cut on the bias before I start
The mix station is setup to weigh each epoxy batch, the precoat will use the fast hardener. System 3 suggests using .5 fluid ounces per square foot of hull, this looks like too much for the hull to absorb, so I am defaulting to putting on just a solid coat like I was painting and not going back for any dry spots.
The precoat went on so easy and dried with a light sheen, fairly certain enough was applied, the good news is that the applications ended up weighing in at ~.85 pounds, meaning that about .9 pounds of weight was saved using the precoat.
The glass was draped with a few extra inches of cloth at each end. I am using the slow hardener to get a water clear finish and give me max time for working, about an hour. The wetout was quite straight forward, using a 7" 1/8" foam roller, I did middle to end one half, other half, then repeat on far side, trimmed ends back about 1/2: shorter than the ends and applied the rub strips. Went back over quarters with squeegee and called it a night.
This is next morning, I am pretty happy with the initial coat
you can see the rub strips in this shot
the leftover epoxy in the tray released quite easily and looks to be glass clear, my regular epoxy has a haze to it, but this is just crystal clear.
the rub strips next morning
and after feathering and a light sanding to blend
then it was on to 2 fill coats, using fast hardener and the 7" roller. I find this epoxy tends to form a bit more, the bubbles break quickly, but I adopted a do 2 feet, tip off with a foam brush, 2 more feet, tip off ....
You never know exactly how the wood will look until you get that full wetout done, the white cedar got a lot darker than I thought it would, but I really like the shading,
I figure that swapping to 4 oz S glass and using the precoat have saved me almost 1.8 pounds, compared to a 6 oz wet layup ... on paper it looks like the 4 oz S glass should be fairly close in performance compared to the 6 oz E glass, albeit, their is a price to be paid for that performance ($$$).
The glass on this 17' hull is about .75 pounds less than the glass on the last 15' hull ... so it looks promising that the goal of not increasing the boat weight from last time, is potentially on track, but it is early days yet, but I am still optimistic.
Brian
Attachments

Last edited:
")


