• Happy Weed Appreciation Day! 🌱🌿🌻

Silicone & Mineral Spirits Mix as Seam Sealer

G

Guest

Guest
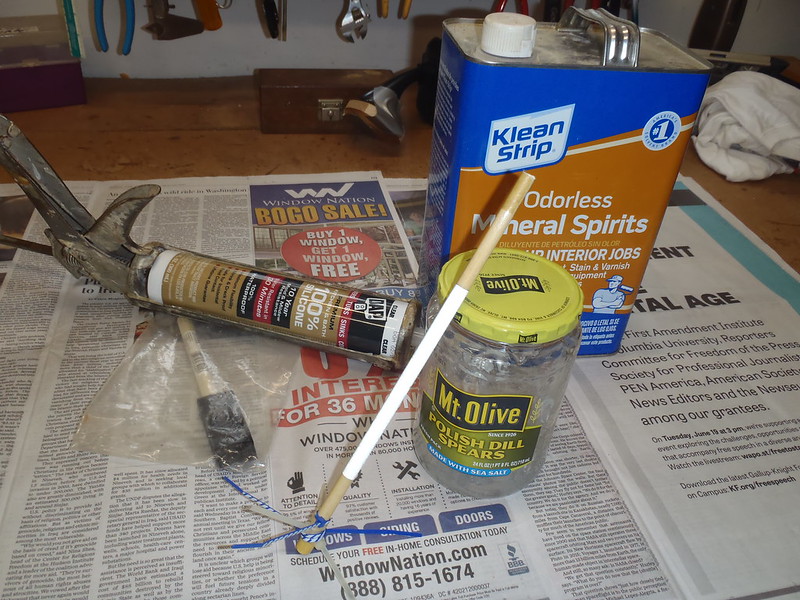
You can make your own sealant for silnylon. Get a caulking tube (or 2 or 3) of good quality 100% silicone. Cut it with mineral spirits (I have also used lacquer thinner) until it is the consistence that you want or need for penetration. Use a clean glass jar to be able to visualize complete dilution. I use a small narrow disposable foam brush to apply.

I am still a little leery of painting a solution containing mineral spirits on a tarp. No reason, just never done that before. I will start with one of the older crapped out urethane coated nylon windblock side tarps, just to see what happens.

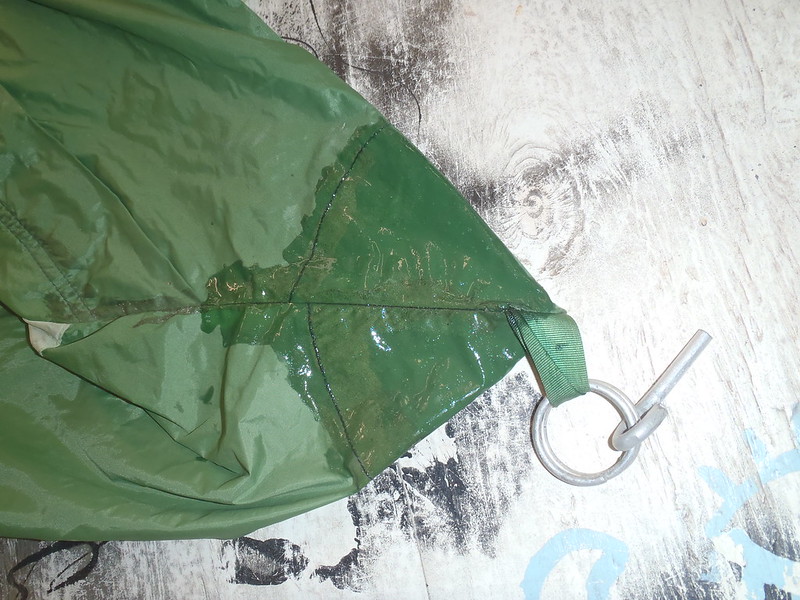
I finally got around to trying this. Not just as DIY sealant for sil-nylon gear, as an experimental starter I tried it first on the ancient urethane coated nylon Eureka Annex accessory. Not a vestibule, but an oddly cut door-end tarp for the old the 4-person Timberline. Now used mostly as a windblock.

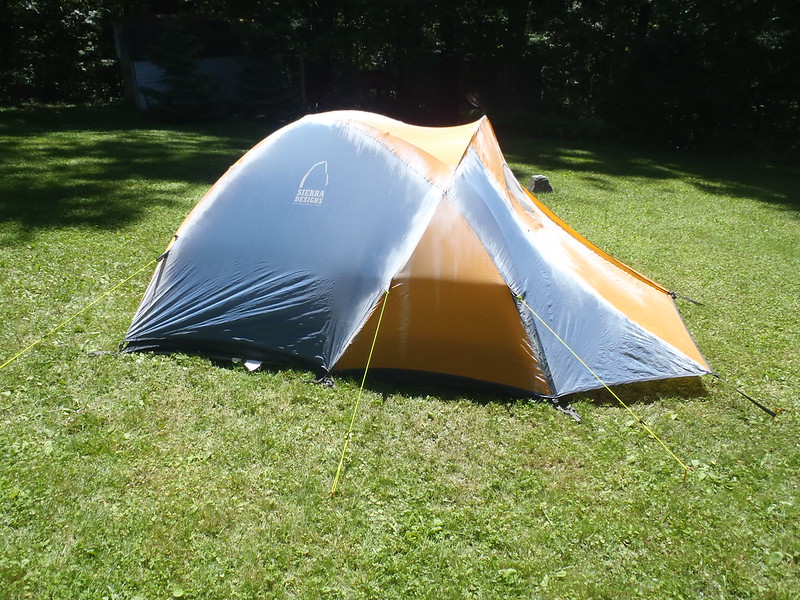
The odd size, shape and corner clips of that Annex makes a perfect wind block for one end of a ridgeline vee tarp, and it is easy to unclip and relocate to the other side when the front moves through and the wind changes direction.

The Annex was semi-useless on the Timberline, rain blew in the sides and end and it was a long duckwalk to get to the tent door. Gimme a closed vestibule any day. But it the Annex is 20+ years old and the perfect sacrificial lamb for the DIY seam seal mix experiments.

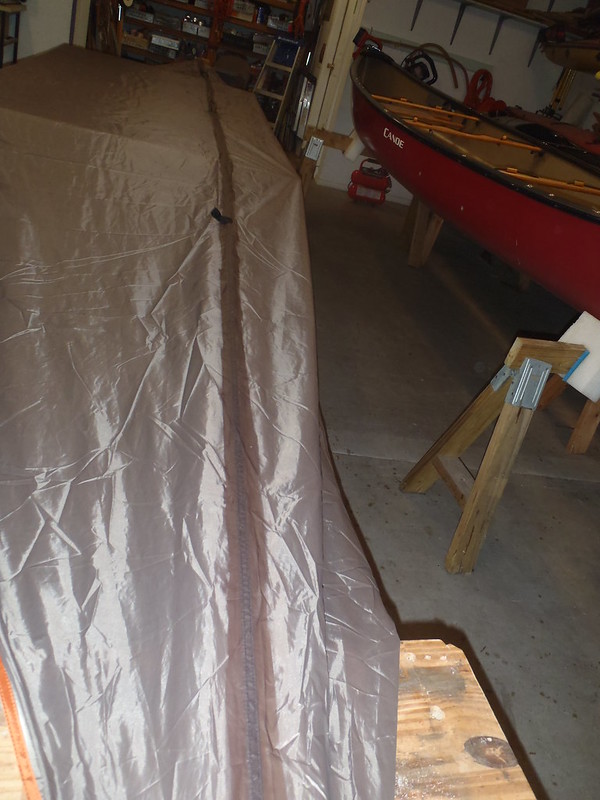
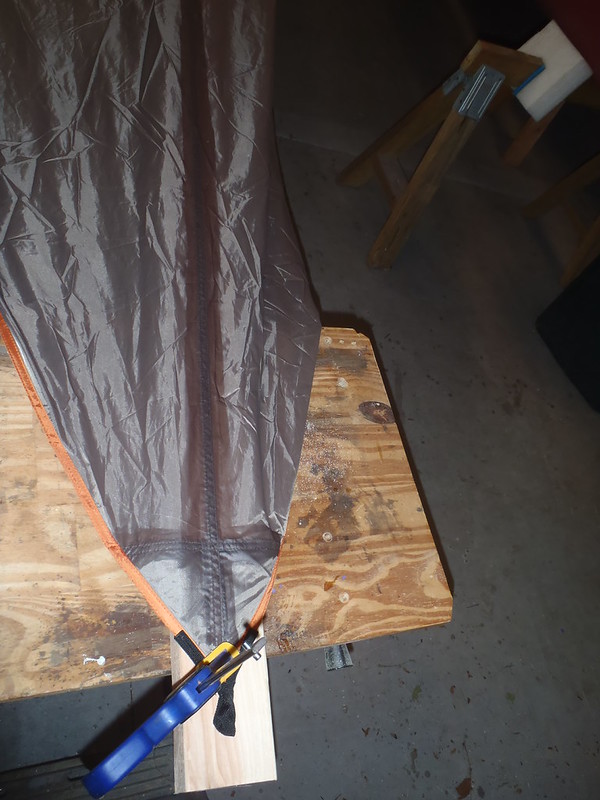
That Annex tarp had not been used for a few years and needed airing out. And maybe a Mirazime bath after sealing. Seams stretched out and clamped on the tabletop.

I mixed up a small batch of DIY seam seal concoction, maybe a 50/50 mix of 100% silicone caulk and mineral spirits. It was reluctant to thoroughly mix via stirring alone, so I alternated stirring, shaking, letting it sit and repeat until it had a slightly viscous gel-like consistency.

For comparison sake I had a 2 ounce bottle of toluene-based Hilllary seam seal on the shelf; reading Toluene as an ingredient made me feel better about using mineral spirits. And a bottle of Gear-Aid water based seam seal on the gear shelves. Why not experiment?

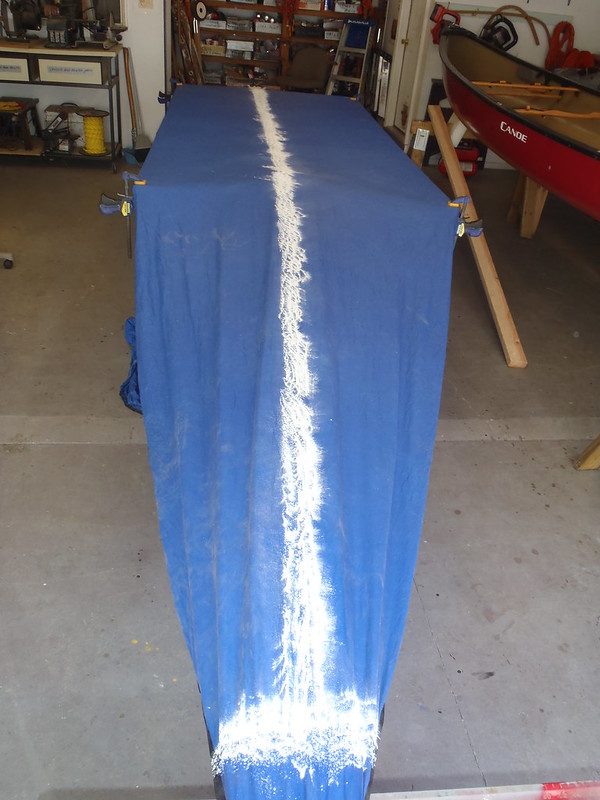
P6090850 by Mike McCrea, on Flickr

I marked the tarp for what I used where, Toluene base on one end, water base on the other *, DIY mix down the long middle seam.

*Reminder to self: The end marked Toluene is actually the water based, and vice versa. Dunna ask, the shop is confusingly fun at times.

With the Annex done and hanging in the sun off the back deck my curiosity was spurred. I looked about on-line and found this DIY seam sealant video:

https://www.youtube.com/watch?v=MC-KftF39J8

My materials, mix and viscosity were right on. I like the Zip-tie stirrer idea, for that seam seal mix and many other stirring applications; old 5 gallon cans of deck waterproofing that go semi-solid at the bottom spring to mind. But I shuddered at the mineral spirits cap inadvertently left unattached on his work area.

The seam seal application video is equally detailed, including a long forgotten hint; Talcum powder!

https://www.youtube.com/watch?v=54VvlMRh1yI

I have a vague memory of hearing that talcum powder trick before, and am willing to give it a go. One bedevilment with some seam seal products is sealed parts of the tarp sticking together during storage.

41860719535_5e063bdcb7_c.jpg
P6070848 by Mike McCrea, on Flickr

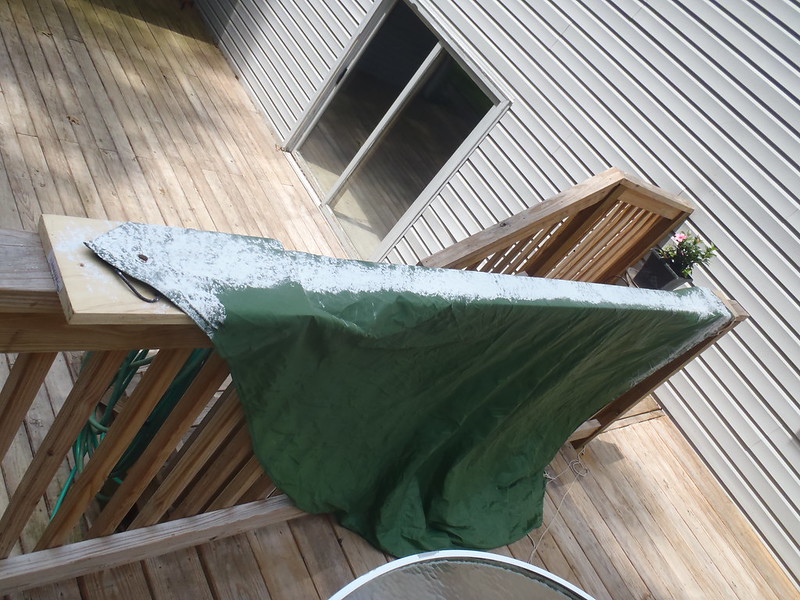
That first side was dry in an hour. I leaf blowered off the excess talcum powder (I should not have been as chincy with the powder; next time, still an experimental work in progress) and did the more important top side stitching on the tarp the same way.

Clamped easy-reach on the table, with no time spent on yard erection, the tarp took minutes to paint the DIY sealer on the stretched seam. I let it seep in and set up a bit, wiped off any excess with a paper towel and hung it on the deck again. With a more robust sprinkle of talcum powder this time.

I let the Annex dry for a day, then packed it away tightly compressed for a few days and see if the talcum powder really prevented sticky.

The talcum powder experiment was successful. With the Annex tightly compressed in a ditty bag and left to bake on the dash of the hot sunny truck for a day it came out of the stuff bag without even a hint of stuck-togetherness from the fresh seam seal.

I will use that talcum powder trick on every tarp and tent.

(In the interest of full disclosure we had no talcum powder in the house. I used Shower to Shower Sport body powder, which was far less perfumee than Shower to Shower Original Fresh. My tarps smelled manly before I blew off the excess. I need to buy a can of unscented talcum powder.
 
Last edited:
All of the talcum power in our house is highly fragranced. It is not what I would call a manly scent. I have used Johnson's Baby as a lubricant when installing bicycle inner tubes; it is also good on plastic parachutes in model rocket recovery systems. After using it, I find myself in need of a shower to wash off the stink, certainly before making a trip to the hardware store. I would be curious to know whether scented Shower-to-Shower on a tarpaulin is much of a bear attractant. They always tell you to keep your toiletries in the food bag, away from camp. Let us know about your findings... "Hey Yogi, this ones got a chewy filling."
 
All of the talcum power in our house is highly fragranced. It is not what I would call a manly scent.
I would be curious to know whether scented Shower-to-Shower on a tarpaulin is much of a bear attractant. They always tell you to keep your toiletries in the food bag, away from camp. Let us know about your findings... "Hey Yogi, this ones got a chewy filling."

I remember that you smelled of sweat and pipe tobacco and Morning Fresh Gardenia

With the Sport powder excess blown and wiped off there was no discernable scent, though my sense of smell is not a bears, who might have a penchant for flabby men pretending they just came from the gym.

I have tarps out in the yard today awaiting the rain, and I found unscented powder.

(BTW, I sprinkled a little of the Original Fresh on the back of my hand for a test sniff. Like a French whorehouse, overpoweringly perfumee. I had to open the windows and put the exhaust fan on, and then wash my hands)

I am now a believer in this DIY seam seal solution, especially for folks with multiple tarps and tents that need attention. Or even tarps that do not yet need attention, ie the Missus new Kelty Noahs Tarp. It was easier to seam seal her new tarp right out of the bag, before the ridgeline or tie downs went on.

The Noahs Tarp is nicely taped on the underside, but I brushed a coat of DIY seam seal along the stitching topside. That tarp has a LOT of seam; one 24 feet seam corner to corner and two 11 foot seams on the sides.

46 feet of seam took longer to seal than the one short seam on the Eureka Annex, and I had to put some extensions on the tabletop to reach that 24 foot center length. Still, stretched out, clamped and held flat at a convenient work height made it 60 seconds easy with a jar of sealant and a 1 inch foam brush.

P6090851 by Mike McCrea, on Flickr

And a lot of unstinky talcum powder.

P6090852 by Mike McCrea, on Flickr

A tip: It was a rainy day and I spread the talcum powder with the tarp on the expanded shop table. I opened the shop garage door and leaf blowered off the excess powder. 50% of which actually went out the door in a giant white cloud, thank god I do not have neighbors near. The rest unfortunately dispersed everydamnwhere in the shop.

Best to do the talcum powder outdoors.

A 10oz caulk tube of 100% silicone runs $8 and mineral spirits $7 a quart. A 50/50 mix will make 20 ounces of DIY sealant in small batches. More than enough to do every tarp and tent we own. For comparison GearAid Sil-Net seam sealer runs $7 for an ounce and a half.

https://www.rei.com/product/705425/gear-aid-silnet-silicone-seam-sealer-15-oz

1.5 ounces for $7, or twenty ounces for $15?
Lemme do the math. 20 ounces of DIY mix equals 13 tubes of Sil-Net.
13 tubes of Sil-Net X $7 a tube= . . . . .good gugga mugga, $91

This is inexpensive and easy, and the table and extensions are already in place in the shop. I am on to the rest of our tents and tarps. Thanks Boatstall, I will be seam sealing tents and tarps for the next week, even if I manage to do two a day.
 
You can use several different solvents, but the one I see recommended most often is odourless mineral spirits, which is just a bit more refined version .... but i use this on all the tarps I have made in silpoly or silnylon .... it is a solid method.

Brian
 
Yup, good stuff... I converted a wally world 13x9 screen tent into my camp kitchen shelter last year. The top isn't (wasnt) waterproof. After I cut all the hard plastic pole supports off and sewed in a Cliff Jacobson style center pole tie loop ,with external tie loop, I painted the whole top with diy sil-nylon coating same as yours... I think I made it 2 to 1 mineral spirits to silicone though. Worked great!

Jason
 
A 10oz caulk tube of 100% silicone runs $8 and mineral spirits $7 a quart. A 50/50 mix will make 20 ounces of DIY sealant in small batches. More than enough to do every tarp and tent we own. For comparison GearAid Sil-Net seam sealer runs $7 for an ounce and a half.

https://www.rei.com/product/705425/gear-aid-silnet-silicone-seam-sealer-15-oz

1.5 ounces for $7, or twenty ounces for $15?
Lemme do the math. 20 ounces of DIY mix equals 13 tubes of Sil-Net.
13 tubes of Sil-Net X $7 a tube= . . . . .good gugga mugga, $91

This is inexpensive and easy, and the table and extensions are already in place in the shop. I am on to the rest of our tents and tarps. Thanks Boatstall, I will be seam sealing tents and tarps for the next week, even if I manage to do two a day.

I bet the savings is much much more! Compare the consistency of your 50/50 mix to the store bought stuff... You would have to thin it down alot more to make an accurate comparison!
Jason
 
I would go with less caulk in the mix personally, helps it get right into the stitching. Also use less powder, sprinkle on and use a paint brush to even it out.

I've been using Gold Bond foot powder for a batch menthol aroma!
 
You are more than welcome. Feels good to be able to contribute.

This may be the best tent and tarp maintenance trick ever. It seems other folks knew and use the DIY silicone & mineral spirits. I had never heard of it and for expense and ease of application I will never buy little 1.5 ounce bottles of seam sealer again.

And it I had not read it on CanoeTripping, a been-there/done-that source of practical tried and true information, I might never have tried it. I am on a roll, and will probably do every tent and tarp we own.

I would go with less caulk in the mix personally, helps it get right into the stitching. Also use less powder, sprinkle on and use a paint brush to even it out.

I tried both weighing and eyeballing the mix, and found it easier to incrementally add minerals spirits, mix and eyeball for the consistency I want, which is more mineral spirits/less viscous than a 50/50 mix. I now have a cheap chip brush dedicated to brushing the powder after laying it along the sealed seams.

The rainfly on my sons big Sierra Designs tent was annoyingly weepy on the last 3 days of rain camper. That tent was next in line.

There is no easy way to seal the seams on that dome shaped fly and bathtub floor corners, no way to stretch it on the shop table, so set up and stretched tight out in the sunny yard. Dang that fly has a lot of seams, two full width Xs across the top and two parallel seams down the vestibule XX==. All are taped on the underside, but the fly dripped from somewhere last trip and I want to seal the stitching on top.

P6110876 by Mike McCrea, on Flickr

While I am at it with the Sierra Designs, all new guy lines. I am glad a bought a lot yellow Glowire, and as I work through seam seaming the rest of our tents and tarps I bet I will need to order more.

Better reflective guy lines, and better stakes; the six Nobendiums that came with the Noahs tarp quickly found a home with that tent. With the tent corners & vestibules staked down and all 7 guy lines that tent uses 13 stakes, but it is seriously windproof in that guise.

Fly seam seamed, excess wiped, talcum powdered, left to dry, blowered clean in the yard and off to hang on the clothesline.

I flipped the still poled tent body upside down and did the bathtub floor and corner seams on the underside (the inside is taped). OK, none of that was actually I, as in me doing anything the tent. That is my sons tent; I just made the seam seal mix and handed him a narrow foam brush.

With the tent in the yard the expanded shop table was available for something flat. One of my all-time favorite tarps, a near 20 year old 18 x 18 Campmor parawing. It is a shame Campmor stopped making that wonderful tarp, it is by far the best simple diamond parawing I have ever used; two poles and four webbing loop corners simple to set up.

Deeply scalloped and wind-proof with a true catenary shape, and perfect low-corner drainage. I have had it up in 50 mph winds and the catenary cuts are aerodynamic perfection; the harder it blows the more the batwing aspect takes shape and the more unflappably firm the tarp becomes, yet because of the way the tarp spills air the seams are not stressed.

http://photobucket.com/gallery/user...FRyaXAvUDUwNjE5ODVfenBzNjQzMGVkNGIuanBn/?ref=

And the directional low-corner drainage is nice for fresh rainwater collection on tidal trips or silt laden rivers. 18 x 18 sounds huge, but that even the edges of the tarp are scalloped ) ( on that diamond-ish shape.

When that tarp is set up properly taut with two high poles and two low corners, it offers enough room for 4 people in chairs gathered round a small table in the center. Two people, a couple chairs and a couple barrels fit far more spaciously with gear storage room at the low corners.

We have, in a pinch, fit a half dozen wet strangers and their stove under it.

http://photobucket.com/gallery/user...FRyaXAvUDUxMTIwMzRfenBzN2FkZGE1MmYuanBn/?ref=

I do love that best-ever wing. In sil-nylon a clone of that tarp, with similar catenary cuts and scalloped edges, would be the windy trip bomb. Probably dang nice over a hammock as well.

That inexpensive Campmor wing was not taped, so seam sealed on both sides, as with the ancient untaped Eureka Annex tarp.

P6110875 by Mike McCrea, on Flickr

This time I was smart enough to take the tarp outside before blowing off the excess talcum powder.

P6120879 by Mike McCrea, on Flickr

I may get a chance to see how many tents and tarps a 10 ounce tube of 100% silicone will do. I have the Tundra Tarp back out of the Ridgeline bag and spread on the shop table. I had sealed the top seams years ago (6 panels, so lots of seams) no doubt using Sil-net, and no doubt using more than one $7 tube.

We have one more cheap coated nylon tarp, and a half dozen sundry sized and seasoned tents that could certainly use seam sealing. I am really hoping I can do some of those tent flys on the shop table; using that flat, well light, convenient height work surface is so much easier, and I can do rainy day inside work.

Dammit Boatstall, see what you went and did.
 
This may be the best tent and tarp maintenance trick ever. It seems other folks knew and use the DIY silicone & mineral spirits. I had never heard of it and for expense and ease of application I will never buy little 1.5 ounce bottles of seam sealer again.

And it I had not read it on CanoeTripping, a been-there/done-that source of practical tried and true information, I might never have tried it. I am on a roll, and will probably do every tent and tarp we own.

I can't wait to try this out myself.
 
DIY Seam Sealer Notes

I am admittedly new at this, but after having done two tents and four tarps I have the practical methodology that works best for me down pat.

Anything flattish gets stretched and clamped on the table, brushed it with the seam seal mix, wait a few minutes for it to seep into the stitching, wipe off any excess, sprinkle with talcum powder, brush the powder (Thanks Bothwell Voyageur, that little brush action helps a lot), blow it off, hang it outside and move on to the next piece.

For anything flat doing the seam sealing on the table is, to my aching back, a huge boon. The table extensions in the shop are simply a couple 1x6s off the table ends on sawhorses. Good light, convenient work height and reach, and much easier to paint a defined line of seam seal with a 1 inch foam brush against a hard flat surface.

I seamed the top stitching on the 12 x 14 Tundra tarp. I had done the bottom, also clamp stretched on the table, years ago with the Sil-Net CCS provides with Tundra Tarps. That tarp has 40 feet of seam, some of which would be unreachable when hung unless working overhead. Sealing and dusting those seams with the tarp stretched and clamped flat on the table took minutes.

The desired consistency of 100% silicone caulk to mineral spirits was easier to eyeball than to measure by weight or volume, incrementally adding/mixing mineral spirits until it looked right.

It helps to keep the foam brush in an air-squished-out ziplock between pieces; the sealant on that brush will set up with surprising rapidity. Best to have back up foam brushes for when the handle falls off as well.

I used the same jar of mix over the course of a day and sealed multiple tarps & tents, adding a dash more mineral spirits as needed. It is surprising how quickly the mix begins to congeal, even in a tightly sealed jar.

I made one batch way to big, and by day 2 there were some sealant globs inside the jar that resisted mixing. I reused the leftover residue in that jar with additional vigorously mixed mineral spirits, but it would have been better to have made just enough, or have started the next day with a fresh, clean glass jar.

After the sealant sat on the seams for a few minutes I wiped off any excess with paper towels, which also removed any inadvertent globbies or over-thick coating. Caveat, one of the heartier old tents had such thick, rough stitching that it disintegrated paper towels. That is why god made rags.

I used wayyyy too much talcum powder at first. Less powder and some swipes with a cheap chip brush was more effective. Even using less powder the leaf blower was handy for removing any powder residue.

Tarps much are easier then tents.

But I discovered that the old Timberline fly and tent body was flat enough to do on the table. Even sealing the seams inside the bathtub floor. I did not relish the prospect of crawling around inside the tent with a jar of DIY mix and a brush. Turning the tent body inside out it fit just fine clamped on the 4 x 8 tabletop.
 
Last edited:
DIY Stirrer for DIY seam seal (and other stuff)

OH MAGAWD, in my best Valley Girl voice.

Good lord I am stubborn at times. Or perhaps lazy. Ignorant of valuable recommendations. OK, stupid.

The zip tie stirrer shown in this video at the 3 minute mark is the freaking bomb and I finally made one. After hand-stirring DIY seam seal for a half dozen tents and tarps. I never claimed to be fast on the uptake.

https://www.youtube.com/watch?v=MC-KftF39J8

His stirrer pole in the video is inexplicably 5 times longer than it needs to be. A 10 inch length of old fiberglass snow stake fits in the drill fits the tall pickle jar just fine. Yum, Polish Dills.

P6230942 by Mike McCrea, on Flickr

It helps to hold a rag or paper towel over the jar to prevent splash.

That Zip-tie stirrer beats hand swishing a tongue depressor by many minutes of semi-fruitless effort. It makes a much more thorough mix, and is easier to remix the leftovers in the jar for the next seam, or even for refreshed the jar for use the next day.

Do not even start the DIY seam sealer process without spending 60 second to make that zip tie stirrer. I will never hand mix DIY seam seal again. Or gallon cans of old paint, or 5 gallon cans of deck sealant gone sludgy at the bottom.

That is the best shop trick I have learned in a while. Do not be a lazy dipshit like me, make one of those first. I say whip it, whip it good.

https://www.youtube.com/watch?v=ATFsuhA0qKM

The video suggestion to use a weight scale may be ill-advised; just mix the silicone and mineral spirits to the desired consistency by eye, adding a bit of whichever seems necessary for the thickness you want for that application.

The bathtub floor corners on Timberlines and Alpine Meadows are often the exposed and leaky rain bane of A-frame tents as they age, so I mixed the seam seal a little thicker, covered the entire double-fabric corner area, and let it sit longer before wiping off the excess.

P6240946 by Mike McCrea, on Flickr

Outside, and inside. Same seam seal on those inside full corners and interior seams.

It is sooooo much easier and faster to turn a tent inside out to seal the interior seams and corners on the shop table. And, again, I keep find places I originally missed years ago while on my hands and knees inside the tent get-me-outa-here huffing sealant fumes.

Plus, if the tent needs a Mirazyme bath, the recommendation is to unzip everything and turn the tent inside out. Sealing the interior seams last, the tent is already inside out and ready for bath time.
 
How Much Seam Will 10oz of Silicone Seal?

I may get a chance to see how many tents and tarps a 10 ounce tube of 100% silicone will do.

I now have an approximate answer for that. Using a single 10 ounce caulk tube of 100% silicone (and however much mineral spirits) I seam sealed the following, most of the tents and tarps both inside and out.

Timberline Annex tarp
16 x 16 Noahs Tarp
Sierra Designs Alpha 3 tent and fly
Campor 18 x 18 parawing tarp
12 x 14 Tundra Tarp, the only tarp DIY sealed just on one side. The other side was originally done with the tubes of Sil-net CCS provides, and that sealant is still going strong (and is visibly thicker on the seams than the DIY mix)
16 x 16 Sportsman Guide tarp
Alpine Meadows 2-man tent, fly and two vestibules
Alpine Meadows 4-man tent, fly and one vestibule
MSR Hubba Hubba 2 man tent and fly (two skinny men maybe, but my favorite solo tent). Outer sides only, both pieces were very nicely taped on the inside.

After sealing big tarps and tents the little Hubba Hubba was a quickie pleasure. Two straight flat seams on the tent body, perfect for clamped and stretched tabletop work, I did not need the table extensions.

The Hubba Hubba fly has some elaborate seam stitching design and pattern, >=I=<, and the body has some equally intricate tent floor corner stitching as well.

The other more modern tents also have some complicated stitching patterns, which seem to represent a latter day improvement in fly and tent corner fabric design, like partial blankets in composite canoe layup schedules. Someone actually gave some thought to those stitching patterns.

All Hubba Hubba seams done indoors, working on the shop table, which required stretching out the fly one half at a time. Thankfully indoors, it was 90F and humid outside.

There is still some silicone left, probably enough for another tent. But I have reached the end of my enthusiasm for Seam Seal Week(s).

A single 10 ounce tube of silicone caulk did 5 tarps and 4 tents, and that was with some significant made-too-much wastage of DIY sealant left in a series of glass jars. I guesstimate that would have required at least a dozen or more 1.5 ounce tubes of SilNet. At $7 a pop. Do the math.

Major props to everyone who recommended that DIY sealant, mixing consistency suggestions, chip brush and less powder technique and etc.

The collected wisdom here is greatly appreciated, and it was worth a couple weeks of on-and-off effort to seam seal everything, inspect and repair everything, replace stakes and guy lines (love that Glowire) and de-stink the older stuff.

Got a family trip coming up. Maybe it will rain.
 
I am an ardent fan of the GE Silicone II thinned with mineral spirit method. I brush on with foam pad brush then rub off excess/push into seams with a clean cotton cloth. One significant advantage to this method is ileaves the surface "Gunk" free and dry in less than 1 hour. Talcum powder is unnecessary an introduces messiness to what can be a mess free process.
 
That's been my experience as well OCDave, I use a small glue brush (bristle) and push the glue into the thread on the seam. I brush any excess along the seam so it doesn't build up in any one spot. It is only the thread holes on the seam that actually need the sealing and i wipe off any sealant that isn't on the fold. Ge Silicone II is also what I use and will travel to get that if necessary. I also traveled to get the odourless mineral spirits that is recommended in a few posts/videos, but I don't know if that makes any difference ... but what I have has worked well so far.

I haven't needed to resort to talc powder yet as the seams on all the tarps I made, ended up dry and no stick at all ... I like to put them up taut and leave for 2 days after I put on the sealant.

Brian
 
I just picked up a tarptent to lighten my backpacking load, and the homemade mineral spirits and silicone is how they recommend seam sealing right out of the box. I had never heard of it. Funny to find it here at nearly the same time.

https://youtu.be/BDLVCXRTHKU
 
Back
Top