• Happy Weed Appreciation Day! 🌱🌿🌻

Reflector Oven

I would be interested to know if painting the inside makes any difference. I’ve never seen one painted and it is called a reflector oven. I knew someone that would occasionally polish up the inside. Like you aslg I too want to make a smaller one.
Jim

I don't think it makes a difference whether the inside is all shiny or whether it is black with soot or painted. Gil's book has a long discussion about this with another reflector oven expert and the consensus is that the reflector oven name is kind of a misnomer. It isn't about reflection but trapping heat.
 
Thanks. I'll just tack the posts on here then. After seeing other posts about the bulk of a fixed side oven I wanted a knock down oven mostly for reasons of keeping the volume down.

When I had my millwork shop in town I used to collaborate with a sign maker on carved and sandblasted wooden signs and through him I learned that buying aluminum sign blanks is about the least expensive way to buy smaller aluminum sheets. I got two sheets of 24" x 36" .040 aluminum for $14.95 each and a $9.99 flat shipping charge. I'll need 24" x 24" or less for this oven and will have a quite a bit left over to put on the plywood cart for other projects (or a smaller oven). And at around .57 pounds (260 grams) per square foot the oven will come in somewhere under 2 pounds.

Like you I'll use my Unisaw with a non-ferrous metal blade I already have to cut the parts out. I'm still up in the air a bit as to what will be the easiest way to cut or mill the material to leave the tabs. I have a portable band saw, a heavy duty variable speed drill press I could use for light milling and a slew of routers up to 3 HP. I'm kind of leaning toward making a simple ell shaped jig for a router and template guide as that would let me make another oven quite quickly.

I have a big Hobart automatic meat slicer on the workbench trying to figure out why the automatic slicing part doesn't work so I can resell it and three canoe seats to lace with webbing before getting to the oven so I have time to mull it over yet.

Boatman53, as alsg said there's a fair bit of evidence that these capture and contain heat more than reflect it. The scheme my brain cell came up with to maybe confirm or deny that is to drill a hole though the top panel and drop one of my smoker thermometers into the middle of the oven and place the oven in front of the flame from my overgrown propane pot burner (think turkey fryer on steroids). The burner would give me a better chance of having the same amount of potential heat after painting the inside and checking it again. The worst thing that can happen is that I drill out the hinge rivets, reverse the hinge to the other side of the panel and flip the painted side to the outside.

If the black paint makes a positive temperature difference then well and good and I'll paint the next one too, if a negative difference I'll flip the panels and if no practical difference that would infer that they do indeed trap and hold heat and that if wouldn't pay to paint another oven.....

Best regards to all,


Lance
 
Well, I ran into a snag when I finally opened the package with the .040" aluminum sign blanks as they were painted white (even though the ad didn't say anything about a color or coating) so they won't work for an oven. Other than little bitty sign blanks most bare aluminum sign blanks are .080" thickness (think road signs) and would be much too heavy. While waiting to see if I could find .040" aluminum at a reasonable price I even contemplated ordering some cheap sheet pans to get what I wanted. And....

It finally just penetrated my (alleged?) brain that there are several full size commercial 18x24" sheet pans in the basement that are too nasty to use for baking anymore. I have so many of them that I use them for shelf liners under things that might leak and as drip pans under things like chainsaws. The back sides are clean. I just sorted out the worst ones for reflector oven material. I already have a full sized cardboard mock-up of the reflector oven so I'll put a non-ferrous metal blade on the tablesaw and start cutting the pans down this weekend. Come heck or high water there will be a reflector oven!

The top and bottom panels of the mock up will need to be extended a bit to allow for locking tabs and the rear door will be widened to the same width to reduce leakage of heat around the edges but the basic oven design is ready to go. The pics show the mock-up sitting on a full sized commercial 18x24" sheet pan along with a 1/4 size 9.5x13" sheet pan. It will take 1-1/2 full sized sheet pans to make the oven. The oven will hold pans up to the 1/4 sheet pan with room for air flow around it. The line on the outer end of the oven shows the rack height at the top of the slope of the bottom panel. The rear door will be 4" (10 cm) high.


Click image for larger version  Name:	image_14432.jpg Views:	4 Size:	313.6 KB ID:	105688


20200307_114957.jpg


Once I have it cut out and have the edges smoothed I'll paint the dirty side with black high temperature paint and temporarily bolt the hinges on to do the temperature comparison. Once I decide which way the painted side will face I'll rivet the hinges on. More pics to follow.....

Best regards to all,


Lance
 
Last edited:
Sandpaper will take care of the grime.

I figured that something like that would both help clean it and give some "tooth" for the paint to better adhere.

I'll give some thought to making a pair of templates of the tab and slot cuts as that will allow me to scale the oven up or down using a standard tab and slot size. I think that having this oven and a smaller one would help make for picking the oven that best fits the trip menu and numbers.

As of now I plan on using the smallest down spiral router bit I have (1/8"?) for the slots and bending the tabs as needed for a snug fit. And I haven't yet decided between the tablesaw, router or Porta-Band saw to cut the tabs themselves. A hardboard template and a top bearing router bit would likely make cutting tabs a matter of about a minute per cut and wouldn't take more than 15-20 minutes to make so I'm kind of leaning that way.

I think I'll cut a piece of light gauge flattened expanded steel for a rack since I can use that as a grill too (I already have the expanded steel).

I just dug out my face shield to help with the aluminum chips and I'm off to the basement to see how the sheet pans work out.....

Best regards,


Lance
 
Hello All

Yup, I'll admit it. I've been slacking....

So I cut the sheets I needed out of a couple of rough old full size sheet pans 10-11 days ago and they turned out to be .040" thick which was my original plan anyway. And it confirmed that the projected dimensions of 15" wide, 8-3/8" deep, 12" tall overall with 4" of vertical back panel and the shelf set at the bottom of the back panel would fit a 1/4 sized commercial sheet pan (half a household sheet pan) with four clear inches above the rack in the rear of the oven and ample air circulation around the pan.

Figuring out how to cut properly sized slots so that the .040" panels weren't flopping around led to ordering a $12 solid carbide 1/16" diameter router bit so there would be just a few hundredths of an inch clearance. Which router bit I managed to snap off almost immediately due to careless handling of the router. Note to self: 1/16" solid carbide bits are brittle little things.

But freehand cuts with a .045" thin cut-off wheel in an angle grinder and a bit of dressing up with a hack saw blade did the trick for the slots although the cut off wheel raised a horrible burr around the underside of the slots.

And the old sheet pan metal was ugly enough that it gave me a rash so I made my first trip to the Greensboro branch of the Alro Steel Outlet. Boy, that should have been my first stop when this project started. They have "remnant" steel, stainless steel, aluminum, brass, copper, Delrin, acetyl and UHMW polyethylene with very reasonable prices.

Second quality .040" aluminum sheet with a few dings or scratches was $1.85 a pound or about $.50 a square foot. Remnant stainless steel in shapes was $3.80 a pound. I got a 4x4' sheet of .040" and a 2x4' .030 sheet (to try a small ultralight solo oven) and 10' of 3/16" stainless round rod (for shelf rods). Oh, and I got some UHMW poly sheet to make a few jigs. And a couple of 1/4" sheet 8x16" pieces in case the poly sheet didn't work out. So enough to make several big ovens (they take a bit under 4 square feet each), three or four small lightweight ovens and leftovers for tinkering with for around $38.

I had pretty much free-hand cut the locking tabs on the ugly sheet pan oven panels but since the dimensions were right I made a simple poly sheet jig to cut the locking tabs with a router and template guide and cut out the parts for an oven from the .040" sheet. The tab jig worked fine. As the replacement router bit hadn't arrived I cut the slots with the angle grinder. So the side panel got a fair bit of scratches from getting rid of the burrs from heck around the slots. Note to self: save the darn grinder for cutting the stainless rod you big dummy. I should have waited for the replacement router bit as removing the burrs scratched the sheet pretty badly.

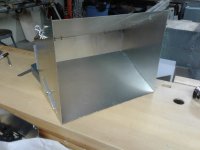
Here's the first oven made from the clean "remnant"sheet without the shelf rods installed yet. Note the scratches around the slots. You can even see them in the shadows on the far panel. The rash is back......

Click image for larger version  Name:	20200318_114654.jpg Views:	0 Size:	241.8 KB ID:	106332


The only small hinges on hand were black so the back panel got a custom upgrade to the highly desirable custom black accent hinges. Yeah, that's it, no mistakes here, it's all custom accents.

Click image for larger version  Name:	20200319_195759.jpg Views:	0 Size:	296.5 KB ID:	106334

And with the stainless shelf rods.... The loop ends are so that the rods can be used as a light duty set of fire irons over a fire without rolling away and dumping the pot. Err, don't ask why I know that they need this.

Click image for larger version  Name:	20200319_182916.jpg Views:	0 Size:	261.5 KB ID:	106335


And with the 9-1/2x13" quarter sheet pan.

Click image for larger version  Name:	20200319_190754.jpg Views:	0 Size:	261.4 KB ID:	106336

And with a six cup muffin pan. I spaced the rods at 3" on center which proved to be sized for the muffing cups to sit perfectly in between the rods, almost like I planned it. But not only didn't I plan it but the bottoms would likely burn before the tops baked if they sat that low so I'll play with shelf rod spacing and see whether I can use the three rods or need to use four because Nancy (AKA Betty Crocker to the neighbors) will pout if she can't bake muffins in camp. And no, that's not her muffin pan it's a parts pan for when I disassemble stuff. It was someones nice tinned steel pan at one time though.

Click image for larger version  Name:	20200319_190815.jpg Views:	0 Size:	250.9 KB ID:	106337

Lastly, knocked flat. I'll use a mini carabiner to capture the rods and pins. I may even rivet a cord for the 'biner to the lower rear of a side panel where it won't see much heat.

20200319_214804.jpg

So.... Lessons learned to date:

The .040" aluminum is plenty stiff enough for this without being too heavy. The whole oven weighs 2 pounds 5 ounces (1000g) with the rods being 7 ounces (200g) of it.

Making the oven narrower or wider is always on option as it only needs setting the tablesaw fence to the desired width when cutting sheet down. The original plans called for a much wider oven as it was designed for large group expeditions. Similarly, an oven for an 8 or 9" pan is easy, too. I made the tab jig to index off the end of the panel so length is infinitely variable.

Hinging the rear panel likely adds 1-1/2 to 2 ounces (35-50g) of hinge and rivet weight. If I didn't have the door I'd be cutting two more tabs and two more slots to hold the back panel on. I'll use the oven some before passing judgement on the rear door. But I already know that the rear door will want a tab on the bottom panel to hold it snugly closed with a simple straight pin.

And as the back panel isn't fixed there is a premium on tight fitting slots to keep the whole thing from being floppy. The tab for the rear door will help stiffen it some.

If it needs more stiffening I'll mark where the rods pass through the side panel and use the .045" cutoff wheel to run a shallow groove around the rod to have it kind of hook over the side panel and help stiffen the whole thing.

The new router bit for the slots came this afternoon so I'll make a simple jig for cutting the slots. The rash is better already.


So why the fussing with details and jigs? Nancy and I met many moons ago when our oldest sons were Cub Scouts together. We have five sons and a daughter so I spent 14-15 years as a scout leader with 11 as a Scoutmaster. I only stepped back when the youngest son turned 18. Now, as grand kids reach scouting age the boys are coming back into scouting as adult leaders. Heck, after an 11-12 year break I'm back and active with scouting, too. And so I think that some reflector ovens in a couple of sizes are in the future gift rotation for sons and grand kids......

We're going boondocking near Mount Rogers in the Washington and Jefferson National Forest Saturday so I'll use the oven some this next week. After I'm back I'll paint one side of the panels black and test it to see if it us more efficient with a dark surface.

So enough rambling for now. I hope it was worth your time to read it all.

Best regards to all. We pray that all in the Canoetripping clan and their families stay healthy.


Lance
 

Attachments

  • 20200318_114741.jpg
    20200318_114741.jpg
    250.1 KB · Views: 1
Last edited:
That look awesome ! Way better than the Svente I got(It's too small.....) "And so I think that some reflector ovens in a couple of sizes are in the future gift rotation for sons and grand kids......" Maybe I'm one of your son and you don't know.........
 
That look awesome ! Way better than the Svente I got(It's too small.....) "And so I think that some reflector ovens in a couple of sizes are in the future gift rotation for sons and grand kids......" Maybe I'm one of your son and you don't know.........

Hmmm...... With 7-8 years as a Junior and Senior High Youth Group Advisor in a church with a large and active youth program, Scouting and 29 years in combat boots I had no shortage of "sons". Maybe you're one I just don't remember???? After all, Nancy does occasionally accuse me being somewhat like Winnie the Pooh. You know, as in "Winnie the Pooh was a small orange bear whose head was stuffed with fluff."?

It has been several years since I made any real jigs or fixtures or used any other than my 12" and 24" Omnijigs for cutting kitchen cabinet drawer dovetails for Betty Crocker's new 44" deep pantry cabinet to have full extension drawers. To be honest, part of this project was simply to get a chance to do some custom stuff again even if the degree of complication and required accuracy aren't like some of what I used to do.

Now that I have a roadmap of sorts to jigs that work for knocking these out fast and accurately scaling them to ovens that are shallower and shorter in height should take just a few hours for each size. And in fact, when it comes to making an oven, cleaning up and smoothing the edges of the cut sheet stock takes longer than roughing out and finish trimming the panels. That's the beauty of simple jigs and fixtures.

The one thing I haven't yet figured out is cutting tight slots for the .030" sheet. I may just wind up using the 1/16" router bit and bending the tabs a bit to snug them up although I have a concern about how well that will hold up in such thin stock. But I'll leave that for another week or two. For now I think I'll have another beer and head to bed.

Best regards to all,


Lance
 
Last edited:
You sure get a lot of fun out of 38 bucks. I'm enjoying it.
Never having operated a reflector oven I'm asking myself if the rear door ought to be kept as simple as possible, with no fiddly pins to work while a hot sheet of metal and prized contents are sitting delicately before the fire? So I much prefer the hinge option to the tabs. Maybe with a clasp? Keep in mind I'm a scorched pot baker, not the fine muffin maker you're used to in camp. Also interesting bit of detail with the muffin tin height in the baker. Would never thought of that. Good thing I'm not baking for Betty. How about an additional pair of holes to raise the rearmost or middle rod setting to raise up the back of the muffin tin thereby setting it at a jaunty angle forward providing some more distance from the reflecting sheet?
I'm really looking forward to the solo version you mention.
 
Last edited:
I'm not so sure about the $38 as there are a lot of other little expenses that sneak in like paint, router bits, hairpin cotter pins etc but maybe I'll stick to the $38 if Nancy asks. :rolleyes:

As far as the hinged door, my thought was to avoid moving a hot oven to check and rotate things and then having to get it back in the same level spot. I left the door panel a bit wider and longer than strictly needed so that if the body of the oven settled into a bit of a trapezoid that the door would cover the opening. And I thought I allowed enough distance between the top and rear panels when I riveted on the rear door so that the rear panel would hang down freely and not have a gap at the back of the stove. As it turns out it only took a tiny bit of misalignment for the door to have a good 1/4" gap on one side.

It only takes a few ounces leaned on the door to bring it tight so I figure a pin with a loop head big enough to stay cool was in order. I suspect that opening up the upper loop of a hairpin key will do the trick. I'll likely take a few minutes today to rivet a little tab on the bottom panel and cut a matching slot in the door.

When I make the next one I'll shim between the two panels with a couple of bits of scrap sheet to get better alignment and see how that works. I'd like to avoid the weight of a continuous piano hinge but if it comes to that I'll use one as it should eliminate any gap issues.

Changing a rod's height and tilting the muffin pan would lead to odd shaped muffins.... And sure enough, when I set the oven on the counter to knock it flat Betty Crocker made me wait while she tried various pans in it. About the only thing she didn't try was a popover pan. Sure enough she had the same observation about the height of the muffin pan. Then she headed down the hall to her fabric stash to find something stout enough to make a carry bag for the oven. She's anxious to try the oven out. Since we are truck camping this time I'll have a small digital thermometer along so I can start getting a handle on temperatures. Maybe a rolled and stuffed pork loin roast is in order, too.

Best regards to all,


Lance
 
Perfectly formed muffins. That's just weird. (lol) But I guess she knows best.
My own Mrs Crocker made an Irish soda bread/barm brack for St Patrick's Day the other day. She pulled them (2) from the oven, placed them on the counter and gave them each a tap. "They're ready." I tapped them too and had my doubts. One loaf went to work with her, the other stayed home, where I tested it's doneness like an amateur by cutting into it. And by the end of the day confirmed she shoulda made three.
A rolled stuffed pork loin sounds perfect for an oven test.
 
Well done! We love our reflector oven and I'm sure you will too. I really like how your oven breaks down flat! A simple wire, folding bail type handle might be a handy addition. Ours has one and it makes it easy to remove the oven from the fire when you're finished or when you need to rotate the pan half way through.
 
Hi Rick

For most things I hope the door will keep me from moving it too much but we'll see. I have a roll of 1/16" stainless cable and ferrules around here somewhere if they are needed though.

We're headed out this morning and I had thought of taking a stuffed pork loin roast to make in the oven but opted for a small stuffed venison backstrap for a roast as the smallest hunk of pork loin in the freezer was nearly 3 pounds so too big for two of us. Not an issue if we took the camper but tenting it with leftovers like that would be a beacon to critters so not on good.

I'd better get good with this oven quick. Nancy has plans for biscuits, a double chocolate cake and other stuff planned. And she said something about flatbread pizzas for the next trip.

Best regards to all.


Lance

EDIT: At 17 ounces Nancy says it's "adorable". The stuffing is homemade breakfast sausage cooked to no longer being pink and a little egg and bread mashed together. That avoids the conflict of sausage wanting to be cooked to 165 F and keeping the roast rat 125-130 F. Results pics when we return. Wish me luck. Nancy's too good a pistol shot to really tick off....

20200321_100041.jpg
 
Last edited:
Hmm...

OK, I know it's an older thread but since the winner of the reflector oven is looking here for ideas I scanned the thread and realized I didn't post the results of the venison roast last March. My bad. So...

Yes, they're biscuits from a tube. I hadn't planned on making them but on the way into the mountains the thought crossed my alleged" mind" that I wanted something potentially sacrificial to map hot spots with so I got them en route.

Click image for larger version  Name:	20200322_172205.jpg Views:	2 Size:	499.5 KB ID:	123936

As seems to be the case on all reflector ovens the back of the oven was the hot spot.


Click image for larger version  Name:	20200322_172205.jpg Views:	2 Size:	499.5 KB ID:	123936

And in went the sausage stuffed and rolled venison backstrap.

Click image for larger version  Name:	20200322_172738.jpg Views:	2 Size:	539.2 KB ID:	123937

Resting....and testing our patience.....

Click image for larger version  Name:	20200322_180528.jpg Views:	2 Size:	491.9 KB ID:	123938

There were no leftovers.....


Later in the year I made these sesame crusted pork loins although I will confess it was in the backyard fire pit and not in camp :(

But now that I've done them in a reflector oven once they will make an appearance in camp sometime this year. They are easy to make and well worth the effort. :)

Click image for larger version  Name:	20201023_181946.jpg Views:	2 Size:	466.7 KB ID:	123939

Best regards to all,


Lance
 
Last edited:
That all looks delicious! As I mentioned in one of the posts earlier in this thread, I decided my oven was too big. It was sized for a guide with a large group and, well, I don't do much guiding of large groups. So I ended up taking it apart and cutting it down to fit a standard 1/4 baking sheet, which works fine for 1-2 people. I also cut out the fixed shelf, which I think absorbed too much heat. I hope to put it back to use soon.
 
The winner of the custom reflector oven in the 2021 drawing was Sweetfancymoses. He and I talked a while ago and one change I told him I think I'll make going forward is to get some long stainless steel skewers and use them for the shelf as they can do double duty around the campfire. I ordered a pack of these to see how they work out.

https://www.amazon.com/gp/product/B074ZLTBZN/ref=ox_sc_saved_title_9?smid=A3IEEDMWTA8OSP&psc=1

They have what appears to be a fancy washer like thing that's supposed to make sliding food off them easier. If those were removed they look like they'd pack flat. And they could be cut down easy enough if needed. When I get them I'll post some pictures and my thoughts of them.

Best regards to all,


Lance
 
I remember fondly the day Doug D unveiled the Campmor Reflector Oven. He cooked nothing more than store-bought frozen bread dough, but Oh, it was the tastiest thing to ever enjoy around the campfire. Just ripping off gobs of steaming fresh baked bread and scarfing it down. That was a long time ago and I finally just bought a Swedish Reflector Oven. Light and compact so it's not a hard decision to bring it along. I like the fact that there are no tiny pieces to drop in the duff. For 2 people, it's a nice dessert plus a high carb 2nd breakfast the next day. I have a killer cranberry orange scone mix, which I'm happy to share but you can also find it on the internet. Brownie mix, ginger bread mix also good. The Jiffy Biscuit mix is just a mouthful of sawdust to me.
 
Cranberry Orange Scones and the Swedish Reflector Oven that baked them.
 
Back
Top