• Happy Weed Appreciation Day! 🌱🌿🌻

Rebuild of a Mad River Traveler

Joined
Dec 9, 2014
Messages
1,239
Reaction score
461
Location
Penacook, NH on a back road
So a while back I picked up a MR Traveler basically for free and after stripping the gunwales, seats and thwarts off I'm left with a puzzle. The shear line in the middle of the boat has an outside flare to it! Is that a design feature I ask as I scratch my head or something else? Never seen this before! So I start asking around to some of the boat builders out there and they all say the same that coming out of the mold it shouldn't be like this. So now I'm putting this out for some suggestions to all you more the well knowledged folks than me on how to deal with putting new gunwales on this old hull. The flare is about 112" on the right side of the boat and about 75" on the left side before going straight up to what I image is normal!

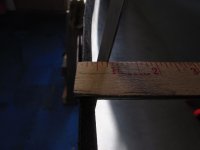
I taped a ruler vertical and then ran a yardstick across the hull to get a measurement seen in the pics. Going to use some old almost full length gunwales to see if I can pull them in some so they are flush on the top side if you follow me. Anyone have suggestions or seen this before? I have no desire to cut it off as was suggested to me, would like to keep this 31 year old hull true to its design.

dougd
 

Attachments

  • IMG_4630.JPG
    IMG_4630.JPG
    192.4 KB · Views: 28
  • IMG_4631.JPG
    IMG_4631.JPG
    165.3 KB · Views: 27
For some reason I cannot open your photos however the problem could be at my end.
I do not have this boat anymore so cannot be of much help. Thought I'd post a photo in case you could pick up something from it. Good luck with your project.

P8190002.JPG - Click image for larger version  Name:	P8190002.JPG Views:	0 Size:	600.6 KB ID:	118944
 
dougd - Like Gerald, the photos didn't come out on my end either. Just thought you should know since my guess is you think it would be helpful for folks to see them more closely otherwise you wouldn't have posted them.

That's all for now. Take care and until next time...be well.

snapper
 
Work?

Oh yeah, I remember that.

I kinda sorta remember work. 35 years of commuting pre-dawn to the University in inner-city Baltimore was plenty for me. I went back for a visit.

Once. A few months after I retired. I truly loved and enjoyed some of my co-workers, but there is nothing that will get me back into Baltimore City. Work was the 600 block of Lombard St., three blocks from where Simon & Burns “The Corner” was set. Nope, no thanks, nevermore.

Or even get close; if I have to drive south to the suburbs I am horrified at the traffic, the clueless drivers, the sheer number of people. Almost anything I need to do I can accomplish across the nearby Pennsylvania border for brick and mortar, or I order on-line.

My suggestion to Doug, give the length difference in weird sheerline flare from side to side – 112” on the right, 75” on the left - indicating some long-term (poor, on the ground, rotted gunwales, maybe propped over a log) storage was to put the Traveler away for now , C-clamp some pieces of 2x4 to the weird warp sheerline flare, and try to s-l-o-w-l-y tighten the clamps every few weeks to see if that edge will come back to normal.

I can only imagine that the sheerline curl took years to develop, and ain’t coming back to true (without cracking the glass) much quicker.
 
I picked up a Traveler earlier this year, and I am happy to look at or take photos of, or take measurements of or...etc. Whatever might help you.
 

Attachments

  • IMG_3357 (2).JPG
    IMG_3357 (2).JPG
    382.9 KB · Views: 18
  • IMG_3359 (2).JPG
    IMG_3359 (2).JPG
    631.6 KB · Views: 18
I am hopeful that I can get the photo problem resolved soon.

In the meantime, one work-around is to post the picture in the body of the post. This works from a windows pc, but I am not sure if it works using other systems:

Make sure the curser is in the place where you want the picture to go. Click on "upload attachment". You will see:

Insert: Thumbnail Small Medium Large Fullsize Remove
[file name here].jpg

I usually click on "medium" and the picture is inserted.

I used this work-around in my post about the flashfire floatation tank relief valve, which I just posted.
 
I've had no problems viewing the pics posted here on this thread. I use whatever laptop is available to me, young and old.
Doug's Traveller hull deformity looks a little troubling but I agree I wouldn't cut the sheer. Good luck with the gunnels Doug.
Those are nice photos Gerald and Dagger.
 
I can't view the photos to the point of making any sense out of them. But if the area of deformed hull extends no farther down than one inch from the top of the molded hull, I probably would simply cut the hull down since you are going to rerail it anyway.

I have owned a MRC Traveler for about 4 decades now and it was the first dedicated solo canoe I ever bought. As for being true to the design, the Traveler evolved from the Jim Henry designed Screamer, which was a downriver racing canoe which was very deep. The Traveler was cut down about one inch at center from the Screamer, but it is still quite deep for a solo canoe, 14" at center. That is the same center depth as the Jensen-designed Wenonah WWC1, also a downriver racer. There was a time when the Wenonah WWC1 was a popular solo tripper in the northwoods and a lot of owners cut them down an inch to reduce the windage.

The Traveler's design suited me well at the time I bought it because as my daughters were growing up I could put one of them between my knees in front of me and trim the boat with the sliding center seat. But it is a really big solo boat, and too big for day trips and most common applications. Unless you really need that depth because you plan to use this for expedition tripping with a heavy load, paddling with a small child or large dog, or downriver racing, it can be argued that a cut down hull that catches less wind would actually make for a better boat. Cut down an inch would still make it 13" deep at center, same as for the Malecite. Compare that to the 11.75" center depth of the MRC Independence.
 
if the area of deformed hull extends no farther down than one inch from the top of the molded hull, I probably would simply cut the hull down since you are going to rerail it anyway.

Pete, out of curiosity how/with what would you recommend cutting down the sheerline on that fiberglass canoe?

I can see laying a strip of duct tape along the sheerline, both inside and out and scribing cut lines on those, thinking also that the tape would help prevent the glass from fraying too badly when cut.

But the actual cutting tool?

Obviously not a Skil-saw due to the curve of the sheerline. A Sawzall might be hard to handle on a flexible gunwale-less glass hull.

Jigsaw? Dremel tool with rotary cutting blade? Maybe a coping saw so the cut could be done more slowly and carefully?

Some other tool that would work best?
 
A coping saw would probably work and would be safe, but might be interminably slow. I have a scroll saw so that is what I would try first. But I would expect to have to brace the hull sides with something like slotted furring strips or such to stabilize the sides and reduce movement if using a jig saw, scroll saw, or other type of reciprocating saw. A Dremel with a rotary cutting wheel might work well and would certainly be worth a shot. A rotary cutter would eliminate the problem of the shaking back and forth that a reciprocating saw can cause.
 
Last edited:
I trimmed down the sheerline on a couple old fiberglass Wenonahs in the past. I don't remember all the details, only that I used a jigsaw and that it went quickly without any issues. I don't think I did anything to stabilize the hull before cutting. I'm sure there was some chipping and frayed edges but I figured it was all going to get covered by the (alum) gunwales anyway, and it was. I do think I remember lightly coating the newly cut edge with epoxy just to seal it up.

Alan

That's good to know. And a jigsaw or scroll saw cuts on the pull stroke which helps to reduce "chatter" of thin material. If the sheerline of the hull is flared outward, most of the sawing would be done on the interior of the hull and the outward pressure would tend to stabilize the hull.
 
I'm going to borrow this thread since I've adopted this boat.

As pblanc says above, this is a high volume hull based on a downriver racer, the Screamer. I like that style; I don't complain about the wind and I do complain about sit-n-spin boats with too much rocker. My "use case" for the boat is as a big water solo tripper: Moosehead Lake, Chesuncook, and the Allagash headwaters lakes and associated rivers. Basically a boat that's suitable for lake waves and class II+ with a full load.

The hull is fiberglass, so it's never going to be light, but I'd like it to be plausibly portagable (double carrying). I believe it was officially 60# new, and I weighed the bare hull at 48.7, which seems a bit high given the official spec but maybe that spec is based on a dubious "average". In any case, my target weight is 59. I'd like to stay true to the original design, so giving it a shearline haircut would be a last resort. Also, I really like the original (?) contour seat frame and wooden slider rails that came with it, so I plan to use them even though they're not light (they weigh about 2.5lbs, without webbing or drops). Otherwise, I'm going to try to minimize weight -- aluminum or wimpy softwood rails if possible, no decks, aluminum or laminated thwarts and grab handles. I don't think I'm going to paint it, I kinda like the weathered gelcoat, 'twas once green.

It's all well and good for me to contemplate light rails, but if the shearline problem proves to be intractable I may have to solve it with the bigger hammer approach of big gunwales, as it seems the owner before Doug did. We'll see. Also, it's a PITA to work on a boat with no gunwales, so the sooner I can get on with it the better.

Right now I'm experimenting with some "Acetone Therapy". (How bad can it be, ladies dip their fingers in it!) The plan is to keep a section of the hull wet with a rag soaked in acetone for a period of time, clamp it tight to a more correct shape, eventually remove the rag and let it dry out while still clamped, then release the clamps and hope it keeps the correct shape. Whether this works at all and if so what the time constants are is TBD.

IMG_20211121_142619335.jpg
 
Doug and I spoke at length about correcting the deformed sheerline, with a best guess that the Traveler sat wood gunwales down rotting away across a midships log, time and weight eventually producing the deflections.

I had not considered an acetone solution. I was thinking maybe reverse the time and weight process and add heat. Aim a halogen lamp at the deformed area, get it hot, C-clamp a board on either side , tighten the clamps until you start to hear (hopefully just gel coat) cracking noises. Let them sit for a few days, heat and clamp them again and repeat as needed.

You might only need to do that a few times to tell; if it shows heat + pressure + time improvement keep going.

Worst case scenario, if the deflection is irreversible, and without cutting the sheerline down, you might be able to clamp it until it cracked and make glass & gel coat repairs with the sheerline held in proper regunwaling position.

I’ll be watching this might-take-a-while rebuild; I was tempted to go get the Traveler if only to tackle fixing that deformation; the last thing I need is a canoe with can’t keep my head inside 26 ½” wide gunwales.

I think Doug wanted me to take it just to hear about how quickly I swam on the inaugural paddling test.
 
The first course of acetone therapy was inconclusive. I think it's a tad better, but the test section was not the worst area. Might be placebo effect. Bad lab discipline on me for not taking a precise measurement beforehand.

Spending some quality pre-turkey time with this boat in full sunlight and with a tape measure, I'm starting to think the excess flare problem is not as bad as it looks. Currently, the relaxed hull is about 16' 1" long and ~30-31" wide. The specs for this boat (thanks Mr. Guest) are 16' 3" long and 26.5" wide. If I clamp in some temporary brightwork and pull the hull in to 26.5" width, it looks like the photos below. Note that I'm taking the measure at the hull edge -- is that what the official spec would be, or would it be outwale-outwale? In any case, with the sides pulled in the boat has a bit of bubble chine style tumblehome and the sides up to the shearline look much more natural.


IMG_20211125_104656454_HDR.jpg

IMG_20211125_104733491.jpg

One of the things I've noticed is that the hull is happy to bend inward as long as one grabs a big enough longitudinal section. I'm starting to think the next step might be to just put some gunwales on the boat, adjust it to original spec, and see how it looks. More valium less acetone? The hull deformity would still be there, but rather than being excess flare it would be an inward crease/dimple below the gunwhales.

Can any current Traveler owners (fellow travelers?) comment on the precise dimensions? It'd also be great to know the thwart lengths and positions.
 
After thinking about it and reading what people who know more than me think, I decided to give poplar a try. It is big box store convenient and this boat needs some rails soonest.

I found a nice 1x8x9' poplar board; would have liked something longer, but that was the best in the bin. The plan was to cut 8 3/4x3/4 half-blanks, then scarf those into 4 full length (18'ish) blanks. This is the most ripping I've ever done, and my skill saw is a basic consumer grade model that I bought to do a few deckboards, so I was a little nervous. Also, I knew I needed most of the wood so I didn't want to screw up. I followed @Jim Dodd's howto on cutting strips religiously, even down to the bucket as a saw stand. Or I should say as religiously as I could given that I don't have an altar strongback and was working on a couple pallets on my cellar floor. It was slower for me because I didn't have a long enough work surface and I had to do some start-stop-reclamp-repeat as I got to the narrow end of the board, but it all worked and the strips look pretty good. Kinda fun doing the skillsaw fence thing, afterward I even cut some quarter inch strips from some maple scraps for kicks.

IMG_20211127_130139644.jpg

After lunch I cut some angles to do the scarfing, and I that point I realized that my nice looking strips were not quite rectangular in cross section. Hmmm. Maybe the base plate of my saw was a bit off? It should be flat, the lines match up. Oh well. After making a few kibbles of kindling I found which of the four sides seemed best for cutting the angle, and did the same for all 8 of them.

They seemed to line up pretty well. Ratio is only about 3 to 1; I put my trust in epoxy. We'll see how they look when it's all cured. You can really see the greenish hue in the poplar when it's clamped between pieces of pine.

IMG_20211127_151215736.jpg

Assuming they turn out well, next step will be to shape them a bit (I'll take off the corners, but not much more than that) put some secret sauce on them and then install.
 
I'm making progress with the gunwales. Since I'm a woodcraft luddite I figured I would shape them by hand, with a rasp and then sandpaper. Also, I felt like they were a bit underengineered being from a light piece of poplar, so I didn't want to remove much material.

The shaping wasn't particularly hard, but I should have given more thought to the fact that when you have 72 linear feet of something that needs to be processed even something that's easy gets a bit tedious. However, I'm pretty happy with how they turned out. I stained them with some light (pecan pie?) stain I had around and gave them several generous coats of turpentine + boiled linseed oil.

They are fairly light. The four blanks weighed ~6.5 lbs with 75 stainless steel screws.
IMG_20211130_202511496.jpg
If you look closely you can see a couple round dents in the wood, from aggressive c-clamping. More dents to come with the install!

This afternoon I got started on installing them. Sorry for the grainy picture. Of course when it's dark at 4pm you need a lantern to do anything outside after work.
IMG_20211203_163418325.jpg

The original gunwales were installed with screws 6.5" apart, whereas the second set were installed by a drywall monkey on meth. For this third set, I figured the 6.5" spacing was about right, so I marked the original screw locations and put my screws about midway between them, missing the monkeywork where possible. Basically I put my c-clamps right where the old screw holes were, and then followed the technique from one of @Robin's youtube videos . (What's with the Dawn? I only had Palmolive.)

I only have 4 c-clamps, so it was creeping along three screws at a time, but I was fine with that since with the shearline curl issue this hull needed a lot of clamp-massage-repeat to get the gunwales up to the top edge of the hull. I'll finish up the ends in the daylight tomorrow. I think the shearline problem will mostly sort itself out as the gunwales are pulled together by the thwarts, but we'll see.
 
Back
Top