• Happy Weed Appreciation Day! 🌱🌿🌻

Optima Number 3

Joined
Jul 6, 2021
Messages
643
Reaction score
555
Location
The Hereford Zone along the Mason-Dixon Line
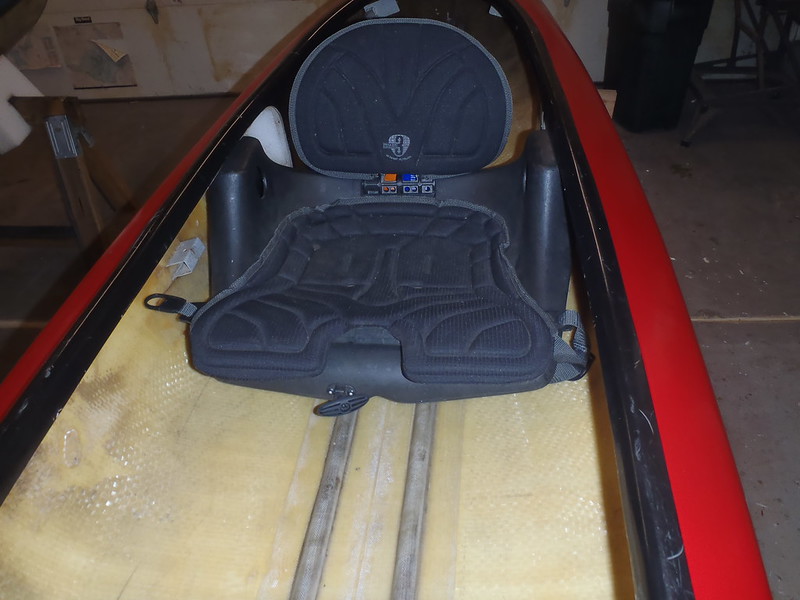
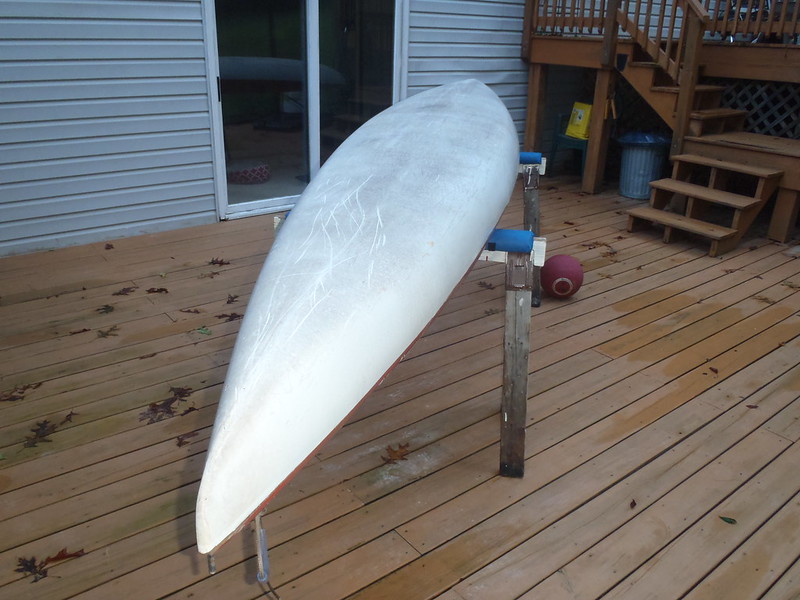
Look what followed me home from Lancaster, another Hyperform Lettmann Optima. My current Optima came out of Lancaster County; someone up that way was selling Hyperform in the ‘70’s.

P8300001 by Mike McCrea, on Flickr

The last Optima conversion was as much fun as I’ve ever had in the shop. “An atheist, a communist and a Quaker walk into a bar. . . . . .

http://scooter-bangortoportland.blogspot.com/2015/05/1977-thermoform-optima-decked-canoe.html

I worked DougD like a rented mule during that 3-day marathon decked sailing canoe conversion.

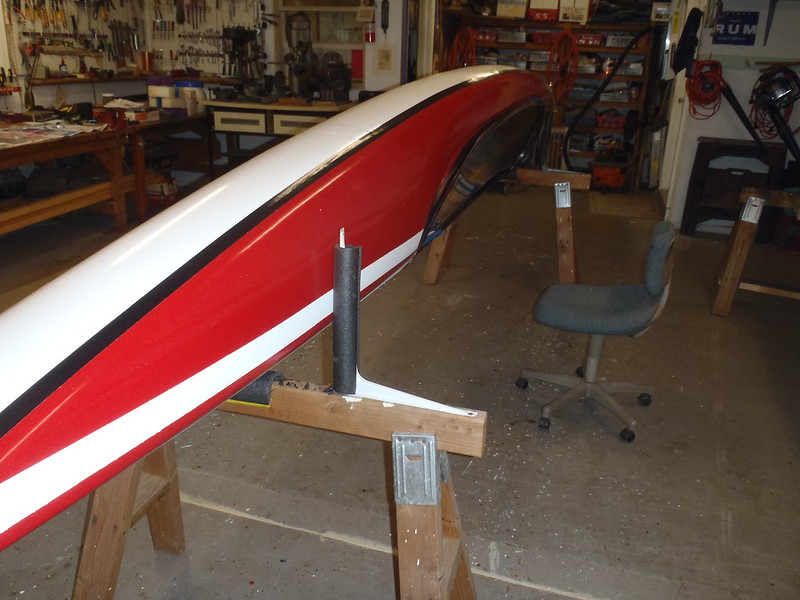
The new one is a very nice 1975 Optima, 57lbs before tandem seat removal. Add in decent center seat, a modern rudder, foot controls and utility sail thwart, probably keep it close to 65lbs. My ’77 glass & nylon Optima, fully outfitted, came out at 57lbs, Doug’s ’77 woven roving version at 63lbs.

The bottom needs a coat (or two) of leftover EZ-Poxy white.

P9010008 by Mike McCrea, on Flickr

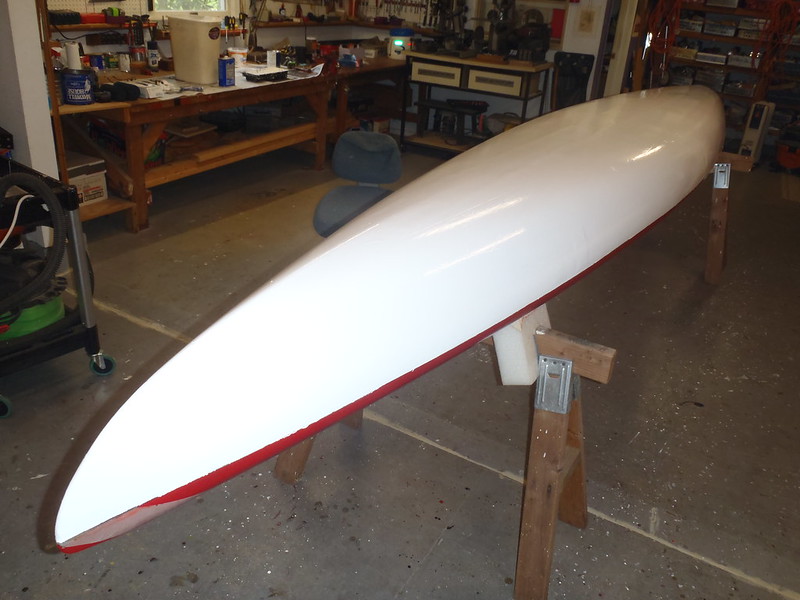
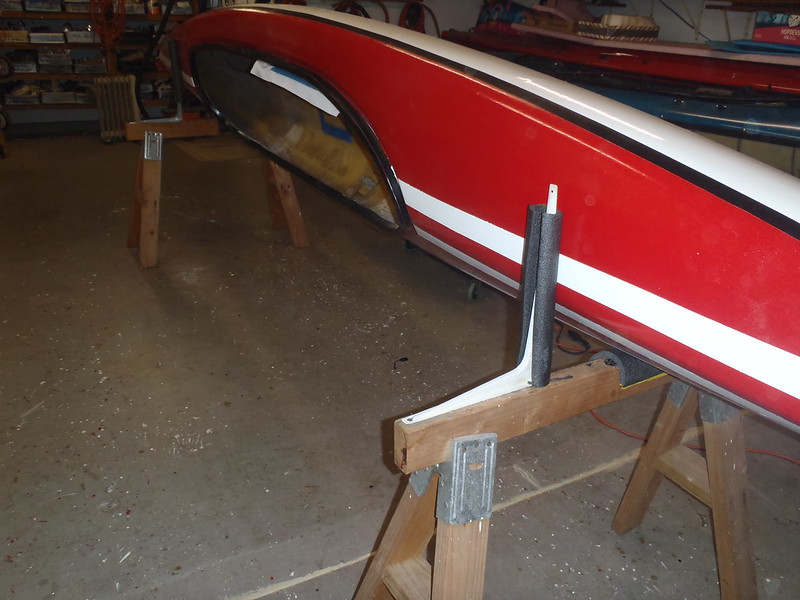
Not sure about the decks, they are in decent shape, but are un-sea kayak like smooth flush no-dimples or reveals. The decks could easily be rolled and tipped, and I have some leftover Fire Red EZ-poxy I need to use up.

P9010010 by Mike McCrea, on Flickr

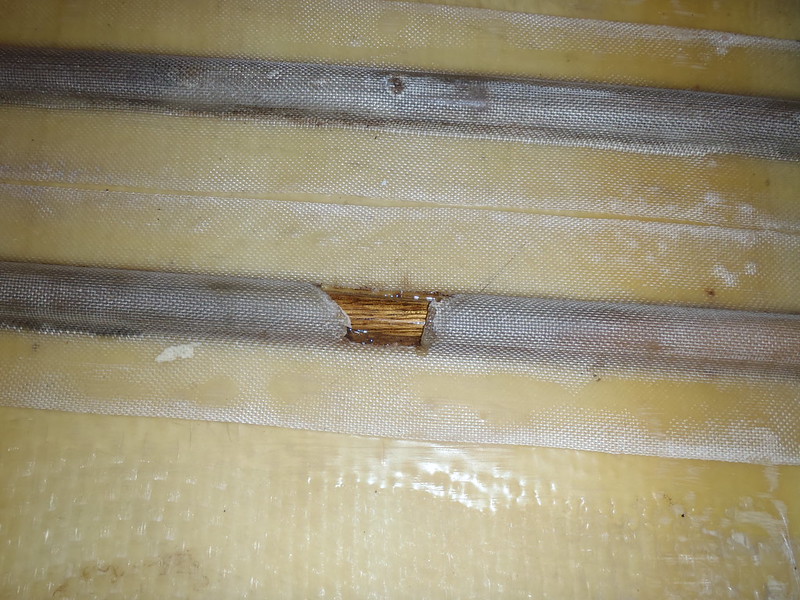
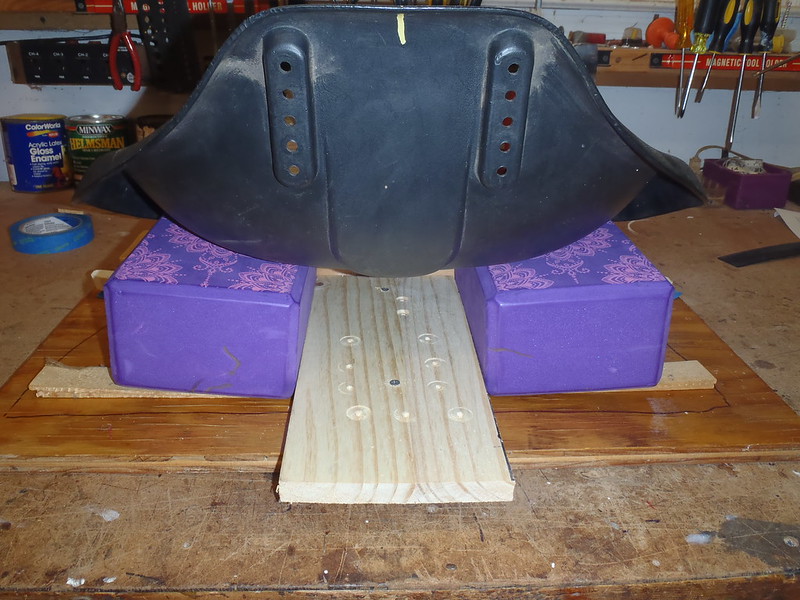
The gel coated bottom is a better job than Doug’s or mine, seemingly a thinner gel layer, but better laid, three little missing chips, cumulatively the size of a pinky nail. The bottom scratches are numerous, but none are very deep. Good gel coat, reminiscent of early ‘70’s Mad River gel coat craftsmanship.

Another shop boat project at last; it’s not the rotted gunwales kevlar solo canoe of my dreams, but it’s something. Fill in the missing gel coat chips with G/flex, lightly sand the bottom, roll and tip some EZ-Poxy, then think about Fire Red decks.
 
After debriding and cleaning the teensy gel coat chips missing from the bottom, cumulatively the size of a pinky nail, the shallow voids were filled with G/flex 650, thickened with Colloidal Silica. After some cure time and a bit of RO sanding and the bottom will be ready for EZ-Poxy painting.

P9040016 by Mike McCrea, on Flickr

FWIW those scratches would not come clean, even with using DougD’s “Magic Mix” of 50/50 Dawn and vinegar. I will lightly sand the entire bottom before painting.

I had mixed some excess G/flex, and used it on the stern stem, where the gel coat was starting to wear thin. I know where the Optima was paddled most often, the shoreline is largely rock; the folks who owned this hull took good care of it. I could have laid a Dynel sleeve skid plate on the sharp vee stems while I was at it, but there was no need.

The bottom does have a lot of scratches, but Hyperform’s gel coat work was impressive in 1975. The gel coat was not laid as thickly as on mine or Doug’s, both 1977 Optimas. There are zero spider cracks, which is astonishing for a 46 year old hull; that gel coat layer has proven remarkably hearty and durable. Very reminiscent of 70’s Mad River gel coat work, perhaps there is something to be said for thinner, better laid or better chemistry gel coat.

Or perhaps better workers; the guy who founded Phoenix/Poke boats worked for Hyperform before starting his own company, using the same Hyperform-style pigmented glass & nylon technology. Whoever was building boats at Hyperform in ’75 did nice work.

The deck is the pigmented glass & nylon as both our Optimas, the bottom on this one is gel coat, glass and woven roving, like Doug’s (mine has a glass & nylon bottom), but seemingly thinner stranded roving, and not as exposed knit-like yarn. Or maybe Hyperform ’75 just did a better job laying the roving and Vinylester resin.

In order to “puddle” contain the thickened G/flex the hull was repositioned several times, first cockpit down, then angled / left and \ right.

After the thickened epoxy had a night to cure the Optima back went back upright (I bet this hull gets flipped a dozen times in the shop before I am done) and I removed all of the Hyperform & Lettmann logos. They were not in terrible tattered condition, but if I decide to paint the decks Fire Red they needed to come off.

P9030003 by Mike McCrea, on Flickr

A stacked pile of old launch permits too, ending with in 2008, so I suspect the Optima has been unused in covered storage for the last 13 years. Even so, as usual, red is the worst color for sun fade.

P9030002 by Mike McCrea, on Flickr

That shiny exposed red really makes me want to paint leftover Fire Red EZ-Poxy the decks. Or buff out the oxidation and wax. Or maybe do nothing, especially nothing elbow greasy energetic, to the decks ;-)

The biggest repair needed was replacing a 2’ section of internal keelson.

P9030005 by Mike McCrea, on Flickr

The keelson substrate is wood, 7/8” wide x 3/8” tall. WHHAAAA, I don’t wanna have to cut and a custom shape a piece of wood.

I don’t have to; the scrap box of thwart, yoke and seat frame pieces to the rescue. I add three times the amount of scrap to that box compare to what I use, but I do use those scraps all the time. Waste not, want not, and sometimes a scrap piece is the perfect lazy man solution.

P9030009 by Mike McCrea, on Flickr

Piece of cut down thwart end. Two saw cuts, some sander work and I had perfect 7/8” x 3/8” matching dimensions. And it’s already varnished.

P9030011 by Mike McCrea, on Flickr

I didn’t want to wait around for regular epoxy to set up before fairing and covering that ash stringer; G5 five-minute G/flex to the rescue (thanks Doug, I’m on my second set of G5 bottles.

https://www.westsystem.com/specialty-epoxies/g5-five-minute-adhesive/

P9030007 by Mike McCrea, on Flickr

That stringer will be covered with thickened epoxy, Dynel and G/flex 650; the “not recommended for moisture” of G5 doesn’t matter in that quickly hold-in-place then covered application.

So far, I’ve used “toughened” (and silica thickened) G/flex 650 to fill the gel coat chips, and G5 quick-set to position and hold the stringer. That ash stringer will get covered with peel plied Dynel sleeve, but I want some uber thickened epoxy to fill and fair the half round ash substrate first.

Oh boy oh boy, I get to work with another West System G/flex for the first time, G/flex “thickened” 655. Same 1:1 mixing ratio, 655 comes in two 125ml “toothpaste tubes”. I had hopes it would be mold-ably thick like PC-7 epoxy.

Nope, it is thicker than 650, but still has the consistency of honey. I added a wee bit of Colloidal Silica to the 655 to make it more paste like and filled/faired the exposed stringer. And then immediately painted that with straight 650, laid a strip of (pre-cut) Dynel sleeve atop, painted a top coat of 650 and laid a strip of release treated peel ply.

I gotta say, having found release treated peel ply in pre-cut rolls has made things a lot easier.

P9040012 by Mike McCrea, on Flickr

It was non-boat worker Glenn who found a source for release treated peel ply in rolls.

https://www.aircraftspruce.com/catalog/cmpages/peelply.php

Thank goodness Glenn doesn’t work on boats. He has a half dozen that desperately needing attention, and had he started fixing his derelict canoes he wouldn’t have had time to become an illustrious Staff Member on Canoe Tripping. Glenn needs a new tee shirt; the canoe tripping logo on the front, STAFF in bold letters on the back.

Some gloved babysitting of the Dynel under peel ply and that broken keelson should be good as new.

Peel ply removed the next morning the repaired keelson doesn’t match in weave or color, but it should be dang tough; Dynel sleeve, so two layers thick, lapped well past the ends of the break.

P9040015 by Mike McCrea, on Flickr

In a day or two, after some bottom sanding and another wash/rinse and I can roll & tip a coat of white EZ-Poxy.
 
With the gel coat chips filled, cured and sanded, I taped off the seam edge, and was faced with a decision.

I could, as often before on elder-hulls, roll and tip a coat of epoxy resin. And then pull the painters tape, wait a week for that to cure, wet sand, re-tape and roll the first coat of white EZ-Poxy. I know that the epoxy layer would fill in the shallow bottom scratches better than paint alone.

More mental shop whining, WAAHHHH, I don’t wanna wait a week, then wet sand, then freaking tape the seams again. And besides, I have good weather coming for wet sanding on the back deck.

I went ahead and rolled the first coat of white EZ-Poxy.

Eh, OK, I probably should have rolled and tipped an epoxy layer first. I had a quarter can of EZ-Poxy white left, but forgot how paint thirsty aged un-epoxied gel coat can be, seriously slurping in the first coat.

I might have made it to two coats with paint laid atop a less thirsty epoxy coat. There are a lot of thin spots, and it absolutely needs a second coat. As has every hull I’ve ever painted, epoxied or not, and ,most benefitted from a third coat of paint rolled & tipped. Pay the Piper, do it right, do it twice or, better, thrice.

That 46 year old hull was thirsty enough that I don’t have nearly enough paint left for a second coat. Ca-ching, another quart of EZ-Poxy white ordered and on the way. I’ll use it eventually; a friend has an ancient white-over-white Sawyer Loon I want to have my sanding and painting way with someday.

The second (and third?) white bottom coat will get Pettit 3021 Performance Enhancer added; 8oz can of enhancer per gallon of paint, I got a lot of 3021 enhancer left. And some measured math to do before decanting and adding the additive.

https://www.pettitpaint.com/product...rt-polyurethane/ez-poxy-performance-enhancer/

The fresh quart of EZ-Poxy white won’t arrive for a week/10 days, I need to shop futz with something meanwhile. I have some leftover Fire Red EZ-Poxy, enough (I think) for two coats the decks, might as well use that paint up as well. I am rolling and tipping the faded decks; kinda knew I was from the start.

With the Optima on the back deck near the hose, I wet sanded and rinsed bottom and the decks. Those surfaces are now silky smooth. So smooth I keep running my fingers along the sides in the shop, making pleasurable “Oh baby” noises. Wet sanding the hull bottom and decks took all of 30 minutes. So silky, so worth that effort.

With another can of white EZ-Poxy on the way I have a nascent plan to tape off some full deck length “muscle-car accent stripes” for white-Fire Red stripage. I kinda like the off-set paired wide and narrow look. Or maybe two wide stripes, centered equally up the middle, so the paddler doesn’t become tipsy stripe imbalanced when looking at the front deck.

https://www.google.com/search?q=off...g&ei=4Ak5YYe1Eraf5NoPkayGuAg&bih=854&biw=1249

It will have race car stripes, but y’all get a vote on the layout and design. Which I may ignore. I have already ignored a friend’s suggestion that I combine the few ounces of white EZ-Poxy with some leftover red, and paint the decks, his words, “Dog Dick Pink”.

That boy ain’t right. There is rain in the forecast tomorrow, good day to be shop taping and painting. Vote early, and often.
 
Looks like a good fix Mike.
Glad to see I'm not the only one who hangs on to scrap wood !
They say it's not scrap, until it's saw dust !

Jim
 
Painting the Optima decks was mostly a taping challenge. Taping the curved gunwale edge on a canoe or the cockpit seam on a kaya. . . . . er, decked canoe, is always a peculiar trial. With the continuous curve the tape first wants to walk up into the line, until you get to the center of the boat, then it reverses course and wants to creep away from the line. Arrgghh!

I didn’t just need to tape the Optima’s hull/deck seam, I needed to tape off the black cockpit coming transition. I will note that there isn’t a lot of straight around a cockpit coaming.

And that soon to be sexy hull needs muscle-car racing stripes on the decks; I opted for the taping (and re-taping) ease of parallel two inch wide white stripes, separated by an easily-later-masked two inch wide center over the Fire Red EZ-Poxy. All together that made for a complex taping task, even the stripes were oddly involved.

P9080005 by Mike McCrea, on Flickr

Of course, after the second coat of red goes on the decks I’ll have to pull the tape and re-mask in order to paint a couple coats of white for the stripes. I think it’s going to be worth it for the dual white racing stripes accents on the red decks, and those will not require much paint.

P9090008 by Mike McCrea, on Flickr

Rolled and tipper and no surprise, the Optima decks will need a second coat of EZ-Poxy, and I think I have enough Fire Red remaining. I want to add 3021 Performance Enhancer to the second coat, and, while dispensing paint for the first coat, could gage the quantity needed to second layer, and then calculate the amount of enhancer to add.

I am getting better at estimating the quantity of paint required; one measured cup of EZ-Poxy was plenty to paint the decks, with almost enough left over for a custom paddle blade design I had set aside to receive any excess. I mixed a touch of color tint to the dregs in the pot to make enough for the blade. (Well, OK, I had a DDP custom color plan going in)

Some days later, with the complex masking job now held tape edges painted in place and un-paint-creepable, I was loath to take everything off, wet sand and re-tape for a second coat. So I cheated a wee bit and used 0000 steel wool to take the shine off the 1st coat of red. A little tack cloth action I was ready to roll paint.

The second coat of Fire Red on the decks will have Performance Enhancer added; the mix recommended is 2oz per quart and I need but one cup. Skipping my checked-thrice math my supply of little graduated medicine cups are marked in cc’s and ml’s. More conversion.

Ah, rolling and tipping. So much prep time; sanding, cleaning, taping, cart and bench ready with paint, performance enhancer, pot and graduated medicine cup, roller, pan, foam brush, gloves and acetone for any oopsies, so little time actually painting.

I was again proven inaccurate at estimating the quantity of paint remaining is a mostly empty quart can. Scraping out the dribbles I had ¾ of a cup of Fire Red, 6oz; I adjusted my Performance Enhancer added accordingly.

It was mighty close, thank goodness second coats always use less paint. I was squeezing the dregs out of the roller and scarping the pot and pan clean to get enough enhanced red (and dollop of custom tint) to second coat the paddle blade, an area which could only benefit from the Performance Enhancer’s “added hardness and longevity”. If I’m doing custom paint work, dammit, I want it to last.

P9100011 by Mike McCrea, on Flickr

All that prep work and it took 20 minutes to roll & tip the decks and use the last drops of paint. And almost that long to clean everything up and put it away.
 
Painter’s tape pulled. Any minor paint creep at the hull/deck seam edge will be covered by the new seam trim; 1” Gorilla tape, which has worked very well and lasted durably in the past.

P9110015 by Mike McCrea, on Flickr

Oh heck yeah, I think those decks will look good with dual racing stripes.

I have a ways to go before the painting in finished, another coat (or two) of white on the bottom, then a couple/three coats of white on the decks to create the racing stripes, the last of each with Performance Enhancer added. With wait time for curing, hull flipping, sanding and second coat applications, I can stretch painting the Optima out for weeks.

Just need the fresh quart of white EZ-Poxy to arrive. FWIW, all of the Amazon EZ-Poxy vendor’s prices, with shipping included, were near the same. I picked one at random and ordered.

Eh, maybe too random; I didn’t think about it, maybe I should have looked for a vendor in a neighboring State. My new can of gloss white EZ-Poxy, much like the Conk seat shipping episode, has been vacationing in Florida this week; Pompano Beach, then Opa Locka. What’s next, Flamingo? Everglades City? Maybe a stop in Micanopy to see old friends.

I like the “tracking” ability with shipped packages, but if this paint passes my house en route to some Distribution Center in Pennsylvania I’ll be pissed.
 
After a week of wandering around Florida the order of white EZ-Poxy suddenly took flight. I suspect literal flight; half a day later it was shuffling around a two stops in Baltimore before arriving, not at my doorstep, but perched porch pirate precariously atop my mailbox, unseen at the top of the driveway. Gee, thanks.

Time for another coaming taping job. I will say this for Hyperform’s 1975 coaming-to-hull fit; that is as tight a no-gap fit as I have ever seen. Nice work boys.

Further notes on taping and masking; 2” wide tape is, uh, twice as difficult as 1”wide tape when it comes to conforming to hull curves. I don’t need to tape, paper mask and re-tape that seam at catch drips or dribbles, but I don’t trust 1” wide tape to catch any over-exuberant roller saturation. So, one mask of trickier-to-lay 2” tape.

I had high hopes, but low expectations for that second coat. I hoped that one more coat of white would cover the thin spots and holidays on the bottom’s first coat, and low expectations that I would be pleased enough not to roll & tip a third.

Time to roll. I didn’t skimp on EX-Poxy for the second bottom coat; one cup, with an ounce of performance enhancer, was more than enough, but as usual I had things prepped to accept the excess in the pan and on the roller.

P9140006 by Mike McCrea, on Flickr

Had the first coat not been a Scotsman’s leftover combination of EZ-Poxy Gloss White and Hatteras Cream the coverage would have been easer still. It didn’t take much “cream” to make white noticeable off-white. But I doubt the scant couple ounces in either leftover can would have survived head space storage over time un-solidified, even having combined the leftovers there was some crust present to extract.

My low coverage expectations were exceeded. No holidays, no thin spots. Two coats was good enough, and it will be easy enough to tape and paint it again after a few years when it acquires enough battle scars. I pulled the tape.

P9140009 by Mike McCrea, on Flickr

I had some Performance Enhanced white left in the pan, and another paddle blade that needed some prettification; enhanced base white blade, to be later pattern taped and painted with various stripes. Still had some white paint left to squeeze out/use up, and there this dang Maple tree in our turn-around spot that I have almost sideswiped a thousand times while squinting through the triplicity of rain spattered truck and cap windows.

P9140011 by Mike McCrea, on Flickr

It was a better to ask forgiveness than permission for that tree trunk painting. I can use the leftover white from the deck’s racing stripes to finish the drippy bottom down to nearer ground level. I wonder how the Missus would feel about some fluorescent orange stripes on that white tree trunk beware paint?

Better not to ask first.
 
Prepped for the white stripes, red center stripe taped off, outer edges of the white stripes taped.

P9140013 by Mike McCrea, on Flickr

And outer edges paper masked, in case I drip or dribble on the Fire Red hull. More benchtop prep, more calculated quantities of paint and Performance Enhancer. 1/3 cup of EZ-Poxy should be enough, even with first-coat thirsty decks.

P9140016 by Mike McCrea, on Flickr

Painting the white stripes was short work, but I then faced a dilemma; I’d like to sand and second coat the stripes after the EZ-Poxy has cured, but I really don’t want to pull the tape after the paint is dry and discover obvious creeps or drips under the tape. And, mostly, I really, really want to be finished with taping and painting.

The single coat of Enhanced EZ-Poxy covered the wet sanded red decks better than expected, a couple thin spots, but it passes the 30 foot test, and even the 10 foot test. It’s too risky not to pull the tape now and later discover cured drips and dribbles I can’t simply acetone away.

Screw it, I pulled the tape.

Lordy that was a wise idea. There were the expected minor creeps and dribbles here and there under the tape, but near puddles of white paint in the cupped curves under the coaming ends. I have no Fire Red left with which to touch up that puddled white, and spent twice as long with folded paper towel squibs and acetone removing them as I did painting the stripes.

All in all though, not bad.

P9150018 by Mike McCrea, on Flickr

Not perfect, but I haven’t achieved perfection yet. I doubt I’ll paint racing stripes again, and think they would have looked better had I spaced them 4” apart, but with the Fire Red decks and white strips that Optima is already a sexy thang.

After a couple days cure time and I can add the 1” Gorilla tape seam, and start thinking about custom outfitting. I have ideas, starting with a choice of three very different seat options.
 
Nice job and write-up as usual. The flashy red color and striping make the boat look very fast -- Fast Eddy.

I'm interested in the Performance Enhancer, which you refer to several times and which I've never heard of. If I get some, should I take it with or without food?
 
I have a variety of Performance Enhancers available in the shop, although none will make your willie stiff. Today’s little helpers are Yuengling Porter and the last of the Bruce Banner. I tried to interest you when you last visited to no avail.

You are welcome to try the EZ-Poxy Performance Enhancer. I recommend taking it with a pallet cleansing IPA, although the label includes such cautions as “Use only in a well ventilated area”, “Permanent brain and nervous system damage” and “Properly fitted respirator”. A huff or two might be all you need for enhanced performance.

This stuff, EZ-Poxy 3021 Performance Enhancer additive:

https://www.pettitpaint.com/product...rt-polyurethane/ez-poxy-performance-enhancer/

Having used it, and not used it, I’m convinced about the claims of higher gloss finish, and flow out of roller stipple and brush strokes.

The claims of hardness and longevity also seem to be holding up; ask Guest in a few years, he has a paint panel test underway.

https://www.canoetripping.net/threa...rustoleum-topside-take-ii.114417/#post-125460

 
Onward with the Optima. More taping, albeit not for painting this time.

1” Gorilla tape covers the deck to hull seams were some red/white paint lines were a little uneven. 16’ 6” of hull seam, 30’ roll of black 1” Gorilla tape; more than a full length roll. So, as often before, six feet off an in-progress roll of Gorilla tape wrapped evenly around the stern, then overlapped a few inches with the fresh roll, up around the bow and back the other side.

P9160003 by Mike McCrea, on Flickr

Dang, Sexy Thang looks so much better with that black tape and clean seam lines.

One more bit of tape, or, actually four more short pieces of tape. Every boat we own, and every boat that has come through the shop in the last 10 years,has short pieces of High-Intensity reflective tape on either side at the stems.

Sexy Thang needs the same. I’m all out of red reflective tape, but have plenty of gold. It won’t be color coordinated, but gold and silver are the most reflective.

P9160006 by Mike McCrea, on Flickr

That (discontinued, of course) High Intensity Watersports Tape has proven very durable and long lasting. I originally bought a roll, then another, then a 5-color pack of rolls. That five-pack is almost all gone on various boats, barrels, buckets and hard to find in the dark black Pelican boxes. Not to mention portable wag bag toilets and harder to find in the dark without my specs black glasses cases.

And one on my wife’s forehead. My reflective tape won’t get me into heaven anymore, but I love the ability to shine a light at the boat at night and have it flash back safe and sound. Nice being able to find my glasses case in the mess of the dark tent too.

Time soon for some OEM outfitting removal; gutting, cutting, grinding and sanding, the least fun and dustiest part of these decked sailing tripper conversions. Time to prep some PPE.
 
I’ve been pondering seats, or seat, solo, and need to have a look at the possibilities before I cut out any OEM parts or pieces.

What I don’t have is another Wenonah bucket on pedestal; the one in my current Optima was removed at the bow paddler’s request from a Sundowner, and replaced with her preferred contour wood frame & webbing.

P9160012 by Mike McCrea, on Flickr

That short pedestal Wenonah bucket is near perfect for the Optima, and with Ridgerest padding is incredibly comfortable. (wide Wenonah seat pan, not the skinny version)

I have a choice of three seats available in shop storage excess; all will need some minicel elevation to facilitate single blade use.

Option #1, a Wilderness Systems Phase3 seat.

P9160010 by Mike McCrea, on Flickr

Pros: Very adjustable. Already a bit elevated, and, when resting on a bottom-carved slab of minicel, easily positioned at decked canoe height.

Cons: Some folks despise those seats. And some folks, me included, despise some of those seats; Phase3 seats come in a couple different styles and widths, and most are too narrow at the front “arms” for my manly thighs with feet on rudder pedals. And they are not lightweight; that one, one of the lighter, narrower versions, weights 7lbs. The wide fat-arse one I have (and like) in the Sea Wimp weights 11 lbs.

That one was too big. And too heavy.

Option #2. I don’t even know where I got this seat, or what hull it was in or meant for, if any; maybe a kiddie kayak, or Twiggy’s boat?

P9160014 by Mike McCrea, on Flickr

Pros: It only weighs 1lb 7oz. (I hear Alan Gage gasping “Only?”)

Cons: The seat pan is 12” x 14”, too small for most folk’s derriere, much less an endomorph’s arse, and I don’t see anyone shifting their weight when sailing without getting a black plastic wedgie.

That one was too small.

Option #3. A Mad River IQ bucket.

P9160017 by Mike McCrea, on Flickr

Pros: The most comfortable bucket seat ever to kiss my arse; with that high-rise back it is the only seat I can comfortably use without a back band. Mad River got at least a couple things right on their IQ stuff. With some RidgeRest padding that IQ pan only gets more comfortable. Deeply sculpted 18” x 13” seat, with a nicely thigh-curved front edge. Serendipity, elevated on a minicel pedestal the top of the high rise seat is just below the sheerline.

Cons: Not many. 1lb 14oz.

And that one is juuuust right. I kinda knew that going in.

It helps that I have a fully outfitted Optima side-by-side for comparison. We had an identical boat alongside for comparison when we marathon outfitted Doug’s Optima (My “Opie”, his “Cadillac”), and when we marathon outfitted my bro-in-law’s Freedom Solo. I say “we”; they did all the work, I just supervised and put tools away.

PC170120 by Mike McCrea, on Flickr

Yes, we remembered to weight the Freedom Solo first. I’m getting better at that and weighed Optima #3 before doing anything else.

P9160018 by Mike McCrea, on Flickr

Looking at the comparison Optima alongside I was mystified as why the seat location appeared oddly different even located in the same measured fore/aft position. Oh, yeah, it would help if I laid the seat in place facing the bow, not the stern. True story, an anonymous friend, initials DD did that, and actually installed a bucket seat facing the stern.

Glad DD has never seen me do something like that, say, for example, intend to install a test rivet snap, get distracted and instead carefully melt a hole and seat a grommet instead. As DD often reminds me, he just stood there watching me do it, trying not to laugh. What are shop friends for?

I’ll need to slightly carve the minicel pedestal to conform to the seat pan bottom, do some contact cement work and add some curved wedges at the rear for additional lean-back support. But now that I know none of the OEM seat frame or other outfitting will be needed I can get to some cutting and gutting.
 
Some of gutting the ‘70’s outfitting was pull-a-pin easy, even the long gone seats held in with pins. They had to be removable, if left in place upside down on vehicle racks they would pivot down and hammer on the roof. Doug discovered that the hard way bringing his Optima home.

The OEM foot braces are as distinctively 1970’s as bell bottom pants. Square aluminum brackets that the tandem foot brace bars slide into, with cotter pin adjustability. Actually not a bad KISS system.

P9170025 by Mike McCrea, on Flickr

The bracket is too well glassed in place to contemplate cutting out, but, once unpinned, the pedal bar slides out easily. I have quite the collection of those ‘70’s style foot pedal bars. The ones from the Klepper Kamerad used a pivoting “gas” pedal design.

P9170027 by Mike McCrea, on Flickr

If anyone has use for a set of either style, well, just ask; I don’t need that collection of historic entropy, but you know how it is with a Scotsman never-know saving stuff.

Time for the uglier gutting work. I needed to cut out the OEM seat supports while the hull is fully open. Maybe this time I’ll remember to install the carry handles as far as possible up in the stems before the utility thwart gets glassed in, otherwise I’ll need skinny Doug to come down and squeeze through that miniscule opening again.

P9170021 by Mike McCrea, on Flickr

Those supports are superfluous crap, and the seats that were removably pinned into them were incredibly uncomfortable. Cutting those fugly seat supports out was actually easy enough, but even gowned, gloved, goggled and respiratored I needed an immediate shower and change of clothes.

P9170024 by Mike McCrea, on Flickr

Happy was I to be done with the cutting and sanding; had I been smarter when I was younger, and worn better PPE, I might not be as sensitized today. I fled the shop in a hurry, took a shower and changed clothes. . . .and returned to find that in my itchy scratchy haste I had overlooked a half dozen sharp glass edges that needed aggressive sanding before I could proceed any further.

Two showers today, cleanest I’ve been in years, and I’m on my third set or clothes (#1 and 2 are in the laundry, double rinse cycle). No jinx, I really think that’s it for the fiberglass cutting and sanding.
 
I had side of hull tasks to do on the Optima, some epoxy filling, covering some ragged edges and installing padding to cover the now exposed foot brace brackets. Best done facing my work with the hull propped sideways, so back to an old trick, a couple tall L-brackets screwed into the top of the sawhorse. I don’t want to scrape up that paint job before Sexy Thang even sees water, so some cushion for the pushin’.

P9170030 by Mike McCrea, on Flickr

Screwholes already in the sawhorse ends of crossbars from the last time I held a hull sideways, no drilling required.

With the foot brace bars removed I didn’t like the epidermis or gear scraping possibilities with those exposed brackets, but they are sturdily glassed in place and would be a delicate PITA to cut free.

P9170031 by Mike McCrea, on Flickr

I need some padding, preferably black. Going through the box labeled “Miscellaneous Outfitting Parts” I found a couple of thick black foam cylinders from an old exercise bench leg press. I have long wondered why I was saving those, now I know. Still wish I had save the barbell weights too.

P9170032 by Mike McCrea, on Flickr

A bit of band saw work and I had eight perfectly quartered pieces to protectively pad those old brackets, pie wedges that would be insta-stuck when properly contact cemented on the L against those brackets.

P9170034 by Mike McCrea, on Flickr

A little contact cement and heat gun work, and with a bead of E-6000 around the edges those pads aren’t going anywhere. I covered the set I missed on Opie while I was slicing and dicing foam cylinders, glad I saved both those WTF cylinders, got half of one left.

FWIW adhereing minicel-wise, we tried slathering G/flex on the wide minicel seat base on Doug’s Optima, so that we would have some forgiving adjustment time. That seat, despite having a huge area of contact, popped right out with an inadvertent tug a few months later. I know how nearly impossible it is to remove properly contact cemented, heat gunned, E-6000 beaded minicel; never again G/flex on foam.

Eh, in for a penny, in for a frou-frou fraction of an ounce; a little rectangle of black neoprene will finish dressing those brackets. When contact cementing neoprene the edges need to be staked down with push pins, otherwise the neoprene will curl up on itself, especially if you activate the contact cement with a heat gun.

P9170035 by Mike McCrea, on Flickr

I still have the brace bar opening in those four brackets accessible, and they would make hella stout tie points for webbing straps.

P9170046 by Mike McCrea, on Flickr

I am a fan of E-6000 for adhesive sealant beading the edges of contact cemented minicel and D-ring pads (thanks Dan Cooke), and I am loving the toothpaste keys on squeeze tubes, especially on hard to tightly roll tubes; zero adhesive or sealant wastage lost in crinkly folds with the key. Never again will I crinkle fold and roll and waste product.

P9170037 by Mike McCrea, on Flickr

One sideways side done, time for a different perspective, hull turned and braced on the other side and repeat.

P9170044 by Mike McCrea, on Flickr

I only got left/right confused the first time I walked up to the cockpit, “Oh, yeah, it’s the other side now
 
Seat time. With the IQ seat resting unglued on yoga blocks laid in the hull, as the test start of fabricating a dense EVA foam pedestal, the high rise seat back is just below the top of the sheerline. Perfect.

The minicel (Yoga block) pedestal base pieces needed to be slightly angled, to match the hull bottom contours, and I know from past installations that the IQ seat pan is most comfortable when canted back just a wee bit, so the top of the high rise back isn’t karate chopping my spine while paddling.

It was easy enough to cob together a seat jig from scrap wood and shallow wedges.

P9190010 by Mike McCrea, on Flickr

It took a couple shallow wedge trial locations to get the seat base cant angles approximated, but resting on the jib the yoga blocks are canted sideways, and the seat tilted back just a touch.

With the minicel pedestal canted and angled I can spin the jig board around and have a look at the backside of the seat.

P9190012 by Mike McCrea, on Flickr

It needs some minicel wedges at the butt curves to support any restful muckle up lean back action. If only I had a box of pre-curved minicel wedges that just happened to fit perfectly. If only, if only.

P9190013 by Mike McCrea, on Flickr

A couple of those stuffed into that seat curve fit like a glove. Two timed coats of contact cement on the bottom of the wedges and top of the yoga block, heat gun action and some E-6000. Those curved wedges aren’t going anywhere.

I want a minicel center support between the yoga block pedestal, glued to the bottom of the seat but simply resting atop the keelsons, so there is still a drainage channel below. Back to the scrap foam box to laminate some minicel risers.

Time for some times coats of contact cement and heat gun work. I love the smell of a heat gun on tacky contact cement in the morning, reminds me of outfitting victory!

P9190015 by Mike McCrea, on Flickr

The sides of the yoga blocks that press against the keelsons already have a beveled edge for bilge drainage, and I positioned them a half inch away, so a twig or spider egg sack couldn’t clog up the works. I even bored out the foam below the seat pan’s drain holes for an unpuddled arse.

There are several reasons for building the minicel pedestal first. Contact cementing all of the pedestal pieces together, and then laying the seat pan in place atop on the spacer jig, I could dry test-fit everything first to make certain it was all properly curve carved and contoured before gluing, and could dry test fit how I was going to lay the insta-stuck contact cement seat pan atop the minicel pedestal (still an anxious “Don’t oops at some angle” moment).

And, mostly, after the seat was contact cemented in place I could put 70lbs of weight on the seat to assure thoroughly smushed firm seat to minicel contact everywhere along the pedestal.

P9200018 by Mike McCrea, on Flickr

The scrap center supports needed a little more depth to rest unglued on the keelson, and the outer edges of the foam base a bit of chine curve sanded down to conform perfectly to the hull bottom.

Finished weight on the bucket seat and pedestal, 2lb 9oz.

Well, at least Sexy Thang has some additional floatation. Or not actually “additional” floatation, there is zero floatation anywhere in an Optima, no end pours, nothing. That at least is a sizable chunk of foam, 11 ounces. Minicel knee bumpers and heel pads will add a little more foam floation.

At the end of the day, really, almost a full day, a relief; seat pedestal contact cement insta-stuck installed in the hull straight, centered and even. I practiced a couple times before the contact cement went on. heck, unlike anomanouse DD I even installed it facing the bow. Same 70lbs of weigh smushing down the minicel; I put a workmate and pad firmly under Sexy Thang’s bottom so I didn’t break her spine.

P9200020 by Mike McCrea, on Flickr

With contact cemented minicel in any application some clamps or weights help assure everywhere is in firm contact; it is right there in the name of the adhesive. That high back bucket seat could not have been installed raised any higher, the seat back is just below the sheerline as planned.

P9210027 by Mike McCrea, on Flickr

I would have contact cemented Ridgerest foam to the seat before installation, but even with RR scraps on hand I didn’t have enough. With all of the curves and high rise back I think any Ridgerest would best be installed in (at least) two separate sections. If I can find an old Ridgerest pad cheap I may still have at it; that stuff makes a big comfort difference on bucket seats.

Not a hard day’s work, but a finicky one. Most of a day’s time spent just building and gluing up a custom minicel pedestal and getting it installed; how the heck did we go start to finish on Doug’s Optima in three days time?
 
There has been a lot of waiting for paint, epoxy and contact cement to set up on this rebuild, wait time which I very much enjoy. Plenty of down time to think and evaluate and plan next steps. And get playful with leftovers on hand in the shop

At another lingering wait period, always good for a beer and a bowl and some thinking, I realized that the shortie decked boat paddle I had painted with leftover EZ-Poxy blade was plain white. Too white. Too stark white.

P9180003 by Mike McCrea, on Flickr

I say I don’t like spray paint, but apparently I was once fond of Rustoleum. Specifically red Rustoleum, two rattle cans of Sunrise Red and a can of Regal Red in the spray paint box. Two of those cans are 90% empty and of doubtful utility, but one can of Sunrise is nearly full.

That too white paddle blade could use some white racing stripes, and a lot more red. What was that I said about being done with taping?

P9190005 by Mike McCrea, on Flickr

Um, OK, that is a photo of the blade taped correctly. I somehow taped it first, on both sides, in the mirror image of what I wanted. I still blame the paint fumes, not the beer and bowl break.

I kinda like the idea of a matching paddle, hope there is no incompatibility in spraying old enamel over recently painted EZ-Poxy. Guess I’ll find out.

P9210025 by Mike McCrea, on Flickr

I have a little touch up to do, but so far so good using leftover Rustoleum red enamel spray over white EZ-Poxy. Time will tell; I don’t expect those two coats of Sunrise spray to be as durable as EZ-Poxy
 
I kinda like the idea of a matching paddle

51504082504_83b213c845_c.jpg


Mike, that is colossally creative coloration congruence, and I hereby award you the official Sexy Thang Paddling Shirt ("NB" standing for Niobium, Naughty Boy or Nude Beaches -- I'm not sure which):


Sexy Thang Paddling Shirt.png
 
Time for a little more painting, this time the shop Gogetch and a hull name.

All of our boats, and many of the boats that have come through the shop, have a hand painted shop Gogetch.

P9210033 by Mike McCrea, on Flickr

Well, fill-in-the-blank hand painted, first a carbon paper tracing on the hull, then small brush in hand to fill in the outline.

P9210036 by Mike McCrea, on Flickr

Every shop Gogetch is the same pipe smoking moon paddler design, but each turns out a little different. Sexy Thang’s Gogetch is the smallest yet, and the most difficult to paint. Thank goodness for a son with steady hands on a teeny brush. No viable cans of black paint, she’s a red, white and blue all American made girl of German heritage.

P9210037 by Mike McCrea, on Flickr

Our decked canoe conversions all have names as well, or at least some indicative artwork. The Monarch has a hand painted butterfly, not a Monarch but a Viceroy. It would take a Lepidopterist to tell the difference.

P9210035 by Mike McCrea, on Flickr

The converted Phoenix Vagabond reminded me of a vintage station wagon, so it became the “Rambler”

P9210028 by Mike McCrea, on Flickr

My Optima became “Opie”, as an Andy of Mayberry homage, done by my shaky hand; even those bulbous letters could have used an artist’s touch.

P9210030 by Mike McCrea, on Flickr

Optima #3, in keeping with the muscle car theme, is of course named Sexy Thang, in a stylized Strip Club-ish font (Brush Script MT). Lot of fine lines with Brush Script, thanks son.

P9210039 by Mike McCrea, on Flickr

Methinks the Missus will prefer stick with sailing her converted Pamlico 145

IMG014 by Mike McCrea, on Flickr
 
ARRGGHHH!

The red enamel spray was, as I feared, curiously incompatible with white EZ-Poxy. Sexy Thang’s matching color scheme red & white striped shortie decked boat paddle isn’t exactly Sunrise Red any more. I have read that EZ-Poxy takes at least a week to fully cure; maybe I rushed it a bit.

P9210041 by Mike McCrea, on Flickr

DD, he of the backwards oriented seat fame, calls that color “Dog Dick Pink”. I guess he gets a shortie single blade to use in his Rob Roy.
 
Back
Top