As I sanded the shafts, I sanded the grips at the same time, to blend them together, and get the grips close to final shape. I don't have a decent picture of this, but I simply grabbed the paddle the way I would in use, and felt for comfort. I didn't go for "perfect fit" at this point, just really close. As I mentioned earlier, I wanted my wife's paddle blade to be about 5 square inches smaller than the templated. this equates to 1/4" by 20". So, I just used my grip as a scribe guide, and scribed a line 1/4" in from the edge from widest part of the blade on one edge, to widest part of the blade on the other. I cut and sanded her paddle to the line. Now it's time for the edge protection, what I started calling "gunk tips". I did this pretty much the same as Brian's post. His description and pictures are MUCH better. If you haven't checked it out yet, I'd go there. his thread:
https://www.canoetripping.net/threads/building-some-new-wood-composite-paddles-for-2020.120222/
I started by deciding where I wanted the tip protection to be. I used the "hand scribe" to draw a line 3/8" in from the finished edge. I cut & sanded to the line. when sanding, I used COARSE grit. I wanted the line to be straight & fair, but I didn't want the edge to be smooth, to get the best epoxy bond possible.
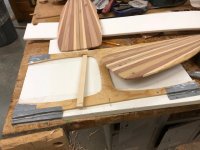
Here are the prep'd blades, and the fixture I used for the "gunk". The base is melamine coated particle board. The top is 3/8" plywood. I duct taped it down so it would be tight, and wouldn't slide around. I could have screwed it, but didn't want to start putting a bunch of holes in it. I covered the edge with packing tape, using a strip of wood to push the tape in tight, and flatten a few wrinkles. I also coated the area with paste wax (not shown).
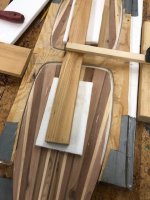
Here both blades are clamped in place. I wanted it to be quick and easy once I mixed the epoxy, I also wanted to be able to get at the entire edge that was getting gunked, to work it in. With this in mind, I have a square of styrofoam, with a strip spanning both blades, and a cross board on top of this holding it all in place. One quick grip clamp holds both blades down. I don't have any pictures of the application. I'm working solo, and once I start mixing epoxy, I'm not taking pictures.
I unclamped the blades, keeping all of the clamping parts handy. I mixed the epoxy. For these two blades, about 8 oz was just about right. Don't try to cut it too close. I did on the straight blades, and ended up a bit short, and rushing to mix a bit more. Using the unthickened epoxy, I liberally painted the edge that gets gunked. Waited a couple minutes, and painted them again. Clamped them in place, then added wood flour just to get the dark color I wanted. I used Walnut dust. Then I added about equal parts of glass fibers, with the fibers "fluffed" in a cup. I didn't have any pre-cut fibers, and for the small amount needed, I didn't buy any. I had some thick matt from a previous repair job. Used the circular wheel cutter, and cut a few 1/4-1/2" strips, and pulled the fibers apart. I mixed the fibers in, making sure they were all wetted. Then I added more wood flour just to soak up the extra "juice".
I spooned the gunk into the gap, using a 1/2" putty knife, spreading, and packing the gunk as I went. I filled it almost to the top of the plywood, certainly above the blade. When I was done, I liberally coated my gloved finger tips with paste wax, and used my finger tips to pack the gunk pretty well.
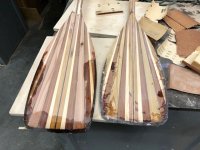
Here's the front & back of the blades out of the mold. I have already started clean-up on what was the top side (right in the picture). Sorry, I didn't take a picture right out of the mold.
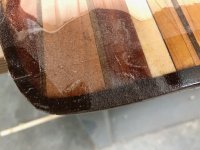
I'm still mad at myself about the power face of the blades, which were down in the mold. You can see quite a bit flowed back. Lots of clean-up here. I saw this after the straight shaft paddles which I did first, and came up with what I thought was a good solution: Add a thin bead of plumbers putty to the bottom of the blade. This would stop the flow back, and make clean-up easier. The plumbers putty would be easily removeable. I was going to try approximately 1/8" "rope" of putty, held back 1/4" from the blade edge. I think that would have worked well, but forgot to add it until the blades were clamped in place, and gunk was mixed. I didn't want to take the time to do it at this point. I'll certainly try it on the next build.
For clean-up I used a disc sander, and belt sander to get as close to the blade face as I felt comfortable without touching the wood. I did this top side only. Bottom side was already pretty close. I finished clean-up with a 1/4 sheet palm sander & 80 grit.
REMEMBER, THE EPOXY IS STILL GREEN. THIS DUST IS NOT GOOD FOR YOU! I had on a shop coat, gloves, hat, and dust mask. I was also working in a large open area where dust couldn't accumulate.
I finish sanded the blade and shafts to 120 grit, using a combination of the palm sander, and hand sanding with 150 grit. When mixing hand & power, I go one grit finer for hand sanding than power sanding. I blew the dust off with an air nozzle, then wiped them with denatured alcohol.
I glassed both sides of the blades with 4 oz cloth. On the thicker side, 2 oz would have been better. I had a roll of 4 oz. I used a roller wheel cutter. I think it was about $20 with 4 replacement blades. Well worth it to get a clean cut, with no stray hairs. I used the blade template, and just stayed about 1/2" big alll the way around, flaired to 3/4" big at the throat. I cut all 4 layers at one time, with no problem. I test fit the pieces before mixing epoxy. Takes about 1 minute. Straight shafts, I tried to save that 1/4" of glass, and was a little short in one spot. Had to recut the glass. It gets trimmed later anyway, so I decided I'd rather waste 1/4". I also ended cutting a short slit where blade transitions to shaft, so the cloth would wrap around the shaft nicely.
I wetted out the blade before setting the cloth in place. I just painted it on with a 2" disposable brush. If you're using disposable brushes for epoxy work, use the brush dry on something first, and tug on the bristles. Mine always seem to have a few loose bristles. I try to get these out before working with the epoxy. I also epoxied the shaft, up to the point where it changes to grip. the grips still need to get finish sanded, and I'll finish those with an oil finish.

Here's the blade glassed. You can see I cut the glass bigger than I needed, but not crazy big.
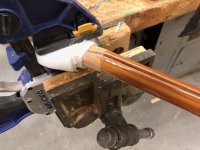
I held my paddles horizontal using a quick grip clamped in a bench vise. Notice the grip are doesn't get epoxied. This area will get final sanded, then coated with an oil type finish. I made a fixture to hold them, but abandoned it after the straight shaft. I didn't do a great job of shaping the holes for the shafts, and I ended up with significant denting as a result. I do plan to redo the angled part with the holes, and try it again. Here's what it looks like. Look at the holes, and don't do that.
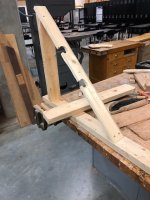
After the glass wet-out was cured to the touch, I added a fill coat. I let this cure over nite. Then I trimmed the cloth, scraped any rough spots, and sanded the blade edge to a bit of a taper. I also rounded the throat area of the blade.
REMEMBER, GREEN EPOXY IS BAD Wear appropriate protection. I light sanded the entire shaft & blade, with 150 grit, by hand. For the final coat, I warmed both parts of the epoxy in hot water. Primarily so it would be thinner, and flow well. It also made it cure faster, so you don't have a lot of time, but it doesn't take long anyway. I hung the paddles for final epoxy coat. came back after 45 minutes or so, and wiped excess off of bottom edge.
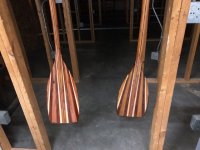
The paddles are set aside to fully cure. I'm not in a rush, so I'll let them sit 2 weeks. In the meantime, I'm doing final sizing, shaping, and sanding of the grips. I've been using products made by "General Finishes" for a long time. Very happy with the results. They're tung oil based, and go on like tung oil. Cure time is much shorter, and more predictable. Usually dry enough to sand after 24 hours in normal temperatures. I use "SealACell" for first couple coats. First coat I saturate, and keep doing so for a few minutes. With paddle grips, I can simply dip it in a small container. Final coat(s) are with "Outdoor Oil" which has UV inhibitors in it. The areas that were glassed/epoxy coated will get light sanded, and coated with a marine spar varnish.
I should have the grips finished, and paddles completely done in 4-5 days. Then, I'll get final weight.


