• Happy National Blueberry Pie Day! 🫐🥧

Multiday Adventure Race Canoe - Composite

What i I don’t like that much is their inwale-only gunwales. It looks slick, but I’ve heard from a blackwater owner it can allow more water up into the boat. Also less things to grab onto when lifting/portaging.

All the Wenonah race boats I've used had the inwale only gunwales. Yes, they were wet--we used Visqueen spray decks. Interestingly, my old C1W has the normal aluminum gunwales reversed from normal, where the outwale is wider--makes a big difference in keeping water out.
 
I only need to finger grip a gunwale occasionally. Never a full on grab. and it works fine on the inwale. I use a line to trim fore and aft and a detachable yoke which traditionally clamps from the outside but works from the inside also. My RapidFire with infused gunwales has no outwale.. After you get used to its absence you don't miss it. Water getting into the boat is hard from the side if the tumblehome tucks high as in shouldered tumblehome. If your hull shape is conducive to waves riding up you can use pool noodles as fake gunwales.
 
I was away on vacation for a week, but am now back at it. I marked all the low spots and holes with a paint pen, then applied body filler (bondo) to each one.

IMG_2063.JPGIMG_2065.JPG

Then I block sanded each bondo repair, and sanded the entire thing with 180grit on the DA sander. The duratec primer/surfacer is pretty neat stuff: it's a nonporous, tough coating that sands fairly easy and can be polished to gloss. It's about as close to sprayable body filler as it gets.

IMG_2071.JPG

I just finished spraying a second layer of the duratec over everything and it layed down real smooth over the sanded plug. I also ordered supplies for the mold: 1gal of gelcoat, 10gal of polyester resin and about 40yds of fiberglass mat.
 
I sanded the second coat of duratec to 400 grit, then gave it a brief compounding with aquaBuff 2000. The surface isn’t perfect, but I plan to polish to the mold itself after it’s released. That should knock down any pinholes that are still there. Now I can start adding coats of release wax to the plug.

Click image for larger version  Name:	IMG_5598.JPG Views:	1 Size:	129.8 KB ID:	95739
Click image for larger version  Name:	IMG_8655.JPG Views:	1 Size:	378.1 KB ID:	95740
 
Last edited:
The plug got 4 coats of Partall paste wax. I found it fairly quick to apply it with the DA sander at low speed using a foam polishing pad. After each coat of wax on the plug, I would wax a sheet of Melamine paneling standing against the wall of the garage. I then cut the panel into 8" strips. I screwed them to the underside of the forms to make a flange all the way around the plug.

IMG_3818.JPGIMG_3819.JPG

Then I had to make a parting dam down the keel line in order to create a two-part mold. The dam is temporary, but needs to be strong enough to laminate fiberglass against. I used 1/4" foam board, and covered the tool face in clear packing tape to get a smooth surface to laminate against. Being that the plug was all glossy and waxy, it was difficult to get anything to stick to it. The best thing ended up being big lumps of plasticine clay. I used some pieces of pine strip to stabilize the dam: it's held together with hot glue where I could, but only clay touching the plug surface. Seams of all flanges are taped with packing tape. It looks rickety, but should be strong enough. Once it was all together, I gave everything another coat of wax. Now I just have to fillet in the corners of the flanges and create some reference keys on the parting line, and I might be able to lay down some gelcoat tomorrow.

IMG_3822.JPGIMG_3825.JPG

IMG_3823.JPGIMG_3826.JPG
 
A great tutorial on mold making ! Thanks ! I like the use of Hot melt glue, holding the dams!

A question that I have is, do you see any problem keeping the glass tight against the hull, in the tumblehome area ?

When I used a Male mold for my composites, I used heat shrink plastic, as the release. Of course the plastic didn't stick to the hull. and so I had to tilt the strongback, to get the wetted cloth to follow the hull shape.

Enjoying this immensely !


Jim
 
Wow, you're making great progress! The parting barrier looks great.

Alan
 
Thanks, Guys. I put in a good weekend and got quite a bit of work done. I pressed filleting wax into the space where the flange and the parting dam met the plug. Ive never used the soft filleting wax before, but it worked well. It is more fragile than plasticine clay, but easier to smooth and work with. I then used the wax to create registration keys along the parting dam. I plan to drill bolt holes, but these should help keep alignment of the two mold halves.

IMG_3830.JPG

Then a quick spray with PVA release agent. I don't build a thick coat on, but rather use the method described here: #2.

Spraying the gelcoat went well. With the black plug, you could really see where it was building thick or thin. I mixed the gelcoat with 20% duratec high gloss additive so that it would spray easier.
Then I let it cure to a hard tack. 4 hrs I think. The Gelcoat data sheet said 2 hrs to begin lamination. I put away the spray equipment and got out a folding table to cut fiberglass on. The whole mold got a single layer of 3/4oz fiberglass mat, and that's where it sits for the night.

IMG_3832.JPGIMG_3833.JPG

I did learn real quick the danger of brushing resin onto the gelcoat and waiting to lay down fiberglass. There is one part on the flange where this happened and the gelcoat started to "alligator" (wrinkle). I think it is due to styrene attack from the resin: the thin gelcoat reacts and swells if it is not immediately stabilized by fiberglass. Ive never seen this happen before, but I think that's what it is. So I will have to do some mold repair once I pull it off the plug. It does seem limited to just one part of the flange, though. So not anything that is going to be on the finished part. Also, the flange is somewhat redundant but is now mainly just a place to tape vacuum line and something to give rigidity to the mold: I am planning on a full envelope vacuum bag for the infusion. This should be the simplest way to achieve a perfect vacuum seal and not worry about the parting line or bolt holes leaking air.

IMG_3834.JPG
 

Attachments

  • IMG_3833.JPG
    IMG_3833.JPG
    175.3 KB · Views: 3
  • IMG_3832.JPG
    IMG_3832.JPG
    101.1 KB · Views: 4
I finished one half of the mold and pulled the parting dam to get ready to gelcoat the other half. The packing tape withe the wax/pva treatment separated really well. The clay didn't damage the other side of the waxed plug, and came off cleanly.
IMG_2172.JPG

One of the unanswered questions I had was: How thick does the mold have to be? I made an estimate using the little mold making experience I have. The final schedule for the mold is Gelcoat, 0.75oz glass matt, and then 4 layers of 1.5oz glass matt. I did put a couple extra layers of 1.5oz matt along the corners and flange edges to build thickness/fillet corners in those areas. This should give a minimum mold thickness of about 5mm. The parting flange where I removed the dam seems thick enough. The half-hull + flanges is about 40 sq ft. of area, and it worked out well that a 5gal pail of resin was almost exactly the amount needed for the half mold using this layup. I used the polyester ortho resin from express composites.

IMG_2176.JPG

You can see the "alligatoring" of the gelcoat in the photos. It looks like this only happened on the edge where the gelcoat was very thin and not reinforced by fiberglass matt. That part will be trimmed off anyway. So I hope the rest of the hull mold isn't wrinkled! I have decided though that I don't like fiberglassing. The polyester resin (styrene) smells terrible, and it is messy, tedious work laminating by hand. Even just having the unopened bucket of resin in the garage- I need to have an exhaust fan running out the window- or the smell will start to accumulate. Each layer takes me a good 2-2.5 hrs of work.

IMG_2174.JPG
 
If you don't already have one, definitely invest in a quality respirator with chemical vapor cartridges. If you already have one, swap in new cartridges regularly. Your brain cells will appreciate it.

Your mold looks great so far, I'm anxious to see a hull pop out of the finished mold. You're waaaay more motivated than I am...
 
Years ago, I watched a guy making Fiberglass tops, for Born Free Campers.
He used a gun to spay chopped glass and resin into a mold. That would make mold making a lot easier !

One drawback to Polyester, or Vinyl Ester resins.

Jim
 
If you already have one, swap in new cartridges regularly. Your brain cells will appreciate it.

Yes, I wear it when spraying gelcoat or pva or anything. When laminating, though, I just wear safety glasses, but not the respirator. I do have exhaust fans running that can do 1.5 volume changes/minute. It keeps the air fresh enough.

Years ago, I watched a guy making Fiberglass tops, for Born Free Campers.
He used a gun to spay chopped glass and resin into a mold. That would make mold making a lot easier !
Jim

I had thought about that, but didn't want to invest in the specialty tools just to make a mold. Despite the large size, I can get it done by hand with simple tools just by throwing more time at it.

I gelcoated the second half today, and put down the first 0.75oz matt to stabilize the gelcoat. For all the time spent laminating thus far, I am getting better at it! This side has zero wrinkling that I can tell: it will probably look a whole lot better than the other side once I open it up.
 
Some good news, and some not as good news:

Good news: I'm finished fiberglassing. And happy about it.

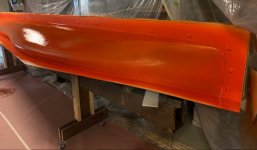
Good news: The mold released just fine from the plug, and has a great shiny tool surface.

Not as good news: Im going to have to do a little repair on the mold.

I finished laminating the fiberglass matt- same schedule as the other side. After It cured for a day, I did a quick sanding of the outside with 60grit and then rolled on a 'hot coat' of resin without any fiberglass. I thought it would be an easy way to knock off any little invisible fiberglass slivers, and to leave a smooth surface to prevent any puncture of the vacuum bag. Tonight, I drilled holes in the parting flange for 1/4" bolts, and then cut the flanges and parting line down to 3.5" with the sawzall. It worked well using a metal blade, but made a mess and sent fiberglass dust everywhere. Then I sanded the cut edges smooth and went to separate the mold. Using a plastic putty knife and wooden chip brush handles, I was able to pry it apart without too much trouble. The plug actually survived pretty well: there was a little section along the parting flange where the duratec stuck to the mold and pulled off of the plaster, but those small chips released form the mold just fine.


image_12094.jpg

The mold did end up right around 5mm thick. It is stiff enough, but I don't think I'd recommend making it any thinner. I was glad to find that If I'm careful, I can lift and move each side myself- picking it up from the center.

image_12093.jpg

The second half of the mold is near perfect. I can buff it then start waxing and prepping it for infusion. The first half though, needs a bit of repair work. The part of the flange that alligatored will need some gelcoat fill and sanding, and the gunwale edge between the hull and flange is a little rough in some places. Nothing I can't fix, and I'll chalk it up to amateur mistakes that more experienced mold-makers have learned how to avoid.

image_12095.jpg
 
Last edited:
Making great progress !
The pics aren't showing up though.

Jim
 
I went about dismantling the plug this evening. First, I unscrewed it from the strongback and laid it down in the grass. Then, with some help from a hammer, I was able to remove the forms and keep the shell mostly intact. It 's somewhat floppy, and it cracked and groaned when I sat in it, but I think I'll keep it around as a reference to help locate the seat/thwarts/foot pedals/etc. The shell with sanded pine strips, sanded drywall mud, and duratec surfacer weighs only about 30 lbs. Each half of the mold weighs maybe 45lbs. The strongback now becomes a work table for the mold to rest on.

IMG_2200.JPGIMG_2201.JPG

I cleaned all the wax and clay off the mold and started repairing the damaged areas. First, I used a file to take off any high corners and to find any bubbles around the wrinkly part. Then a cleaning with some acetone. I used a toothpick to apply gelcoat to the small repair areas and packing tape to ensure it didn't run down the side of the mold. Meanwhile, I ordered supplies for the infusion. It's getting close!

IMG_2203.jpgIMG_2204.JPG

Friends and neighbors want to see the boat I've been working on, but my joke is that I've done quite a bit of work, but I haven't actually started on the boat yet.
 
I was at a canoe auction in Minnesota, years ago. They sold a couple of plugs from Gene Jensen. They brought $800 a piece. Guessing they are worth a lot more now !

Your mold looks great !

Nice use of tape to hold the repair together !

Infusion would scare me more than the first time I fiberglassed a hull !

Enjoying this as always !

Jim
 
That's just too cool. I spent a lot of hours planning in my head and thinking about doing this but never took the leap. Good for you.

Alan
 
Back
Top