• Happy National Zipper Day (pat. 1913)! 🤐

Multiday Adventure Race Canoe - Composite

Nice set up there! I wouldn't have thought to use the strong back as a platform and out feed table to the router!

Jason

I used to set up infeed and outfeed tables, now a couple of rollers is all I use. I just let the strips fall where they may. No problems !

IMG_0302_zpsvt6ov78u.jpg
 
I finished sanding each form to the line and measured out the strongback to finally mount them. A very satisfying evening as I see the boat profile in full-size.
IMG_1809.JPG

Having each form marked with a waterline and centerline made alignment easy: a laser level can plumb things perfectly straight- even on a wonky strongback. The laser has a magnetic mount and stuck firm to the garage door. It has a self-leveling feature. I used the very front and back forms to line up the centerline and then locked the wheels of the strongback in place. Then I had to unscrew one leg of the strongback and raise it 15mm or so higher to get the front and back forms sitting level on the laser line. Once that was done, I removed the front form and began mounting them one by one from the stern. I would clamp each one in place and then tap it around with a rubber mallet until it was perfectly centered on the laser line. Then I just screwed it in place and moved on.

IMG_1814.JPG

IMG_1817.JPG

IMG_1812.JPG

IMG_1819.JPG
 
Nice !
Most people don't realize how much work is involved getting this far !

A Sound set up !

Jim
 
I was able to start putting some strips on last night. There’s a pretty good twist from the bow flare to the tumblehome on the hips, but so far things seem to be staying in place. It’s good to see the contour coming out just like the model.

Click image for larger version  Name:	7A86A0B6-AC51-4C86-ADCD-184552763DF2.jpeg Views:	2 Size:	282.8 KB ID:	94496

With the tight curves, though, I think there is going to be a lot of sanding to get a fair surface. I haven’t decided yet what the easiest way would be to get a durable gloss surface from which to make a mold: I think fiberglass/resin and filling/sanding till glossy would work, but I also might just try a duratec primer surfacer. It’s a mekp catalyzed primer that builds a surface over other substrates and can be sanded to gloss. Drywall compound ala the Moran method would be easy to fair, but I can’t think of a good way to get a durable gloss surface on top of that.
 

Attachments

  • 7A86A0B6-AC51-4C86-ADCD-184552763DF2.jpeg
    7A86A0B6-AC51-4C86-ADCD-184552763DF2.jpeg
    282.8 KB · Views: 4
Last edited:
So I've been giving this a couple of hours a night and doing about 12-15 strips at a time. It's coming together well. Some notes:

-After 5 strips I realized my stapler was crap. It would jam or misfire every third staple and that just wouldn't do. So I got a new reverse-squeeze stapler and it was the best $25 Ive ever spent. The plastic frame is tough and a lot lighter than the steel staplers- and the reverse-squeeze trigger is lovely.
-A small fine pull-saw is invaluable for cutting strips.
-The long strips sure eat up the glue fast. I'm 75% done and have gone through 28oz of glue already.
-The pine bends and twists easily.

IMG_1879.JPG

IMG_1874.JPGIMG_1872.JPG
I did some research and found that the Duratech primer-surfacer will bond to plaster fairly well, so I'll likely prep the plug surface as follows: Pull staples and sand wood smooth-> fill cracks and skim coat with drywall compound, sanding to 220 or so-> spray Duratech primer/surfacer-> Sand and buff to gloss-> wax and spray PVA release. The hull is 54 sqft, so a gallon of the Duratec should allow a 30-40mil surface on the whole thing.

IMG_1880.JPGIMG_1877.JPG
 

Attachments

  • IMG_1872.JPG
    IMG_1872.JPG
    124.3 KB · Views: 6
I don't care how fast it is ! That is One Sexy hull !

You are not going to Glass the hull ?

By the way ! I'd feel right at home in your shop !

Jim
 
Okay, I finished the stripping and pulled about 1200 staples.

Click image for larger version  Name:	IMG_1886.jpg Views:	3 Size:	99.9 KB ID:	94627

I ran the 10" block plane over it in a few different directions to knockdown the seams and even out thick/thin strips and fair the surface a bit . The convex curves planed well with nice piney curls, but the concave sections in the bow/stern flare weren't touched by the plane. I also ripped a few knots up and made a small hole- but it will be covered- that's the cost of using cheap knotty pine from menards. If the knots weren't there I'd be super tempted to try and glass it and make a wood boat. But the purpose of this is only a temporary pattern plug: once I lift a good mold off, it will be dismantled.

Click image for larger version  Name:	IMG_1886.jpg Views:	3 Size:	99.9 KB ID:	94627

Click image for larger version  Name:	IMG_1891.JPG Views:	1 Size:	110.1 KB ID:	94628


I then sanded the whole thing with 60grit on the DA. Batman helped sand and sweep the garage. Next step is to make the bow/stern transitions. They should be able to be cut out of a 2x4. Ideally I'd start shaping it on the bandsaw, but I need a new blade- so I'm probably going to start attacking them with hand tools.
 

Attachments

  • IMG_1886.jpg
    IMG_1886.jpg
    99.9 KB · Views: 6
  • IMG_1886.jpg
    IMG_1886.jpg
    99.9 KB · Views: 6
Last edited:
Just curious if you glued your strips to the forms ? Beings its a Plug, that would guarantee it would hold it's shape, after pulling staples. It would be hard to save the forms though !

How will you cut the mold off the plug ?
Lengthwise, or across the mid section (widest point) ?

I'm diggin this ! Thanks !

Jim
 
I used the paper templates to cut out the bow and stern profiles, then I roughed out a 2x4 for the stem and stern transitions and glued them on. Then shaping with the block plane, and sanded a smooth curve.

The strips did get a dab of glue where each met the form. With the different curves, I was worried it might not hold its shape once the staples came out.

IMG_1894.JPGIMG_1899.JPG
IMG_1900.JPGIMG_1901.JPG
 

Attachments

  • IMG_1897.JPG
    IMG_1897.JPG
    214.4 KB · Views: 4
  • IMG_1894.JPG
    IMG_1894.JPG
    182.3 KB · Views: 6
Wow ! Nice job shaping those Sabots !
She looks like she will go by herself !

Jim
 
How will you cut the mold off the plug ?
Lengthwise, or across the mid section (widest point) ?

Jim

Because of the negative draft angles, it has to be a two-part mold. I think it will have a single parting flange along the keel line. Because it'll be 20' long, I'm a little unsure of what I'll do with the mold when I'm finished with it or where I will be able to put it, so I had thought about trying to make a transverse parting flange as well for a 4-part mold that is easier to store. I think it will be much less complex as a 2-part, though. Because of the very fine bow/stern ends, I t will be almost necessary to have the mold open to separately wax each half before assembling them.

Another problem is that the parting flange between the two halves of the mold needs to be airtight to seal the vacuum. Leaks here would be disastrous to the finished part. Industrial production molds have an integrated sealing gasket built in. I could mold a channel into the parting flange for tacky-tape to make a seal, but the thought of trying to assemble two halves of a heavy mold together while not messing up the tape is daunting. I think it would be far easier to use tacky tape to seal the outside edge of the parting flange after the mold is assembled. The problem here is any bolt-holes on the parting flange would leak air into the mold. Options are 1). bolt the flange together and use an envelope vacuum bag to completely enclose the mold, 2). bolt the mold together and make a separate "strip" of vacuum bag along the outside keel line to enclose the parting flange and all the bolts, or 3). use no bolt holes on the flange and just seal the edge with tacky tape- using 2 dozen small C-clamps to hold the mold halves together. Ive never vacuum-bagged anything this large before, or anything with a 2-part mold- so I'm open to advice.
 
Setback: 2 days of thunderstorms and 95% humidity has swelled my wood pattern and even buckled it off the forms in some areas. I could have swore it was getting ‘bubbly’ as I was sanding it but I didn’t realize why until today. Unfortunately, last night I also put a coat of drywall compound on it, which I’m sure didn’t help the moisture problem at all. So I hung some plastic sheeting to make a room separate from the rest of the garage and i pulled the dehumidifier out of the basement. It started running 4 hrs ago and read 93% humidity (as it was raining all last night and today). Now it’s down to 51% and I can see the wood plug stretching back out already. Of course there are cracks in the joint compound, but they’ll be easy to fix with further coats.

6C511C85-8BF7-43AF-93D1-A9D08203D5B5.jpeg

I guess I underestimated the hygroscopic effect of wood. So until I am able to make the mold I’ll have to control the humidity out there to keep the pattern still. I was planning to hang plastic anyway before I started spraying with the hvlp, but it had to happen a bit sooner. That’s Minnesota weather I guess, if it’s hot enough to let epoxy cure, it’ll be humid enough to make the wood swell!
 
We are suffering with the humidity here also, maybe worse !

I doubt sealing, or glassing the hull with epoxy first would have made a difference in the hull bubbling.

I wonder if gluing the strips to the forms would have helped ? Just a thought !

The dehumidifier is a good idea !


Jim
 
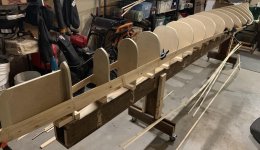
I guess with the joint compound I officially departed from a standard canoe build. I can't put away the woodworking tools quite yet, but I have moved into the composite realm.

I put two full coats of joint compound on the plug. I sanded the first one roughly, then dusted some old spray paint over it for a contrast. I put on a second coat and spend a good deal of time sanding the curves as evenly as I could. For the most part I used a regular drywall sanding block, but I also made a torture-board and duct taped three sanding screens together to really level things out. It worked really well on the flatter sections of the hips, and on the long, skinny nose. I thought I had it pretty well flat.

IMG_1909.JPGIMG_1912.JPG


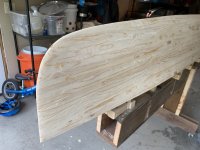
I then shot it with 2 coats of the duratec primer-surfacer. I've never used this product before, so it was with some trepidation I mixed it up and poured it into the paint gun. The problem is that it will gel in 14-16 minutes- so you have to shoot it and then clean the gun right away. I'm am novice painter at best, and the short gel time doesn't give me much room for error or time to dial things in. I used a $45 HVLP gun with a 2.5mm tip. I catalyzed at 1.7% as it was about 80 degrees. I set a timer for 13 minutes, which was my signal to stop spraying and and get some acetone into the gun asap. It turned out to be plenty of time. About 700 mL mixed was enough for a moderate coat on one side, and I could mix and spray it in only 6-7 minutes or so. At first I sprayed it un-thinned, and it went down, but was really sputtery and orange peely. I also had the air control too far open so it was just blasting out the gun. On the other side, I tried thinning it 10% with MEK substitute and it flowed out so much nicer than unthinned. I also got my air settings dialed in to give a nice even spray.

IMG_1918.JPG

The good news is that this product leaves a good surface on the plug. The bad news is that it shows just how crappy of a sanding job I did. I am going to block sand it a little and shoot two more coats on each side. The drywall mud also had a lot of small craters and pinholes in it that didn't get fully covered over, so they need to be filled. So more sanding is in my future.

IMG_1922.JPG
 
That Hull looks Space Age !

Interested to see how that swell handles turning !

Your making amazing progress !

Jim
 
Setback: 2 days of thunderstorms and 95% humidity has swelled my wood pattern and even buckled it off the forms in some areas.
I guess I underestimated the hygroscopic effect of wood
That’s Minnesota weather I guess

And Maryland. As earlier:

This is way above my pay grade in complexity, but is humidity a concern?

My shop was a garage and has a concrete slab floor that stays cold/cool well into summer. When it gets warm out the humidity in the shop skyrockets. Right now; it’s 80F outside and even with the windows closed to retain some cool the humidity in the shop is 75%. If I opened the windows it would jump even higher.

I have to run a window AC unit for humidity control, and will need to install it soon.

The shop window AC unit went in a couple days ago. Not sure why I waited that long, whatever else working cool and dry is a pleasure.

A friend way north in New England had issues in his hot humid shop yesterday with hand laid cloth and epoxy.
 
Did anyone see Savage Rivers new extended racing canoe ( designed for long distance races)


New Design!

The "Muskoka".
18'- 6"
32" at the 4" waterline.

Meets the specs for the Muskoka X race as well as the Yukon River Quest and the US Nationals standard class. It's a modified Susquehanna with a narrower waterline. Same great handling and stability only faster.
Its only on their FB page not yet on their website.
 
The "Muskoka".
18'- 6"
32" at the 4" waterline.

Interesting that 1.5” narrower is enough to justify a redesign. I guess we don’t know all the modifications that were done.

Looking at at the photos shows the partial-rib layup very well. Likely full blankets of the spread-tow carbon and Kevlar, with partials of carbon over the foam floor and ribs.

What i I don’t like that much is their inwale-only gunwales. It looks slick, but I’ve heard from a blackwater owner it can allow more water up into the boat. Also less things to grab onto when lifting/portaging.

I am amazed how the 18.5’ tandem weighs as much as my 16’ ‘lightweight’ solo. Vacuum infusion is the way to build light canoes!
 
Last edited:
What i I don’t like that much is their inwale-only gunwales. It looks slick, but I think practically it would allow more water up into the boat. Also less things to grab onto when lifting/portaging.

Even with a conveniently reachable front thwart I appreciate having enough outwale to finger grip.
 
Back
Top