• Happy International Mermaid Day! 🧜🏼‍♀️

Multiday Adventure Race Canoe - Composite

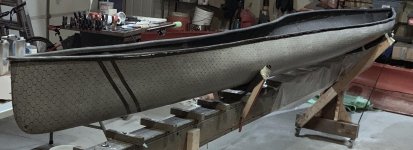
I assembled both halves of the mold and bolted them together. Then I constructed two slings on the strongback to hold the upright mold: these are simply 2x4's screwed to the strongback in a "v" fashion with an NRS strap slung between the tops of the v to cradle the mold. It is resting about 2" above the strongback- this should allow me to apply the vacuum bag all around it when that time comes. I also taped all the edges and over the bolts with vinyl electrical tape to cover any sharp edges and prevent vacuum bag punctures.

IMG_2339.JPGIMG_2340.JPG

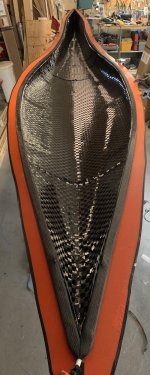
Then I started laying fabric: First a football of 1.4oz Eglass so I can sand out bottom scratches without the innegra fuzzing. After this, I laid some cosmetic detail pieces that I don't have any photos of- so they will be a surprise if they turn out. Then a full blanket of the innegra/carbon hybrid cloth. It is surprisingly difficult to get it to lay flat in the mold: it takes a lot of massaging the fabric to get it to conform to the compound curves of the hull, and then to make sure the pattern is relatively straight. Once it is positioned, there is some careful cutting of the bow/stern ends to get them to lay down in a nice overlap in the pointy ends of the mold. My caveman fingers are too large for this and I found a leftover pine strip useful for manipulating fabric in the ends. I was planning to put some internal skid plates in: strips of Sglass on the outside of the innegra, but I really don't think I can manipulate a small strip in the tight corner and not have it get all wrinkled when putting the innegra on top.
 
The thwarts look good. I know what you mean about not knowing how strong to make things when you don't really have anything to go on.

On my thwarts I used regular 25psi construction foam and a single 18oz carbon sleeve.

Alan

The carbon/Kevlar sleeve I’m using is 5.7oz cloth. The carbon sleeve is 7oz- so with my three layers, it’s near the same fiber weight as yours!

Looking at total fiber weight was how I started estimating what layup schedule to use for my hull. Most commercial manufacturers and other builds I’ve seen use something in the range of 12-18oz total fiber weight in the thickness of their layups. Then you can fine tune based on testing and specific fiber properties. I’m using a spread-tow carbon on the inside of the core- (stronger than a regular plain/twill cloth) so the fabric can be a little lighter.

Schedule for this build is:

football 1.4oz E glass
5.1oz innegra/carbon hybrid
3.6oz innegra plain weave
1/4” core/ribs
2.65oz spread-tow plain weave carbon.

so 11.35oz total fabric weight in the stack. (12.75oz under the bottom football”. This project is meant to be as ultralight as I can reasonably go. I’ll be sure to report results: If she folds in half when I sit down, then I’ll know I probably went too light!
 
I can only say one thing, Impressive! I'm so impress by people that take on projects like that, I wouldn't know how to start... I have a few design ideas for ww boats, and other things not boat related but I can't see to be able to learn how to use programs like Sketchup lol.... So I'm hooped hahaha
 
Oh, you can easily add more stiffeners, once you get it out of the mold, if need be !

I'll be curious how much resin will be needed for this ?

This is SOO cool !

the White Water hull I just Hand laid up used over 2 1/2 gal. of epoxy resin, on 5 1/2 layers of cloth. It came out plenty ridged !

Jim
 
Last edited:
I'll be curious how much resin will be needed for this ?

Jim

For all my test infusions I made a spreadsheet to keep track of fabric size/weight/sq in of core/resin usage and final part weight. Every test I would calculate the fiber volume ratio and tweak the spreadsheet to match better. So I have a pretty good estimation of how much epoxy to infuse. It says about 1.85 gallons, but a lot of that is waste that gets trapped in the peel ply/infusion mesh/feed lines. I have 3 gal on hand if needed. The gel time at 77deg F is 45 min, but I’m going to be working at 88deg so it will be a bit faster.

For a straight fabric infusion I can get a 60% fiber volume ratio. It’s difficult to calculate when infusing a sandwich core, though: the divinycell H80 is closed cell, but the surface soaks up about 275grams of resin/sq meter: and even more for the scored core that I’m using. The epoxy is where all the weight is. Less epoxy = higher fiber volume ratio= lighter, stronger part.
 
Lots of work completed this weekend: I laid up all the dry fiber. First, the full blanket of innegra/carbon hybrid. Then, a blanket of plain weave innegra. It was much more difficult than I would have thought to get everything to lay down flat without wrinkles. I used some 3M super77 spray adhesive as a tackifier to help, but you have to really use it sparingly, and I don't want to fix the fabric really rigid or I risk bridging or wrinkling when its placed under vacuum. Then I laid the core I made earlier.

Click image for larger version  Name:	a1.JPG Views:	1 Size:	302.2 KB ID:	96935

Next, I laid out strips of 20mm spread-tow carbon and sprayed them with tackifier. I ran them along the sheer line below the gunnel, to aesthetically give a sharp black transition from the hull to the gunnel. Then I trimmed all the fibers flush to the top flange of the mold.

Click image for larger version  Name:	a1.JPG Views:	1 Size:	302.2 KB ID:	96935Click image for larger version  Name:	a1.JPG Views:	1 Size:	302.2 KB ID:	96935Click image for larger version  Name:	a1.JPG Views:	1 Size:	302.2 KB ID:	96935

Next, I wrapped the carbon sleeve onto the gunnels and fit them in place on the edge of the mold. While pulling the sleeving on, I actually broke the foam in half at two different places. I didn't repair it as it was a pain to carefully feed the sleeve on each 20' gunnel, and the crack edges seem to line up just fine. I'm hoping the crack line doesn't show through in the final product.

I made a small gudgeon block of foam for the rudder pivot and placed it just inside the stern. So the hole for the rudder pin will be drilled right through the stern deck. It's going to be tight geometry to fit the snap ring on the end of the rudder pin, but I think it makes for the cleanest mounting of the rudder, and if it doesn't work I can always make an external gudgeon.

Then, I packed the foot peg t-nuts with wax and added a scrap piece of innegra surrounding each for a little extra strength.

Click image for larger version  Name:	a1.JPG Views:	1 Size:	302.2 KB ID:	96935Click image for larger version  Name:	a1.JPG Views:	1 Size:	302.2 KB ID:	96935Click image for larger version  Name:	a1.JPG Views:	1 Size:	302.2 KB ID:	96935

Then I added the final fiber layer: the spread-tow carbon. This material is extremely difficult to work with. It feels like handling slippery tissue paper, and it will unweave itself if you simply look at it the wrong way. It doesn't like to drape cleanly on any curved surface. Whereas the full blankets of innegra were laid lengthwise in the canoe, I laid this fabric widthwise just to make it easier to handle. I took my time to make sure it was tight against the other layers, and I used the least amount of tackifer I could- I am worried about bridging at the core transitions and curves of the hull. You think a regular plain or twill weave fabric doesn't stretch along the fiber axis, but because of the high number of crimps in the weave, there is actually a little bit of "stretch" that can occur as the weave flattens under vacuum. Because of the minimal crimp in the spread-tow, this fabric has zero stretch along the fibers. It is far less forgiving of any bridging. I cut the edge of the carbon right at the middle of the gunnel. It is not attached or tacked to the gunnel and I want it to be able to slide a bit: I expect it to be pulled slightly underneath into the hull curve as I vacuum down the stack.

The checkerboard reflections of the different tows are rather dazzling. It's a cool effect when this fabric is shown glossy on the outside of a part. However, the inside of the canoe will have a matte finish from the peel ply that will be laid in next.

Click image for larger version  Name:	a1.JPG Views:	1 Size:	302.2 KB ID:	96935Click image for larger version  Name:	a8.JPG Views:	1 Size:	386.1 KB ID:	96936

To prepare for the infusion, I also printed some resin ports. These are a transition from the feed/vacuum hose outside the bag to the spiral tubing inside the bag. It provides a flow path without kinks, and makes an easy way to seal the tubing as it goes through the bag. They sell these things commercially, but I designed these myself: I can print them for $0.13 each- so I just use them as a disposable. This infusion will have a central resin port, and 6 different vacuum ports.

Click image for larger version  Name:	a1.JPG Views:	1 Size:	302.2 KB ID:	96935Click image for larger version  Name:	a1.JPG Views:	1 Size:	302.2 KB ID:	96935
 

Attachments

  • a7.JPG
    a7.JPG
    234.6 KB · Views: 4
  • a6.JPG
    a6.JPG
    324.3 KB · Views: 5
Last edited:
Have followed this topic while and I must say, very impressive work! Building stripper seems so simple after looking this one...

This is like rocket science!

How thick the walls are going to be when canoe is fully complete?

What's going to be cost for this one?

Sent from my PLK-L01 using Tapatalk
 
This is like rocket science!

Same materials, different application. Hopefully similar velocities :)

How thick the walls are going to be when canoe is fully complete?

Not sure exactly. I had a test piece measure real close to 1.1mm, but it used a thicker twill carbon.

What's going to be cost for this one?

I have about $80 in the plug (waste), $450 in the mold (reusable), and $1100 in the infusion (materials and disposables). ....so I'm really hoping It works on the first shot...
 
That is going to be amazing !

Will the resin flow all around carbon sleeve, full saturating it ?

Keeping my fingers crossed on this !

Jim
 
Will the resin flow all around carbon sleeve, full saturating it ?

Jim

Yep- Once I open the resin line, I expect everything to wet out in 30-40 minutes. This is a cut section of my gunnel infusion test- both sides wet out fine. The gunnels are the last thing in the flow path though, so it will be slow to infuse. If there is a problem with the infusion not wetting everything out it will either be at the gunnel, or beneath the core. Beneath the core problem would mean a scrapped hull. If the gunnels don't infuse correctly, I'll just cut 'em off and make new ones secondarily.

Click image for larger version  Name:	IMG_2377.jpg Views:	1 Size:	189.2 KB ID:	96955

I'll explain my infusion strategy more once I have a photo of the lines in place, but it will be a single resin inlet and 6 vacuum outlets. This way I have 6 different "zones" of vacuum draw: if the flow front reaches a vacuum line before the rest of the boat is finished infusing, I can just clamp off the one zone and let the rest continue. I've never infused something close to this size before, so I'm trying to hedge my estimations a bit. Pro boatbuilders use computational flow software to plan the infusion and run computer models to get the best setup. I'm more-or-less just reckoning where I think the flow front will go first- based on my limited experiences so far.
 
Last edited:
AFter the fibers are laid, the infusion disposables are next: Peel ply, infusion mesh, resin feed lines, vacuum lines, and finally the vacuum bag.

Peel ply is a nylon cloth that allows everything else to release from the epoxy. The green stuff I'm using is silicone coated to release easier. It's a little more expensive, but for as much a PITA as it is to remove it from the final part, the few dollars' expense is well justified. It will leave a fine matte texture on the surface of the part, so the goal is to lay it flat without wrinkles. overlaps are fine. It doesnt stretch and so it will tend to 'bridge' any gaps on a concave surface. you can use tackifier spray to help place it, but tape and most anything else wont really stick to it well at all. The the epoxy will infuse vertically through a peel ply layer, but travels really slowly horizontally within a single layer of peel ply. This makes it useful as a "resin break" right before the vacuum lines.

IMG_2369.JPG

Next is the infusion mesh. It is a polyethylene grid mesh that allows for a fast horizontal flow of epoxy over the top of the fabric stack during the infusion. It has a limited stretch depending on how you orient it.

IMG_2374.JPG

Then the lines are laid. 1/2" spiral tube as a resin feed line laid central along the keel. 1/2" tube to give a low resistance, as the epoxy needs to flow from the central feed port 10' to each end. 1/4" spiral tube around the perimeter to the vacuum ports.

Then is the vacuum bag. Ordinarily, it is sealed to the sides of the mold with tacky tape. Because of the large split mold, I elected to use a full envelope bag around the entire mold. The piece of material I made the bag from here is huge: 8 yards long by 120 inches wide. Carefully unrolled and applied to prevent any snags or holes!

I sealed it up and started to draw down the bag. Vacuum pumps are low volume devices, so I just used a regular shop vac to pull most of the air out initially. I did this gradually, and pulled and adjusted the bag to conform to the mold and curves of the hull and make sure everthing inside didnt get wrinkled or pulled around. Just as I started to get most of the air out and start compressng things, I noticed the gunwales starting to lean in toward the center and fall off of the edge of the mold- mostly in the area of biggest tumblehome curve. I manipulated them through the bag as best I could, but it only got worse the more suction I put on the bag. I didn't even connect the vacuum pump yet and the mild suction was too much for the stack: I knew something was wrong. As much as I wanted to keep going and get a perfect vacuum, I knew what I had to do: cut the bag open and fix whatever was pulling the gunwales inward. Here is a benefit of the envelope bag, I guess: I cut off the end and slid it halfway back to expose the problem area. I reajusted the peel ply and mesh layers. I think it was the mesh that was too tight and pulling them in. Then I resealed the bag and tried again. This time it was a success. and I got everything nice and tight. So it's ready to infuse!

IMG_2380.JPG
 
It worked.
I went for it and got the infusion done. It took about 32 minutes to infuse at 88deg ambient. I used exactly 1.8 gal of epoxy mixed in three batches. I have a video of the infusion, but I'm going to combine it with videos I have of each step after the boat is finished. So stay tuned for a Diresta-style build video.

Click image for larger version  Name:	IMG_2392.JPG Views:	0 Size:	364.1 KB ID:	97195Click image for larger version  Name:	IMG_2390.JPG Views:	0 Size:	377.6 KB ID:	97196

I let it cure 18 hrs before demolding, which was a pain. I tore up my arms and hands ripping the bag/mesh/peel ply off the inside, and then carefully struggled for about an hour trying to get both halves of the mold off without damaging the canoe. But a hull popped out with a nice surface. And the mold survived relatively unscathed. I still have to file down the parting line along the keel, and the sharp edges of epoxy clinging to the gunwales, but I have a new canoe. It needs thwarts and seat and rudder, but fresh out of the mold....it weighs 20.6 lbs. Her name is "Dragonfly".

Click image for larger version  Name:	IMG_2448.jpg Views:	0 Size:	373.9 KB ID:	97197Click image for larger version  Name:	IMG_2392.JPG Views:	0 Size:	364.1 KB ID:	97195Click image for larger version  Name:	IMG_2392.JPG Views:	0 Size:	364.1 KB ID:	97195Click image for larger version  Name:	IMG_2449.jpg Views:	0 Size:	459.9 KB ID:	97198

I'm beyond excited that the infusion worked. This weekend I'm going to see if it will float upright, and try and nail down the seat height/placement.
 

Attachments

  • IMG_2444.jpg
    IMG_2444.jpg
    204.8 KB · Views: 9
That is So Cool !

I love the Innegra/carbon Pattern !

My experience with Epoxy, that it's soft until at least a few curing days. However you should be fine ! I don't think I could wait to paddle it either !

I hope it Flys !

Jim
 
Haven't been around much and just saw this, exceptional and informative to say the least, exponential congratulations is well deserved here.

Looking forward to the in water tests too. - eric
 
I epoxied on the thwarts and handles, then spent some time with a dremel tool knocking down the sharp edges on the gunnels and the parting line. Then mounting the rudder and foot pegs. With the seat sitting in there the entire thing weighs at final 25.5 lbs.

Click image for larger version  Name:	IMG_2458.JPG Views:	0 Size:	366.9 KB ID:	97232

This afternoon I took it for a maiden voyage at a local lake: 10mph wind and a couple powerboat wakes to keep it interesting. Initial stability is pretty low and different from anything I'm used to: it's a tippy feeling! But secondary is huge. I'm not sure I could tip the edge into the water if I tried- I only had the seat duct taped in to the floor, so I couldn't heel it too far. I had a small hydration pack with me- so I was about 20lbs below the design weight. The trim was pretty easy to dial in: I had marked the calculated center of bouyancy on the hull and it was pretty close. I had the seat at 6 inches, and I think I want to knock it down an inch or so. Then I have to make sure I can mount the yoke at the balance point too, before I epoxy things into place. (I'm using a pedestal mount yoke).

Click image for larger version  Name:	IMG_2458.JPG Views:	0 Size:	366.9 KB ID:	97232

But it moves forward, and in a good way. I used both a single and double blade paddle, and both were easy and vertical with the skinny nose. I felt more stable using a wing paddle, and felt that it was easier to find a steady rhythm. I have to sand and gloss the gunnels though: at least at the paddling station- as I got a couple abrasions on my thumb.

Click image for larger version  Name:	IMG_2458.JPG Views:	0 Size:	366.9 KB ID:	97232

The rudder was great. I have little experience with rudder boats, but it almost felt like cheating I could point the bow anywhere I wanted with a paddle on any side of the boat. Wind/waves, no problem. The gas pedal controls seem fine. With the rudder up, I could paddle 5-6 strokes on each side before switching. I wonder how much drag the rudder makes- I wonder if I can test that or not.

Click image for larger version  Name:	IMG_2458.JPG Views:	0 Size:	366.9 KB ID:	97232
I kept it upright, and didn't end up swimming. I did swamp it afterward to both wash off some sanding dust and make sure that it floated if submerged. I'll have to try a self rescue sometime and see if I can empty it and get back in. I don't know if it's fast yet or not- I'll have to do some time trials on my usual routes. It is though, a very cool feeling knowing there isn't another canoe like this in the world.
 
Last edited:
WOW !!!! 25.5# That blows my mind !

The gunnels scraping your thumb. Maybe on the Next one change the gunnels profile, less on the outwhale, and maybe bevel like the Bell profile.

My Hat is off to you on this build ! To say the least it has been an inspiring build !

Thanks !

Jim
 
Congratulations on the successfully infusion and unmolding. You've certainly got something to be proud of.

Alan
 
Thanks.

I retooled the seat and it feels solid now. I cut 1 inch off of the pedestal, but then also put a 1/2" of minicell foam on top of the seat. The pedestal brackets "sides" were interfering with the yoke, so I cut them off. The front and back are just epoxied to the canoe bottom, and I cut the sides into angled bracing. Removing all this from the pedestal saved me 10oz or so.

IMG_2471.JPG

Then I drilled the gunnels for... I guess it would be called a coaming. I am making a front spray cover and this will be the dam to support it and prevent waves from washing into the boat. I made it from an old aluminum tent pole. (to make the bend without kinks, I filled the pole with table salt, then chucked the pole in a drill and wrapped bailing wire around the outside). To drill the shallow angle holes I dug out the Kreg jig! It was a perfect angle, and the hole was just the right size to epoxy a small piece of pole in place as a socket. The coaming is lightweight, removable, flexible if it gets bumped or crushed. and stays out of the way of paddling. The downside is that it will limit visibility a bit when portaging.

IMG_2477.JPGIMG_2473.JPGIMG_2474.JPG

I clamped the yoke on and portaged 1/2mile down to the river today where I paddled a familiar course. I fought a wind part of the way (again- the rudder, kicks arse), but dragonfly looks to be about 10% faster than my (unloaded) magic on the same stretch. This was up current/down current, but I averaged 5.5mph for 10miles. I switched up the wing paddle and single blade along the way, and felt like I could move pretty well with both.
 
Back
Top