Yeah Mike. That's what I did. It is a Wilderness UL.
-
Happy National Sunglasses Day! ☀️🕶️😎
You are using an out of date browser. It may not display this or other websites correctly.
You should upgrade or use an alternative browser.
You should upgrade or use an alternative browser.
G
Guest
Guest
The acquisition of the Klepper was the result of my bemoaning the lack of a summer shop project. I think I got exactly what I asked for. Between some planned trips and increasingly tricky outfitting challenges it may in fact take me all summer.
I’m quite pleased by that. There is seemingly no end of peculiar outfitting challenges on the Comade, and it may take me the better part of a week just to get the foot pedals installed.
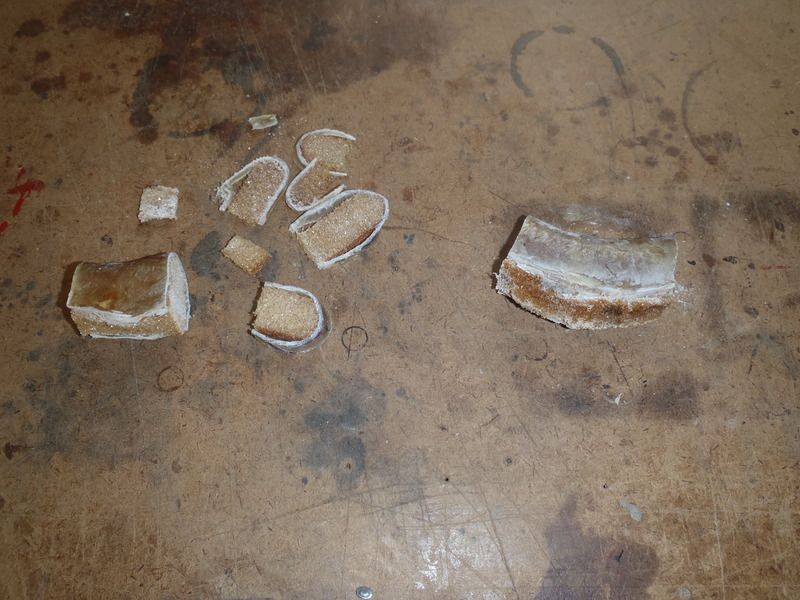
The bottom of the bulkhead slot presented a large resin void that needed to be filled so that the rail would have a flush surface. Some thickened epoxy pooled in that void brought it flush and I was back to the cutting table to size out some glass and peel ply.
Shop hint – Never throw away little scraps of peel ply. You never know when small pieces might come in handy.
A couple of small squares and strips of glass and the exposed foam areas of the cut out bulkhead were covered. While I was at it I added a small piece of glass in the bolt hole areas.
And, next day, sanded and recoated with epoxy. Two days to get one bulkhead ready for the installation of the foot pedals. An installation action that requires drilling two holes and installing two bolts, which takes all of two minutes once everything is prepped, marked and ready.
With one rail ready for installation I can flip the hull and repeat on the other side. One of the oddities of working on these old oddities is that the hull is constantly flipping from side to side and right side up to upside down, working sideways under cowling, atop decks, and under decks, sometimes moving the boat onto different height sawhorses.
Time to flip the Comrade again. Time to get better handles on it while I do so.
Moving the hull sideways, upside down, onto different horses and etc is easier with some kind of grab handles installed. I had attached a pair of simple toggle handles to the painter line holes for test paddle transport, but those holes are so close to the cutwater that if the bow handle dangles it gurgles in the water, and the stern toggle would be uber awkward with a rudder in place.
The easiest and most comfortable solution is to install a pair of carry handles on the decks, and I happened to have a spare set in the outfitting box.
http://topkayaker.com/index.php?main_page=product_info&cPath=2_134&products_id=1334
I’ll still use those sturdy and well sealed stem holes as through-hull painter line attachments.
I’m quite pleased by that. There is seemingly no end of peculiar outfitting challenges on the Comade, and it may take me the better part of a week just to get the foot pedals installed.
The bottom of the bulkhead slot presented a large resin void that needed to be filled so that the rail would have a flush surface. Some thickened epoxy pooled in that void brought it flush and I was back to the cutting table to size out some glass and peel ply.
Shop hint – Never throw away little scraps of peel ply. You never know when small pieces might come in handy.
A couple of small squares and strips of glass and the exposed foam areas of the cut out bulkhead were covered. While I was at it I added a small piece of glass in the bolt hole areas.
And, next day, sanded and recoated with epoxy. Two days to get one bulkhead ready for the installation of the foot pedals. An installation action that requires drilling two holes and installing two bolts, which takes all of two minutes once everything is prepped, marked and ready.
With one rail ready for installation I can flip the hull and repeat on the other side. One of the oddities of working on these old oddities is that the hull is constantly flipping from side to side and right side up to upside down, working sideways under cowling, atop decks, and under decks, sometimes moving the boat onto different height sawhorses.
Time to flip the Comrade again. Time to get better handles on it while I do so.
Moving the hull sideways, upside down, onto different horses and etc is easier with some kind of grab handles installed. I had attached a pair of simple toggle handles to the painter line holes for test paddle transport, but those holes are so close to the cutwater that if the bow handle dangles it gurgles in the water, and the stern toggle would be uber awkward with a rudder in place.
The easiest and most comfortable solution is to install a pair of carry handles on the decks, and I happened to have a spare set in the outfitting box.
http://topkayaker.com/index.php?main_page=product_info&cPath=2_134&products_id=1334
I’ll still use those sturdy and well sealed stem holes as through-hull painter line attachments.
G
Guest
Guest
2[SUP]nd[/SUP] verse, just like the first. Cut out the template slot in the bulkhead on the other side. Dang was it easier to cut out the full width needed using the cut-out template rather than sawing away at it a little bit at a time.
If side #1 had a resin void that needed filling side #2 had a raised pool of resin that needed grinding. Again, the layup technique from side to side is noticeably different. That side took a lot of PPE clad grinding and sanding to get the rail seated flush.
More glass and peel ply and wait time.
I sure hope that is the last of the cutting and grinding, I’m tired of getting all PPE clad just to do 3 minutes of Vinylester grinding with a Dremel tool. It takes as long to put on and take off the respirator, goggles and gown as it does actually grind the little obstacles away.

If side #1 had a resin void that needed filling side #2 had a raised pool of resin that needed grinding. Again, the layup technique from side to side is noticeably different. That side took a lot of PPE clad grinding and sanding to get the rail seated flush.

More glass and peel ply and wait time.

I sure hope that is the last of the cutting and grinding, I’m tired of getting all PPE clad just to do 3 minutes of Vinylester grinding with a Dremel tool. It takes as long to put on and take off the respirator, goggles and gown as it does actually grind the little obstacles away.
G
Guest
Guest
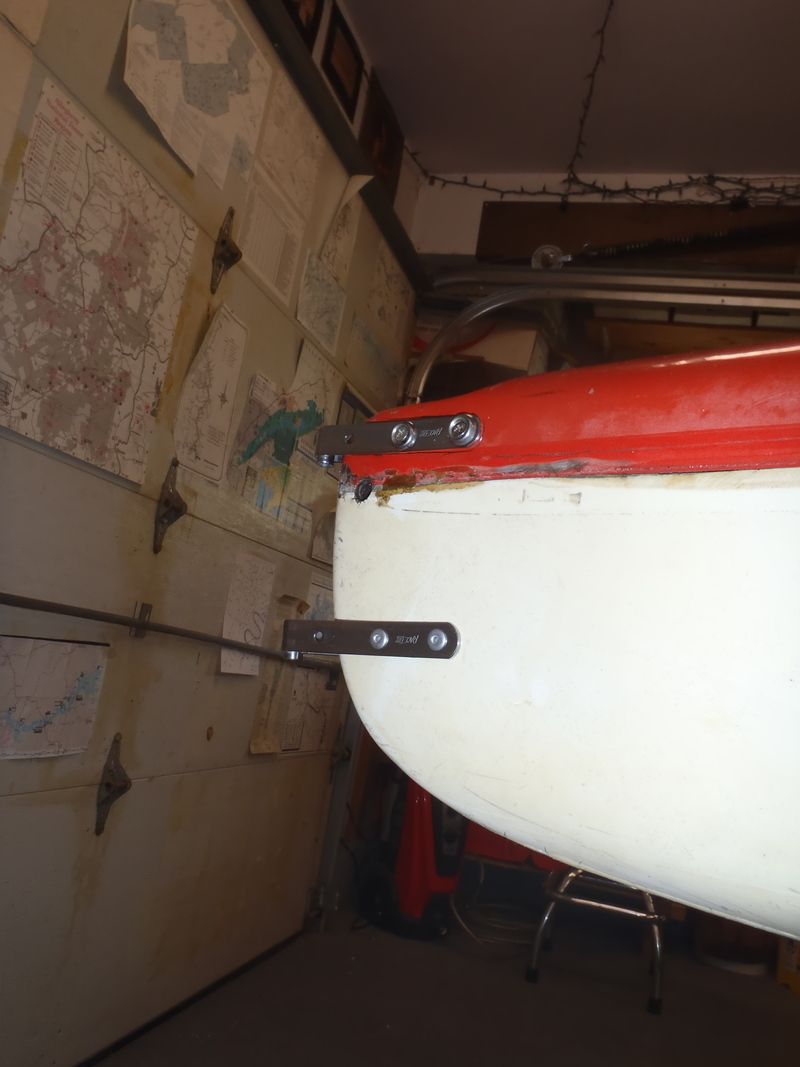
Foot pedal rail bolts and the three bears
The standard length ¼” diameter bolts that work on most composite or plastic hulls are 5/8” in length, but those were tooooo short to protrude sufficiently through the Comrade’s thick woven roving.
Time for a hunt through the stainless steel hardware supply and a test fit.
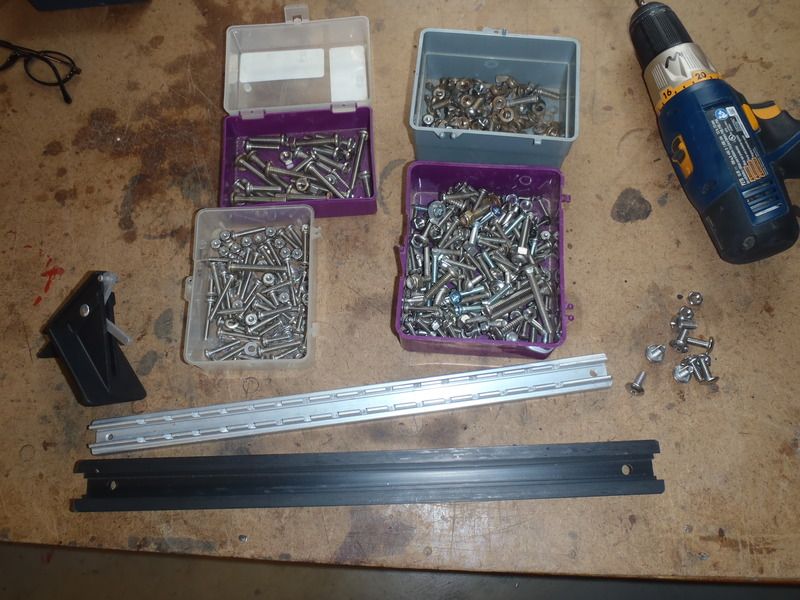
My next selection proved tooooo long; those bolts need to be a very specific and exacting length, so that when tightened they fit snug in the nut but do not protrude to interfere with the movement of the slider rail.
And, finally, these were juuuust right.
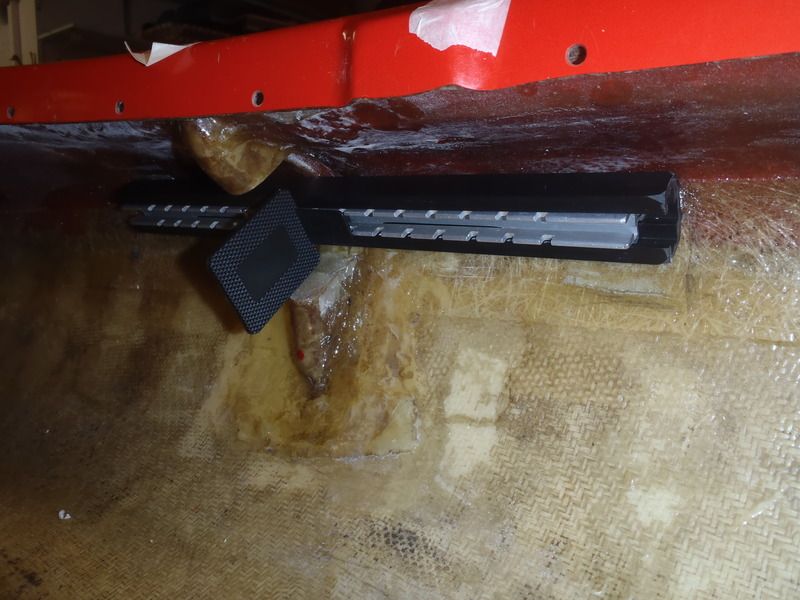
Thank goodness for a healthy shop supply of stainless steel. I really didn’t feel like running to the hardware store for four bolts.
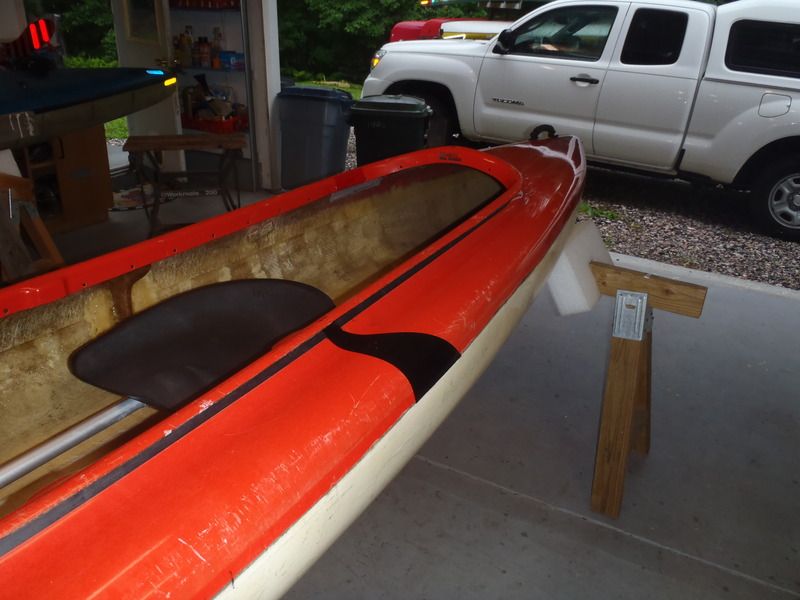
Two foot pedal rails installed and a test sit on the shop floor boat pad reveals something I had kinda hoped for. In my preferred sliding seat location, with the pedals positioned even with the cut out slot in the bulkhead, I can drive the rudder pedals without interference, and can slid my toes an inch outward and brace against the remains of the bulkhead.
Sweet.
The standard length ¼” diameter bolts that work on most composite or plastic hulls are 5/8” in length, but those were tooooo short to protrude sufficiently through the Comrade’s thick woven roving.
Time for a hunt through the stainless steel hardware supply and a test fit.

My next selection proved tooooo long; those bolts need to be a very specific and exacting length, so that when tightened they fit snug in the nut but do not protrude to interfere with the movement of the slider rail.
And, finally, these were juuuust right.

Thank goodness for a healthy shop supply of stainless steel. I really didn’t feel like running to the hardware store for four bolts.
Two foot pedal rails installed and a test sit on the shop floor boat pad reveals something I had kinda hoped for. In my preferred sliding seat location, with the pedals positioned even with the cut out slot in the bulkhead, I can drive the rudder pedals without interference, and can slid my toes an inch outward and brace against the remains of the bulkhead.
Sweet.
")
G
Guest
Guest
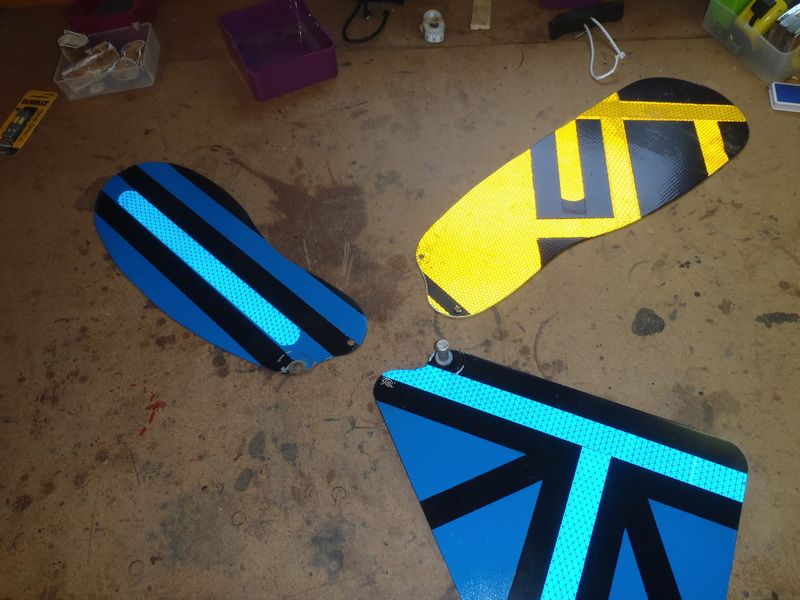
Looking at all those hatch covers, you need to get into sewing !
And then maybe farm yourself out, and make covers for others.
I have the greatest respect for people who sew their own gear. My father was a sailmaker in the Navy and that man could sew anything. I didn’t get that gene.
Fortunately those ubiquitous Harmony/Wilderness covers fit a wide range of decked canoe cockpits.
Having storage covers for those boats is a huge boon in camp, especially on family trips where everyone’s PFD, paddles and etc can just stay dry and covered in their boat instead of picking and sorting through a mass of gear in the morning. All the more so if a site is distant from the landing, eliminating the need to carry paddling gear back and forth to camp.
Last edited:
G
Guest
Guest
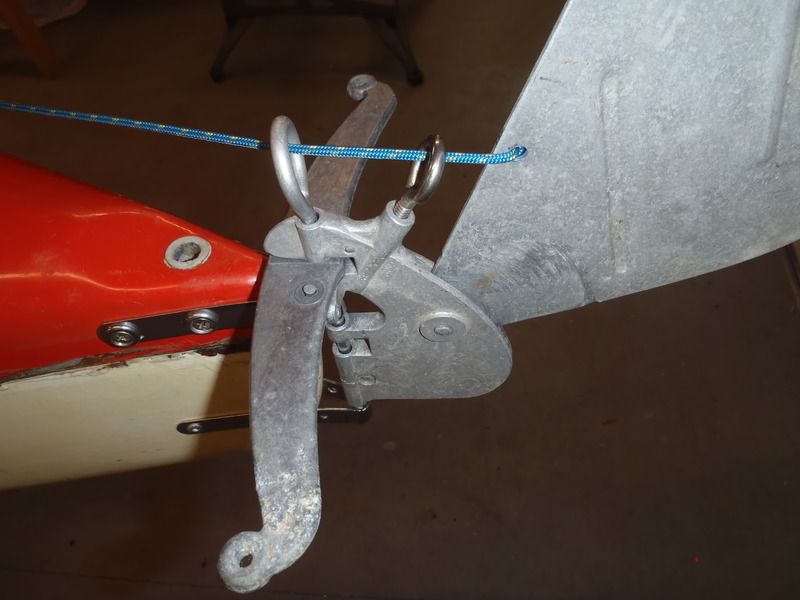
Rudderless no longer
I don’t have a spare modern rudder, so I needed to figure out a way to use the 40 year old Klepper rudder that came with the Comrade. I found an aftermarket Klepper rudder adapter for beer money and two days for delivery (vs $70 + shipping and four to six weeks for that still-made Klepper part from Germany) Thanks GG.
Those adapters are made for Klepper’s skin boats. I knew I was taking a chance with fitment issues, and despite come serious adaptive surgery, re-drilling holes, grinding away bits here and there and some custom heating and bending to match the stem, the result was far from desirable.
It was never going to seat far enough to reach the original pin hole and I eventually broke the thing trying to adapt it. It was worth a try to keep the rudder almost OEM.
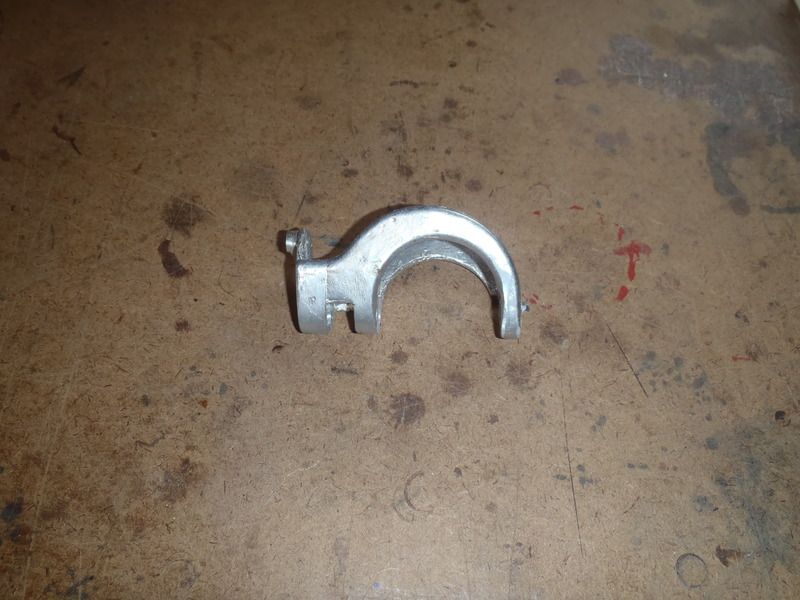
Scrap Plan A and start saving up beer money. I have a better and sturdier Plan B at hand anyway. A pair of Duckworks gudgeons.
http://www.duckworksbbs.com/hardware/p-g/canoe/index.htm
Those will work with the existing rudder hardware, pin and stem shape, but unlike the pin-able/removable adaptor the two gudgeons will need to be permanently installed on the stern.
Simply installing those two gudgeons, of course, turned into yet another multi-day project.
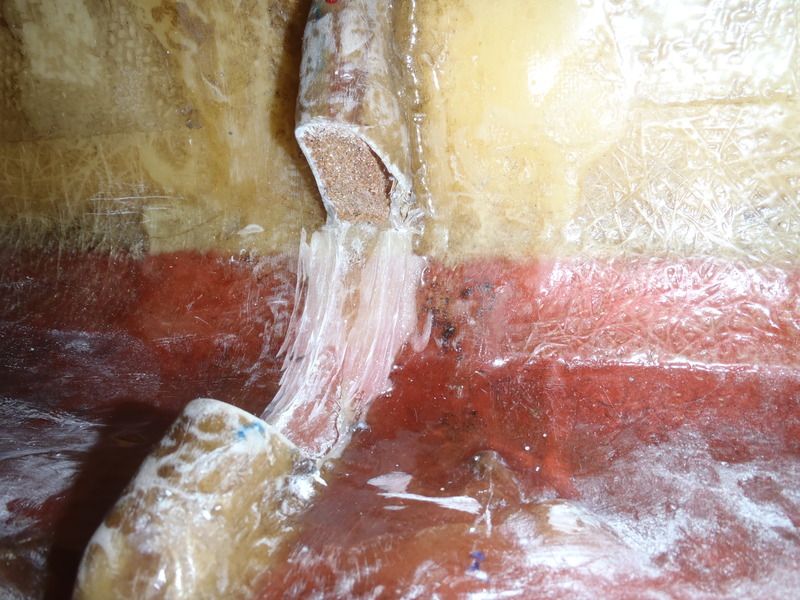
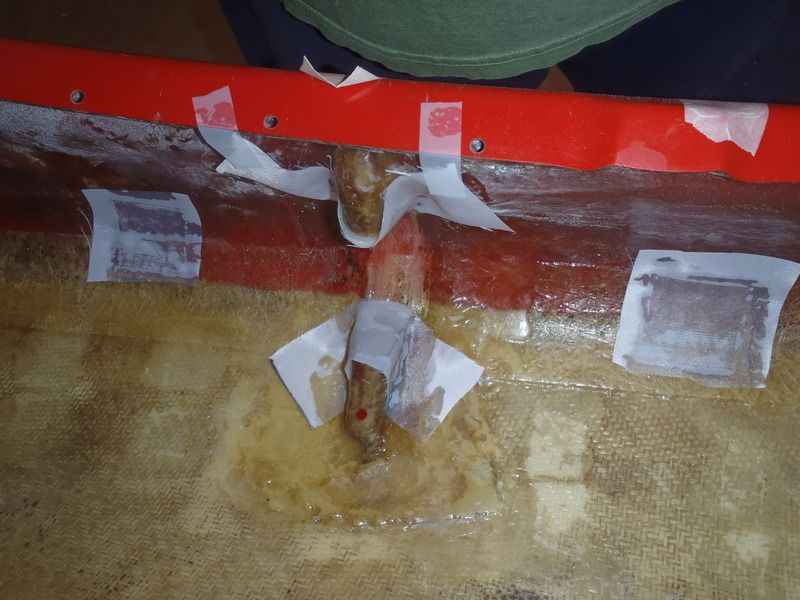
I marked the top gudgeon, drilled the holes for one side, filled them with G/flex and attached that side. And then quickly flipped the boat over so that gudgeon hardware and resin holes were on the down side, allowing the resin to pool around the interior of the hole and hardware for a good seal.
Wait for that to cure overnight, flip the hull and repeat the same process on the other side of gudgeon number 1, re-flip to pool the resin and wait. Then do the same for the second gudgeon.
The lower gudgeon is right at the cutwater, so I took special care to get that one syringe pumped full of G/flex and well sealed.
I love the Comrade; four days to drill 8 holes and install two gudgeons; five minutes of actual work, 90 hours of waiting for epoxy to set.
I know I’m slow in the shop, but that may have set a record.
It was worth it for the end result. That monster rudder is now tight and sturdy and still unpins easily, leaving only the gudgeons, which has rudderless transport advantages.
I’ll need to figure out how to make the control and retraction lines removable from the rudder housing, but that’s a small price to pay.
I don’t have a spare modern rudder, so I needed to figure out a way to use the 40 year old Klepper rudder that came with the Comrade. I found an aftermarket Klepper rudder adapter for beer money and two days for delivery (vs $70 + shipping and four to six weeks for that still-made Klepper part from Germany) Thanks GG.
Those adapters are made for Klepper’s skin boats. I knew I was taking a chance with fitment issues, and despite come serious adaptive surgery, re-drilling holes, grinding away bits here and there and some custom heating and bending to match the stem, the result was far from desirable.
It was never going to seat far enough to reach the original pin hole and I eventually broke the thing trying to adapt it. It was worth a try to keep the rudder almost OEM.

Scrap Plan A and start saving up beer money. I have a better and sturdier Plan B at hand anyway. A pair of Duckworks gudgeons.
http://www.duckworksbbs.com/hardware/p-g/canoe/index.htm
Those will work with the existing rudder hardware, pin and stem shape, but unlike the pin-able/removable adaptor the two gudgeons will need to be permanently installed on the stern.

Simply installing those two gudgeons, of course, turned into yet another multi-day project.
I marked the top gudgeon, drilled the holes for one side, filled them with G/flex and attached that side. And then quickly flipped the boat over so that gudgeon hardware and resin holes were on the down side, allowing the resin to pool around the interior of the hole and hardware for a good seal.
Wait for that to cure overnight, flip the hull and repeat the same process on the other side of gudgeon number 1, re-flip to pool the resin and wait. Then do the same for the second gudgeon.
The lower gudgeon is right at the cutwater, so I took special care to get that one syringe pumped full of G/flex and well sealed.

I love the Comrade; four days to drill 8 holes and install two gudgeons; five minutes of actual work, 90 hours of waiting for epoxy to set.
I know I’m slow in the shop, but that may have set a record.
It was worth it for the end result. That monster rudder is now tight and sturdy and still unpins easily, leaving only the gudgeons, which has rudderless transport advantages.

I’ll need to figure out how to make the control and retraction lines removable from the rudder housing, but that’s a small price to pay.
G
Guest
Guest
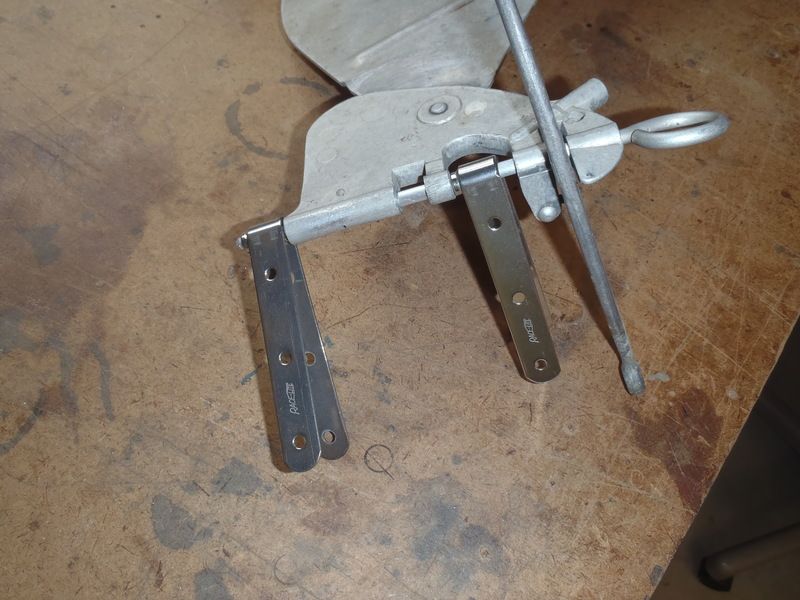
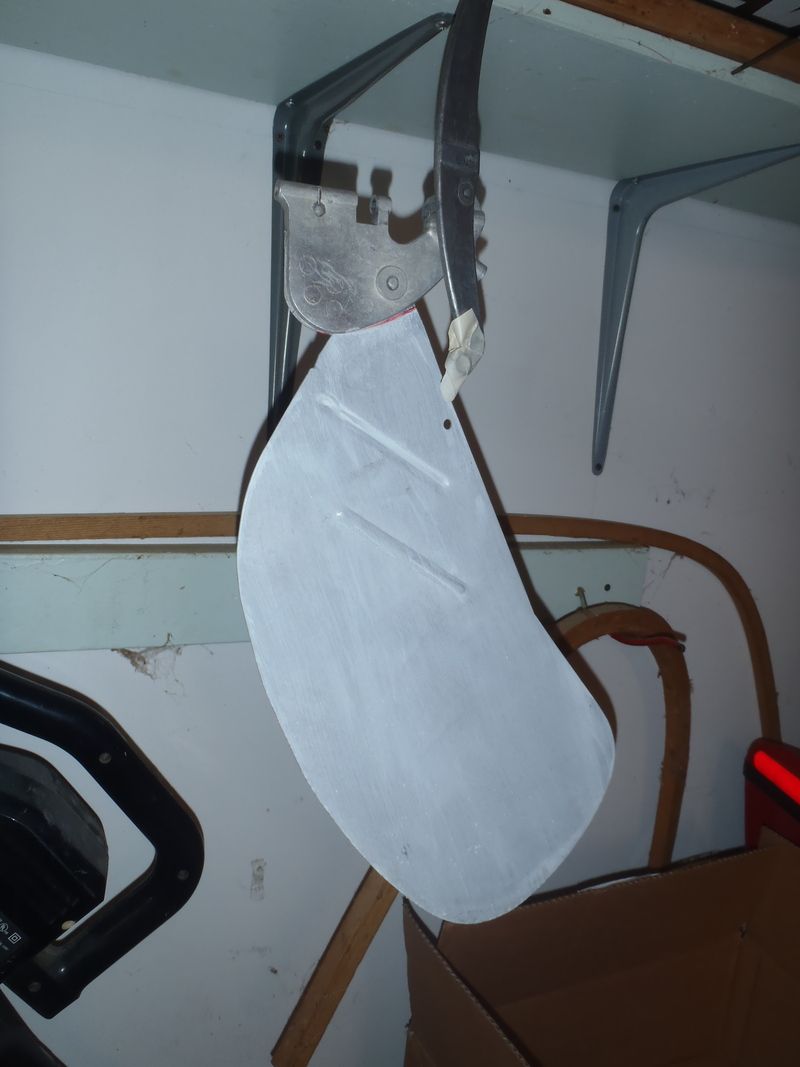
The OEM Klepper rudder needs some kind of rudder retraction line.
From archived images of the Klepper it appears that the OEM rudder was typical 70’s kludge; meaning pull ashore and either remove the rudder of affix it at 90 degrees out of the water.
I like the size, shape and depth of the OEM rudder blade and do not want to replace it, but I’m not pulling ashore and hopping out of the boat every time I want to retract the rudder
The simplest solution is usually to reshape the top of the rudder blade into some Kruger-style Dr. Seuss-ish curves, each rudder housing requiring a slightly different shape.
Using a Kruger-esque gravity deploy line is simple, requiring only a single line off the rudder blade at a shaped pivot point. Yet several of the old-school decked hulls (Old Town Sockeye, Hyperform Optima and Klepper Kamerad) had that same stupidly awkward pull ashore and manually retract the rudder design (mal) function.
I had anticipated that the Comrade would continue to throw outfitting curveballs my way. It has at every turn so far.
But, miraculously, because of the OEM eye bolt pin and appendages on that rudder, it needed only an attachment hole drilled in the rudder blade and a small eye bolt to screwed into one mystery appendage to function perfectly.
Even that second eye bolt is somewhat superfluous and a simple rope hole in the rudder would work (I’ll install a clip there for rudder removal).
A simple hole drilled in the rudder and a length of line works with eloquent simplicity. So why was there no hole or attachment point on the rudder blade? Warum kein Loch?
From archived images of the Klepper it appears that the OEM rudder was typical 70’s kludge; meaning pull ashore and either remove the rudder of affix it at 90 degrees out of the water.
I like the size, shape and depth of the OEM rudder blade and do not want to replace it, but I’m not pulling ashore and hopping out of the boat every time I want to retract the rudder
The simplest solution is usually to reshape the top of the rudder blade into some Kruger-style Dr. Seuss-ish curves, each rudder housing requiring a slightly different shape.

Using a Kruger-esque gravity deploy line is simple, requiring only a single line off the rudder blade at a shaped pivot point. Yet several of the old-school decked hulls (Old Town Sockeye, Hyperform Optima and Klepper Kamerad) had that same stupidly awkward pull ashore and manually retract the rudder design (mal) function.
I had anticipated that the Comrade would continue to throw outfitting curveballs my way. It has at every turn so far.
But, miraculously, because of the OEM eye bolt pin and appendages on that rudder, it needed only an attachment hole drilled in the rudder blade and a small eye bolt to screwed into one mystery appendage to function perfectly.

Even that second eye bolt is somewhat superfluous and a simple rope hole in the rudder would work (I’ll install a clip there for rudder removal).
A simple hole drilled in the rudder and a length of line works with eloquent simplicity. So why was there no hole or attachment point on the rudder blade? Warum kein Loch?
G
Guest
Guest
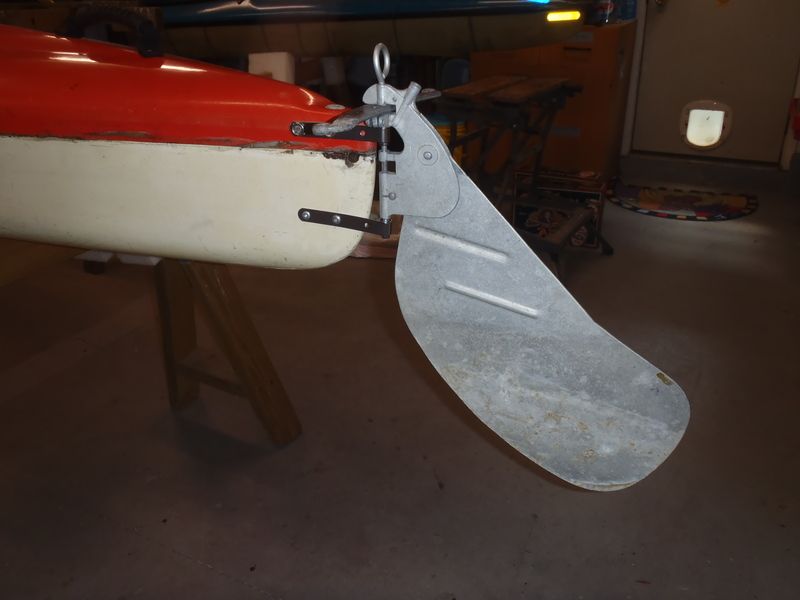
Nice Rudder. Needs some cleanup and TLC. First a diluted vinegar bath to get rid of 40 years of corrosion and etch the aluminum or the primer coat.
It is always amazing how much crud comes off just soaking in a diluted vinegar bath for a few hours. Or overnight. Followed by a neutralizing baking soda rinse, clear water rinse and dry.

Then a coat of aluminum primer. I was surprised at how thin that primer spreads, forcing me to go back and re-read the directions several times. The 0.05 point font directions on the half-pint can requiring both reading glasses and a magnifying glass.
The rudder needed a top coat, and I was still feeling Farmersexual. International Harvester Red on the blade. The aluminum primer coat seemed to snatch paint from a foam brush; if the brush wasn’t heavily loaded it nearly stuck to the primer.
I tipped it out as best I could, but it still developed some sags. Who cares, it’s behind me and I’m not looking at it. Wabi-sabi good enough.
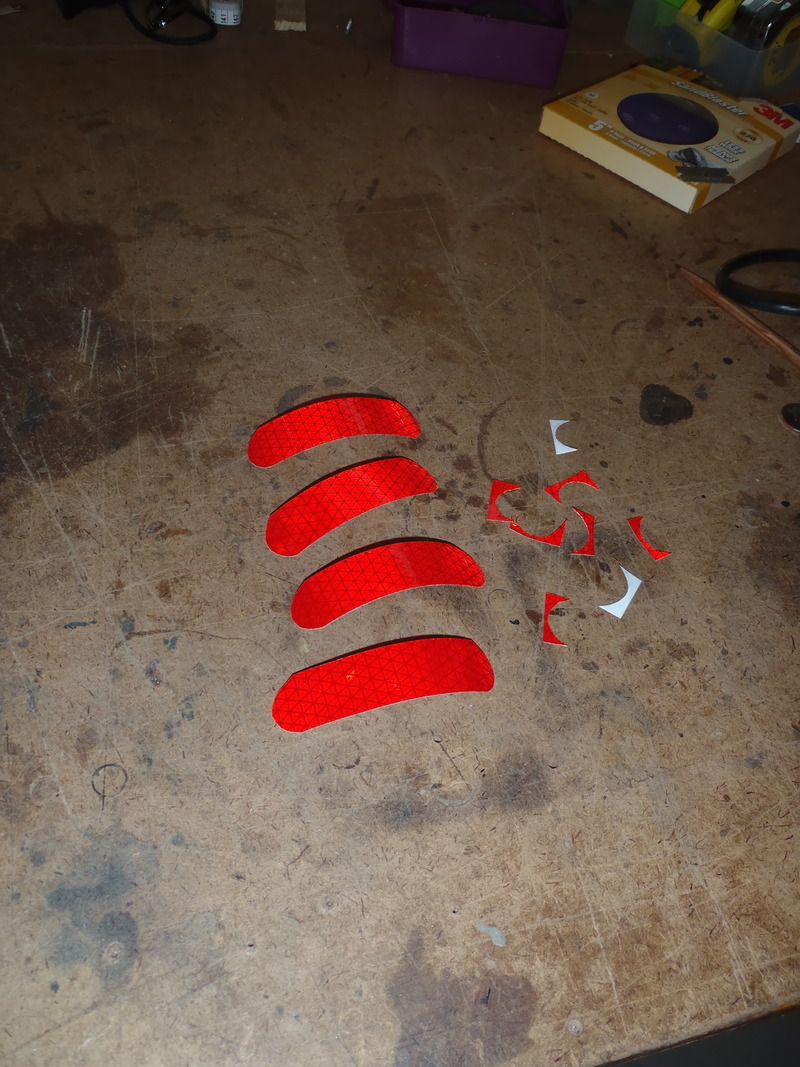
Some random black pattern on the blade tip for show, some Hi-Intensity reflective tape for visibility and it’s a proper shopworks rudder.
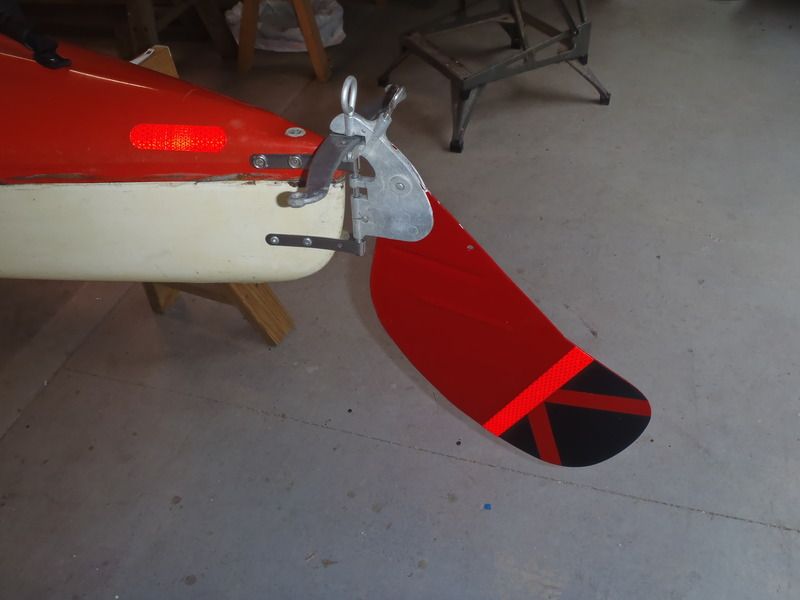
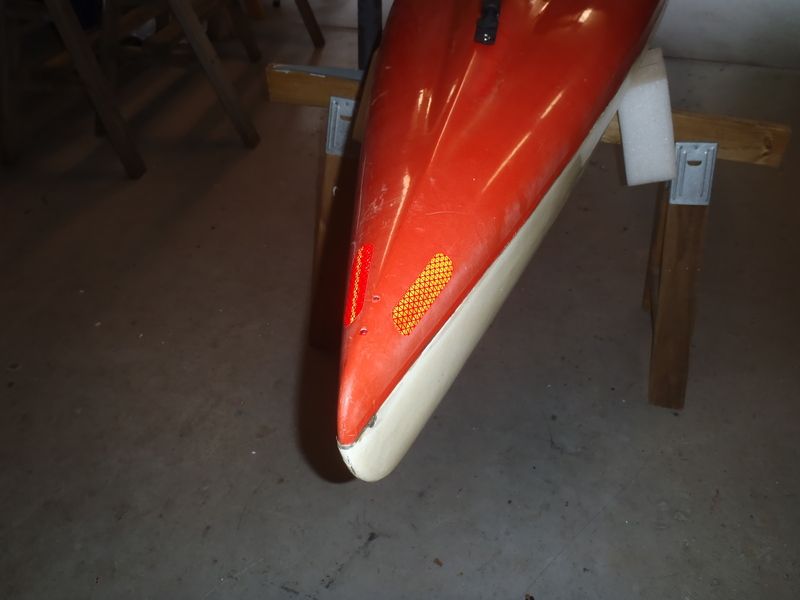
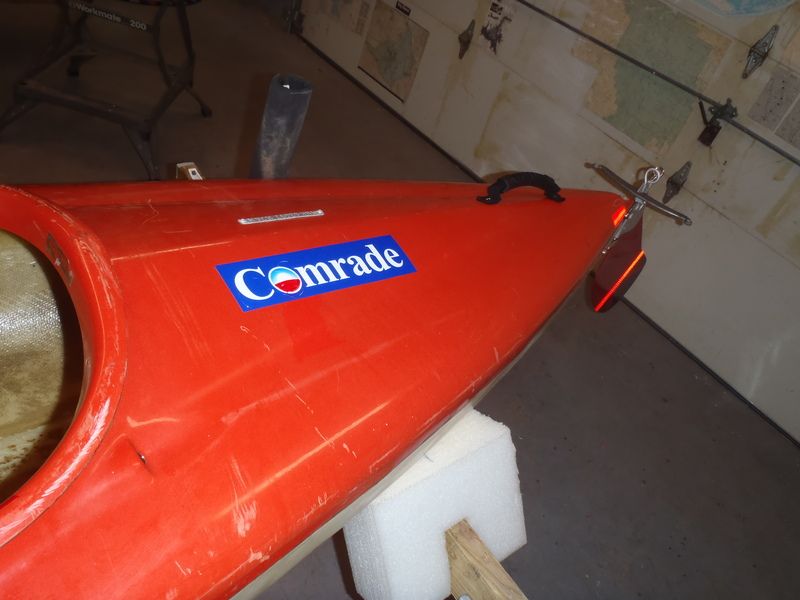
While I had the reflective tape out I added the usual flashes to the bow and stern.
And while I had the paper and tape out I masked off a couple of the fuglier repairs on the coming and painted them red or black in keeping with the Comrade’s color scheme. If I’m feeling artistic at some point I may go back and add flames to that black wedge along the coming.
Lastly, the Comrade moniker. My hand-painted boat names are shaky crude at best. I went the bumper sticker route this time.
It is always amazing how much crud comes off just soaking in a diluted vinegar bath for a few hours. Or overnight. Followed by a neutralizing baking soda rinse, clear water rinse and dry.

Then a coat of aluminum primer. I was surprised at how thin that primer spreads, forcing me to go back and re-read the directions several times. The 0.05 point font directions on the half-pint can requiring both reading glasses and a magnifying glass.

The rudder needed a top coat, and I was still feeling Farmersexual. International Harvester Red on the blade. The aluminum primer coat seemed to snatch paint from a foam brush; if the brush wasn’t heavily loaded it nearly stuck to the primer.
I tipped it out as best I could, but it still developed some sags. Who cares, it’s behind me and I’m not looking at it. Wabi-sabi good enough.
Some random black pattern on the blade tip for show, some Hi-Intensity reflective tape for visibility and it’s a proper shopworks rudder.

While I had the reflective tape out I added the usual flashes to the bow and stern.


And while I had the paper and tape out I masked off a couple of the fuglier repairs on the coming and painted them red or black in keeping with the Comrade’s color scheme. If I’m feeling artistic at some point I may go back and add flames to that black wedge along the coming.


Lastly, the Comrade moniker. My hand-painted boat names are shaky crude at best. I went the bumper sticker route this time.

I don't really have any worthwhile input but just wanted to say that I'm enjoying following along. One of these days I need to do some rudders so it's always interesting to watch you do yours. And always lots of great outfitting tips.
Alan
Alan
G
Guest
Guest
I don't really have any worthwhile input but just wanted to say that I'm enjoying following along. One of these days I need to do some rudders so it's always interesting to watch you do yours. And always lots of great outfitting tips.
I’ll be getting back at the Comrade soon. I had a long strange trip out to the Gulf Stream to scatter a friend’s ashes, and watched a large Mako chomp pieces out of a Tuna while it was being reeled in. The following day one of my companions had just come out of the water when the 7[SUP]th[/SUP] NC shark attack took place 200 feet up the beach.
My chigger bites from the NC swamp portion of the trip have faded (bad, bad year for chiggers down south) and I’m almost caught up at home. Tomorrow will be time to put the Comrade on a pad on the shop floor and mark/measure for minicel pads and floatbag D ring placement.
G
Guest
Guest
One of these days I need to do some rudders so it's always interesting to watch you do yours.
Having watched your work I expect to be rudder impressed.
I will offer a few thoughts from the kludge rudders I have put together.
A tripping canoe rudder needs to be oversized. A longer/wider blade will cavitate or bend sideway; a stiffer rudder blade and bigger vertical “shoulders” on the rudder housing can compensate for that. (Thanks Rocky Headlands).
A Kruger-style rudder, with a single retraction line and gravity deployment is simple, effective and easily field repairable. And there are times in steep following chop that I wish it retraced 270 degrees like a Feathercraft type rudder instead of 170ish, so it wasn’t getting slapped around in the waves. I noticed when Jim Henry sold his personal (camo) Monarch that it had a Feathercraft rudder.
Duckworks gudgeons are the bomb if semi-skilled at DIY manufacture. On a canoe the ability to remove the rudder and housing without undue hardship and finicky frou-frou, is a huge boon.
http://duckworksbbs.com/hardware/p-g/canoe/index.htm
Lastly, the ability to foot control a rudder is beyond useful and is worth whatever outfitting sacrifice needs to be made. That is a near necessity under sail, but the simple ability to stash a paddle and use both hands, even briefly, for some task while maintaining course is a godsend during long days in the boat.
Grab a drink, trim some gear, take a photo, slather on some bug juice or sun screen; sometimes I need just 60 seconds hand free and still in control, without making for some eddy or wind shadow.
I discovered how nice rudders can be when I raced kayaks for a little while. Paddling was so much more efficient when you didn't have to worry about correction strokes to stay on line no matter the wind, waves, or current. I singled bladed my surfski quite a bit and it was nice to take 25 strokes per side before switching to give the muscles a break.
Normally I'm pretty happy without a rudder on my canoes but there are times it would be nice. Upstream travel is one of those times and I'm going to have a lot of that on my trip. I'd originally planned to outfit my current build with a rudder but after finally getting it to the point it was paddleable it tracked better than I thought it might and I was ready to quit working on it for a while so I gave up on the idea. But a thought keeps nagging in the back of my head that 1 week into my leg of upstream travel I'm going to be kicking myself for not installing a rudder. I could also run into a week's worth of wind crossing WCPP. I think future Alan would gladly trade the efficiency for weight so today present-day Alan read through all your rudder installs and started cutting out some ugly templates and giving it some serious thought. Like I didn't already have enough to do getting ready....
All the pictures and step by step instructions have been much appreciated.
Alan
G
Guest
Guest
Normally I'm pretty happy without a rudder on my canoes but there are times it would be nice. Upstream travel is one of those times and I'm going to have a lot of that on my trip
But a thought keeps nagging in the back of my head that 1 week into my leg of upstream travel I'm going to be kicking myself for not installing a rudder. I could also run into a week's worth of wind crossing WCPP. I think future Alan would gladly trade the efficiency for weight so today present-day Alan read through all your rudder installs and started cutting out some ugly templates and giving it some serious thought. Like I didn't already have enough to do getting ready....
Weeks of upstream travel and the potential for days of big lake wind. I think Future Alan is on to something.
It is hard to quantify the weight vs increased efficiency. Given your carbon fiber skills and demonstrated inventiveness I’m looking forward to seeing what you come up with.
The massive and all metal overbuilt rudder on the Comrade weighs 1lb 11oz. With modern materials and design forethought I expect that could be reduced to well under a pound. Just leave one beer behind and you are back to even.
The massive and all metal overbuilt rudder on the Comrade weighs 1lb 11oz.
Just for the blade or the whole darned contraption? From the looks of it I would have guessed the whole thing weighed 4lbs. or so. If it's really only 1 3/4 lbs for the whole thing that makes me feel a bit better about the weight since under 1lb should be doable with carbon.
Alan
G
Guest
Guest
Just for the blade or the whole darned contraption? From the looks of it I would have guessed the whole thing weighed 4lbs. or so. If it's really only 1 3/4 lbs for the whole thing that makes me feel a bit better about the weight since under 1lb should be doable with carbon.
Weighed on a food scale. I went back and weighed it again a second time.The whole thing, massive metal rudder blade, oversized metal arms and housing and giant pin. And primer/paint/tape job.
Onno makes a carbon rudder system that comes in just under 1 lb.
http://www.onnopaddles.com/onnocomponents.html
dang, I’m starting to feel better weight-wise about that massive Klepper rudder.
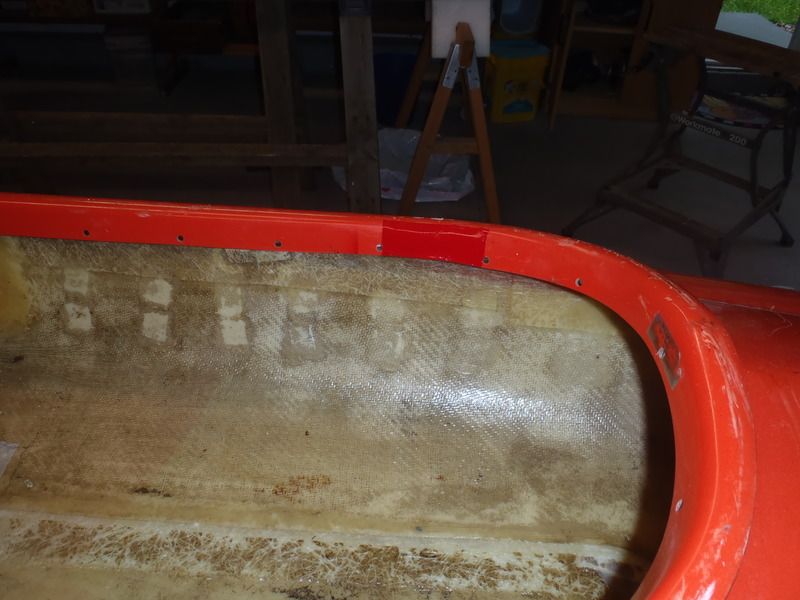
Nearly all of the 1970’s whatchamacalit hybrids I have worked on started life as tandem open-cockpit kayaks with rudders. All had some OEM floatation. Some had ethafoam pillars under the decks, which would have precluded too much gear storage room when using them as solo sailing trippers. Some had the familiar shoebox sized blob of foam in the stems, leaving space for gear storage but providing just enough floatation that the hull wouldn’t sink to Davey Jones.
The Comrade is the first I’ve seen that came with a large volume of foam floatation tucked along the ( |__| ) sides of the hull. The Comrade was designed and built a true tandem sailing kayak, so the addition of OEM floatation was a safety issue.
I add some built in floatation during my soloization conversions, largely glued in place minicel heel and knee pads. Paddled or sailed as a tripper my dry bagged gear fills the under deck area and provides considerable water displacement.
Without gear in the boat in-water recovery is impossible with float bags. I have capsized one of those boats when day paddled empty and it took me a very long time to bail and pump out that XL sized bathtub full of water, and that was after having swum the hull to shallow flat water where I could stand beside it.
Having experienced that joy I add pad eyes under the decks to attach tapered floatation bags for use when paddled of sailed empty.
The float bag attachments are triangulated clips on the bag’s end lines; unlike an open canoe there is no need for top lacing to keep the bag in place, but trying to tie in the float bag’s end lines under the decks, sight unseen and upside down at arm’s length is awkward at best. It is much easier to reach under the decks and snap on a clip.
“Whatchamacallitit hulls” is apropos as they defy traditional definition, especially after I’m done outfitting. They have large decks, and a rudder, so it’s a kayak. But they are typically 28-30 inches wide and 12-14 inches deep, with a raised seat for single blading, so maybe it’s a canoe.
The Kruger designed boats (Loon, Monarch, Sea Wind), the Clipper Sea-1 and others are/were billed as canoes. Complicating the confusion some outdated Brit nomenclature called kayaks “canoes” and canoes “Canadianes” (or some spelling variation thereof).
What’s in a word? I paddle my open boats with a double blade, have spray covers and sails on them, and now rudders. Sure looks like a giant kayak. If I paddle one of the decked boats with a single blade, sans rudder or sail, it sure looks and feels like a canoe. To help identify them with the nearest genre I tend to call them decked canoes.
BTW – Klepper boats have a special place in early expedition paddling. The first two solo kayak crossings of the Atlantic (Franz Romer in 1928 and Hannes Lindemann in 1956) were accomplished in modified Klepper kayaks.
http://www.canoekayak.com/canoe/expeditions-going-it-alone/
"Without gear in the boat in-water recovery is impossible with float bags. I have capsized one of those boats when day paddled empty and it took me a very long time to bail and pump out that XL sized bathtub full of water, and that was after having swum the hull to shallow flat water where I could stand beside it."
Capsized? You fell over in dead calm water. I blame the brain fart you experienced. Remember? I was there!
Capsized? You fell over in dead calm water. I blame the brain fart you experienced. Remember? I was there!
G
Guest
Guest
Capsized? You fell over in dead calm water. I blame the brain fart you experienced. Remember? I was there!
But unlike a lot of my swims, where the boat stays mostly dry and upright, I managed to fill that puppy full.
G
Guest
Guest
If it's really only 1 3/4 lbs for the whole thing that makes me feel a bit better about the weight since under 1lb should be doable with carbon.
Out of curiosity I just weighed the DIY rudder on the Penobscot. The housing, oversized blade and two attached gudgeons and three control line clips weigh 1 lb 14oz.
Under a pound in carbon seems achievable.
Similar threads
G
- Replies
- 13
- Views
- 4K
G
G
- Replies
- 3
- Views
- 1K
G
G
- Replies
- 12
- Views
- 2K
G
- Replies
- 18
- Views
- 3K
G