• Happy National Bugs Bunny Day (1938)!❓⬆️👨🏼‍⚕️

Klepper Kamerad TS rebuild

G

Guest

Guest
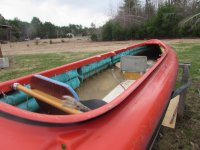
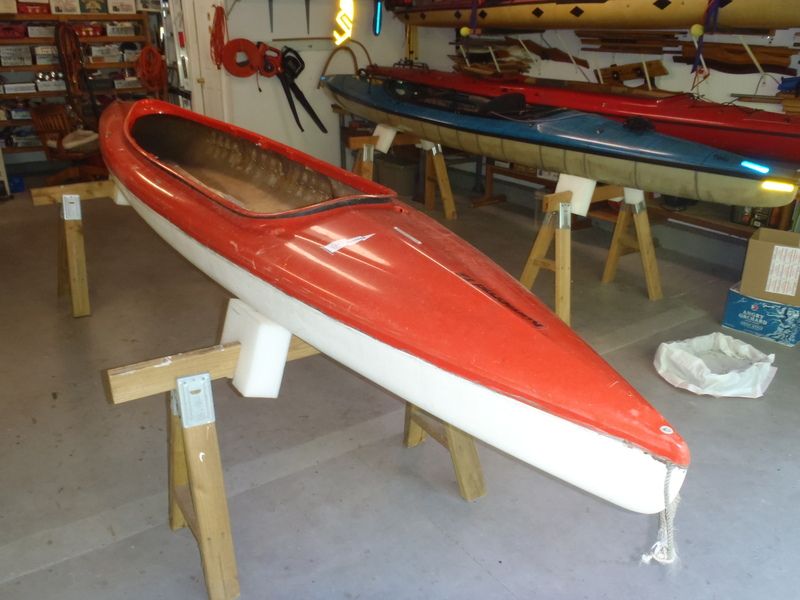
Thanks to Mad Mike for finding it and DougD for fronting the cash and hauling it from New Hampshire to Maryland, I have a summer shop rebuild project. A 1976 Klepper Kamerad TS (Tandem Sailing) kayak with rudder.

https://www.google.com/search?q=kle...e%2Fpaddeln%2Fklepper_kamerad_ts.html;931;740

Woven roving, glass and gel coat, 5’ 11” long x 30” max width. Purportedly 73 lbs from the factory, if my kg to lb conversion is correct.

Doug stripped out the antique Klepper seats, and the Kamerad weighed it at 68 lbs in the shop, but there is still a lot of glassed in hardware to remove.


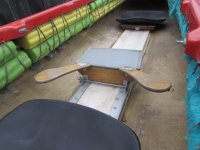
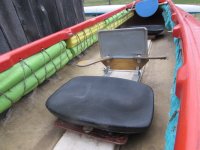
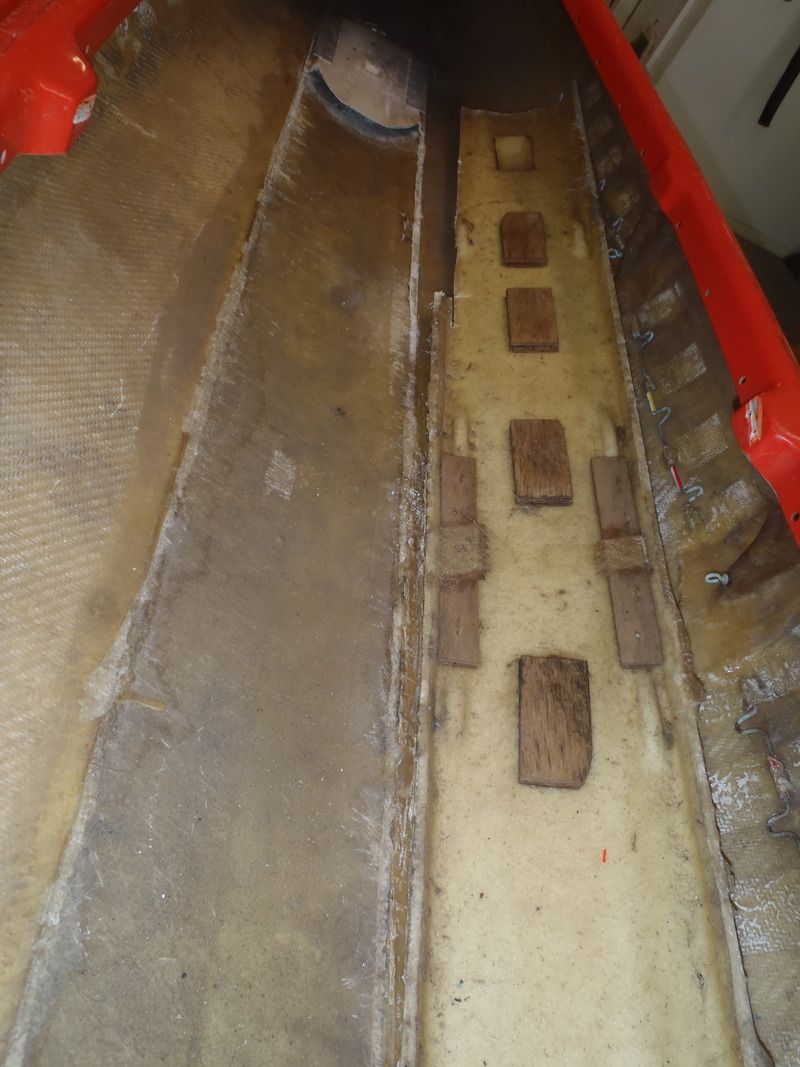
Day 1 of the gut. Starting with the 9 foot long by 9 inch wide fiberglass track to which the OEM seats were fastened. I can pry that sucker up a bit in the center, but the ends are well glassed. (I didn’t know how well ‘til I got them free and could see the puddles of thickened resin and wood support blocks affixed below)

Fugly.


Between a Dremel tool, sharp putty knife, a couple of hacksaw blades with duct tape grips, lots of elbow grease and a few swear words I had it cut out. I left the bow portion with the mast step; thinking I might eventually use that step and hardware with a real mast.


And then, after carefully Dremeling that end to leave the OEM mast step in place, I took it out as well. If I ever move on to a real tack-into-the-wind sail (doubtful) I’ll install my own step below the mast hole in the foredeck.

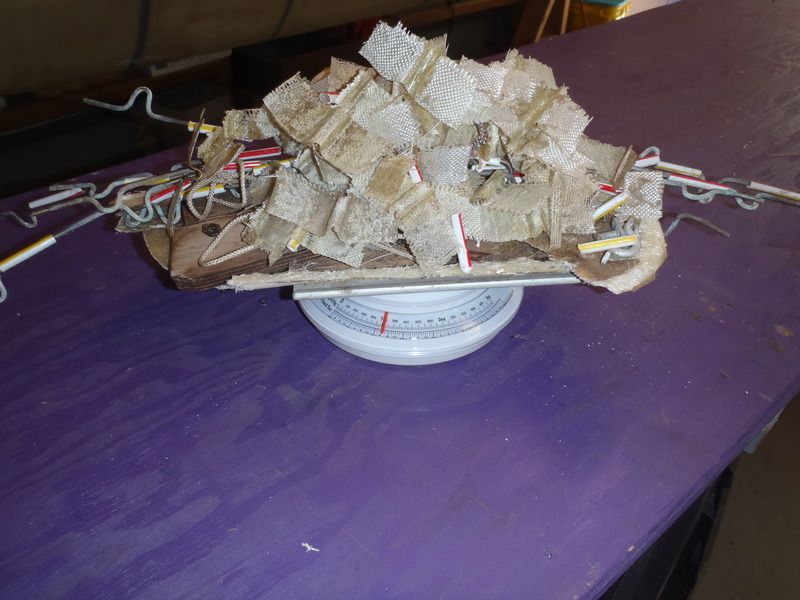
That seat and mast step panel was fiberglass, with some plywood supports glassed in underneath. There’s 5.5 lbs gone.

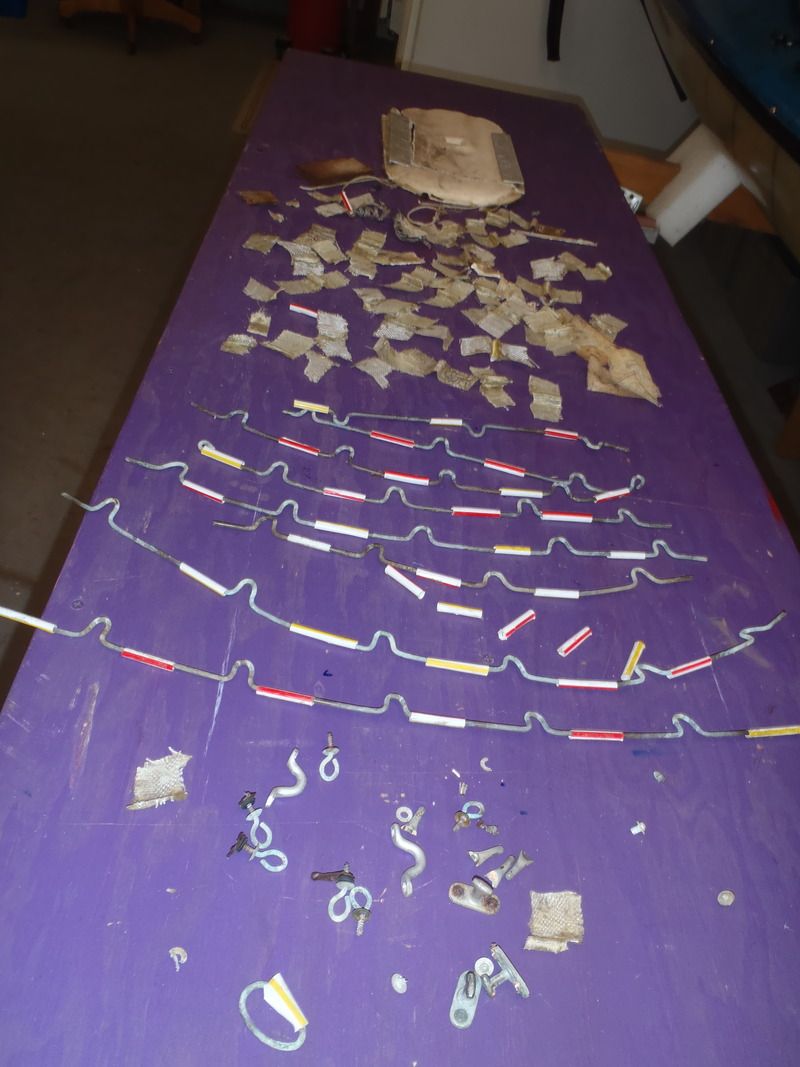
The Kamerad has lots of other sailing and seat attachment hardware that needs to be removed. Four cleats, 6 eye screws, four pad eyes and a partridge in a pear tree, most of which resisted drilling out and needed to be hack sawed and Dremeled free. And that just the stuff I can reach with the hull right side up.


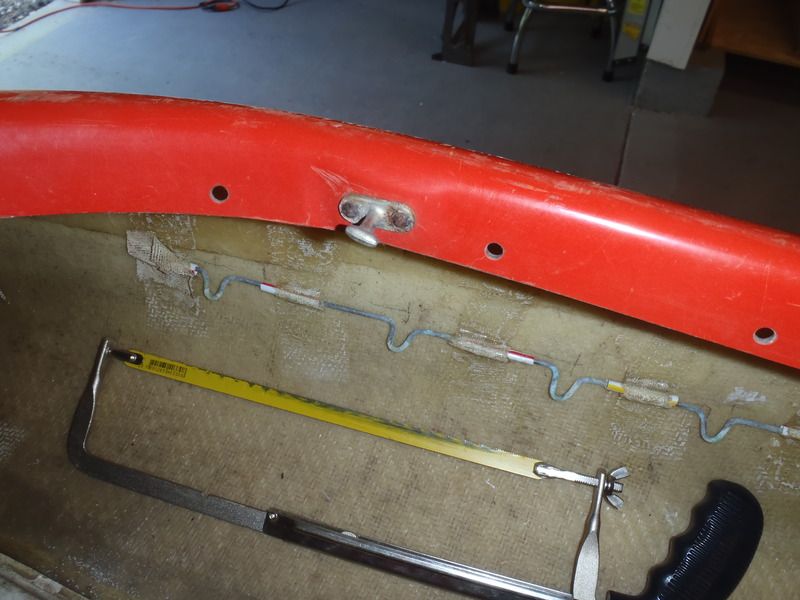
The Kamerede (I want to put extra e’s in that) had 8 feet of spring loaded doohickeies (German technical term) glassed along each side to hold floatation under the cockpit coming. Hoo-effing-ray, those things pulled free with their glass strips sans any cutting or Dremeling.


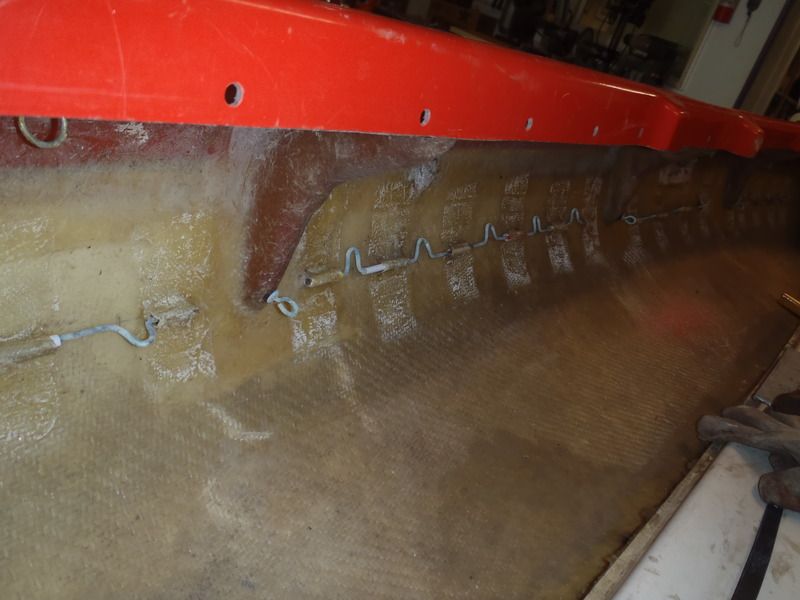
That’s a lot of unnecessary appendages for modern soloization. Another 18 oz removed

That was a mess of antique OEM outfitting.


The Klepper already needs a better name. Or at least an easier name; I have trouble spelling Kamerad and want to put an E on the end, or somewhere in the middle. Maybe English would be easier; The Comrade. Wait, it won’t be a TS Tandem Sailing hull, but a solo boat. Meh, Comrade SS may be a little too WWII.

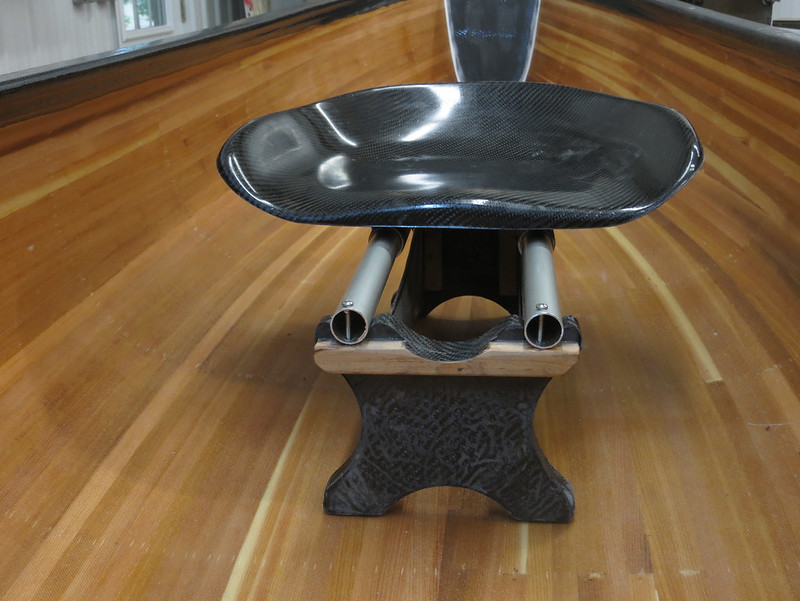
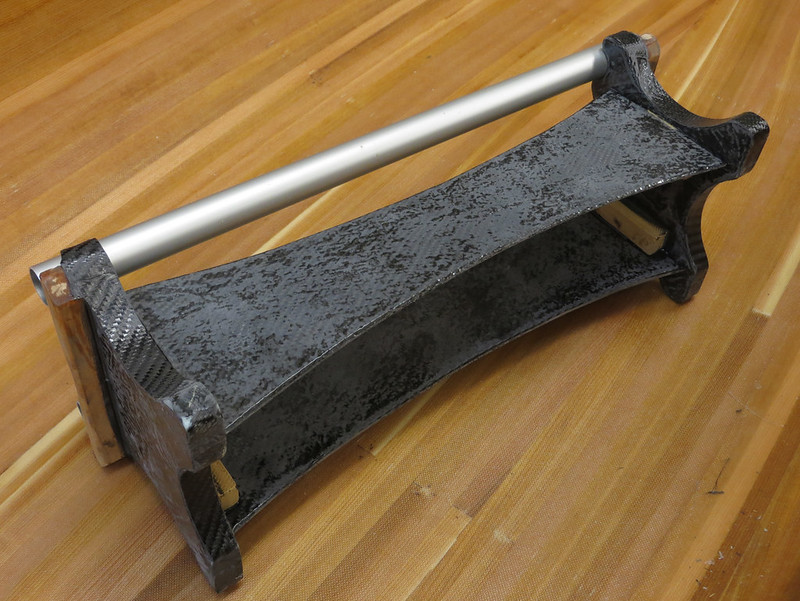
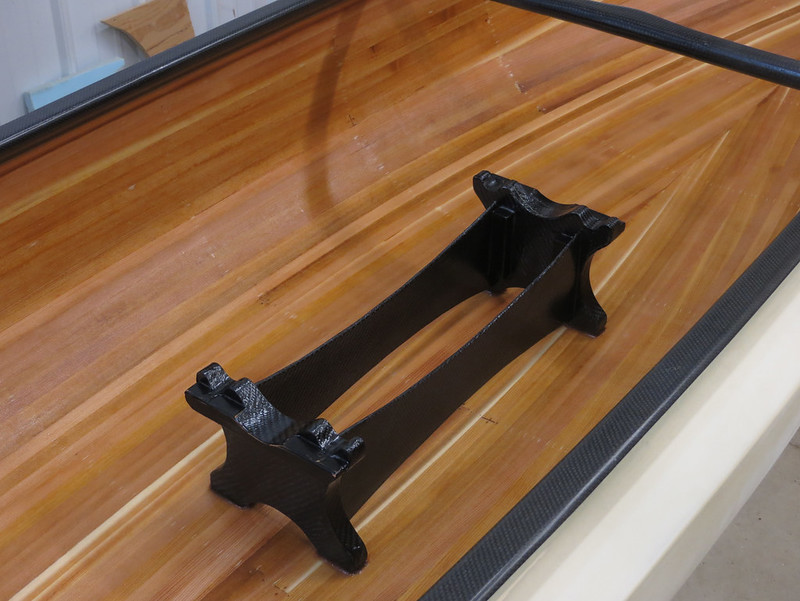
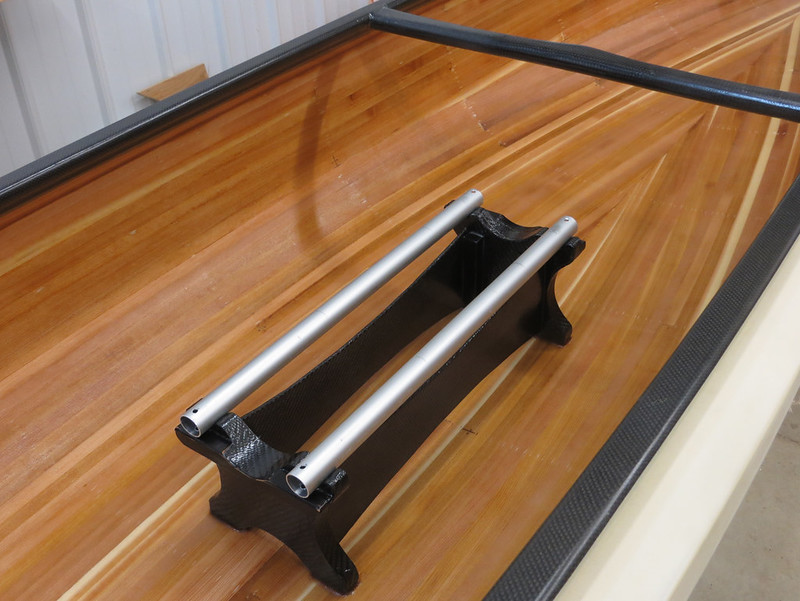
Stripped of everything I can see or reach with the hull right side up it’s time to invert it on tall sawhorses and gut stuff from inside the decks.

There wasn’t as much antique outfitting on the inside, just a half dozen rings. Cunningly crafted for the times technology I suppose; a ¾” stainless ring laid flat against the hull with a stainless steel wire “padeye” laid over it, covered cloth and resin with the wire padeye part exposed and another free dangling SS ring through that.

They must have been tricky to get glassed in place all as one piece. They were sure a PITA to get out.

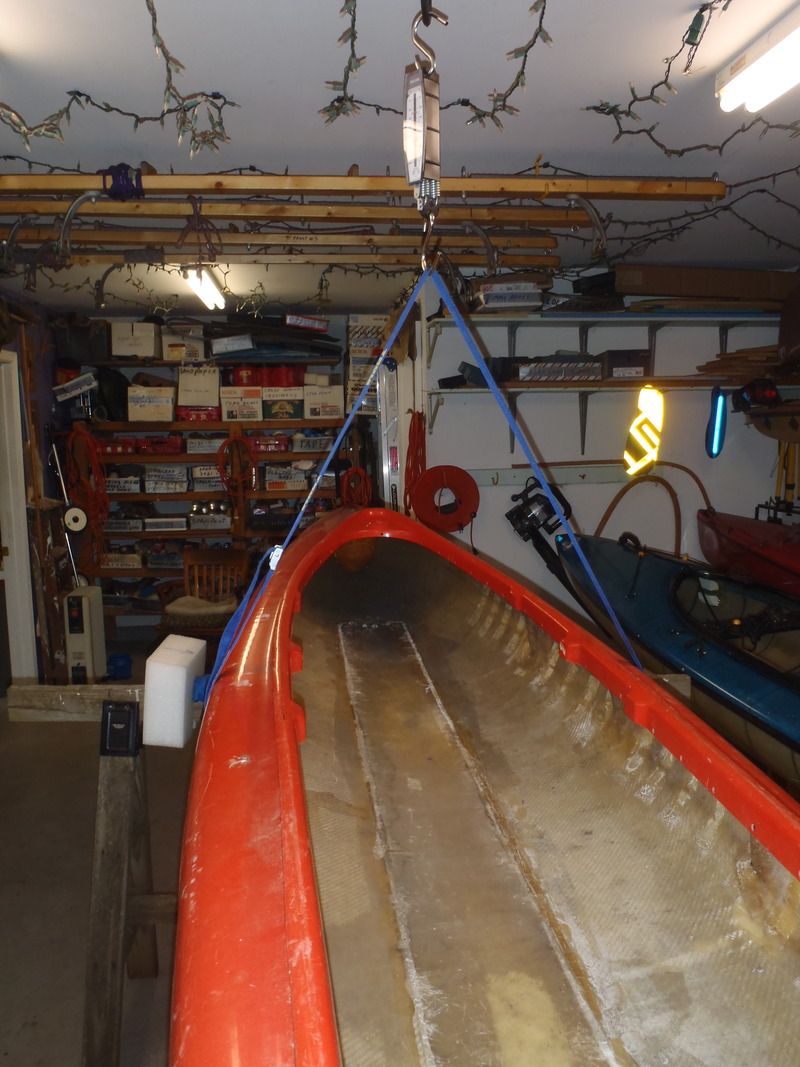
That’s everything out of it ‘til I go full-on PPE with sanders on the inside. Dreadful work, especially in a sweaty summer. Beyond the sanding dust I create this is the least the Comrade will ever weight. Back to the scale.

Spec’ed at 73 lbs from the factory the gutted Comrade is a hair under 60 lbs.

 
No Title

I had the pleasure of doing the original stripping of the TS. I'm sure in the day it was made this was high tech but dang those seats look mighty uncomfortable. As for the pool noodles, well there were a lot of them, enough to fill 3 garbage bags. Two layers worth with the top ones being so degraded they crumbled under my fingers. Definitely built for sailing, one tough hull! Anyone want some pool noodles?
 

Attachments

  • photo2245.JPG
    photo2245.JPG
    108.1 KB · Views: 1
  • photo2246.JPG
    photo2246.JPG
    114 KB · Views: 1
  • photo2247.JPG
    photo2247.JPG
    120.3 KB · Views: 1
  • photo2248.JPG
    photo2248.JPG
    158.7 KB · Views: 1
I suspect that the pool noodles were owner replacement for the OEM side floatation. A couple of boats of that vintage I’ve worked on had ethafoam floatation. Ethafoam does not age well.

The seats are likewise typical of the 70’s era stuff I’ve removed, really uncomfortable designs without the slightest nod to ergonomics.

The Klepper ID’s and stickers have all gone bye bye. I left the HIN plate on, but I wanted the Klepper flag and Kamerad TS stickers gone. In part because I don’t know where various outfitting parts may be positioned and pad eyes, grommet straps and other deck fittings look awkward when installed atop a sticker.

But also because I’ve won a couple of bets with paddler folk I’ve met along the road. Well, not so much won a bet as much as not lost one. When some boathead met along the way has curiously inquired about what that was on my roof racks I’ve offered “If you can name the manufacturer and model I’ll buy you breakfast”.

The ’71 Old Town Sockeye is a sure winner in that bet, as is the ‘77 Hyperform Optima. The ’76 Kamerad should provide another breakfast not bought, as well as the pleasure of watching some greybeard paddler carefully inspect the hull with a free meal on the line and before finally give up.


Those were some seriously well made labels, from back in the 70’s when men were men and stickers stayed stuck for 40 years. I had to soak them repeatedly with Goof Off and scrape them up a teeny weeny bit at a time with a razor edge.


Much cleaner looking without the antique stickers.


Oh, what the heck, while I’m just dubbing around on the decks I may as well shine up the HIN plate. And fiddlededee I have some aluminum brightener


Hmm, now I have a photo record of the serial number. That might not be a bad idea for all my boats.
 
Hmm, something I've never thought about till this project. Given that I know nuth'n 'bout no a) kayaks, b) sail boats, c) ideal watchamacallit hybrids; where does flotation fit in to all this? Without flotation would a boat like this partially sink, or was flotation to aid with in water recovery only? Is it worth installing flotation tanks in the stems to help with sea worthiness?
 
Who knew there were all these decked canoes coming along in the 70s while Verlen Kruger was coming up with the Loon (predecessor to the Sea Wind)? How did you even know about them? I wonder if the designers and builders were informally collaborating back then. Weren't the 70s just so great!
From the Forward to the Ultimate Canoe Challenge, I found out the Verlen undertook the Cross County Canoe Safari in 1971 in a 21’ tandem. In 1975 he started work on a solo craft suitable for a long voyage. In 1979, one Mark McCorkle used a Loon for a 8,331 mile trip. Verlen then embarked on the Ultimate Canoe Challenge in 1980 in a Loon.
 
Hmm, something I've never thought about till this project. Given that I know nuth'n 'bout no a) kayaks, b) sail boats, c) ideal watchamacallit hybrids; where does flotation fit in to all this? Without flotation would a boat like this partially sink, or was flotation to aid with in water recovery only? Is it worth installing flotation tanks in the stems to help with sea worthiness?

Nearly all of the 1970’s whatchamacalit hybrids I have worked on started life as tandem open-cockpit kayaks with rudders. All had some OEM floatation. Some had ethafoam pillars under the decks, which would have precluded too much gear storage room when using them as solo sailing trippers. Some had the familiar shoebox sized blob of foam in the stems, leaving space for gear storage but providing just enough floatation that the hull wouldn’t sink to Davey Jones.

The Comrade is the first I’ve seen that came with a large volume of foam floatation tucked along the ( |__| ) sides of the hull. The Comrade was designed and built a true tandem sailing kayak, so the addition of OEM floatation was a safety issue.

I add some built in floatation during my soloization conversions, largely glued in place minicel heel and knee pads. Paddled or sailed as a tripper my dry bagged gear fills the under deck area and provides considerable water displacement.

Without gear in the boat in-water recovery is impossible with float bags. I have capsized one of those boats when day paddled empty and it took me a very long time to bail and pump out that XL sized bathtub full of water, and that was after having swum the hull to shallow flat water where I could stand beside it.

Having experienced that joy I add pad eyes under the decks to attach tapered floatation bags for use when paddled of sailed empty.

The float bag attachments are triangulated clips on the bag’s end lines; unlike an open canoe there is no need for top lacing to keep the bag in place, but trying to tie in the float bag’s end lines under the decks, sight unseen and upside down at arm’s length is awkward at best. It is much easier to reach under the decks and snap on a clip.

“Whatchamacallitit hulls” is apropos as they defy traditional definition, especially after I’m done outfitting. They have large decks, and a rudder, so it’s a kayak. But they are typically 28-30 inches wide and 12-14 inches deep, with a raised seat for single blading, so maybe it’s a canoe.

The Kruger designed boats (Loon, Monarch, Sea Wind), the Clipper Sea-1 and others are/were billed as canoes. Complicating the confusion some outdated Brit nomenclature called kayaks “canoes” and canoes “Canadianes” (or some spelling variation thereof).

What’s in a word? I paddle my open boats with a double blade, have spray covers and sails on them, and now rudders. Sure looks like a giant kayak. If I paddle one of the decked boats with a single blade, sans rudder or sail, it sure looks and feels like a canoe. To help identify them with the nearest genre I tend to call them decked canoes.

BTW – Klepper boats have a special place in early expedition paddling. The first two solo kayak crossings of the Atlantic (Franz Romer in 1928 and Hannes Lindemann in 1956) were accomplished in modified Klepper kayaks.

http://www.canoekayak.com/canoe/expeditions-going-it-alone/
 
I wonder if the designers and builders were informally collaborating back then. From the Forward to the Ultimate Canoe Challenge, I found out the Verlen undertook the Cross County Canoe Safari in 1971 in a 21’ tandem. In 1975 he started work on a solo craft suitable for a long voyage. In 1979, one Mark McCorkle used a Loon for a 8,331 mile trip. Verlen then embarked on the Ultimate Canoe Challenge in 1980 in a Loon.

I believe the basic concept predated Verlen Kruger’s designs by years. By decades if you start the lineage with John MacGregor’s Rob Roy in the 1860’s.

http://en.wikipedia.org/wiki/John_Ma...28sportsman%29

I’ve read various books by or about Kruger but not seen any reference to his early design influences. I doubt he reinvented the wheel without drawing some inspiration from the then existing “decked canoes”. And I believe he had it all dialed in to near perfection with the Sea Wind.

As far as collaboration between the earlier designers and builders I’m sure there was some, or at least some copying. All of the 70’s open cockpit decked tandems I’ve seen are 16 to 16 ½ feet long and 28-30 inches wide.


I do know that the original owner of Phoenix previously worked for Hyperform, which may explain the similarities between the Hyperform Optima and the Phoenix Vagabond, including pigmented glass and nylon construction (top and center boats above).

That style tandem hardshell is still being built by the Bavaria Boote Company (Columbia or Missouri models).

http://bavariaboote.de/kajaks/bavaria-boote-kajak

Who knew there were all these decked canoes coming along in the 70s while Verlen Kruger was coming up with the Loon (predecessor to the Sea Wind)? How did you even know about them?

I didn’t. I got the Old Town Sockeye (yellow and black boat above) as a dumpster-ready freebie a dozen years ago and originally rebuilt it as it came from Old Town, as a tandem, including the crude 1971 “seats” and (lack of) rudder controls. It proved to be such a capable boat that I gutted it and re-rebuilt it as a dedicated and modernized solo.

I didn’t know the Hyperform Optima even existed until I found one for a pittance 20 miles from my home. Didn’t know the Klepper Kamerad existed until Mad Mike found one cheap in Vermont.

Folbot made some similar hardshell tandems back in the glorious 70’s as well, or at least some hardshell kit. And I’ll bet there are others I’ve never heard of.
 
Last edited:
Bottoms up Comrade

There is a lot of sanding to be done inside the Comrade, days worth maybe, both mechanical and hand sanding. But the bottom is severely spider cracked, with a couple of chunks of gel coat missing.


Methinks I should repair the bottom first, before I wiggle or jiggle any of those cracks more open whilst thrumming an RO sander on the inside. BTW, that harmonic hull thrum of an RO sander, especially inside a decked boat, can be maddening. I wear a pair of flight-deck headphone style earmuffs.

The stems are especially badly spider cracked and I’ll be covering that area with a Dynel skid plate one repaired. There is a right way and a wrong way to repair gel coat damage. I’m going to go the wrong way; epoxy.

I’m going to try filling the holes, epoxying the bottom and adding skid plates all at once, while I have good chemical adhesion between epoxy coats.

First task, wash the bottom. Several times, first a vinegar and water bath with a scrubbie, then a soap and water bath, rinse, dry, and alcohol wipe. Pretty much I just kept scrubbing it until the sponge or cloth was coming off clean. There was some 0000 steel wool mixed in there somewhere as well.

And then let it dry for a day. Well, more like two. Doug plumb wore me out. All clean and dry, I papered and taped the hull to catch any errant drips. Probably overkill, but I know how sloppy I can be.


Next measure and cut the Dynel and peel ply pieces needed. Um, not yet, I need to wash my grimy hands first before I start handling cloth or peel ply. All the more reason to work on a clean boat.

Fill the couple of deep gel coat chips with a slurry of epoxy and 406 colloidal silica and peel ply over top.


Let that set up and brush the worst of the spider cracks with a layer of West 105/206, warmed to seep into the cracks. Warm, unvicious West 105/206, all the better to seep into the spidercracks. What the heck, I brushed all of the visible spider cracks with that wheepy seepy epoxy coat.


I tipped that out with a foam brush, repeatedly, until there was nothing left to drip or sag, and then roll out a thin coat of mixed 105/206 and G/flex over the entire bottom and tipped out.

That process is more efficiently accomplished doing one side of the hull, stem to stern from keel line to cockpit seam (or gunwale line), at a time, with a roller man and a tip out man following along a half boat length behind. I had to recruit a shop helper son as tip out man.

Four pumps of 105/206 mixed with an equal amount of epoxy proved exactly the right amount to roll out one half of the hull with a thin, foam rollered coat from bow to stern.

I made a little extra epoxy mix for the other side, rolled it out with the tipper man following behind and then rolled the extra epoxy I had made inside the pencil marks for the Dynel skid plate. Laid down the Dynel, rolled a little more epoxy atop that, smoothed out the peel ply and walked away.


The only thing I didn’t have was white pigment to tint the Dynel. The Dynel is transparent enough that the filled gel coat cracks show though even with the peel ply layer on. A little dab of white pigment in the Dynel epoxy would have covered that. Didn’t have any.

Well, I didn’t walk away for long. I don’t have Doug here putting tools away behind me, so there was that need. And it is so humid the epoxy might take ages to set up, so I put the shop AC unit in the window.

Eventually, like the very last thing before putting on seam tape, I’ll wet sand the bottom and paint it white.

Tomorrow I should be able to turn it over and have a wee dab’ll do ya epoxy session on the inside. The Comrade had partial bulkheads on each side between the hull and deck, a very clever method of stiffening the deck which I had never seen before.


Those are little glass bulkheads are hollow, and I’ve removed various OEM hardware from them, leaving open holes from pop rivet or screw. I want to power wash the inside before I get too busy with sanders and I don’t want to fill those bulkheads with water.

I’m psyched to scrub the inside clean. Not so much to spend a day or two clad in full PPE sanding old Vinylester.
 
Time to think about a seat, even though that installation is a long ways off. The Phase 3 seat I have left is too narrow fit my endomorph hip bones (the uber-comfortable one in the Sea Wimp does, but that’s the only XL wide Phase 3 I’ve ever come across).

The Optima is 12” deep at the top of the cockpit coming and a Wenonah bucket seat on aluminum frame I had in the shop worked fine, augmented with a Surf to Summit back band. The Comrade is 13” deep at the top of the cockpit rim and I’d like to bring it up to a comfortable bent shaft height.

I’m not clever enough to build my own. Maybe if I gathered a half dozen young lovelies in the shop I could entice Alan to come east and show me how to build one. But putting an ultralight carbon seat in a 60 lb woven roving boat makes no sense.

Something like the pedestal from a Wenonah Prism should give me 5 ½ inches of height, and a tad more with some Ridgerest pad glued in place.

Time to discuss my needs with Alison at Wenonah and get them building me a seat. A sliding seat will eliminate one immovable issue when friend’s use those sized-for-me (or my sons) decked hulls; Joel’s little tyrannosaurus arms can’t reach the sail mount or utility thwart with a fixed seat.

Hey Joel, I wonder if the foot pedal cables should be reversed in the Comrade? Time will tell, and reversed pedals are useful for sailing with the rudder.
 
Maybe if I gathered a half dozen young lovelies in the shop I could entice Alan to come east and show me how to build one.

Sounds like a plan to me. In return I'll scrounge up a half dozen rusted axe heads to entice you to the midwest where you can help me do the custom outfitting on my new boat.

Alan
 
On a more serious note building a sliding pedestal is easy-peasy. The hardest part is figuring out how high you want your seat to be and calculating how much of that height will be taken up by the seat, aluminum tubing, and the base.

When I built my first one out of wood I really didn't have a clue and was amazed it came out at all. It actually turned out pretty well. It was all built from scraps of plywood laying around the shop.

Once you know the width and height you want you just cut out a couple squares or rectangles, whatever the case may be. Then to make them look prettier and save weight you find something round laying around the shop that has the right diameter to trace for cutouts in the edges. When you're done you have two fancy looking pieces of scrap wood with legs on the bottom, that will be glassed to the hull, and shoulders up top that will support the aluminum tubing.

See, they're just dressed up rectangles:

20150510_006 by Alan, on Flickr

On the one I built from wood I used 1/2" plywood and elected to epoxy a piece of 3/4x3/4 solid wood to the top edge to give the aluminum a little more support and give me more material to screw into. I did the same for the carbon over foam model because you can't attach a screw to foam.

Now you just need some webbing to attach the front and rear pieces to add structure and keep them from racking back and forth. 1/4" plywood works fine. They could be straight sided rectangles but adding reverse arches looks a lot nicer. Attaching it directly to your front and rear supports would be pretty tough so again I add small 3/4"x3/4" solid wood blocks. These are epoxied to the front and rear supports and then the side webs are epoxied to these.

20150510_008 by Alan, on Flickr

20150510_009 by Alan, on Flickr

20150525_001 by Alan, on Flickr

Then all you have to do is sand out little channels for the aluminum tubing to sit in and you're ready to go.

20150525_002 by Alan, on Flickr

On my wooden one I used a hole saw to further reduce weight:

20120717_004 by Alan, on Flickr

Now you have a cheap, solid, and lightweight seat frame onto which you can mount any seat you'd like, providing you can find a way to attach some aluminum tubing to the bottom of it.

Attaching aluminum tubing to the bottom of a bucket seat is easy enough. The hardest part is getting the placement right so the seat sits at the correct angle. Once you get it marked tack them in place with super glue gel, add a thickened epoxy fillet where they contact the seat, and then a layer of fiberglass. Rock solid.

Now you need some larger diameter tubing that will slide over the 1" aluminum tubing attached to the pedestal frame. 1 1/4" bathroom vanity drain pipe from Ace Hardware is thin walled and a perfect fit with just enough slop to keep from binding if you alignment isn't perfect but tight enough that it doesn't wiggle and jiggle. Attach it to the aluminum tubing on the seat bottom with the same method as above. The tubes must be perfectly parallel to each other so they don't bind when sliding. Figure out what distance you need between the tubes and cut some scrap wood that size to fit between the tubes while you're attaching them.

This slider wasn't on a pedestal, which is why the cross tubes are so long, but you get the idea:

20140801_010 by Alan, on Flickr

Using a wooden seat frame would be super easy as it would eliminate the cross pieces of aluminum.

I didn't come up with this design. I stumbled upon it while trying to decide how to build that first sliding pedestal.

That hollow area under the seat is a great place for water bottles, snacks, bug spray, or whatever other little things you want readily available. Keeps them from sliding all over the place.

Alan
 
Alan,

Thanks for that....I was at the point where I have decided to punt, so to speak. My SIL and his vacuum bagging equipment now reside in HIS house, and I can't seem to scrape together enough free time to finish my grandiose seat frame/portage yoke combo. I am not pleased with my current seat cleats in the Red Kite. I was actually going to send you a PM asking about your pedestal mounted seats.

Mike, sorry for butting in...
 
Thanks for that....I was at the point where I have decided to punt, so to speak. My SIL and his vacuum bagging equipment now reside in HIS house, and I can't seem to scrape together enough free time to finish my grandiose seat frame/portage yoke combo. I am not pleased with my current seat cleats in the Red Kite. I was actually going to send you a PM asking about your pedestal mounted seats.

I look at Alan’s stuff and just think “Wow”. And then I think “Wow, there is no way in heck I’m clever enough to do that, or ever will be”

Then I punt deep and just buy a sliding pedestal seat from Wenonah.
 
G/5 Epoxy

I am loving the West System G5 epoxy Doug gave me.

http://www.westsystem.com/ss/g5/

It has cut days off waiting for small screw or rivet holes filled with epoxy to cure. The caveat that it is “Not recommended for long term bonding subject to high loads or moisture” doesn’t bother me, after the 5 minute fill sets up I’m either topcoating it with regular G/flex or covering it with epoxy and cloth.

I still turn to G/flex for most small repairs, and ubiquitous West 105 for wetting out cloth, maybe with some G/flex mixed in, but G/5 augments those two applications wonderfully.

All time best mistake Doug has ever made. Not that it had much competition in that category.
 
Holey Comrade

Tomorrow I should be able to turn it over and have a wee dab’ll do ya epoxy session on the inside.

Yeah, well, that wee dab’ll do ya epoxy session turned into lot of holes that need filling. With the Comrade ionnards hidden from view positioned upside down I’d forgotten just how many holes there were.

28 old OEM outfitting holes to be exact, along with a jagged crack in the back deck and a missing chunk of cowling lip.


Finding, cleaning and drip taping all of the holes took as long as mixing epoxy and red pigment and fill them. Waiting for each fill to set took even longer.


The cleaning revealed a label from the original vendor, the Denville Ski and Sport Shop. Back in the day when there were lots of Mom and Pop sports stores that carried canoes and kayaks as an off-season side line. Ski stores and hunting shops with a few boats in the back. Locally we had both the Ski Chalet and an archery shop that sold boats. Those were the days.


The old hardware holes in the Comrade needed three separate epoxy sessions. One with the hull upright, one each with the hull held at 90 degrees.


A couple of tiny batches of red pigmented epoxy filled the holes, and a batch of silica thickened epoxy and red pigment filled the missing chunk of cockpit lip.


With the void from that missing chunk of cockpit lip filled flush with thickened epoxy and a few hours wait time I G/flexed on a pigmented piece of 1” glass tape covered with peel ply.


The color match was way off, but the repair seems flush and sturdy.


Many tiny timed epoxy repairs. Maybe an ounce of epoxy all told, but it took a day of wait time to get it all done right. I’m not counting the hours on this rebuild, I want to savor the days of tinkering.

I will re-weight the Comrade tomorrow to see how much epoxy weight the repairs and bottom coating have added.
 
Awaiting on the weighing

I might as well wait to weigh until I am fully done sanding the inside of the hull. The Comrade is already sideways on the horses and protected by a U of foam. I do like a couple pairs of shelf brackets sleeved with pipe insulation to hold a boat securely on its side.

And chunks of ethafoam packing material cut to fit angled atop a sawhorse for holding an upright hull steady in place. Pretty much any size or shape hull, I can just adjust the spread of the ethafoam blocks along the sawhorse to fit. (The Sharpie arrows are there so I don’t put them on bass akwards)


I went at the Comrade’s rough edges using a variety of sanders, and there was a lot of sanding to be done. Gobs, no pun intended. There were half inch tall puddles of resin on the floor from the old seat track and mast step. And some really gnarly pieces of OEM glass sticking out on the interior sides. One particularly nasty protrusion was an inch tall, razor sharp folded wrinkle of old, thickly resined glass.

I think I’m beginning to discern different hands laying cloth and resin back in ’76. The bulkheads and outfitting on one side was rather nicely done, and the other side was apparently slathered on a by a novice on a Friday afternoon during Oktoberfest.

Seeing the jaggedness of the interior chines I’m convinced the Comrade originally came from Klepper with foam floatation installed along the sides, otherwise it would have been badged in German as a Kasereibe

I got lucky on the inside chines, a 5 inch RO sander fit that arch nicely and two 100 grit disks did one full side down to where there was naught but a little hand sanding left.

The bottom had some serious resin puddles at the ends of the old seat and mast step pan. 80 grit on a belt sander, 100 grit on a sheet sander, 120 on an RO sander. A little of those resin puddles fore and aft still remain, but at least they are now low, smooth puddles and not whitecapped jagged.


I was PPE clad and had already changed outer garb three times between sanding sessions. With the sides and bottom done I needed to go shower the old Vinylester (polyester?) dust off me before I got itchy.

Itchier. Over the years of working on old hulls I’ve developed some sensitivity, which seems at its worst when sanding glass and Vinylester. I’m not sure if that is the curse of the old boat worker, or the curse of working on old boats. Epoxy resin dust doesn’t bother me as much (although I’m still PPE clad), but I can tell when I’m sanding Vinylester.

I have dozens of old lab coats and use them as a PPE overcoat in the shop, shedding them between sandings. Actually, I step outside and blast myself with the leaf blower before removing anything.


I was using a leaf blower to de-dust my still lab coat clad, masked and goggled body on the lawn when the mail lady came down the drive. She might have thought I was working with Ebola, but she has been here before.

Someday I oughta greet her in my special lab coat.


I’m saving that one for when Alan comes to visit.
 
Day 2 of sanding

Me no like sanding inside the hull all PPE clad. There was more sanding than I thought, invisible until I got up close and personal with my head inside the Comrade on the tall sawhorses.

But with the sanding done I could finally take the Comrade outside for a serious scrub and wash.

dang, sanding not done actually. While I had it out with the hose I wet sanded the epoxy coat on the bottom, and will roll on/tip out a second coat of 105/206 and G/flex. Well, I didn’t wet sand the bottom, I recruited some offspring to help.

Wet sanded, washed, rinsed and clean the Comrade came back in the shop to dry for round two of epoxy roll out on the bottom.

The old rope handles are now soaking wet and need to go. I inspected the empty rope holes and they are solid glass through and through, without void or opening to the hull. Unlike a lot of hulls of similar vintage the rope isn’t just a loop epoxied in place, instead it is installed so that it runs freely through the hole. A little coating of G\flex inside the old holes and they’ll be ready for a pair or modern carry handles.

Taped and papered, rolled out and tipped out with the 106/206 and G/flex mix, the bottom is looking very good.

Actually it still looks like heck. The 1[SUP]st[/SUP] coat of epoxy on the bottom made every spider crack stand out even more and the chines are a near continuous mass of spider cracks from stem to stern. But it feels good. After that first epoxy coat and wet sanding it is smooth as a babies butt.

I won’t touch the bottom again until I paint it, so tomorrow I can turn the Comrade back upright and think about the epoxy and cloth work needed on the inside. There’s a bunch.
 
Yesterday’s thin epoxy bottom coat set up nicely, and before commencing any further work, which from here on out will only be adding outfitting weight, it seemed like a good time to finally re-weight the Comrade.

Since gutting the hull of the remaining OEM hardware I’ve added Dynel skid plates, 2+ coats of epoxy resin to the bottom and patched some holes and cracks. But I’ve also sanded away a considerable amount of old resin and glass. I doubt I’ve added a pound of weight.

The Comrade was a hair under 60lbs after the gutting….tale of the hanging scale (with a tip of the hat to Robin) says….a bit less of a hair under 60 lbs. The Dynel skid plates, repairs and epoxy bottom coats didn’t add much more than I removed in sanding.

I patched the long crack in the stern deck with cloth and peel ply, recoated the OEM deck stiffener tubes (another cunning build feature, incorporated only on the bow deck) and re-coated the old seam tape from bow to stern. I like the cockpit stiffening function of those glass bulkheads enough that I epoxy coated them as well. Five pumps of West 105/206 (no G/flex) did everything.

What the heck, I’ve got a food scale; I weighed an equivalent volume of water. Less than a quarter ounce, including the mixing cup.

That was a short day’s work, but it may be the last time the Comrade will need to be upside down on the tall horses. Tomorrow the Comrade flips back upright and I can put some serious thought into the seat.

The easiest two choices are a Wenonah pedestal slider, which would weight only 3 1/2 lbs even with a plastic seat bucket, or a Wilderness System Phase 3, which weighs closer to 8 lbs even without a minicel pedestal base.

I won’t have a clue which I’d prefer ‘til I flip the Comrade upright tomorrow.
 
Back
Top