G
Guest
Guest
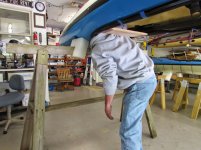
DougD came down from New Hampshire with two project boats on his roof racks, and a long weekend to spend. Joel came down from Maine to lend an outfitting expertise hand.
Project Boat #1 was a 1977 Hyperform Optima. Yes, another Hyperform Optima.
http://www.canoetripping.net/forums...scussions/diy/655-hyperform-tandem-conversion
Identical hull shape to mine, even the same year and blue over white color, but very different in construction. My Opie is pigmented glass and nylon, Doug’s is much stiffer woven roving, glass and gel coat with different keel line stiffeners.
Hyperform made some of the first commercially available kayaks in the US, licensed from European designers. That they would offer two completely different laminations for boats obviously built on the same mold is probably evidence of early lay-up experimentation.
Doug had already gutted the Optima of seats and extraneous glasswork, sanded down any sharp edges and installed new seam tape. He got some looks driving down with two weirdo 70’s decked tandems on his roof racks.
Doug had sent me his rudder and I reshaped it so that it would work as a Kruger-style gravity deploy. I knew he wanted a Wilderness Phase 3 seat and had one almost ready to affix, with a two inch minicel pedestal which brought the seat arms just under the deck coming for some additional deep-hull seat elevation. We were ready to rock and roll come morning
I was thinking of this project being akin to one of those reality car shows, “Three days to turn the ’56 Chevy into a Low Rider”. Three days to turn a 1977 Optima into a poor man’s Sea Wind with Barcalounger padded comfort.
Thursday morning we started working on Doug’s new old hull at the crack of 8am, after some shop coffee and strategizing gab fest.
Opus Number 2 is in absurdly good shape for a 38 year old hull. A couple of small gel coat cracks on one the deck, but the bottom was relatively unscarred and it was obviously a barn find boat that had seen no UV. Even the Hyperform and Lettmann stickers were 99% intact.
A Barn Find Optima that qualifies for Historic Tags. We started to work with the plan that we would proceed with the outfitting the hull strategically, with the hull upright, finishing up with any epoxy, cloth and peel ply late in the day, so we could walk away and pull the ply to start afresh the next morning. Opus Number 2 needed to be ready to go back on Doug’s car Saturday evening. Let’s roll.
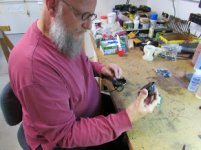
First order of business was to install a seat. Doug likes the Phase 3 seats, and seemed to like them even more when he was shown how to properly adjust them. I happened to have several never used Phase 3’s, enough to keep a spare and send a couple home with Doug for future use or spare parts. Shout out and thankee Dave and Joel for the unused seats.
I had prepared one of thePhase 3 seat with a 2” minicel bottom base, carved to fit the seat bottom and hull shape of my Optima, which would raise Doug’s seated position close to single blade level.
A little Joel in attendance finagling with the unattached seat to found the trim placement and, whadda ya freaking know, a spray skirt for a Pamlico 145T fits perfectly around the cockpit coming, with the tunnel exactly where it should be positioned over the seat. Sweet.
Fortunately we had Joel’s years of kayakcraft to get that part right. Mikey don’t wear no skirts.
Even more fortunately we had Joel available for the next critical steps, installing the rudder cables and foot controls. Well, not just available, Doug and I mostly stood back and handed him tools and parts and he made that look easy.
We had a variety of ruder foot pedal options, but nothing works as well as in a 70’s retrofit as Yakimas (now made by Mohawk).
With Joel taking on the cables and pedals what would have taken Doug and I half a day took a couple of hours. In what would become a recurring theme, Joel worked, Doug helped and I mostly provided the tools and materials at the ready. And occasionally put away some tool Joel still needed.
New rudder, cables, gravity retraction line and ball through a closed cleat, pad eye line guide, self-tensioning bungee and cord locks pulling both pedals forward. Done to perfection. Done better than my Opie dammit.
The controls were positioned for Doug’s arm reach and inseam. Joel seemed oddly eager to measure Doug’s inseam several times, and asked if he dressed left or right.
With the boat dressed for size we could install some bungee lines. A simple vee of bungee on the bow deck, with wood balls to make stuffing a paddle blade under easier. The front deck is far beyond reach, but that bungee compliments a Paddle Park vee to be added later to the utility thwart.
We added four grommet straps to the stern deck to allow strapping on a dry bagged sleeping pad, chair or other long light gear.
Doug, a word of caution, a 30-pack of Natural Ice might lead to stability problems if strapped on the back deck. Or when consumed in a 24 hour period.
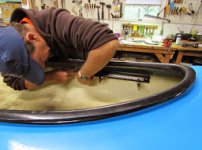
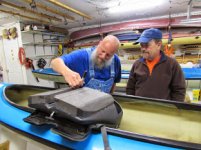
It was time to make some serious shop dust. Doug brought down a piece of butternut to use as a utility/sail thwart. Time to again sit Doug in Opus on a padded shop floor and mark the ideal position for the sail mount and etc. We used a clamp-on utility thwart to find the best position away from paddle stroke range but close enough to lean forward and dismount the sail or reach other things on the utility thwart.
Getting the dimensions of that wood piece to fit exactly between the insides of the coming, with not just the / \ angle but also the interior coming curves ( ) is a delicate process, cautiously custom shaping the wood to fit inside the cowling curve and angle. A task which required several different tabletop belt sanders and a little bit off here, a little off here, a little more curve, just a touch more there.
When that piece of Butternut fit almost perfectly and we routed the long edges, RO and hand sanded and called it ready to go. It was time to turn to the epoxy work that could be done with the boat still right side up.
We G/flexed in D-ring straps for gear or float bags attachment on the floor below the bow and stern decks, covering them with wax paper and sandbags before moving on to epoxy work in the center of the hull.
The utility thwart installation, once shaped and sanded to fit, is simple but it is usually a multi day process. We did a dry test fit to position the utility thwart at cowling height, propped it up exactly so on a removable platform of empty boxes and wood scrap, taped the edges to mark the position, papered the inside of the hull incase anything dripped and etc, etc all that dang prep work that takes far longer than actually laying cloth and epoxy.
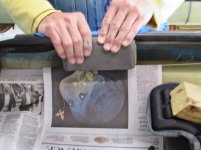
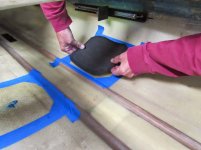
We cut a piece of kevlar felt to the butt end size, stapled it onto the end of the utility thwart, saturated it with G/flex and stuffed it in place. That gap filling application is about the only use for kevlar felt I ever need. And of course I have a lifetime supply of it that those wee quantities.
Previously that first kevlar felt utility thwart adhesion mean that I had to step away from the thwart or any other boat work overnight for fear of knocking it askew. That resin saturated kevlar felt isn’t there to provide any real strength, it’s just there to hold the thwart in place so I can lay glass across the edge of the cockpit coming and thwart
But Doug had brought an unopened kit of West System G/5 Five Minute epoxy.
http://www.westsystem.com/ss/g5/
I didn’t know there was such a thing. Hell, Doug didn’t know there was such a thing, he bought it by accident. And for this marathon endeavor it saved us a night’s epoxy cure wait; 5-minutes later the utility thwart was help firmly in place and we could lay more cloth and resin
G/5 will have a place in my epoxy stash, especially since Doug left me with the nearly full cans.
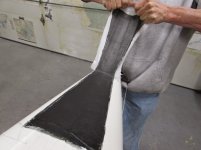
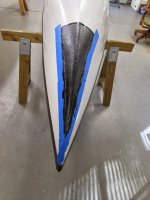
We cut strips of glass tape and epoxied them (West 105/206) into place across the coming edge and thwart ends, peel ply’ed them and walked away. It was 6pm.
We knocked off at 6pm. That accounted for a 10-hour day with three guys working. And none of us dubbed around aimlessly for long, even me.
Probably an aggregate 20 hours of work; I didn’t give Doug a rest, he went full on for all 10 hours. Joel did more in 6 hours and Doug and I could have done in a day. And I mostly supervised and cleaned up, contributing maybe 4 hours of actually tool in hand.
Joel departed and I eventually put Doug to bed in the tripping truck. The lights in the truck bed weren’t on for long; he must have been tired. Little did he know that I was just warming up, and had barely started to work him like a rented shop mule.
Tomorrow Day 2 and some real work begins. Sleep well Doug.
Project Boat #1 was a 1977 Hyperform Optima. Yes, another Hyperform Optima.
http://www.canoetripping.net/forums...scussions/diy/655-hyperform-tandem-conversion
Identical hull shape to mine, even the same year and blue over white color, but very different in construction. My Opie is pigmented glass and nylon, Doug’s is much stiffer woven roving, glass and gel coat with different keel line stiffeners.
Hyperform made some of the first commercially available kayaks in the US, licensed from European designers. That they would offer two completely different laminations for boats obviously built on the same mold is probably evidence of early lay-up experimentation.
Doug had already gutted the Optima of seats and extraneous glasswork, sanded down any sharp edges and installed new seam tape. He got some looks driving down with two weirdo 70’s decked tandems on his roof racks.
Doug had sent me his rudder and I reshaped it so that it would work as a Kruger-style gravity deploy. I knew he wanted a Wilderness Phase 3 seat and had one almost ready to affix, with a two inch minicel pedestal which brought the seat arms just under the deck coming for some additional deep-hull seat elevation. We were ready to rock and roll come morning
I was thinking of this project being akin to one of those reality car shows, “Three days to turn the ’56 Chevy into a Low Rider”. Three days to turn a 1977 Optima into a poor man’s Sea Wind with Barcalounger padded comfort.
Thursday morning we started working on Doug’s new old hull at the crack of 8am, after some shop coffee and strategizing gab fest.
Opus Number 2 is in absurdly good shape for a 38 year old hull. A couple of small gel coat cracks on one the deck, but the bottom was relatively unscarred and it was obviously a barn find boat that had seen no UV. Even the Hyperform and Lettmann stickers were 99% intact.
A Barn Find Optima that qualifies for Historic Tags. We started to work with the plan that we would proceed with the outfitting the hull strategically, with the hull upright, finishing up with any epoxy, cloth and peel ply late in the day, so we could walk away and pull the ply to start afresh the next morning. Opus Number 2 needed to be ready to go back on Doug’s car Saturday evening. Let’s roll.
First order of business was to install a seat. Doug likes the Phase 3 seats, and seemed to like them even more when he was shown how to properly adjust them. I happened to have several never used Phase 3’s, enough to keep a spare and send a couple home with Doug for future use or spare parts. Shout out and thankee Dave and Joel for the unused seats.
I had prepared one of thePhase 3 seat with a 2” minicel bottom base, carved to fit the seat bottom and hull shape of my Optima, which would raise Doug’s seated position close to single blade level.
A little Joel in attendance finagling with the unattached seat to found the trim placement and, whadda ya freaking know, a spray skirt for a Pamlico 145T fits perfectly around the cockpit coming, with the tunnel exactly where it should be positioned over the seat. Sweet.
Fortunately we had Joel’s years of kayakcraft to get that part right. Mikey don’t wear no skirts.
Even more fortunately we had Joel available for the next critical steps, installing the rudder cables and foot controls. Well, not just available, Doug and I mostly stood back and handed him tools and parts and he made that look easy.
We had a variety of ruder foot pedal options, but nothing works as well as in a 70’s retrofit as Yakimas (now made by Mohawk).
With Joel taking on the cables and pedals what would have taken Doug and I half a day took a couple of hours. In what would become a recurring theme, Joel worked, Doug helped and I mostly provided the tools and materials at the ready. And occasionally put away some tool Joel still needed.
New rudder, cables, gravity retraction line and ball through a closed cleat, pad eye line guide, self-tensioning bungee and cord locks pulling both pedals forward. Done to perfection. Done better than my Opie dammit.
The controls were positioned for Doug’s arm reach and inseam. Joel seemed oddly eager to measure Doug’s inseam several times, and asked if he dressed left or right.
With the boat dressed for size we could install some bungee lines. A simple vee of bungee on the bow deck, with wood balls to make stuffing a paddle blade under easier. The front deck is far beyond reach, but that bungee compliments a Paddle Park vee to be added later to the utility thwart.
We added four grommet straps to the stern deck to allow strapping on a dry bagged sleeping pad, chair or other long light gear.
Doug, a word of caution, a 30-pack of Natural Ice might lead to stability problems if strapped on the back deck. Or when consumed in a 24 hour period.
It was time to make some serious shop dust. Doug brought down a piece of butternut to use as a utility/sail thwart. Time to again sit Doug in Opus on a padded shop floor and mark the ideal position for the sail mount and etc. We used a clamp-on utility thwart to find the best position away from paddle stroke range but close enough to lean forward and dismount the sail or reach other things on the utility thwart.
Getting the dimensions of that wood piece to fit exactly between the insides of the coming, with not just the / \ angle but also the interior coming curves ( ) is a delicate process, cautiously custom shaping the wood to fit inside the cowling curve and angle. A task which required several different tabletop belt sanders and a little bit off here, a little off here, a little more curve, just a touch more there.
When that piece of Butternut fit almost perfectly and we routed the long edges, RO and hand sanded and called it ready to go. It was time to turn to the epoxy work that could be done with the boat still right side up.
We G/flexed in D-ring straps for gear or float bags attachment on the floor below the bow and stern decks, covering them with wax paper and sandbags before moving on to epoxy work in the center of the hull.
The utility thwart installation, once shaped and sanded to fit, is simple but it is usually a multi day process. We did a dry test fit to position the utility thwart at cowling height, propped it up exactly so on a removable platform of empty boxes and wood scrap, taped the edges to mark the position, papered the inside of the hull incase anything dripped and etc, etc all that dang prep work that takes far longer than actually laying cloth and epoxy.
We cut a piece of kevlar felt to the butt end size, stapled it onto the end of the utility thwart, saturated it with G/flex and stuffed it in place. That gap filling application is about the only use for kevlar felt I ever need. And of course I have a lifetime supply of it that those wee quantities.
Previously that first kevlar felt utility thwart adhesion mean that I had to step away from the thwart or any other boat work overnight for fear of knocking it askew. That resin saturated kevlar felt isn’t there to provide any real strength, it’s just there to hold the thwart in place so I can lay glass across the edge of the cockpit coming and thwart
But Doug had brought an unopened kit of West System G/5 Five Minute epoxy.
http://www.westsystem.com/ss/g5/
I didn’t know there was such a thing. Hell, Doug didn’t know there was such a thing, he bought it by accident. And for this marathon endeavor it saved us a night’s epoxy cure wait; 5-minutes later the utility thwart was help firmly in place and we could lay more cloth and resin
G/5 will have a place in my epoxy stash, especially since Doug left me with the nearly full cans.
We cut strips of glass tape and epoxied them (West 105/206) into place across the coming edge and thwart ends, peel ply’ed them and walked away. It was 6pm.
We knocked off at 6pm. That accounted for a 10-hour day with three guys working. And none of us dubbed around aimlessly for long, even me.
Probably an aggregate 20 hours of work; I didn’t give Doug a rest, he went full on for all 10 hours. Joel did more in 6 hours and Doug and I could have done in a day. And I mostly supervised and cleaned up, contributing maybe 4 hours of actually tool in hand.
Joel departed and I eventually put Doug to bed in the tripping truck. The lights in the truck bed weren’t on for long; he must have been tired. Little did he know that I was just warming up, and had barely started to work him like a rented shop mule.
Tomorrow Day 2 and some real work begins. Sleep well Doug.
")