• Happy Weed Appreciation Day! 🌱🌿🌻

Freedom 17 Strip build

Joined
Feb 17, 2014
Messages
327
Reaction score
2
Location
CT
I've been wanting to build a strip canoe for a long time, for some reason though I got started building kayaks. I've built six Skin on Frame kayaks and one strip kayak. This will be my first canoe, honestly I think it's the builds I've seen here as well as the trip reports that pushed me over the edge and finally got me started. Of course every build I've seen I've loved and wanted to build...I was going to build a solo boat because so many are being built here but I settled on a tandem tripper so it will be easier to get out on the water with my kids.

I'm expecting this to take all winter, so don't expect me to go as fast as Stripperguy! This is where I am so far.

I bought a sheet of 3/4" birch ply for the forms for $35 at HD. I know it's a little excessive but the MDF I was going to get was $30 which seemed ridiculous so I splurged. I'm using an almost internal strongback which means I don't need plywood extensions to reach the ext. strongback thus I can get all my forms on one sheet of plywood.

image.jpg

This is a detail of one of the forms, I'm an engineer so I have access to ACAD and large format printers so this made the lofting a little easier. The slot in the middle is for the internal strongback which is a 2"x 4" x 12' aluminum beam. I use the same technique Nick Schade shows in one of his kayak books, basically you cut the slots very accurately and drop the forms on the beam and everything magically aligns. It works really well.

image.jpg

Here the form is roughed out, the mouse ears are relief for the template router bit I use in the next step.

image.jpg

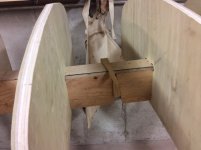
The template is really simple to make, just outline the piece of aluminum with scrap wood. Then cut most of it out with a bandsaw and use the router to get it perfect. Then through away the scrap wood and you're left with a plywood template that fits the aluminum extrusion. BTW the picture shows a 2" x 2" extrusion, the beam I use is really 2" x 4"

image.jpg

The finished product, all sanded up to the line, and the slot routed out.

image.jpg

I'm going to try to keep track of the time spent on this build. So far I've spent 2hrs to draw and print forms, 1/2 hr cutting out paper, 4 hours cutting forms. I still have to finish about 8 forms.

Total 6.5hrs
 
Excited to follow along in another build! The internal strong back is interesting, it will be fun to see that come together. If you didn't already have the beam and experience with this method from building kayaks do you think you'd still use it for canoes?

Alan
 
I was tired of cleaning up forms so I thought I'd show some pics to explain my strongback. I used a 3 foot section of aluminum I had laying around for this example. The forms look a little wavy but thy're not I swear. I cut them out with bandsaw on a bevel, that way when I'm sanding I don't need to cleanup the whole thickness of the plywood. The wavyness that is visible is from my bandsaw work, the sanded profile is nice and fair.

photo%25201.JPG photo%25203.JPG

Here are three forms in place with spacers. All of the spacers are 11.25" except for the middle spacer which is 10.5" and has wedges to snug everything up (the outer forms are clamped in place). The spacers are nice because they hold the spacing and keep the forms perpendicular to the beam.

Alan, I think this method is really good if the forms are designed well. If they need lots of adjustment an external strongback would be better. Also, the beam I had costs around $300 new, I was lucky in that my work was scrapping a test fixture and I got it for free. One of the cool things about this method is that it's very repeatable which is helpful when building kayaks, you can loosen up all the forms to knock the hull loose and then retighten and build the deck in about 2 minutes.

I just put in another hour. Total time ~ 7.5 hours
 
Are you going to go with staples or the more finicky staple-less stripping system? Bet you can beat my time of 177 hours to build one 15 1/2 foot stripper. ;)
 
Mr wysedav,

Very interesting to see that internal strongback technique. What, does everyone have some 80-20 laying around? Pretty handy stuff, isn't it?
Uhmm, a Freedom 17? I have to go look that up. What is it made for? Or is it a general purpose tandem?

And you're lucky to have access to a full size printer...I have an extra HP printer that I'll bring home from work shortly, it takes 36" rolls and saves much time.
I like the idea of the form spacers too. You've used the same methods with your kayak builds, so I suppose the forms are plenty rigid enough.

And now I find myself studying your photos to see what your shop looks like...Is that what everyone else does when I post photos of a build?
I am disappointed that I can't seem to find any source of tunes. Are you a radio guy? CD's? No, you're younger, right? You must have an Ipod or Iphone for tunes.

You do have tunes, don't you??!! How can a guy (or gal) build without tunes? I don't think it's possible...

I just realized that I don't know how you attach the stem forms. Is your internal strongback shorter than your boat by the length of the stem forms?
 
Last edited:
Mr wysedav,

You do have tunes, don't you??!! How can a guy (or gal) build without tunes? I don't think it's possible...

No tunes here. I either talk to myself, talk to the dog, sing, zone out, or scream; all depending on what I'm working on and how it's going. A couple times I've thought about setting up something to play music out there. Maybe one of these days....

Alan
 
Mihun09,

I didn't use staples on the kayak I built, it was a pain in the neck at some points but I got through it. I don't think this canoe will be as difficult as the kayak had lots of compound bends in the strips. Also I used redwood which is a little stiffer and more brittle. On this one though I'm still debating what to do, I really like the look of some of the painted hulls I've seen so I might just staple it and be done.

My plan for this build is to use 3/16"+ strips with 4oz cloth doubled in the football and up the stems. I'll probably build air chambers in the front and rear to cover up my mistakes at the stems. I want to make the yoke and seats from carved foam covered with carbon to help keep things light (I probably won't do that, I just want to watch SG do it on his next build). I think the gunwales will be softwood in the center with a hardwood exterior (don't really know just guessing). I'd like to keep the boat around 40lbs.


SG, what engineer doesn't like 80/20? I'm holding onto that one 12' piece like it's gold!! I do also have a bunch of 3-4' pieces which come in handy at times. The forms are rock solid, I was going to use 1/2" material but I didn't feel like remaking my spacers. Here are the details on the Freedom 17.

I haven't quite worked out the stems yet, I think they will be 2.5' long with the missing form let into it in the appropriate location.

freedom17.jpg

Here are some pictures of my shop, I'm really proud of it...it's nice and clean!! Overall it's not very big, about 14' x 24' but it works. I just try to get all my tablesaw work done before I start building so I can move it out of the way. It used to be bigger but I gave up half of it so my son could have his own room.

Yup, I have a radio it's tucked out the up near the ceiling. That's one of the best parts about building a stripper, most of the work is quiet so you can actually hear the radio.
photo%25201.JPG

This is one side of my chop saw station notice the 80/20? The plank at the top is soon going to be a canoe..2" x 8" x 18' clear cedar.

photo%25202.JPG

The other half of my chop saw station.

photo%25203.JPG

Some shop built storage, and router table. SG you might like this, under the router is a Duff Norton linear actuator that I use to raise and lower the router, works great! The router table gets rolled into the doorway to the right when I start building to free up some floor space. I upgraded the electrical in the shop, I have plugs about every three feet along the walls...best thing ever and not that expensive.

photo%25204.JPG


Storage area.

photo%25205.JPG
 
I'm envious, for now.
Your shop looks great, very organized and clean...I never seem to apply the standards to my home shop as I do to my work machine shop and laboratories.
Next year, MDB and I are building a new house, along with a large (30 x 60?) outbuilding. Hopefully, I can include features such as you have; I also see your dust collection system. That's pretty high on the list.

Anyway, I'm ready to see those forms set up. You weren't planning to go to work today, were you?
 
A dust collection system is high on my list of priorities for next year as well. Our work space was a smaller single car garage with low ceiling. Wall height is 6 feet. The electrical is all conduit run out of a 60amp panel (yet to be hooked up). I tend to do most of the cutting outside just because none of our buildings are long enough to run 18 foot stock. SG's 60 foot building will take care of that issue.

Do have a radio, but I find the voices in my head tend to drown that out at times. (It is more my own thought process than other voices). We built a bear mountain boat as well.

We won't be doing any work on anything this Winter, considering no power or heat yet.
 
Very well organized shop for a small space. I have a similar roll around "A frame" cart except mine is setup for sheet goods on each side and lumber in the middle. Unfortunately it's nearly too heavy to roll so the mobility factor didn't work out quite as well as I'd hoped.I have a much larger shop but it's much less organized. Hoping to change that in the next week as I'm finally getting around to building all my drawers so I'll have some storage space.

I agree that the dust collector is a huge bonus. Every time I empty that 20 gallon drum of sawdust I can't believe that if not for the collector all that would be on the floor and every other horizontal surface; as well as in my lungs. It's also great for sucking up the dirt pile after sweeping.

Alan
 
Oh good, another build thread with lots of photos. Great stuff.

Thanks for taking us along for the ride.
 
Sorry I haven't posted in a while, the weather has been pretty nice the last few days so I've been finishing up tasks around the house. The main task I wanted to get done was install some beams in my screened in porch. I had to do that before I started the canoe because I needed to use the aluminum strongback as a template to scribe the beams. The beams started life 6" x 10" x 14', I had the bandsaw mill cut the bottom and sides off so I eneded up with three 1 1/2" slabs which I reassembled into a hollow beam. I took out the core as these are wrapping a 2x6. This is what the final product looks like...

beams.JPG


While I was at the mill I asked them to cut the cores into 3/4" slabs, they also ripped my 2x8 cedar plank in half. I'm going back this week to get some more wood so I have enough to finish the canoe (the cores are somewhat knotty and heavy so I don't plan on using them for the canoe).

Hopefully I'll be cutting strips this week.
 
I started putting the forms on the strong back, from #2 to #14 which works out to be 12' of canoe.


photo%25201.JPG

A metal bracket at each end prevents the form from sliding off the beam when the wedges are inserted.


photo%25202.JPG

Between the middle most forms there are wedged spacers that lock all of the forms in place.


photo%25203.JPG


This end view shows how all of the forms aligned (camera angle makes it seem a little off) No alignment necessary if the forms are made correctly.
The bow and stem forms will be made next, I plan on making them one foot longer than normal so they will reach all the way to the last forms on the beams.

Elapsed time 9.5hrs
 

Attachments

  • photo%25202.JPG
    photo%25202.JPG
    40.5 KB · Views: 0
Looks great so far! If you look long and hard enough, you can see a boat in there somewhere. It will magically appear before your eyes before you know it.

I really like your strongback approach. It looks like it would be quite a bit more stiff than the traditional wood/laminated beam set up

Keep plugging away, this will be a great read through the winter. Take your time, you'll be happy you did.

Momentum
 
This is how I created the bow form...I made it a foot longer so it would reach all the way to the second form and then attached it with a cleat. I then added a couple of gussets to keep the form square to the 2nd form. Lastly I cut the form 0 and 1 in half minus the bow form thickness and screwed them on in the correct location. I checked the forms for fairness and all looks good, before I start stripping I'll check the bow and stern center lines with my laser.

You'll notice I have some legs mad out of 80/20 scraps that I had laying around. Seemed like a good idea but I think I'm going to make some sawhorses of some sort to hold the canoe in position, these don't seem stable enough.

I won't be around this weekend so don't expect me to have it half stripped by Monday like StripperGuy. Next week I hope to get the strips cut and everything ready for work on the weekend.

One more hour gone...

photo.JPG
 
Yeah, it's looking good!! The other day, I was adding up your form spacing and wondering how you would make up the missing length.
I'm guessing that you already have that strongback and didn't want to create another one that's 2 ft longer.
And for the record, Alan has the record around here as the fastest build in the west!! East too, I guess. I'm a distant 2nd or 4th...
Have you decided on your layup yet? How thick will be the strips, what weight cloth, how many layers?
 
It surprised me how fair these forms are and how gentle the bends, I expect the stripping will go quickly so maybe I can come in 5th or 6th although I'm not really in a rush.
You got it, I figured 12' is long enough, I didn't think scabbing on an extra 2 ft was worth the effort. BTW, I'm not really sure the aluminum strongback is any better, it seems like I have a good amount of time invested in the forms. I think an ext. strongback is just as good....unless you want to build more than one then the Al saves some time.

I have 3.25 oz cloth left over from the Petrel build which I'll use for this build. I plan on two layers in the football (in and out) everything else a single layer, the cloth is pretty tight so I'm going to wet out with Low V epoxy. Probably no staples, just because it's not that much harder and the holes bother me for some reason. Strips will be a strong 3/16" maybe a little lighter when I get past the chine. I think the layup should be light yet strong enough, I don't really baby the Petrel and it's holding up fine. Basically I avoid rocks and enter/exit from the water as much as possible.
 
Back
Top