• Happy Launch of Lewis & Clark Expedition (1804)! 🧭🏞🏞️

Freedom 17 Strip build

Well that makes me feel better. I have this French curve looking scraper that in using in the chine area, seems to be working ok. After scraping I'll quickly hand sand and say good enough. Good observation on the forms, they are a pain in the neck.

Mem kayak folks always drill through the hull for lifting handles. Just fit a block of wood and epoxy in place first before drilling the hole. Then follow up with epoxy to seal it. I guess I'll do it. I hope the drill doesn't grab and rip my hull in half!


It took me quite a long time to develop the courage to drill through my hull. I actually thought that it was the least of the two evils between drilling through the deck and the hull. I'm strange like that
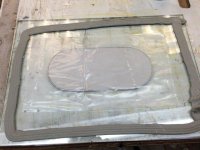
 :) Like you said Dave, I epoxied a block in place, and drilled through the hull and then through the block. Here is where I placed mine... I'm following it up with epoxying in a brass insert I found at Lee Valley Tools

IMG_1383.JPG
 
Sanding the inside just plain SUCKS the fun out of building !
I've found that a variable speed ROS, helps especially in the tight chine area. I bought a Bosch awhile back, and you can slow it down to a dead stop. I like it.

Jim
 
Well it's been a long time since I last posted, Little League and work seem to get all of my free time lately. Here are some pictures of the little progress I have made...


IMG_0555.JPG
Epoxied inside and out and inwale installed, still need one more coat on the outside to get it nice and smooth. I gave up on super light and added a second 4oz layer everywhere (the thought of walking back from the wilderness makes me worry). The hull is about 27# right now. I ran out of epoxy I used about 1.5gal so far. After I epoxied I let it sit without spreaders for a month or so..it grew about 2.5"! So I CA glued some in to control the bulge, works well pops right off when you need to remove.

IMG_0552.JPG IMG_0553.JPG

I put two holes in the hull for painters, I drilled them kinda low about 5" above the water line. I heard that it's better to keep them low so your less likely to tip the boat when lining. Drilled the hole through blocks I had epoxier in place and lined the holes with fiberglass sleeving I had laying around from a previous build.

IMG_0551.JPG

I used some quilted maple scrap to make the decks, about 1/8" thick.

IMG_0556.JPG

This is how I'm doing the guwales. The gap between the inner and outer I'll fill with black epoxy. I'll break all the edges with a router, sand and epoxy.

Getting there, hopefully I'll be done before winter!
 
That stripping pattern sure is easy on the eyes and the decks are beautiful.

I like the epoxied in place blocks for the painter line. I had plans to do that too and then forgot about it until a day after I glued my float tanks in place. :rolleyes:

Hope you can get some more free time on the boat this summer. We're all looking forward to seeing it in the water, but probably not as bad as you.

Alan
 
Ohh... How did I miss this thread? Must go back fro more reading... Just learned a couple of things that I may try in my current build!

Lovely bottom pattern. Rather bolder than anything I've had the guts for yet.

Luke.
 
Nothing wrong with life taking all your time. I know this all too well.

Looking fantastic. I too, love the decks. I really like the look of quilted maple. Pretty sure you won't see that too often in your trips through the wilderness.

All you have to do is put one foot in front of the other and keep plugging away. You'll get there, and certainly in style!

Momentum
 
That is a good trick with the painters ! Kind of reinforces, and seals it.

I'd say you have the hardest part behind you.
Decisions you make now are important, especially in respect to user comfort. Seat location and height, thwart location.

For portaging, I like to be able to wedge my paddles into the canoe, between the seat, a thwart, and the bottom of the canoe.
Here's a pic of a solo, just to give you an idea.

Jim
8ee1a689-01bd-48db-914b-e974a50783c6_zps7caae83b.jpg
 
I had some time to do a little bit of fiberglass work, I made the cutouts for the flat chamber access. I wanted to try vacuum bagging (because it's cool) but am generally too cheap to buy all the misc. materials on line, it gets expensive quickly. So I went shopping looking for alternatives to peel ply, breather, release film and butyl tape. For the peel ply I found some tight weave poly fabric from Walmart in the $1 bin. Release film is 2mil poly, breather is poly batting from Walmart. For the butyl tape I used window caulking, that comes in a roll. About $15 invested into this experiment.

15%2B-%2B1.jpg
This is what I used for a mold, Piece of glass as a base,raised bit in the middle to create an offset for my gasket, 2mil release protecting the mold, caulking around the perimeter.

15%2B-%2B4.jpg
I wet out and put 5 layers of 8oz cloth on top of the mold.
15%2B-%2B3.jpg
Next comes the release fabric, this lets excess epoxy ooze through so he finished part has good resin to cloth ratio. I think you could just use more 2 mil if you wanted and weren't too concerned with weight.
15%2B-%2B2.jpg
Last is the breather cloth this is the air passage that lets all of the air out of the layup.
IMG_0575.JPG
Last step is to cover with more 2mil and pull a vacuum. You can see the excess epoxy oozing into the release cloth and breather.
 

Attachments

  • 15%2B-%2B1.jpg
    15%2B-%2B1.jpg
    45.4 KB · Views: 0
  • 15%2B-%2B4.jpg
    15%2B-%2B4.jpg
    69.1 KB · Views: 0
IMG_0576.JPG

This is the what it looks like after I pulled it out of the mold and trimmed it up.. I was supposed to add some black chalk but I forgot.

IMG_0577.JPG

The molded piece gets glued to the back of the float chamber acces port. The offset that i molded in gives room for a gasket so the panel will be flush when inplace. Otherwise the gasket would make it stand proud.

IMG_0578.JPG

This is the backside of the access cover. The nastyness will be cleaned up a little but basically bungees will go through the holes to hold the plate tight to the gasket. I'll put a bungee anchor points on the inner bow and stern to tie off the other end of the bungee.
 
Dave

You're my kinda a guy ! I seem to look for the economical (CHEAP) , but effective methods of doing things also.

I'm told a vacuum pump, can be made from an old, but operational refrigerator compressor. I had thought about trying an old Electrolux ! :rolleyes:

A friend used this type of cover on a kayak, but found when he would roll the kayak, it would come loose and flood. He ended up putting external latches to remedy the situation.

Looking forward to the finished chamber ! Nice work !

Jim
 
I use the same style for my kayak, I actually find it very reliable and even hard to open. I would guess it depends how well the gasket mates and how strong the bungees are.
 
I think maybe the bungees were at fault with my friends kayak, but at the time he didn't go into great detail. Gaskets, as you state could have been the problem also.

Jim
 
wysedav Love the DIY Vacuum bag rig. I have a couple questions, as I could end up doing similar for some projects...

How well did the polyester cloth end up working for peel ply? Did you have to pull while tacky, or did you wait until fully hard?

Some of the phrasing inline with the pics also had me wondering. If I understand correctly, the layers are:

- glass/composite layup
- Peel-ply equivalent (Polyester fabric)
- Release film (2 mil+ polyethlene plastic - painters film or similar?)
- Breather arrangement

Did I miss anything?
 
The poly cloth worked great, it took some muscle but it peeled off in one sheet.


You had the order close, this is what I did

- mold (may not need this, it could just be a panel you're making)
- Release film (2 mil+ polyethlene plastic - painters film or similar?) This just protects the mold, if you make a nice mold you could wax it and spray a mold release on it then you wouldn't need the plastic.
- glass/composite layup
- Peel-ply equivalent (Polyester fabric)
- Breather arrangement

The peel ply and breather get soaked with epoxy so they get chucked after use. I peeled it after everything hardened up, overnight seemed to be OK I would guess 6-8 hrs would be ideal while the epoxy is still green.

If you want to you can make your own peel ply with painters plastic (I've never done this). Just punch holes in it every 1/2" or so to let the epoxy ooze. If you don't punch the holes you will get a very smoothe surface that just needs a little touch up, it might be a little heavier however since it may have excess epoxy.

This system works really well with flat panels, you can fiberglass both sides at the same time.
 
No Title

Thanks for the clarification. I've really enjoyed seeing some of the details on your build. Given me some insights on things I might try on my own.

Since on the subject, I need to fess up and share my only experiment so far with mold release. (lack thereof) Note: I'm usually not quite this dumb. Brain took a vacation, or something.

I was trying to build a paddle, and thought glassing the blade would be a good idea before attaching to the shaft... I've since rethought construction a bit (for other reasons) I don't have a vacuum pump, though the rest seems simple to scrounge. I Did have a flat surface, and some buckets of weight.

Isn't the result pretty? But there was just one problem...
 

Attachments

  • photo2386.jpg
    photo2386.jpg
    285.2 KB · Views: 0
Oh no! Did you epoxy both of the blades together? Or is that just the camera angle, I can't tell if there is a piece of glass in between the two blades
 
latremorej Just one blade. Glass cloth on both sides. No mold release whatsoever.

Mike McCrea Both.

Then I had another brain issue. I ended up breaking up the glass to try to get it off. Did not work so well. Eventually realized that a propane torch would soften the epoxy, and could have just pulled the whole thing apart.
 
We ALL Learn from our mistakes ! And Sometimes from those made and shared by others ! That's the real beauty of internet !
Thanks for sharing !

Jim
 
Back
Top