• Happy May Ray Day! 🌞😎🌻🩳🇩

FlashFire Outfitting and Repair

G

Guest

Guest
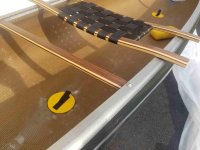
I picked up a 2002 Bell Flashfire in Black Gold a while ago. Judging from the condition of the hull inside and out, she was rarely used.
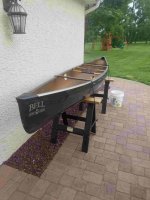
Click image for larger version  Name:	FF whole boat - Copy Image quality 11.jpg Views:	26 Size:	399.6 KB ID:	112995

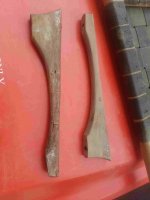
Evidently, it was stored out of the elements , but on the ground or in a damp environment. All the wood needs replacing.
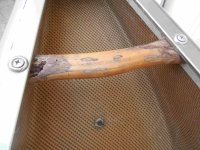
Click image for larger version  Name:	Rooten grab handle - Copy IQ 12.jpg Views:	25 Size:	363.5 KB ID:	112996

Dry rot.

Click image for larger version  Name:	FF chewed  and corrosion BEST - Copy IQ 13.jpg Views:	26 Size:	388.9 KB ID:	112997

An animal chewed the thwarts up.

Click image for larger version  Name:	FF rotten drops - Copy IM 14.jpg Views:	26 Size:	228.8 KB ID:	112998

Dry rot drops blues.

Click image for larger version  Name:	FF corrosion - Copy IQ 15.jpg Views:	26 Size:	237.0 KB ID:	112999

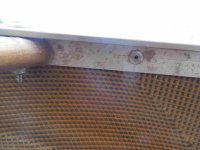
The inner aluminum rails are pitted with white corrosion. The outer rails have that bronze coating and are in cosmetically good shape. I have cleaned them with vinegar but they still show a lot of corrosion.
 
Last edited:
This is my first aluminum gunwale experience. I looked the boat over but did not appreciate the significance of the deformation in the seat area.

FF Bad rails 2 - Copy IM 17.jpg

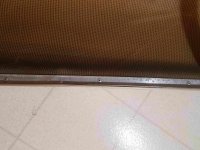
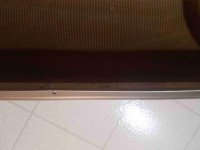
The inner and outers are separated for about 8".

FF Bad Rails 1 - Copy im 16.jpg

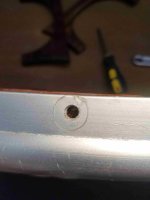
The top rail is bent in at one of the drop holes.

Rail bent in at drop hole - Copy IM 20.jpg


I began installing new drops and, Houston, we have a problem.

FF Bad Rail drop wont fit - Copy IM 19.jpg

The drops fit OK on the other side.

I would be grateful for any advice or suggestions.
 
Click image for larger version  Name:	Northstar twart and seat IM23.jpg Views:	0 Size:	332.1 KB ID:	113010
The thwart, drops, and seat came from Northstar Canoe, the successor to Bell. They are just a little bit more expensive and a cut above in quality, and a bit lighter, compared to Ed's, IMHO.

I like these vinyl patches from whitewater designs for the airbag cage attachment with gflex.

The blush you see on the hull is the typical Bell from water temporary discoloration. The inside hull was pristine when I bought it.

The older I get, the lighter I got to get. I have lost lots of weight recently, so this boat may actually fit me now for daytrips. I have had it for a while but wife is agitating to use it and I am psyched I might finally be under the max weight for it. I was looking for a Wildfire when this came up.

If I cannot get the drops to work, I will consider a kneeling thwart, but my knees will have something to say about that, and it won't be good.
 
Last edited:
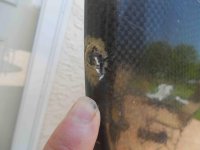
Fixed the bow ding this afternoon.

FF Ding IM 25.jpg

Scuffed it up, then washed with Acetone:

FF Dings scuffed IM 24.jpg

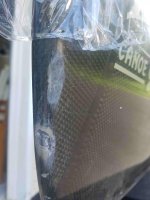
Saran wrap and gflex:

FF Saran Wrap IM 26.jpg

Peel ply? Peel ply? We don't need no stinkin' Peel ply!

FF WE dont need no stinkin peel ply IM 27.jpg
 
Flashfires are so hot. I used to paddle with a woman (a grandmother) that had one and she'd paddle with a leisurely cadence and good technique and she'd just fly along at a very impressive pace. I hope you've got another boat that's hot enough to help you keep up with your wife like maybe a Wenonah J boat.
 
Dave, for the separated wales how about putting a couple clamps on the area to draw them together, drilling a couple 3/16” holes and installing a couple new pop rivets?

Nice job with the Saran Wrap.

The aluminum cleaner I have used is Burnishine Aluminum Brightener. Brush on, allow to set for a few minutes, wipe off and rinse. There are other, maybe better, aluminum cleaners, the Burnishine is the only one I’ve ever used; a 16oz bottle seems like a lifetime supply. I had to use some 0000 steel wool on one set of really cruddy gunwales, and run a strip of tape below the wales to better protect the hull.

That is some impressive wood decay. Gotta love folks who rot their brightwork with poor storage.
 
Nice canoe. Looks like it has some ground contact for awhile.
I have a Bell Northwind in royalex for rocky rivers.
 
Mike, thanks for the suggestion with the clamps. It is a good one. I have been thinking along the same lines. It seems probable that removing the seat released some tension and worsened the separation. I plan to try cutting some wood strips to wedge gunwale to gunwale, and see how the separation responds, and how it affects the alignment with the drops. The only thing I can think of is that the former owner must have dropped something really heavy on the seat area on that side.

I do not have loads of experience with rivets, and these rails are a bit of a mystery to me, but one has to start somewhere.

I have some ideas about drilling out the rivets to installing the cordage restraints for the air bag cage. I will explore that in a later post, as soon as I get this separation problem fixed.

I plan to try the Burnishine you mentioned, or something similar, but that seems like the least of my problems right now.

I need to paint or varnish that ding repair for UV protection.
 
Last edited:
I do not have loads of experience with rivets, and these rails are a bit of a mystery to me, but one has to start somewhere.

I have some ideas about drilling out the rivets to installing the cordage restraints for the air bag cage. I will explore that in a later post, as soon as I get this separation problem fixed.

A simple pop rivet hand tool is up there with a random orbital sander in terms of boat repair and outfitting usefulness. Short (maybe ¼” long) pop rivets (3/16” dia), installed once the wales have been temporarily clamped together, should do the trick on that separated section.

A couple complications/cautions with using a pop rivet tool on aluminum gunwales. You will want to install a small washer on the mandrel head, but need to use a washer that fits under the inwale lip; I’ve had to flatten one side of small washers on a grinder to more of a D shape to make them fit properly under the inwale.

And, on the outwale, make sure the nose/nozzle of the pop rivet tool seats flat and flush against the aluminum gunwale before you drill the holes. Rivets will not seat properly unless the nose of the rivet tool is flat and flush against the wale.

About drilling out some rivets to install cordage restraints. A 3/16” drill will remove the rivet head (flange), it will spin off on the drill and you can tap or pull the remaining rivet pin and mandrel out on the other side.

Lots of cordage restraints available, from manufactured to DIY. These little stainless steel mini D-rings (the two thing bottom left) work very well, and eliminate the need for a washer.

P4030002 by Mike McCrea, on Flickr

The black D-ring with the flat tab just to the right of those mini D’s work equally well, and the tab is made to slip between the inwale and hull. Either held an impressive amount of weight. I got the SS ones are from Dan Cooke, meant to back up snap rivets on CCS spray covers and they have proven decent quality stainless.

The black plastic tab version may be preferable if you do a lot of salt water canoeing. I think Wenonah carries those, I got mine from Blue Mountain Outfitters.

EDIT: Oops, my bad. I just remembered that the stainless mini D-rings use a 1/8” pop rivet, same as the snap rivets on CCS covers. The usual 3/16” gunwale pop rivets won’t fit.


Use the back tab things.
 
Last edited:
Glenn, I had heard about Acetone to cure the Bell water spotting. I don't give much thought, to be honest. The spotting goes away or is replaced every time the interior hull gets wet. My understanding is that this is not doing any harm. If it is, I would appreciate any intel. Thanks.
 
Mike, Much thanks again for taking the initiative and anticipating further helpful info.

Long ago, I put a Cooke cover on a flexcore Prism. The few times I really needed it, the cover was outstanding. Riviting on the snaps is about the extent of my riveting experience. It has been so long, I’ve forgotten whatever I learned. I had some great trips in that Prism, but sold the Prism because I planned to swap it out for an ultra light version, but never did.

I’ve been looking on McMaster. Considering oversized heads, backer washers, etc.

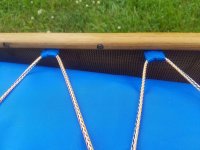
I used nylon webbing and wood screws on a wood gunwale. I might well have gotten the idea from one of your posts long ago. I don’t think that would work very well with rivets:

Click image for larger version  Name:	webs IM 27.jpg Views:	0 Size:	408.9 KB ID:	113142

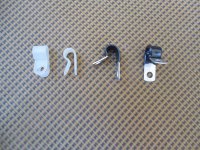
I am considering two types of clips:

Click image for larger version  Name:	Clips for cage IM 27.jpg Views:	0 Size:	419.7 KB ID:	113143

The metal coated clips are from Mohawk from long ago. I have several concerns about those. One, it might cause some galvanic corrosion with the aluminum. Two, While putting heavy packs in and out, etc., might put undue stress on the clip, and rip on the rivet. I would rather the clip fail than the rivet. Three, it is a cumulatively and relatively heavy solution.

The plastic cable clips are cheap and I strongly suspect will degrade rapidly in the UV.

I like the black D-ring with the flat tab. Light weight, and no noisy flapping, clanking. I am not sure I want to be slipping these between the inwale and hull. Perhaps they can be modified to attache between inwale and rivet head.
 
Last edited:
Dave, I have used the mini D-rings to back up spray cover studs and will do so again. Two notes on those mini D-rings; I drilled the ones in the photo out to accommodate a 3/16” pop rivet. Risky business getting fingers close to a spinning drill bit and piece of stainless steel getting burning hot. I clamped them and used a drill press, not something I would want to do with dozens of them.

The other, larger (smaller) issue with those mini D-rings is that the D part is only ¼” wide. On spray cover studs a couple inches below the inwale those are visible and accessible enough. If drilled out and attached via the aluminum gunwale pop rivets they would be awkward to lace and unlace and trick to get to.

Webbing loops are simple enough, 20 penny nail head heated with a torch forms a perfect sealed 3/16” pop rivet hole. I use a washer over the webbing and it works fine with pop rivets. And, as you know, the webbing loops can be made long enough to stick out from under the inwale for easy access.

The downside to webbing, to my mind, is that the gunwale rivets would have a doubled over layer of webbing between the inwale and mandrel head & washer, so maybe not quite as tight as just a pop rivet alone, especially if the webbing compressed over time.

The Wenonah (or whoever*) nylon D’s with the under inwale tab are big enough to stick down from the inwale far enough to be easily laced, and the D hole is decently sized, so you can use larger line or ever 1” webbing straps to secure gear. The tab on those is thin, meant to slip behind an inwale, but you could put them on the outside with a washer. In the weight bearing test that under inwale D-ring held 151lbs

*It was driving me crazy. Northwater, they call them “Lacing eyelets”.

https://northwater.com/products/airbag-tiedown-kit

BMO carries those lacing eyelets sold individually and not as part of a kit.

P4090029 by Mike McCrea, on Flickr

FWIW the black nylon cable clips held 41.4lbs before they broke. The cable clips I tested were the beefy nylon ones, with a 3/16” hole, also from BMO. Most of the hardware store cable clips, black or white, have a smaller dia hole that will not accommodate a 3/16” pop rivet, and are made of flimsier plastic. And, again, might be kind of small to thread line through immediately below the inwale.

P4050026 by Mike McCrea, on Flickr
 
Glenn, I had heard about Acetone to cure the Bell water spotting. I don't give much thought, to be honest. The spotting goes away or is replaced every time the interior hull gets wet. My understanding is that this is not doing any harm. If it is, I would appreciate any intel. Thanks.

When I bought my used Bell Wildfire, it had many of those whitish blush patches. I called Charlie Wilson, who made thousands of Bells, and he said it was due to the type of resin they used in the laminate, which would interact that way with water on the interior.

Acetone will wash away the white blush but it won't prevent the next occurence. You have to put on some sort of protective coating. I use Flood Penetrol.

Dave Curtis turned me on to this product. He uses it to restore and brighten the finish and hide scratches on the exterior of the used composite hulls he sells. It does a great job of this, not by actually removing the scratches, but by filling them and other little porous micro-holes with a thin leveling layer of reflective liquid. The light disperses off it in such a way that it the scratches "seem" to disappear significantly and UV faded gelcoat brightens up.

I found that the Penetrol also brightens up the interior weave fabric of my Wildfire and also serves as a protective coating against recurrences of the white blush. It's only temporary on the exterior or interior, however. You have to apply it maybe twice a season. But it's just wipe on, wait a minute, and wipe off. Worth a try on any older composite hull.
 
Dave, I know I am getting out ahead here, or maybe not of you are soon to install the new thwarts and carry handles, but I believe the shank ends of the machine screws makes for the stoutest possible attachment point for webbing loops. Melt/seal the usual 3/16” hole, slip the webbing loop overt the end of the machine screw, add a washer and nut or nylock.

For thwarts, or yoke in tandem canoes, I use a “bow” of webbing, a longer single length of webbing so the thwarts have a webbing loop sticking out either side.

P5260021 by Mike McCrea, on Flickr

Two carry handles = four webbing loops at the stems, two thwarts with double-sided “bow” loops = another eight webbing loops.

I’ll put them on the machine screws on the rack of the seat drops in some canoes. Seriously stout tie down points that work well with larger diameter rope or webbing for gear lashing.

I just hot putty knife cut the webbing to length, fold it over and put a piece of Scotch tape around the bitter ends to keep them together and even and help keep my fingers away when melting the holes with a hot 20 penny nail head.

https://www.canoetripping.net/forums...-webbing-loops

(Hey look, that thread was back when DougD briefly became DaveO)
 
I like the D-rings on tabs. I think they are nylon or some other strong/tough polymer. They fit just fine between inwale and hull on my Bell Merlin II.

image.jpeg
 
Mike, you said: “The downside to webbing, to my mind, is that the gunwale rivets would have a doubled over layer of webbing between the inwale and mandrel head & washer, so maybe not quite as tight as just a pop rivet alone, especially if the webbing compressed over time.” Exactly my concern.

You have the right idea to use the shank ends of the machine screws for attachment point for webbing loops. I will do that eventually.

While we are talking webbing, I have a hogpodge of nylon straps of varying ages, weaves, and thicknesses, and of unknown quality. I would invest in a roll of 1” nylon webbing if I knew enough to know I was getting quality but not overkill. Any enlightenment on the basics of choosing nylon webbing would be appreciated.

Gumpus, thanks for the pic and for chiming in. I will probably go with the nylon D’s with the under inwale tab (Mike tells me Northwater calls “Lacing eyelets”).

I found several reasonable online sources for the plastic D rings. The key search word is “sewable” D ring. They look identical, as far as I can tell from the online pics.

Glenn, I’ve heard good things about Penetrol. I am not at the point where I want to add any weight for purely cosmetic reasons, but will keep it in mind in the future.
 
Thanks to all the good advice and intel, the planning and materials are pretty much set start to finish on this project. Now, I just need to find the time.

My first priority is to get the bent and separated part of the gunwale back to spec, and install the seat. I have some commitments that will delay getting that done, but when I get to it, I will post the results.
 
Back
Top