That's very sweet, I will have to try that peel ply!
-
Happy National Sunglasses Day! ☀️🕶️😎
You are using an out of date browser. It may not display this or other websites correctly.
You should upgrade or use an alternative browser.
You should upgrade or use an alternative browser.
G
Guest
Guest
That's very sweet, I will have to try that peel ply!
Memaquay, once you go peel ply you’ll never go back.
Get the release treated stuff, so you don’t have to time the pull for temperature and humidity factors. Just leave it on and pull it the next day.
Seriously, the first time you use peel ply for hand laid epoxy and cloth applications you’ll kick yourself for years of sanding and unnecessary resin weight.
G
Guest
Guest
Spray Cover
The female snap fasteners on the DougD cover are a match to the male snaps I have on hand, and the seat opening are fairly well located. But a taped in place test fit shows that the two spray cover pieces are 6” short of matching the Velcro middle seam if taken all the way to the stem tips.

Another test fit and tape in place, moving each cover back a few inches. This is an odd spray cover (more on that later) and there is nothing on the stems to secure an accessible painter line. But if I move the covers a few inches inward the deck plate bungee becomes available and the Velco middles marry perfectly.
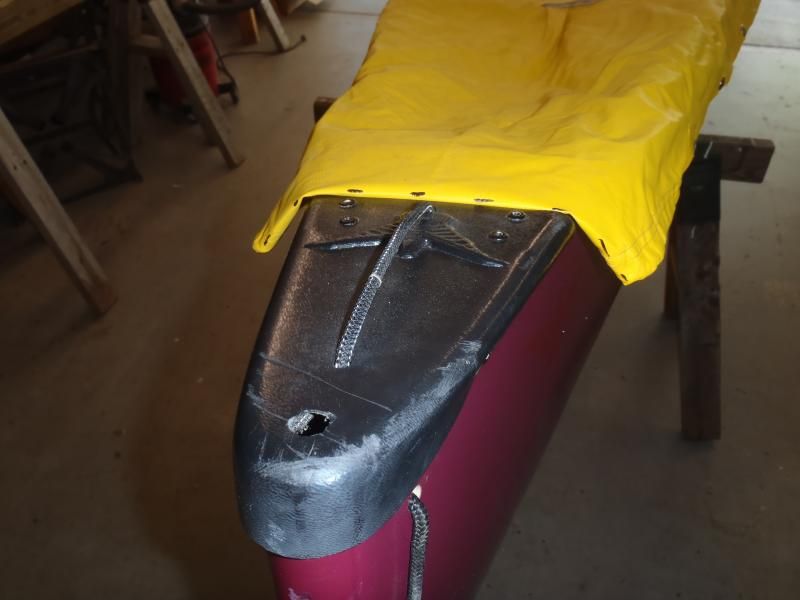
Time to mark the stem ends and do some surgery. I cut off a small tongue, leaving an inch of material to fold over and glue down.
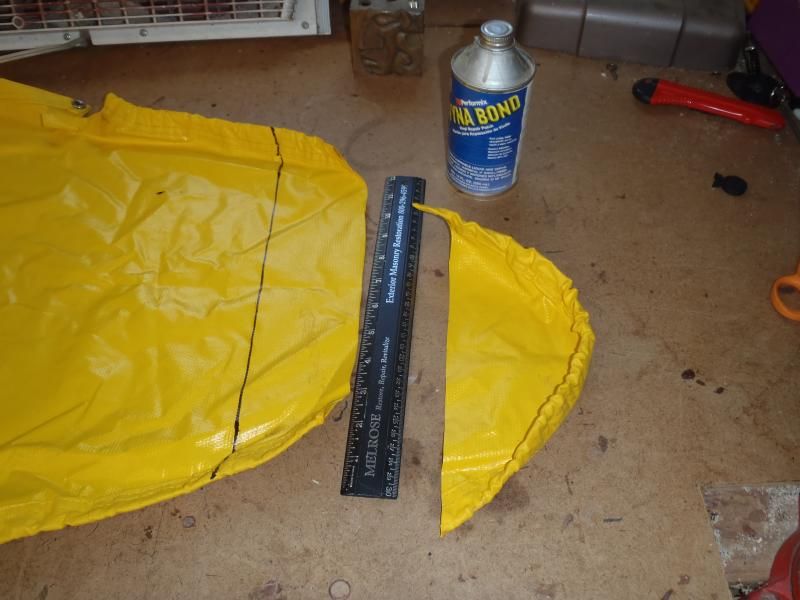
The cover is heavy duty vinyl coated material and I have some Vynabond. And once again I forgot to clean the surface with alcohol before Sharpie marking. I must be getting old.
Vynabonded, folded and clamped. That was about the last of the Vynabond, so even if I had vinyl pad D-rings in the shop I couldn’t install them.
Time to start a BMO list. Vynabond, D-rings, good quality painter line.
With the clamps off and a well glued seam I ran a piece of Tenacious Tape across the edge, just for surety sake. Add to list – more Tenacious tape.
https://www.mcnett.com/gearaid/tenacious-tape#10691
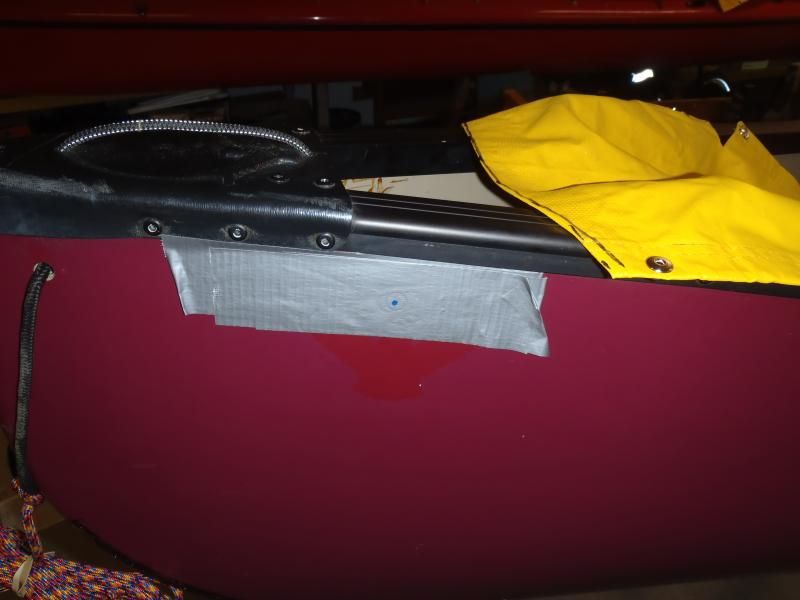
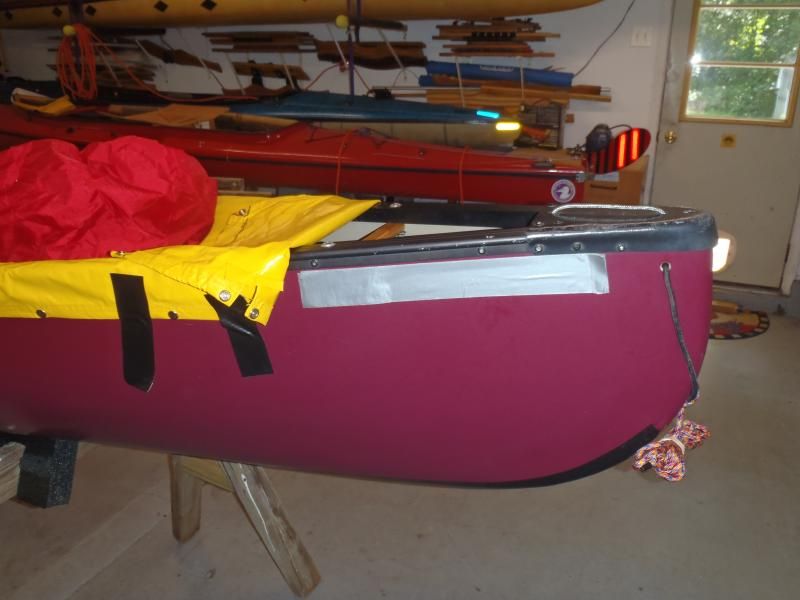
The newly cut spray cover ends need additional snap rivets to hold them in place, two on each side, 8 female snaps to install.
I marked the locations and again turned to the hot nail head to melt a perfect snap rivet hole. Since I had the scrap tongues cut off I used one of those to try melting an installation test hole and seating a test snap before effing up on the covers.
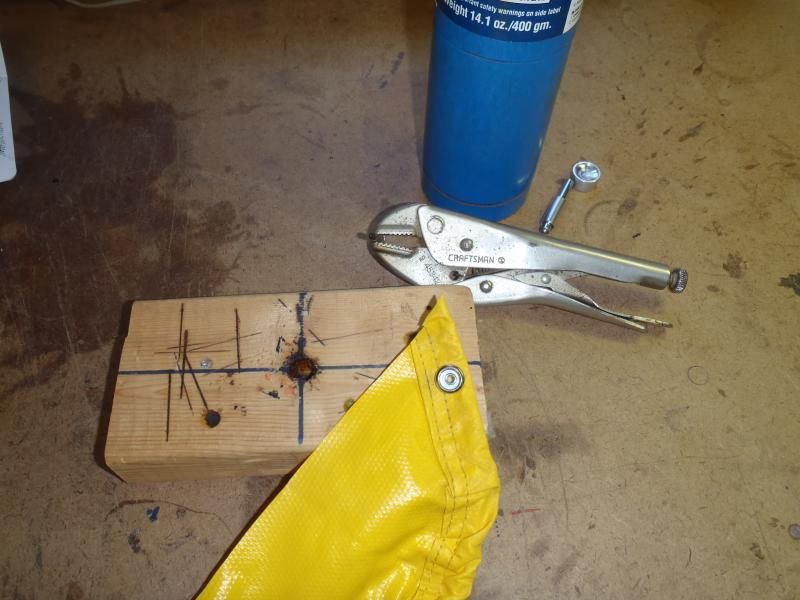
That’ll do. With additional snaps installed on the ends of the covers and I can put them back on the boat and start drilling and installing male snaps under the outwale.
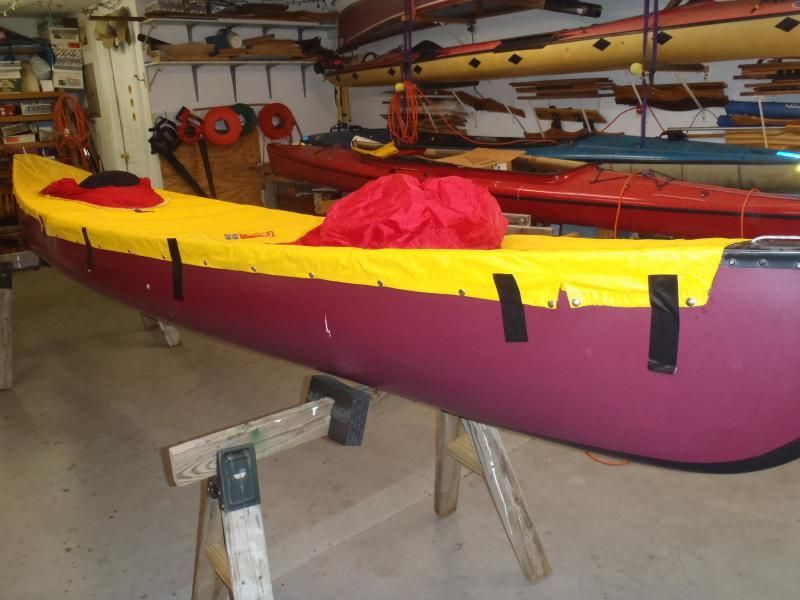
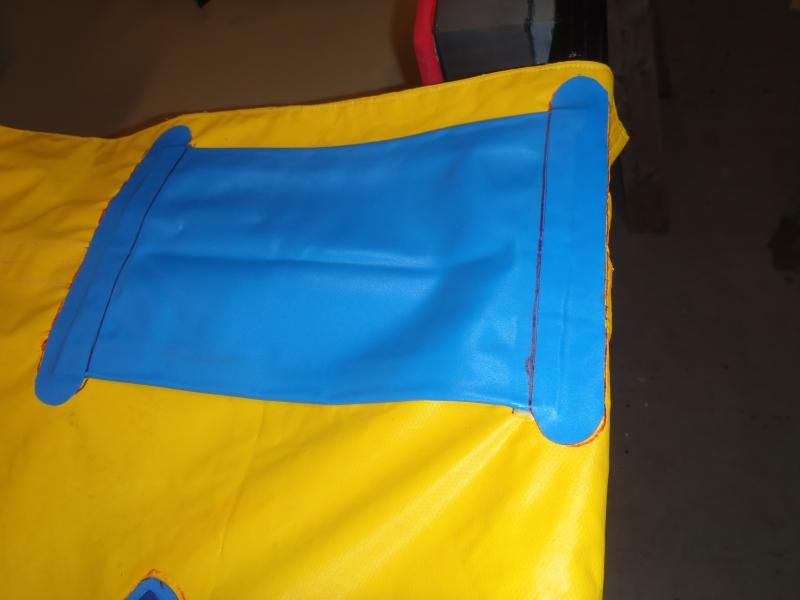
Who knew Coleman Marine once made canoe spray covers? It is an interesting two piece design, made of heavy duty vinyl and cloth material with snaps every 8 inches. Or actually, a three piece design; the rear seat has a permanently placed skirt tunnel, but on the bow seat the tunnel sewn to a large oval that is Velcro’ed to the spray cover.
I pondered the installation for a spell. Unlike a nylon Cooke Custom Sewing cover that will stretch over a higher-than-gunwale load if wetted, or a Northwater cover with toggles and line (or bungee), that heavy vinyl coated material isn’t likely to have much stretch.
That cover was made for a wider canoe 16’ 6” long (I’m thinking old Ram-X….eeesh), and if I install it relatively taut all the way around some of the pop rivets will be 3” below the outwale.
Nix that, I installed it with a little midships sag so the snap rivets were closer to the outwale, where they are better protected from the slings and arrows of inadvertent bumpage. It sags a bit in that guise, but a goodly gear load will eliminate that and the 115L pack and blue barrel protrude a bit above the sheerline.
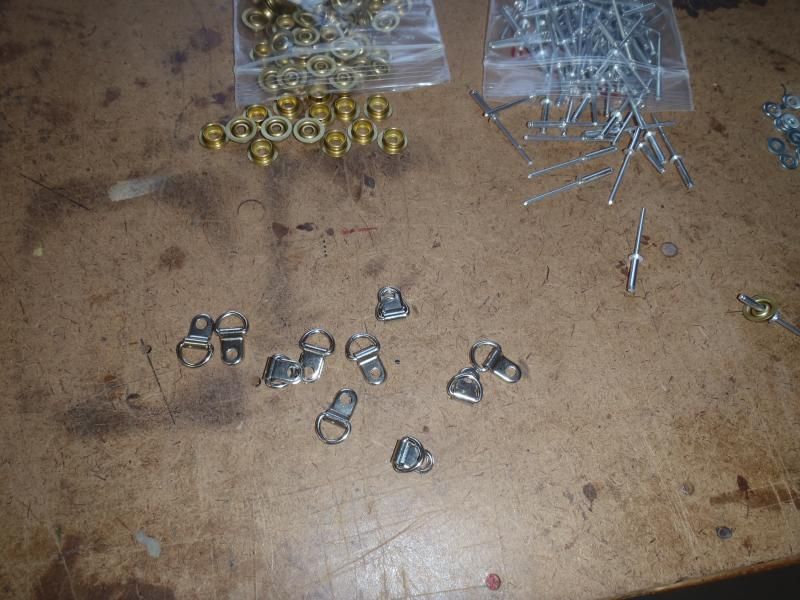
In the box of spray cover parts I found a dozen or so tiny stainless steel D-rings from CCS that can be used behind the snap rivets as float bag lacing points and installed those in a few strategic locations. Note: You still need to use a washer or those small stainless D-ring will simply fall off the end of the rivet. I remembered this only after the first installed D-ring fell off post-riveting.
If drilling four holes for foot braces is nerve racking drilling 56 precisely positioned holes for spray covers is more so.
The process is simple enough, duct tape the covers in place so that the edges are evenly spaced under the gunwales, put a piece of duct tape under the snap rivets on the cover and push them against the duct tape to leave a circular impression as drilling target. It helps to put a Sharpie dot in the center of the impression.
Measure, make sure the parallel snap rivets on each side are evenly spaced under the outwale and install one on the right, one of the left, one on the right, one on the left. Lots of walking around the canoe from one side to the other.
CCS instructions recommend putting a full length of duct tape along the sheerlines just under the gunwale. That’s a lot of duct tape and to leave a decent rivet impression for the Sharpie dot it needs to be good thick duct tape.
Instead I just put a short piece 3-layered duct tape in the approximate area of each snap and move it along to the next sequential snap.
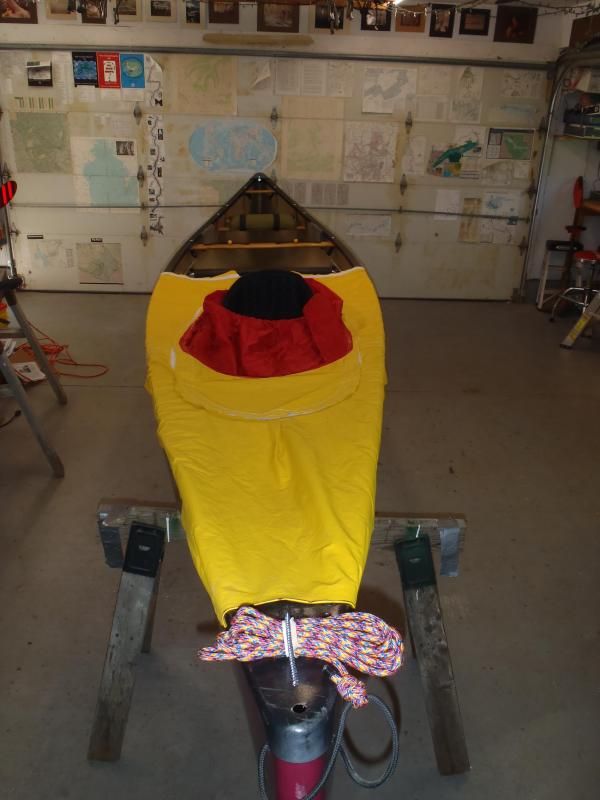
Half way done. I had taped, measuered and marked both cover in place to assure that the Velcro met in the middle, but installed one cover at a time, just in case I screwed something up along my way down the gunwale line and needed to adjust the placement of the next piece
The bow cover went on well; the tunnel placement looks perfect and the back band doesn’t interfere with the cover. I did have to remove the seat hangers to get the washers on behind the bow seat hangers but I like the install so far.
Time to tape the stern cover back in place and see how that goes. Also time to make new pieces of 3-layer duct tape for marking rivet impressions, the old ones are full of potentially confusing holes and Sharpie marks.
It pays to use good quality duct tape to hole the cover in place, but a couple of layers of cheap stuff work well for the snap impressions.
There were some expected obstacles along the way with the stern cover, including snap rivet locations that required removal of the thwart and some pry back of knee bumper to get washer in place.
I found 2 bad female snaps on the stern cover. I have not had to deal with bad females in 25 years, and haven’t had two at a time in far longer.
I may have to have a beer or two before dealing with bad females.
Beyond the couple of bad girls everything is dang near perfect. The openings are well matched with the seat locations, and to access the carry thwarts I need only undo two snaps at each end.

I especially like that bow seat opening with the Velcro’ed tunnel removed.
It’s almost enough to make me want to paddle tandem again. Almost.
DougD, I owe you one. A tandem canoe cover is five Benjamins. I’ve got all of a sawbuck invested in this one, and I know how you and Tara enjoy receiving packages.
The female snap fasteners on the DougD cover are a match to the male snaps I have on hand, and the seat opening are fairly well located. But a taped in place test fit shows that the two spray cover pieces are 6” short of matching the Velcro middle seam if taken all the way to the stem tips.

Another test fit and tape in place, moving each cover back a few inches. This is an odd spray cover (more on that later) and there is nothing on the stems to secure an accessible painter line. But if I move the covers a few inches inward the deck plate bungee becomes available and the Velco middles marry perfectly.

Time to mark the stem ends and do some surgery. I cut off a small tongue, leaving an inch of material to fold over and glue down.

The cover is heavy duty vinyl coated material and I have some Vynabond. And once again I forgot to clean the surface with alcohol before Sharpie marking. I must be getting old.
Vynabonded, folded and clamped. That was about the last of the Vynabond, so even if I had vinyl pad D-rings in the shop I couldn’t install them.
Time to start a BMO list. Vynabond, D-rings, good quality painter line.
With the clamps off and a well glued seam I ran a piece of Tenacious Tape across the edge, just for surety sake. Add to list – more Tenacious tape.
https://www.mcnett.com/gearaid/tenacious-tape#10691
The newly cut spray cover ends need additional snap rivets to hold them in place, two on each side, 8 female snaps to install.
I marked the locations and again turned to the hot nail head to melt a perfect snap rivet hole. Since I had the scrap tongues cut off I used one of those to try melting an installation test hole and seating a test snap before effing up on the covers.

That’ll do. With additional snaps installed on the ends of the covers and I can put them back on the boat and start drilling and installing male snaps under the outwale.
Who knew Coleman Marine once made canoe spray covers? It is an interesting two piece design, made of heavy duty vinyl and cloth material with snaps every 8 inches. Or actually, a three piece design; the rear seat has a permanently placed skirt tunnel, but on the bow seat the tunnel sewn to a large oval that is Velcro’ed to the spray cover.
I pondered the installation for a spell. Unlike a nylon Cooke Custom Sewing cover that will stretch over a higher-than-gunwale load if wetted, or a Northwater cover with toggles and line (or bungee), that heavy vinyl coated material isn’t likely to have much stretch.
That cover was made for a wider canoe 16’ 6” long (I’m thinking old Ram-X….eeesh), and if I install it relatively taut all the way around some of the pop rivets will be 3” below the outwale.
Nix that, I installed it with a little midships sag so the snap rivets were closer to the outwale, where they are better protected from the slings and arrows of inadvertent bumpage. It sags a bit in that guise, but a goodly gear load will eliminate that and the 115L pack and blue barrel protrude a bit above the sheerline.
In the box of spray cover parts I found a dozen or so tiny stainless steel D-rings from CCS that can be used behind the snap rivets as float bag lacing points and installed those in a few strategic locations. Note: You still need to use a washer or those small stainless D-ring will simply fall off the end of the rivet. I remembered this only after the first installed D-ring fell off post-riveting.

If drilling four holes for foot braces is nerve racking drilling 56 precisely positioned holes for spray covers is more so.
The process is simple enough, duct tape the covers in place so that the edges are evenly spaced under the gunwales, put a piece of duct tape under the snap rivets on the cover and push them against the duct tape to leave a circular impression as drilling target. It helps to put a Sharpie dot in the center of the impression.

Measure, make sure the parallel snap rivets on each side are evenly spaced under the outwale and install one on the right, one of the left, one on the right, one on the left. Lots of walking around the canoe from one side to the other.
CCS instructions recommend putting a full length of duct tape along the sheerlines just under the gunwale. That’s a lot of duct tape and to leave a decent rivet impression for the Sharpie dot it needs to be good thick duct tape.
Instead I just put a short piece 3-layered duct tape in the approximate area of each snap and move it along to the next sequential snap.
Half way done. I had taped, measuered and marked both cover in place to assure that the Velcro met in the middle, but installed one cover at a time, just in case I screwed something up along my way down the gunwale line and needed to adjust the placement of the next piece
The bow cover went on well; the tunnel placement looks perfect and the back band doesn’t interfere with the cover. I did have to remove the seat hangers to get the washers on behind the bow seat hangers but I like the install so far.

Time to tape the stern cover back in place and see how that goes. Also time to make new pieces of 3-layer duct tape for marking rivet impressions, the old ones are full of potentially confusing holes and Sharpie marks.

It pays to use good quality duct tape to hole the cover in place, but a couple of layers of cheap stuff work well for the snap impressions.

There were some expected obstacles along the way with the stern cover, including snap rivet locations that required removal of the thwart and some pry back of knee bumper to get washer in place.

I found 2 bad female snaps on the stern cover. I have not had to deal with bad females in 25 years, and haven’t had two at a time in far longer.
I may have to have a beer or two before dealing with bad females.
Beyond the couple of bad girls everything is dang near perfect. The openings are well matched with the seat locations, and to access the carry thwarts I need only undo two snaps at each end.


I especially like that bow seat opening with the Velcro’ed tunnel removed.

It’s almost enough to make me want to paddle tandem again. Almost.
DougD, I owe you one. A tandem canoe cover is five Benjamins. I’ve got all of a sawbuck invested in this one, and I know how you and Tara enjoy receiving packages.
G
Guest
Guest
Little touches
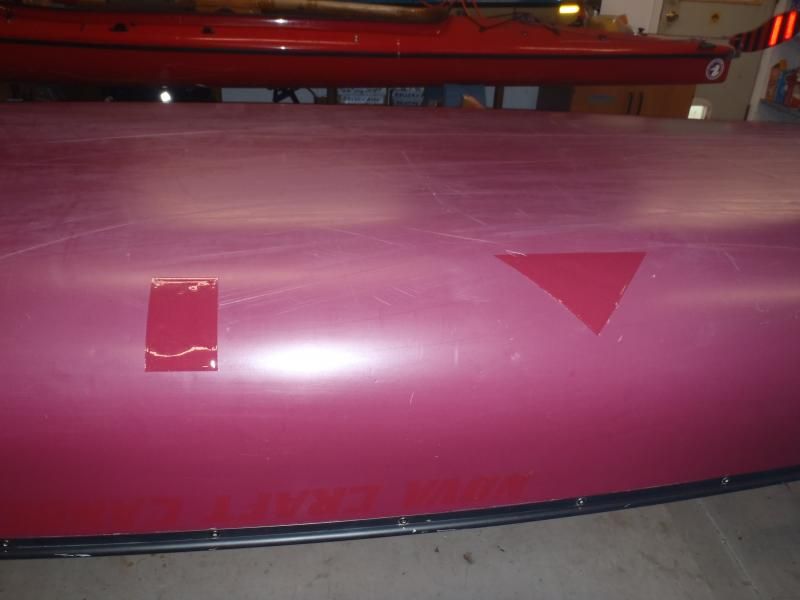
The red tinted G/flex on the chine gouges has had a week or more to cure.
That is not a good color match. A can of burgundy spray paint isn’t a perfect match either, but it is closer. Another tape job
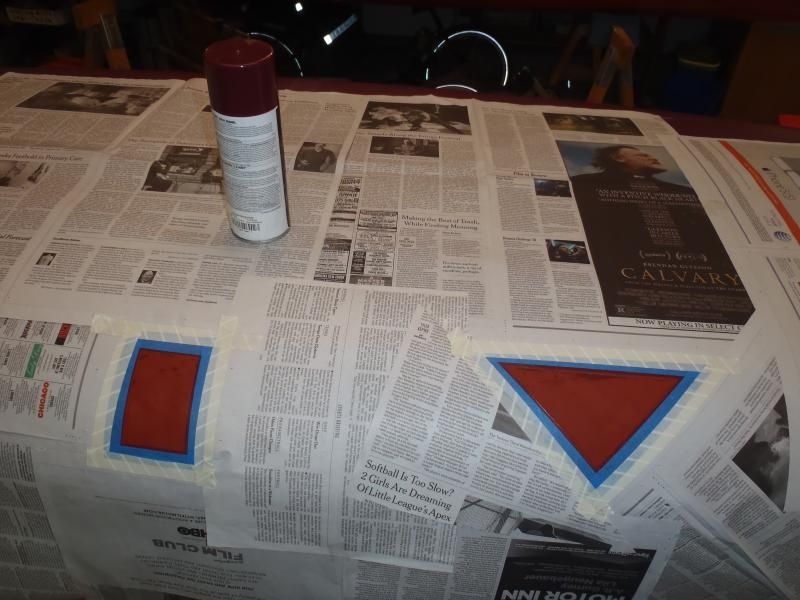
And a lick of spray paint
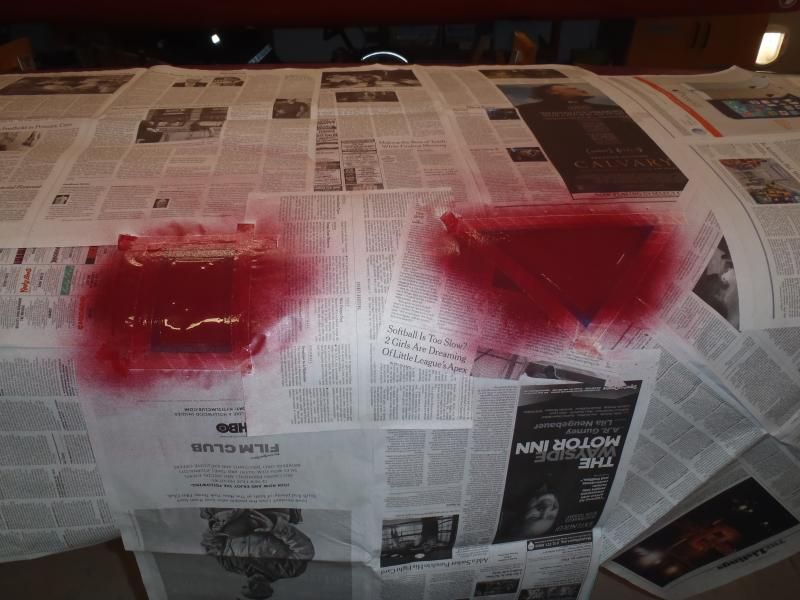
And, eh, it is better. And the epoxy is UV protected.
I retaped and top coated the bias tape skid plate with another epoxy/graphite/pigment mix, and used the left overs to skim the Dynel skid plate as well.

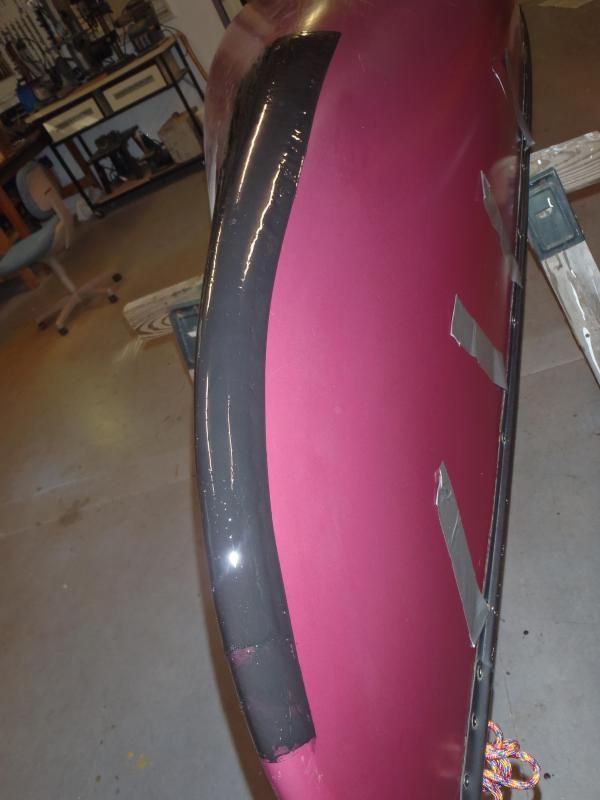
That’ll do, and in a week or so I’ll tape them a third time and spray paint them black for sharp edge lines and UV protection.
I like having some reflective tape on the stems, especially on boats that overhand the truck or van a ways, and I like High Intensity reflective tape. As luck would have it I had 6 pieces already cut to a reasonable length and just needed to round off the ends and stick them in place.
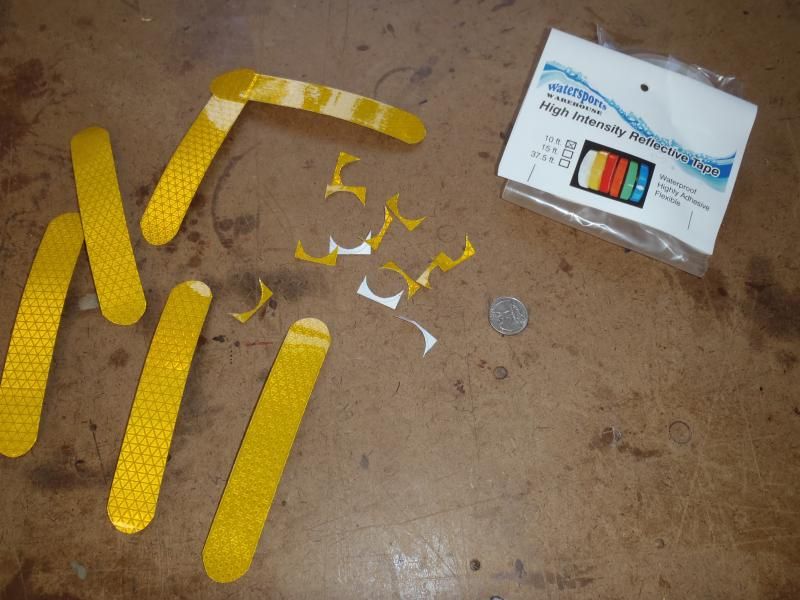
Yes, I remembered to alcohol wipe the hull first, and washed my dirty fingers before peeling the backing off the tape.
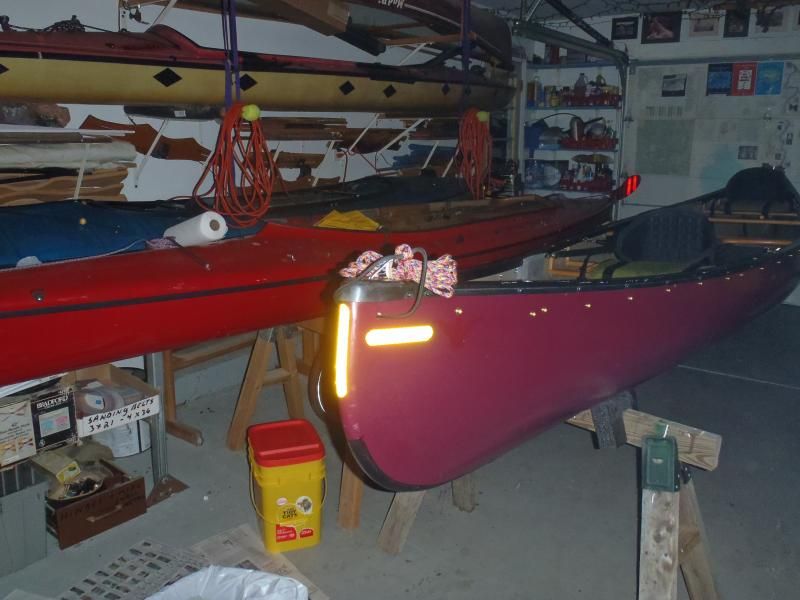
No trouble seeing that.
I did some work on the spray skirt. Fixed the two snap bad rivets and a loose piece of Velcro. The bad snaps turned out to be an easy fix. The heads of two male rivets had snapped off inside the females on the cover and I was able to pull them out with a pair of needle nose.
The cover is otherwise in excellent condition and all it needed was trimming a few stray threads and reattaching an inch of loose Velcro on one end of the middle seam.
Well, that is not all it needs. It needs a pocket and strap for a spare paddle. I always bring a spare paddle and having it stashed under a spray cover would not be helpful if I need it in a hurry.
The red tinted G/flex on the chine gouges has had a week or more to cure.

That is not a good color match. A can of burgundy spray paint isn’t a perfect match either, but it is closer. Another tape job

And a lick of spray paint

And, eh, it is better. And the epoxy is UV protected.

I retaped and top coated the bias tape skid plate with another epoxy/graphite/pigment mix, and used the left overs to skim the Dynel skid plate as well.


That’ll do, and in a week or so I’ll tape them a third time and spray paint them black for sharp edge lines and UV protection.
I like having some reflective tape on the stems, especially on boats that overhand the truck or van a ways, and I like High Intensity reflective tape. As luck would have it I had 6 pieces already cut to a reasonable length and just needed to round off the ends and stick them in place.

Yes, I remembered to alcohol wipe the hull first, and washed my dirty fingers before peeling the backing off the tape.

No trouble seeing that.
I did some work on the spray skirt. Fixed the two snap bad rivets and a loose piece of Velcro. The bad snaps turned out to be an easy fix. The heads of two male rivets had snapped off inside the females on the cover and I was able to pull them out with a pair of needle nose.
The cover is otherwise in excellent condition and all it needed was trimming a few stray threads and reattaching an inch of loose Velcro on one end of the middle seam.
Well, that is not all it needs. It needs a pocket and strap for a spare paddle. I always bring a spare paddle and having it stashed under a spray cover would not be helpful if I need it in a hurry.
G
Guest
Guest
D-rings
Having used the last of the Vynabond and some other shop stock I made the trip to Blue Mountain outfitters to replenish parts and pieces.
http://www.bluemountainoutfitters.net/
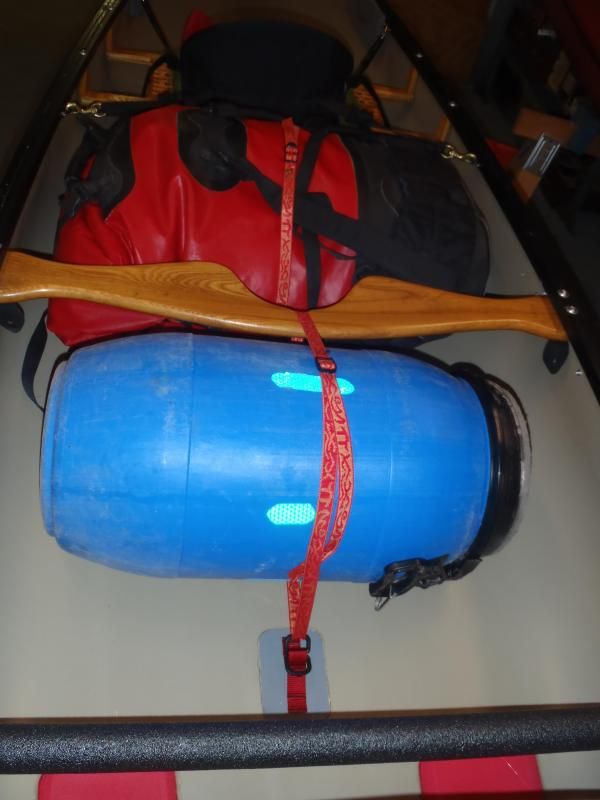
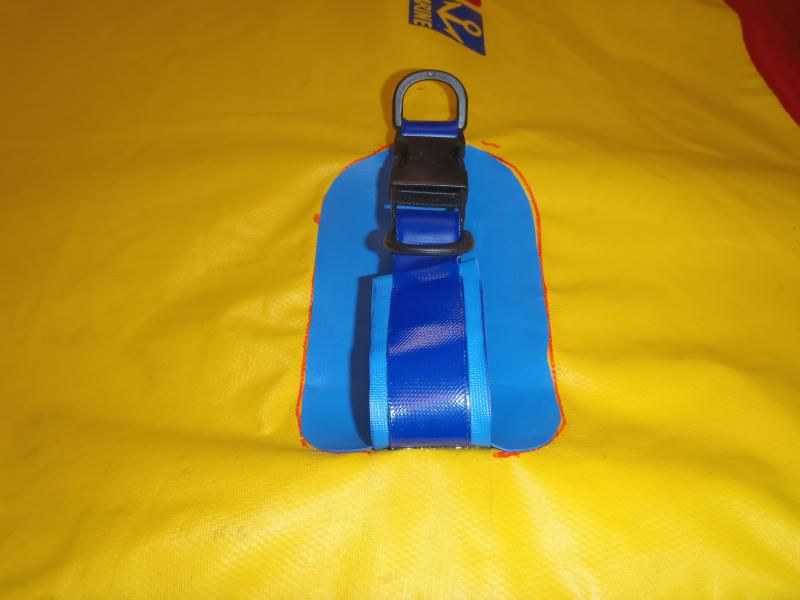
The Cronje needed at least a couple of D-rings Vynabonded to the floor to restrain the heavier gear. I test fit the 115L pack (stuffed with pillows) and blue barrel to determine the best D-ring locations. I like Northwater double D rings (#5 below). With two D-rings on the vinyl pad I can tie or strap off on either side.
http://www.northwater.com/html/products/canoeing/Canoe subdirectory/Anchor-points-outfitting.html
The usual blather – alcohol clean pads and hull, mark locations, Vynabond both surfaces, heat gun, try not to F up the alignment, cover with wax paper and sandbag weight. 60” ladder lock strap are well sized to hold the barrel and 115L pack and I have a free D-ring on the outside edge for other purposes.
Having used the last of the Vynabond and some other shop stock I made the trip to Blue Mountain outfitters to replenish parts and pieces.
http://www.bluemountainoutfitters.net/
The Cronje needed at least a couple of D-rings Vynabonded to the floor to restrain the heavier gear. I test fit the 115L pack (stuffed with pillows) and blue barrel to determine the best D-ring locations. I like Northwater double D rings (#5 below). With two D-rings on the vinyl pad I can tie or strap off on either side.
http://www.northwater.com/html/products/canoeing/Canoe subdirectory/Anchor-points-outfitting.html
The usual blather – alcohol clean pads and hull, mark locations, Vynabond both surfaces, heat gun, try not to F up the alignment, cover with wax paper and sandbag weight. 60” ladder lock strap are well sized to hold the barrel and 115L pack and I have a free D-ring on the outside edge for other purposes.

G
Guest
Guest
Well, that is not all it needs. It needs a pocket and strap for a spare paddle. I always bring a spare paddle and having it stashed under a spray cover would not be helpful if I need it in a hurry.
Time to dress that cover. It needs some paddle pockets, straps and accessible attachment points.
Paddle pockets
I thought that, like many things boatwork wise, it would be wise to use similar materials for the construction of a paddle pocket. So vinyl-on-vinyl
The vinyl seams that I “hemmed” with Vynabond on the cutdown ends of the spray covers seem well stuck and yet pliable. Stashed in the junky end of the gear room I found a couple of old freebie vinyl dry bags with which I had previously experimented, turning them into not-so-dry bags.

One of those should provide ample vinyl material. Cutting one up gives me a 20” x 20” piece of material, or 20x14 if I save the length of dry bag with fastex buckle to repurpose later. Plenty big for two paddle pockets.

I have found it awfully handy when using spray covers to have two paddle pockets, to restrain a combination of a single and a double blade, and sometimes a sail or short pole, especially when launching or landing and wanting both hands free to grab boat or bow line. Handy enough that I had Cooke Custom Sewing install paddle pockets and straps both bow and stern on my solo covers.
First up I needed to find the location for the pockets plural. I put the covers back on and gathered the double and a single blade paddles I would anticipate using in the canoe.
Because of some space restraints with the cover those pockets would function better if left open ended. That might be advantageous so the bow paddler could reach behind, grab the blade and pull a spare through the pocket.
I love a design challenge. I love a design challenge using leftovers and junk even more. Freebie material for two paddle pockets cut, Vynabond edge folded and clamped.

The short ends of those pieces will be Vynabonded to the cover, and the long open ends looked like a good application for a run of Tenacious tape before the pockets are glued in place.

After some dithering and paddle placement experimentation I decided the best orientation for the pockets would be along the gunwale line on either side, allowing for the barrel and 115L pack to take up the cover slack in the middle.
OK, some stupid dithering and paddle location tests. Tee grip in groin, no thanks.

Paddle-cross is even more stupid; I’ll need that sag in the middle to accommodate a barrel and pack.

I also decided that the pockets (and, later, shaft lashings) should all be attached to the stern cover. If I opt to paddle the Cronje solo from the bow seat I might still be able to use that stern cover on the “front” of the boat.
Since the pockets are open ended I can size the length between pocket and shaft lash for the shortest stick I, or someone else, would be likely to use, with a longer blades protruding out the through the open end. I don’t want the long blades sticking out over the gunwales, nor short blades failing to seat between the pocket and shaft lashing. And I don’t want any part of the paddle interfering with either paddler’s seat placement.

That placement of the paddle pockets on that stern cover just happens to seat the pockets nicely atop the yoke, with the shafts/grips resting on the stern thwart. That can’t hurt and keeps the paddles from sagging the cover on the edges.
The hardest part is remembering to alcohol clean the cover and pockets before marking and gluing. Why can I not remember that simple yet vital step?

With the pockets Vynabonded to the cover and clamped down tight it was time to walk away overnight yet again.
Next morning I was pleased with the tenacity of the Vynabond adhesion. Still, those pockets may be subject to some rough treatment while jamming the paddles in and it wouldn’t hurt to reinforce the glued edges.
A look in the adhesives box revealed a fresh package of Aquaseal and Cotol accelerant. Aquaseal is great stuff, but doesn’t fare well over time in storage once opened (keep open Aquaseal tubes in the freezer for best results). I didn’t want to wait overnight for the Aquaseal to set up, so I mixed a couple of small batches at the recommended 3 parts Aquaseal to 1 part Cotol and laid a small edge bead with a tiny paintbrush.

That Aquseal/Cotol mixture begins to set up in minutes, so small batches are necessary. I had just enough Tenacious tape remaining to lay pieces atop the nearly cured Aquaseal. Now I really do need to buy more Tenacious tape.
OK, Vynabonded, Aquasealed and Tenacious taped. If that doesn’t hold the pockets in place I’ll resort to sewing. Ugh.

Pockets done it was time to figure out something to use as paddle shaft restraints on the cover near the stern seat.
The obvious answer was some double-sided Velcro, which means looking through the Velcro box and as usual finding it all stuck together in a giant tangled and sticky rats nest. I’m not a big fan of Velcro, especially not of too many pieces of Velcro on a single item getting stuck to each other, and would once again prefer something vinyl-to-vinyl glued.
I’d also like to have some small nylon D-rings in that stern reachable area to attach a map case or etc. I have the remnants of that old freebie vinyl dry bag I used for the paddle pockets, with fastex buckles and D-rings already attached. And I have a second identical and funked-up freebie dry bag ready to sacrifice for buckles and material. That should work.

More cleaning, marking, Vynabondage and clampage, followed by another bead of Aquaseal/Cotol mix on the edges.


Sweet. The fastex shaft lashing is above the stern thwart and well in front of the knee bumpers.
Of course I can’t read a map without my glasses anymore and there are a bunch of other things I like to have easily at hand atop the spray deck – sunglasses, compass, water bottle, canteen, monocular and etc.
Back to the junk gear pile. I found an old kayak deck bag that serves no purpose. In our decked canoes the front deck is to too far away to reach and putting a bag on the stern deck provides nothing except behind the back blind fumbling and frustration. But that deck bag has adjustable webbing loops and I’ve got D-rings already adhered to the spray cover. And plenty of open space between the paddle shafts.

Now that is a fully dressed and functional spray cover. I can leave one end of the map case free and flip it over for the next map or continuation.
Now that I know it all worked as planned I’ll Vynabond a wider piece of old dry bag vinyl across the middle of those paddle shaft retainers as a grunch-pad, to better protect the cover from wear and to more firmly hold the straps in place. And add a couple of small D-rings for the front of the deck bag.
I’ve got plenty of vinyl left from those two dry bags, and, eventually, a rub rail strip for prying off the stern gunwales would be easy to install. Not that I would ever do such a thing.
I just need to find a lightweight tandem team to try it out. And try it myself from the bow seat backwards with just the stern cover in place. After all this I kind of hope I don’t fall in love with it as a big boy solo.
Wow, you've been busy. Lots of well thought out working remembering all the tedious details. Nice job for sure.
G
Guest
Guest
That looks excellent. Very well laid out.
You know that now you'll have to plan a trip worthy of the boat now.
I find myself on the horns of a dilemma. I only paddle solo and in the back of my mind I had the idea to outfit the Cronje as a tandem and sell it to someone who wanted such a canoe. With the various freebie and leftover parts and pieces I don’t have a lot of money in the canoe and could price it far below its value, especially if it went to a friend.
But I really like the Cronje as a big-boy, big-load, bow backwards solo with just the stern cover in place. That cover is ideally sized for reversing the hull - the open ended paddle pockets and straps still work for paddle storage and the D-rings for the front of the deck bag hold my map case perfectly visible at the end of the cover.
I use that front cover only guise on some trips with my Penobscot, with splash, spray and paddle drip protection (and the sun not beating down on the food barrel) across the bow and the stern, seat and underfoot area open so I can carry my usual essentials bag on the floor and pack easily accessible stuff in the open area behind the seat, above the gunwale line if necessary.
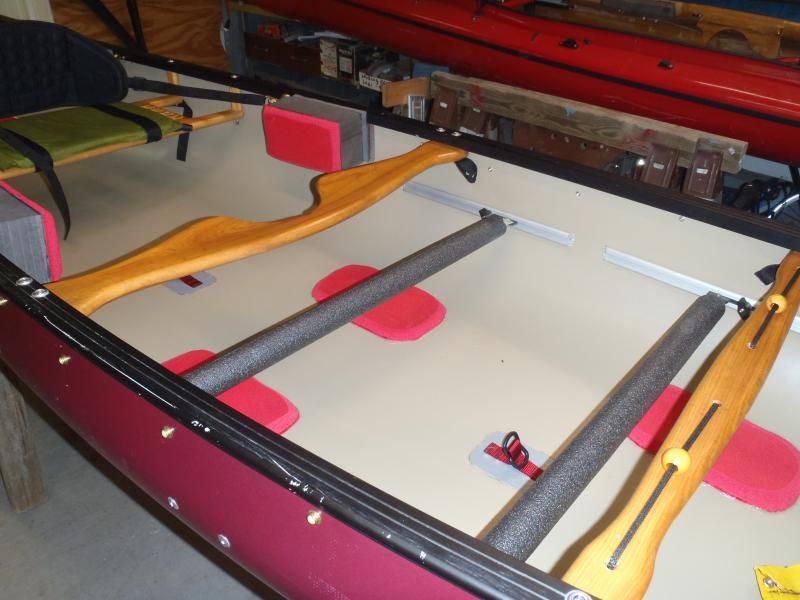
Now I have a major outfitting decision. To be functionally comfortable for me as a bow-backwards solo the Cronje needs another foot brace and giant 4” wide knee bumpers. I have some chunks of thick minicel and another Wenonah foot brace in the shop.
Fortuitously the foot brace side rails I installed for the stern seat are located where the crossbar can be repositioned directly under the thwart, and a test sit shows that a bow backwards foot brace can be adjusted back under the yoke, so no packing space need be sacrificed to either foot brace.
Do I leave it as a tandem or add big knee bumpers and another foot brace for a do-everything hull that works equally well solo or tandem?
Last edited:
I find myself on the horns of a dilemma. I only paddle solo. <SNIP>
But I really like the Cronje as a big-boy, big-load, bow backwards solo with just the stern cover in place. <SNIP>
Do I leave it as a tandem or add big knee bumpers and another foot brace for a do-everything hull that works equally well solo or tandem?
Go ahead, you know you want to
")
G
Guest
Guest
Go ahead, you know you want to
Yeah, that was a largely a rhetorical question. I don’t especially like selling boats and most of my paddling friends are soloists. I really don’t like listing boats for sale at what I know is below market value and then dealing with someone who still wants to dicker.
And when am I going to find another RX Cronje and a freebie spray cover that fits perfectly?
A second foot brace and big minicel knee bumpers are not going to add that much weight, and a second foot brace will not interfere space-wise when packing either solo or tandem since either can be adjusted out of the way under the yoke or thwart as needed.
That decision to add solo knee bumpers seemed preordained when I discovered that I had minicel scraps in both ¾ inch and 3 inch widths perfectly sized for the extended solo knee bumpers.
Having installed giant knee bumpers in the Penobscot I now know that they don’t need to be as oversized. I made them huge in that canoe because I wasn’t sure how sturdily they would adhere when subjected to scraping across them getting in and out of the canoe or bracing under them with my knees.
Set up as a solo/tandem it might be a handy boat to have along at times if I want to head out with a friend along the way or loan to a tandem pair.
I have the same problem with tandems. I rarely ever need one but it's hard to pass up a good deal. I just gave one away to a friend today. Well, actually it's an open ended loan. I never use it and while it's a neat old boat and paddles great it's just not something that I could sell around here short of giving it away and I'd just get frustrated if I listed it for $250 and had to deal with people trying to talk me down....or more likely get no interest at all.
Alan
Alan
G
Guest
Guest
I have the same problem with tandems. I rarely ever need one but it's hard to pass up a good deal. I just gave one away to a friend today. Well, actually it's an open ended loan. I never use it and while it's a neat old boat and paddles great it's just not something that I could sell around here short of giving it away and I'd just get frustrated if I listed it for $250 and had to deal with people trying to talk me down
I would much prefer to simply give a canoe away than sell one on the open market and deal with dickering over an already more than fair price. To that end I’ve kept a list of where shop canoes have gone:
89 Dagger Caper – Local Boy Scout Explorer troop
Old Town Ruston – To a friend for his young son when my boys outgrew it
91 Mad River Explorer – To a friend who needed a decent canoe
Shenandoah – To another friend who needed a decent canoe
Old Town Pathfinder – To family friends
88 Old Town Discovery 174 – Ditto
87 Mohawk Challenger – To local canoe club as “victim” boat for safety class pinning extraction
Blue Hole Starburst – To a friend who could keep it upright better than me
Dreamboat (actually manufacturer name) – To a local family
Mohawk Probe – Local Boy Scout Explorer troop
89 Mad River Explorer – To family friends
Blue Hole Sunburst - Local Boy Scout Explorer troop
Dagger Reflection 16 – To niece as wedding gift
Shenandoah – To brother-in-law
I know that there are a forgotten few give-aways missing from that list as well as others that I sold for $200 or whatever the cost of new gunwales and deck plates.
I am envious of the canoe society that people must have in places like Ontario and Maine. Giving away canoes to people that can use them is a wonderful tradition. I have bought and sold around 6-8 canoes, a driftboat, and several sailboats. I have made money on all of them by repairing them and paying attention to cosmetics. The one exception was a 16 foot wooden driftboat. I punched some holes in it and it was stored outside and started to show some age.
I used to own horses and mules and traded quite a few of those over the years. I was a crummy horse trader, because of the emotional attachment to all of them. I consistently lost money in making those transactions.
I used to own horses and mules and traded quite a few of those over the years. I was a crummy horse trader, because of the emotional attachment to all of them. I consistently lost money in making those transactions.
G
Guest
Guest
I have bought and sold around 6-8 canoes, a driftboat, and several sailboats. I have made money on all of them by repairing them and paying attention to cosmetics. The one exception was a 16 foot wooden driftboat. I punched some holes in it and it was stored outside and started to show some age.
I used to own horses and mules and traded quite a few of those over the years. I was a crummy horse trader, because of the emotional attachment to all of them. I consistently lost money in making those transactions.
Ppine, I’m still recalling give-aways that didn’t make the list. One I think you would appreciate, a Sawyer Champion given to family friends.
I haven’t sold many boats outright except those that I let go to friends for the cost of my materials. I didn’t make money on the ones I sold to strangers, but I came close on a couple.
We had an Old Town Pathfinder, a blem bought new at the end of a paddle show for 2/3 retail. We paddled it for 10 years and when I let it out for sale a guy bought it who absolutely, positively had to have a Pathfinder and no other boat would do (his father and brothers each had one). I let him name the price and it was close to what we had paid 10 years before. I felt kinda bad about that and threw in some paddles and PFDs.
The same with two odd sit-on-tops that I bought cheap, a Dimension Typhoon and a Bic Yakka folding/inflatable. Same story, the guys who bought each of them absolutely, positively had to have that specific make and model and I threw in some gear to make the deal more palatable to me.
I have done a little horse-trading with canoes. I traded a well used Old Town Camper for a Mohawk Odyssey 14. The Odyssey came with factory installed float bags and kneeling pads and the owner was very proud that it didn’t have a scratch on it. The very first trip on which I paddle it involved a dam release that ended unexpectedly and a misread gauge. By the end of that trip the Odyssey was a battle scarred veteran.
Best trade was a kevlar Sawyer Saber I bought back in the days of newspaper ads. $125.
Even the buy was funny. I called the seller and he told me to meet him later that day at his house. His house was a ramshackle affair on the bay, with missing siding, tarpaper and an outbuilding in the process of falling over. On the waterfront side of his home he had a magnificent T-shaped dock, power boats, sail boats, cabin cruisers, you name it boats. His home was condemable but he had a half million in boats.
The Saber was a useless boat for my purposes at the time. I wasn’t racing then and I traded it to a Texas Water Safari paddler for a pristine kevlar OT Northern Light 15, which likewise proved unsuitable for my style of paddling (I rolled out of it twice when I attempted to glance behind me). I sold it for $500, which was a steal for the buyer and $375 in profit for me, so I did make money on one sale.
G
Guest
Guest
Apparently I dream about canoes. I awoke in the middle of the night last week to the realization that instead of beading Aquaseal and Tenacious taping the edges of the vinyl-to-vinyl paddle pocket outfitting I could simply lap a larger piece of scrap vinyl over the edges and seal that with Vynabond.
While I was Vynabonding those overlapping patches I nipped the fastex buckles off the last of the scrap dry bag hardware and glued the still attached D-rings in place to hold the front of the deck bag when tandem/end of the map case when solo.

With the spray covers as functionally dressed as I can envision it was time to bite the big bullet and outfit the Cronje for solo paddling comfort with additional knee bumpers and another foot brace.
Solo Knee Bumpers and Foot Brace
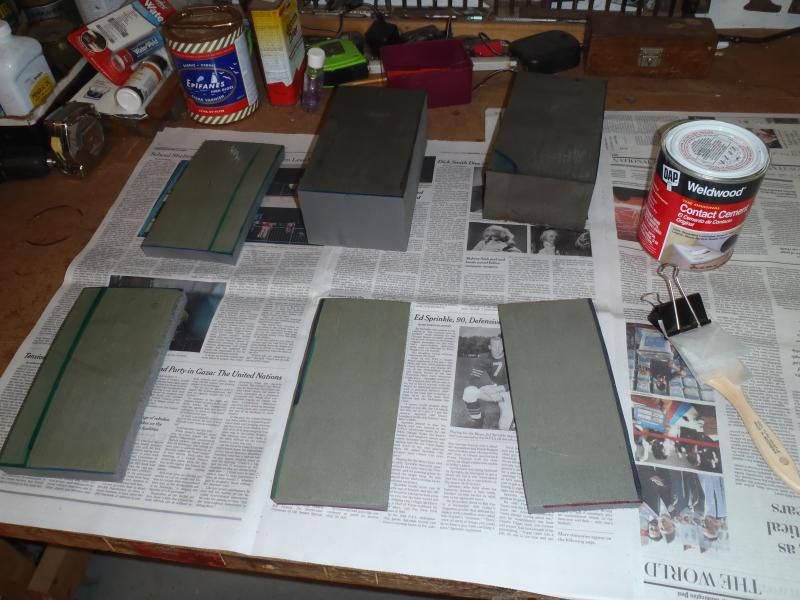
I have a lot more faith in my contact cement/Plumbers Goop process these days and the solo knee bumpers on the Cronje can be significantly smaller than the huge ones I installed on the Penobscot – 8 ½ inches long by 4 ½ inches deep, dictated mostly by the size of 3 inch thick minicel scraps I had available.
The usually steps again; alcohol wipe, mark the hull locations, multiple coats of contact cement, innes clamped to the boat to bring the surface flush with the inwale edge, outies clamped together.
“Outies” plural, I wanted to bring the minicel bumpers 4 inches out from the inwale edge and did not have 4” thick minicel.
More preordained shop supply stuff. Years ago I decided to install Wenonah adjustable foot braces in several family canoes, and a couple of friends wanted to do likewise. We went in together and bought 8 or 10 of them at some discount pricing, and I still have one left.
Solo foot brace
Temporary platform, measure and mark four pop rivet holes, second foot brace done. It’s like it was meant to be.
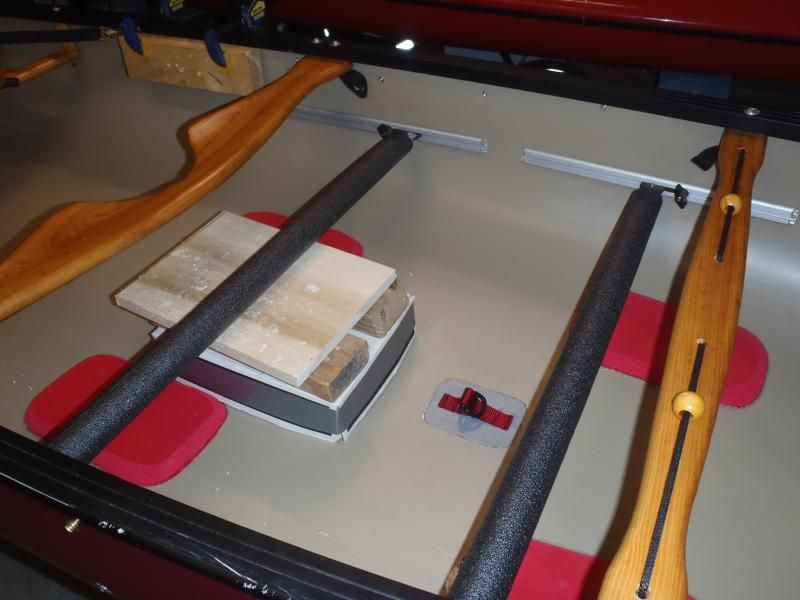
Another test sit in the boat before contact cementing the two solo knee bumper pieces together, using an odd and very handy piece of “shop” equipment – a thick foam pad. It is my sleeping pad in the back of the travelling truck, but it comes in handy on the shop floor when I want to sit in a canoe to find and mark outfitting locations.
The test sit was revealing. Even with 3 ¾ inch thick knee bumpers off either gunwale the knee spread is still a little wide for my endomorph inseam. Those knee bumpers leave a 25 inch spread and I’d prefer something more like 23/24 inches in between to be able to lock my knees against the padded edges of the hull.
I’m out of ¾” minicel, but I have one more Dollar store gardening pad. It’ll have to do.

Ok, that may be the strangest Cronje ever outfitted, and the two opposing foot braces look bizarre.
I really like it as a bow backwards solo with just the stern cover in place.
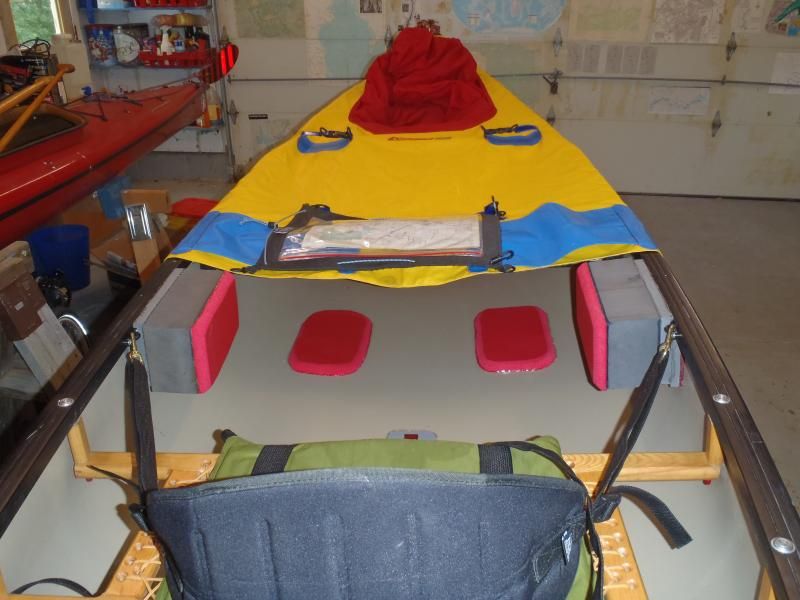
A few test sits in the fully spray covered as tandem Cronje reminds me that I really do not like the restriction of a full cover with spray skirt tunnels. The bow cover is much more my style with the oval Velcro’ed spray skirt removed for an open and easy access cockpit.
But I sure as hell don’t paddle bow. And if I paddled stern tandem (I don’t) I’d cut that tunnel out to have a similar open cockpit.
Now that I know I’m keeping it I feel better about adding Duckhead stickers and the shop Gogetch.


While I was Vynabonding those overlapping patches I nipped the fastex buckles off the last of the scrap dry bag hardware and glued the still attached D-rings in place to hold the front of the deck bag when tandem/end of the map case when solo.

With the spray covers as functionally dressed as I can envision it was time to bite the big bullet and outfit the Cronje for solo paddling comfort with additional knee bumpers and another foot brace.
Solo Knee Bumpers and Foot Brace
I have a lot more faith in my contact cement/Plumbers Goop process these days and the solo knee bumpers on the Cronje can be significantly smaller than the huge ones I installed on the Penobscot – 8 ½ inches long by 4 ½ inches deep, dictated mostly by the size of 3 inch thick minicel scraps I had available.

The usually steps again; alcohol wipe, mark the hull locations, multiple coats of contact cement, innes clamped to the boat to bring the surface flush with the inwale edge, outies clamped together.
“Outies” plural, I wanted to bring the minicel bumpers 4 inches out from the inwale edge and did not have 4” thick minicel.

More preordained shop supply stuff. Years ago I decided to install Wenonah adjustable foot braces in several family canoes, and a couple of friends wanted to do likewise. We went in together and bought 8 or 10 of them at some discount pricing, and I still have one left.
Solo foot brace
Temporary platform, measure and mark four pop rivet holes, second foot brace done. It’s like it was meant to be.

Another test sit in the boat before contact cementing the two solo knee bumper pieces together, using an odd and very handy piece of “shop” equipment – a thick foam pad. It is my sleeping pad in the back of the travelling truck, but it comes in handy on the shop floor when I want to sit in a canoe to find and mark outfitting locations.
The test sit was revealing. Even with 3 ¾ inch thick knee bumpers off either gunwale the knee spread is still a little wide for my endomorph inseam. Those knee bumpers leave a 25 inch spread and I’d prefer something more like 23/24 inches in between to be able to lock my knees against the padded edges of the hull.
I’m out of ¾” minicel, but I have one more Dollar store gardening pad. It’ll have to do.

Ok, that may be the strangest Cronje ever outfitted, and the two opposing foot braces look bizarre.

I really like it as a bow backwards solo with just the stern cover in place.

A few test sits in the fully spray covered as tandem Cronje reminds me that I really do not like the restriction of a full cover with spray skirt tunnels. The bow cover is much more my style with the oval Velcro’ed spray skirt removed for an open and easy access cockpit.
But I sure as hell don’t paddle bow. And if I paddled stern tandem (I don’t) I’d cut that tunnel out to have a similar open cockpit.
Now that I know I’m keeping it I feel better about adding Duckhead stickers and the shop Gogetch.
G
Guest
Guest
I am envious of the canoe society that people must have in places like Ontario and Maine. Giving away canoes to people that can use them is a wonderful tradition. I have bought and sold around 6-8 canoes, a driftboat, and several sailboats. I have made money on all of them by repairing them and paying attention to cosmetics. The one exception was a 16 foot wooden driftboat. I punched some holes in it and it was stored outside and started to show some age.
I used to own horses and mules and traded quite a few of those over the years. I was a crummy horse trader, because of the emotional attachment to all of them. I consistently lost money in making those transactions.
I know what you mean. Even with several advanced degrees and waist-length blonde hair, I can't get more than blue book for my daughter.
G
Guest
Guest
I know what you mean. Even with several advanced degrees and waist-length blonde hair, I can't get more than blue book for my daughter.
Maybe offer her for trade instead.
We had an Old Town Pathfinder, and when I let it out for sale a guy bought it who absolutely, positively had to have a Pathfinder and no other boat would do (his father and brothers each had one). I let him name the price and it was close to what we had paid 10 years before
The same with two odd sit-on-tops that I bought cheap, Same story, the guys who bought each of them absolutely, positively had to have that specific make and model.
How to sell a boat without listing a price
Thinking about the sale of those three boats I remembered that each had something in common – I had listed them on Craigslist not as “For sale”, but as “For Trade”, mentioning that I would entertain trades for specific types of boats, even if in need of repair.
All three eventual buyers contacted me asking if I would sell the boats instead of trade. All three were interested in that specific boat and each named their own price. Their offers were more than fair and there was no dickering. They each got the boat they wanted and I didn’t have to list a price and then bargain over counter offers.
It wasn’t a sales ruse on my part, I really was looking for trades, but it nicely eliminated the dickering business.
G
Guest
Guest
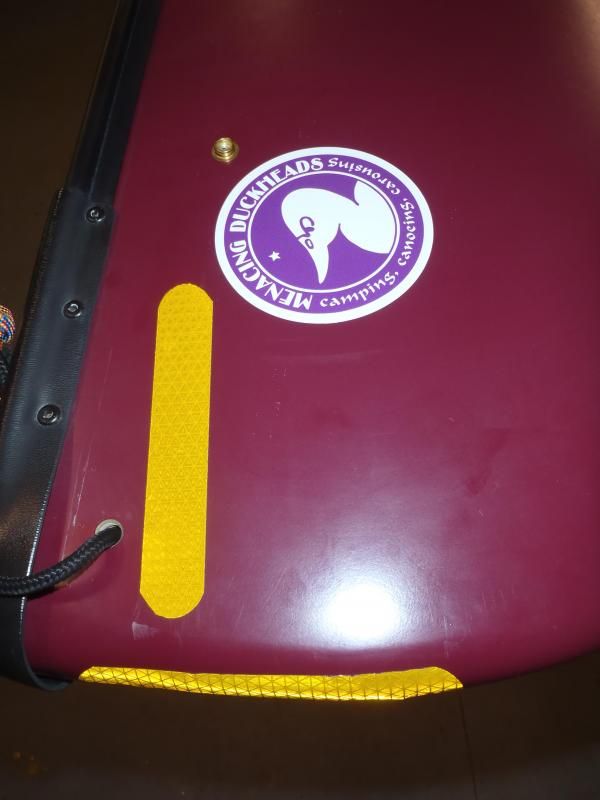
Now that I know I’m keeping the Cronje it needs the hull decorations that go on every keeper shop canoe - a Duckhead sticker and the Shop Gogetch.
I know, I peel off all of the manufacturer’s logos and then add my own crap. But I have only a few Duckhead stickers left and this canoe deserves one for being so well built and cooperative.
And it needs the Shop Gogetch that has gone on every hull that has seen serious shop time.
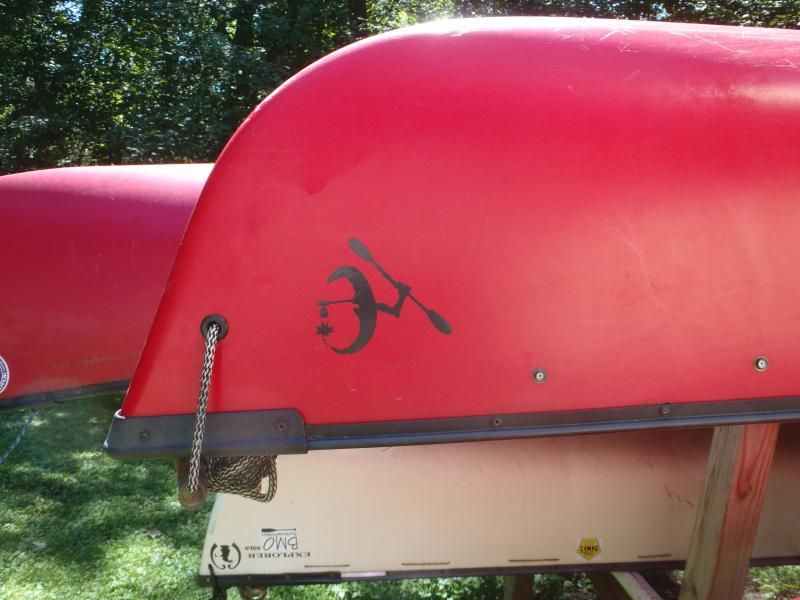

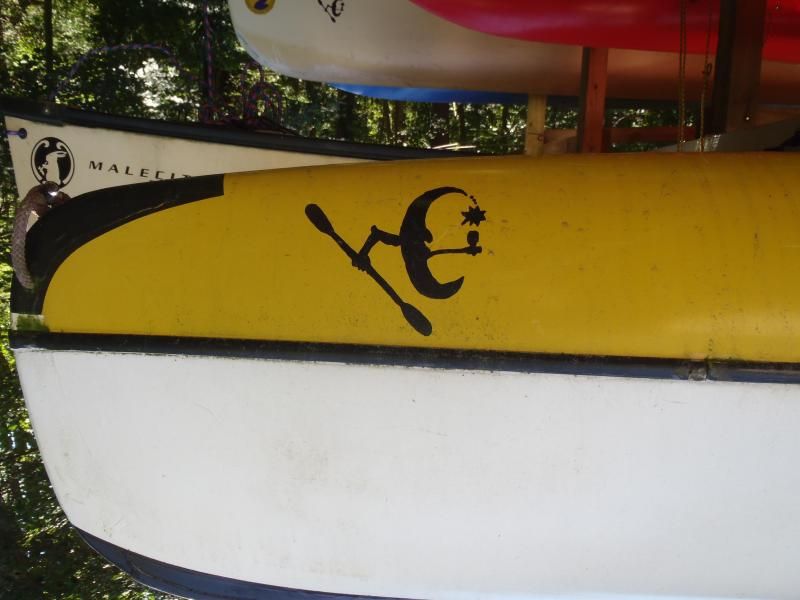
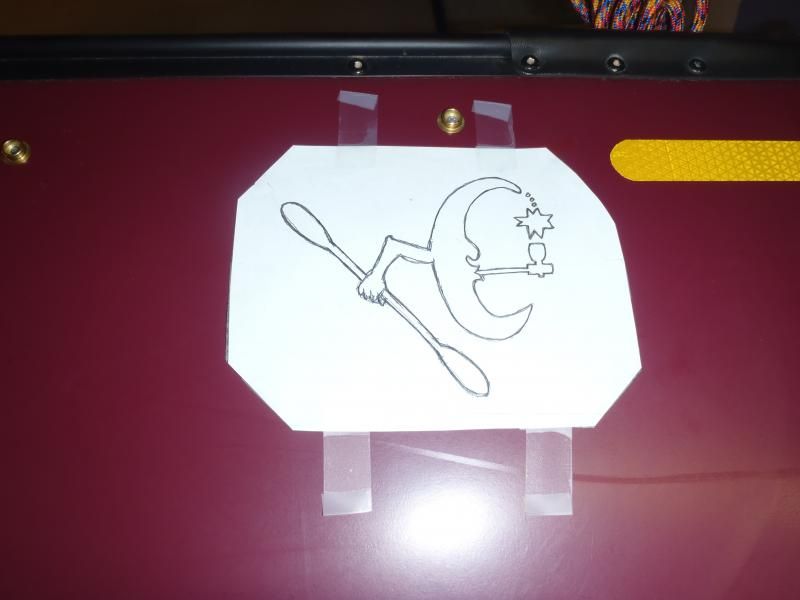
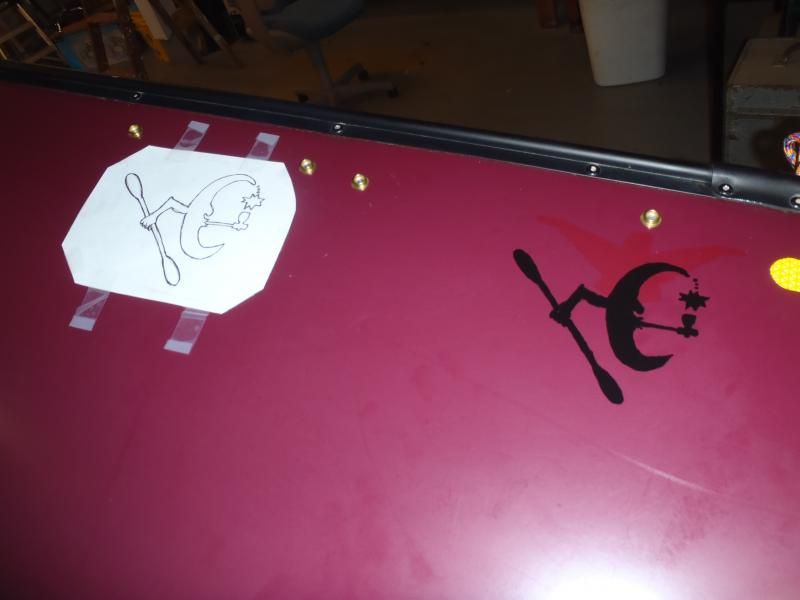
The Gogetch application is radically old school – a paper copy of the Shop Gogetch, carbon paper (remember carbon paper?) and a tracing transferred to the hull. Then some shaky handed fill-in-the-blanks with black enamel paint.
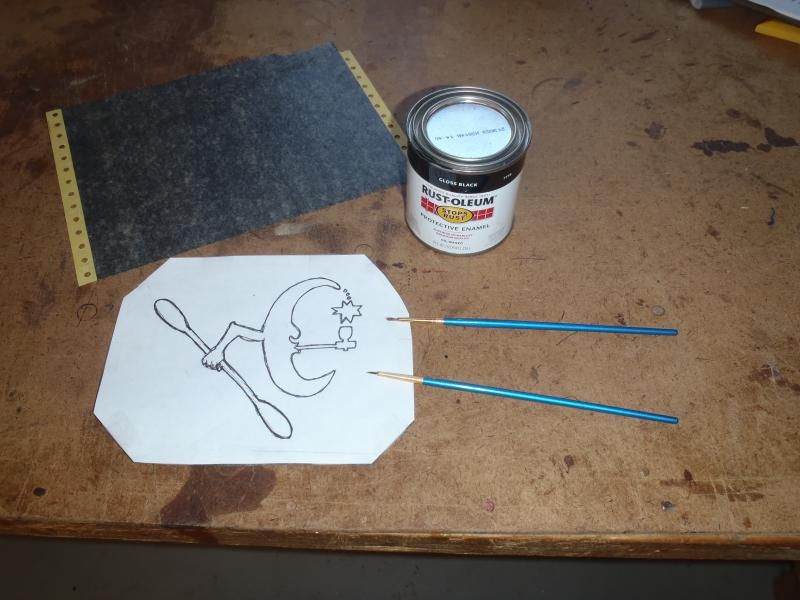
I am a terrible artist with brush and paint and rely on my more artistic friends for more decorative touches.

But the sloppy hand painted Gogetch are a nod to the marks of the Passamaquoddy builders from whom I lifted elements of that Gogetch.
Parts of that Gogetch are an homage to the marks of Old Peter Polchies, Joe Ellis, Solomon Paul and Noel Polchies, with the stylized design brought together into the Shop Gogetch courtesy of an artist friend.
(Scroll down a touch on the link below for page 85 of The Bark Canoes and Skin Boats of North America and various Passamaquoddy markers marks)
http://books.google.com/books?id=1a...onepage&q=Passamaquoddy canoe gogetch&f=false
Scroll down far enough and you will see the original Pipe Smoking Rabbit in the Ferns, the mark of Tomah Joseph. Maybe there really is nothing new in the canoe world.
That’s the last of the Cronje outfitting blather, at least until I get it out on a real trip somewhere and see if anything needs to be tweaked.
Apologies for an over long detailing of simple outfitting, but writing progress notes and taking photos helps to slow my roll, and I know I’ve made most of my mistakes simply by working too fast or progressing to quickly to the next step, before taking time to contemplate the needed prep work or best order of subsequent repair or outfitting sequences.
I know, I peel off all of the manufacturer’s logos and then add my own crap. But I have only a few Duckhead stickers left and this canoe deserves one for being so well built and cooperative.

And it needs the Shop Gogetch that has gone on every hull that has seen serious shop time.


The Gogetch application is radically old school – a paper copy of the Shop Gogetch, carbon paper (remember carbon paper?) and a tracing transferred to the hull. Then some shaky handed fill-in-the-blanks with black enamel paint.


I am a terrible artist with brush and paint and rely on my more artistic friends for more decorative touches.


But the sloppy hand painted Gogetch are a nod to the marks of the Passamaquoddy builders from whom I lifted elements of that Gogetch.
Parts of that Gogetch are an homage to the marks of Old Peter Polchies, Joe Ellis, Solomon Paul and Noel Polchies, with the stylized design brought together into the Shop Gogetch courtesy of an artist friend.
(Scroll down a touch on the link below for page 85 of The Bark Canoes and Skin Boats of North America and various Passamaquoddy markers marks)
http://books.google.com/books?id=1a...onepage&q=Passamaquoddy canoe gogetch&f=false
Scroll down far enough and you will see the original Pipe Smoking Rabbit in the Ferns, the mark of Tomah Joseph. Maybe there really is nothing new in the canoe world.
That’s the last of the Cronje outfitting blather, at least until I get it out on a real trip somewhere and see if anything needs to be tweaked.
Apologies for an over long detailing of simple outfitting, but writing progress notes and taking photos helps to slow my roll, and I know I’ve made most of my mistakes simply by working too fast or progressing to quickly to the next step, before taking time to contemplate the needed prep work or best order of subsequent repair or outfitting sequences.
Thanks for sharing, Mike. It was fun to follow along. I've never done any real modifications other than a foot brace here and there so it was neat to see what could be done with so little. Hope you have a fun time with it.
Alan
Alan
Similar threads
- Replies
- 14
- Views
- 1K
- Replies
- 0
- Views
- 160
- Replies
- 3
- Views
- 330