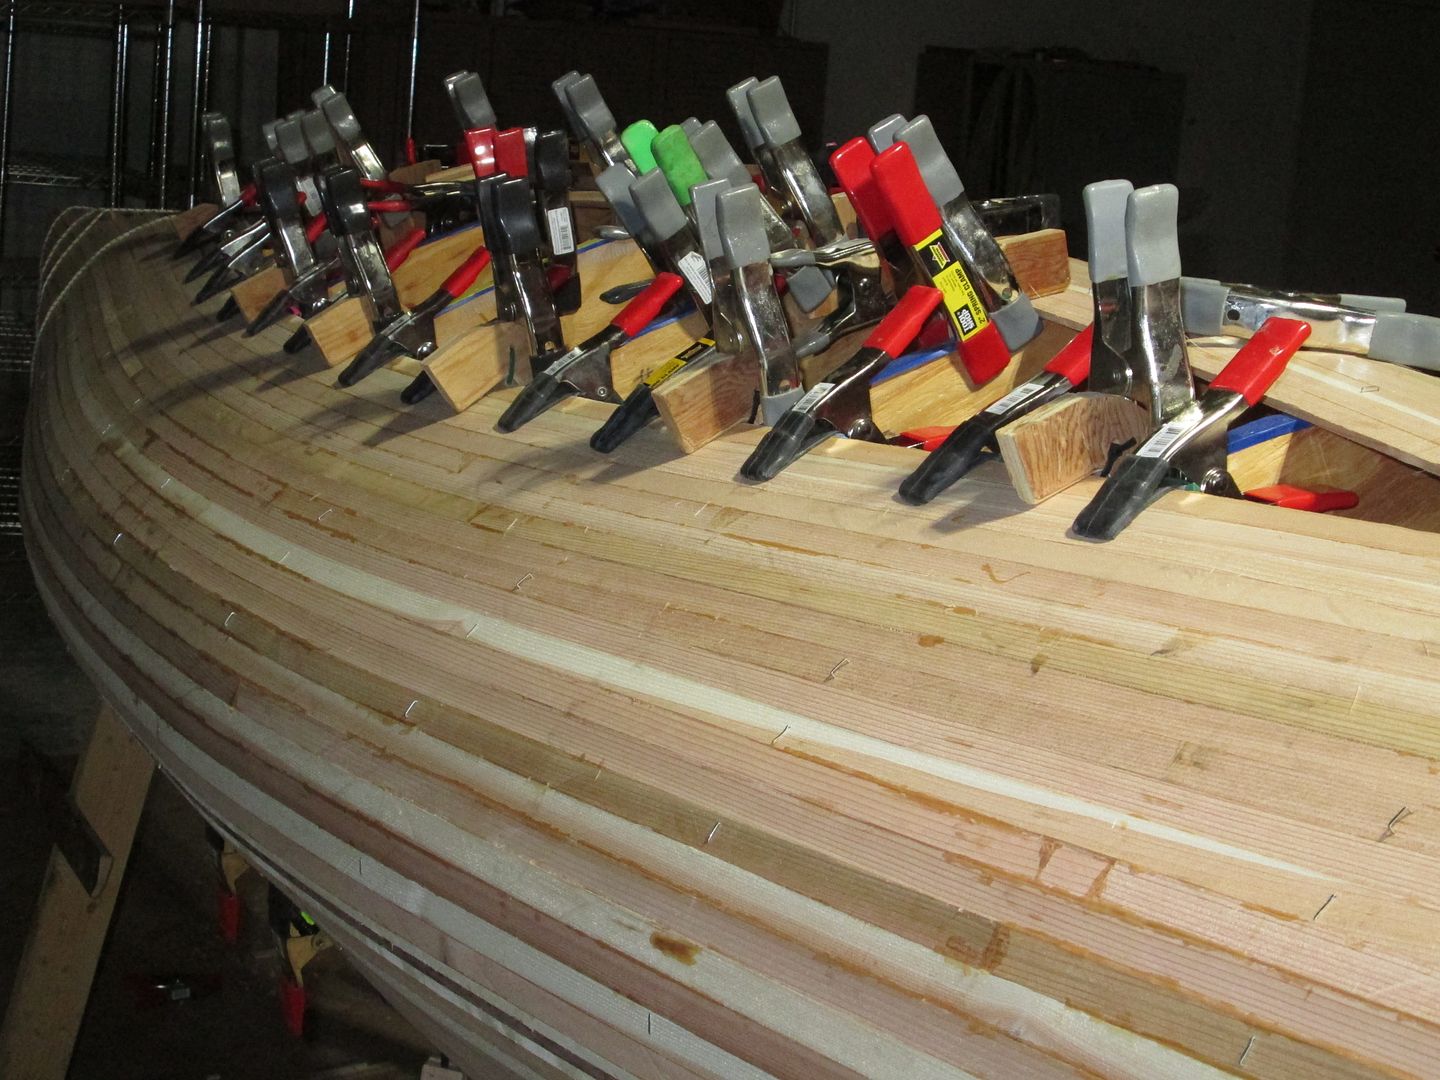
I made about 24 Jimmy clamps. I used staples also. I wanted everything inline and snugged together, what ever it took. I even used sheet rock screws in some places.
-
Happy World Ocean Day!🌊🦞🐬🪸
You are using an out of date browser. It may not display this or other websites correctly.
You should upgrade or use an alternative browser.
You should upgrade or use an alternative browser.
First stripper build: Prospector-16 Help & comments appreciated
- Thread starter Kliff
- Start date
Nice ladder extension tableWell, I took a week off from my canoe build to go fishing. Fishing was so good, I made it two weeks. I'm back at it, and got the cove n bead cut, and the first strip on.
One philosophy I've adopted is, I'd rather do something and not need it, than not do it, and wish I had later. With that in mind, I took great care to keep the strips from each plank together, and in order. I book matched the strips from each plank prior to cutting cove n bead. I think this would have been great, if I had strips long enough to plank the canoe without splices. I do not. Don't see how I can use the neatly organized, matched strips until I get to where I no longer need splices, which will be close to the football area.
The ladder was used again as an infeed and outfeed table. After cutting all of the bead, I simply rotated the router table 180 degrees, and ran the strips the other direction for the cove. All in all, it worked great, and these are by far the best cedar strips I have ever cut.
Looking forward to getting more strips done tomorrow.
View attachment 131352View attachment 131353View attachment 131354
I'm up to 50 "Jimmy Clamps" now. I have another 24 spring clamps on order.
Question on "keep the strips as tight to the forms as you can"....At what point do you consider it a problem? Mine are tight to the forms, to the point where I can't see light between strips and form, except for two stations (4 & 5). For a 3 strip span, they bowed away from the form a strong 1/16". I'm assuming this won't be a problem, just wondering when it is.
I'm up to 10 strips now. Was using TiteBond 2, as memory told me that had the longest working time. So much for memory, read the bottle. I also have a bunch of different wood glues on hand, so I switched to TB 3, which is giving me plenty of working time. Don't know if it's the glue, or the near 100% humidity, but it's a lot of wait time between strips.
Little gaps tend to grow, more on a stapleless build, if you let them !
Yeah ! Staples will save a lot of money, in clamps, a lot of time, and your strips will stay tighter to the forms !
As for pretty ? Well Beauty is in the eye of the beholder.
I learned from builders in Minnesota, and they all used staples ! They didn't waste time, going Stapleless.
I just finished stripping up a hull, using mostly Stapleless method, my second. I did throw in a few staples, to ensure the strips stayed true to the forms.
It's taken me three weeks, with clamps, that I could have done in three days, with staples. I'm not complaining, as it is all fun !
I live short of two miles from the Wood shop, where I'm building the canoe. For the most part, I rode my bike. Yes, I need the exercise !
Every builder must make his choices, as to where, to draw the line, as far as tolerances !
Jim
Kliff,
If your strips are beaded and cover, they should stay nice and true, giving you a fair hull. 1/16” may be a form issue, I certainly wouldn’t sweat it, you are gonna sand it, right?
It seems you’re enjoying the process, I always get a thrill out of seeing the hull shape develop before my eyes!
How about some pics?
Not much time for canoe the last couple days. Had to rebuild a couple windows, before the boss hired someone else to replace them, which I didn't want just anyone to do, in a log home.
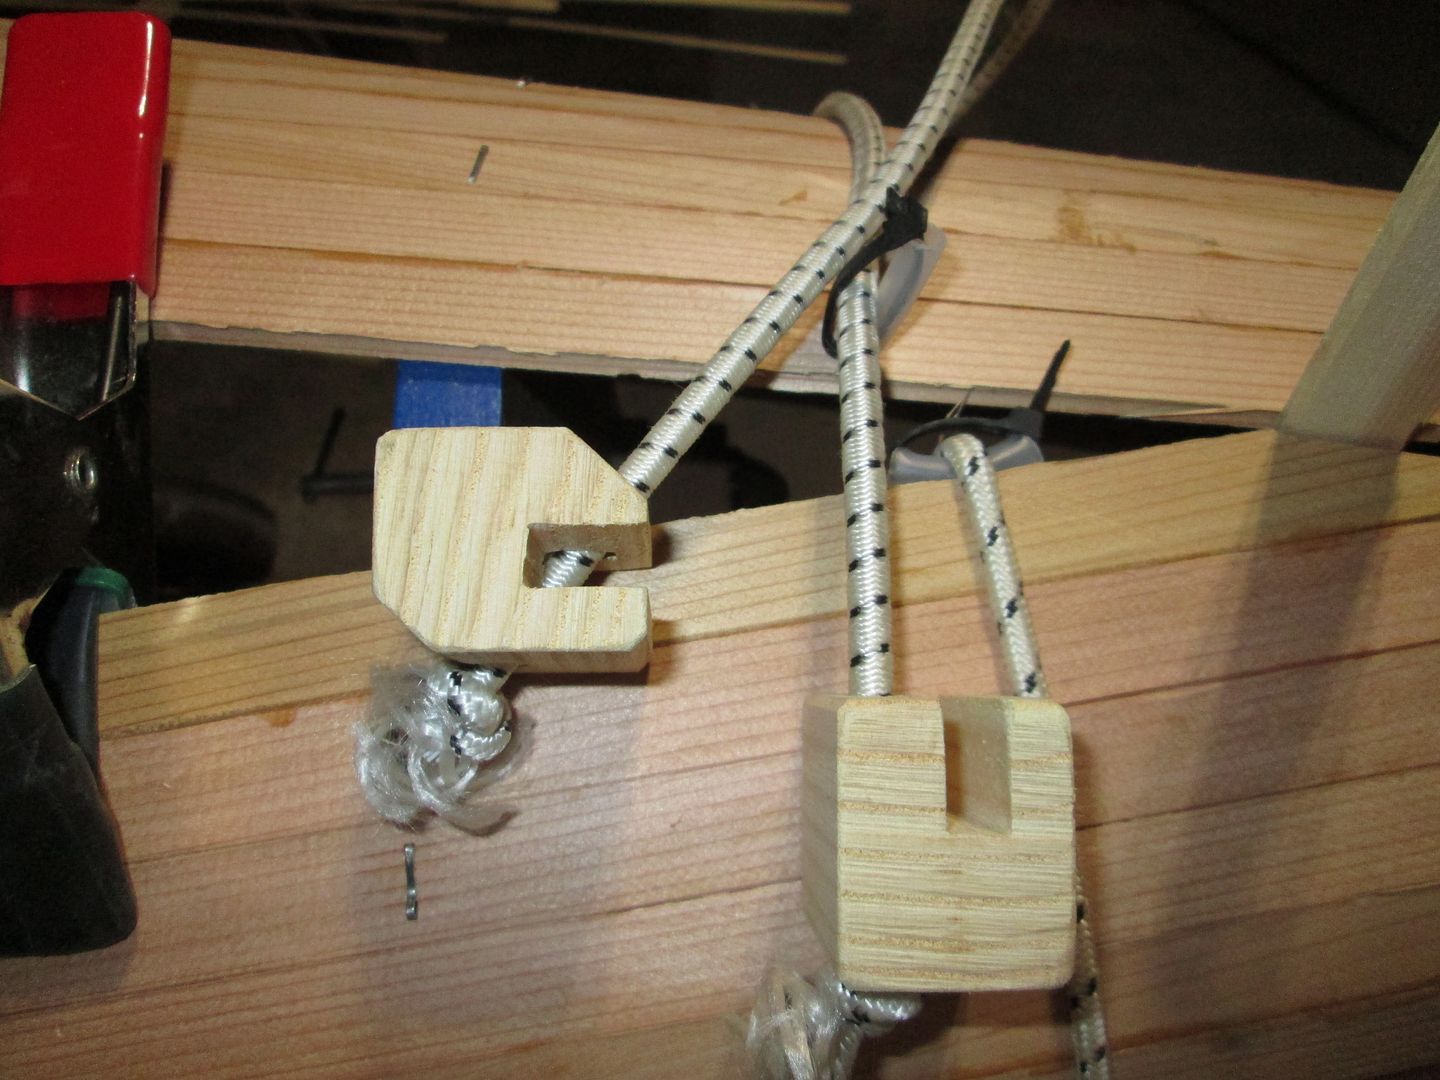
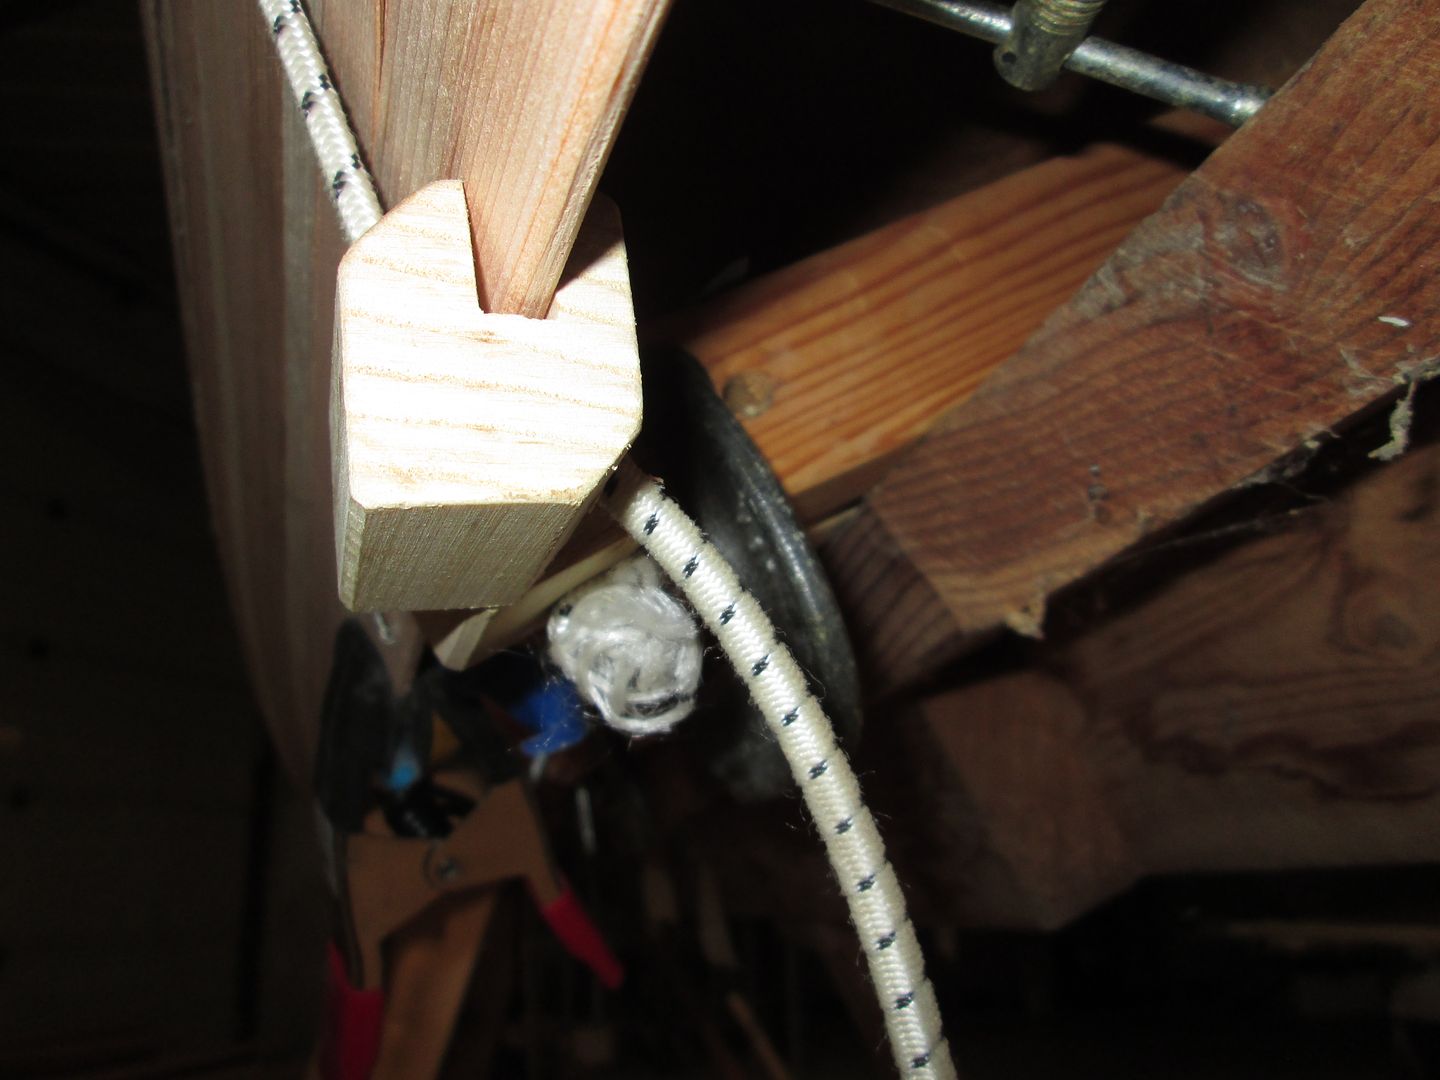
Jim: This is the second pic I've seen of the Virginia Jim Dodd bungees. Can you post a pic or two that shows how they work, or explain them? I'm intrigued. You make me feel much better on my slow progress. Three weeks for a guy that knows what he's doing....
Here's the belt system I came up with, using strips of rubber roofing. The "belts" can lay on the form, or to the side of it to provide a little more inward pressure. I have all the Jimmy clamps removed here, since the glue is dry. There's a bunch of prepunched holes to adjust tension on the fly.
Decided to get a little bold, and try gluing two strips at the same time. Maybe that's common, but I've been doing one at a time, until now. I'll probably be back to one at a time when I get to where the strips are twisted significantly, but so far they lay in pretty easily.


Your rubber strips will work fine ! One of those things you play with, and find what works !
The cool thing about" Virginia Jim's" bungees, is they are so versatile, and easy to use !
The block with the slot cut parallel to the cord, is fastened on the Inside of the shearline. The cord is then stretched up over the strips. I use the zip tied plastic, to protect the cove. The cord is stretch over the outside of the hull, back down to the shearline. Beings the slot is cut at an angle, inside the block. It serves as a wedge and will keep the bungee cord tight. You can put a surprising amount of pressue, and the block will hold the bungee tight ! They are so handy !
Last edited:
Looks like I'll be making some more clamps....
My brother just stopped over, returning some tools he borrowed. Checked on my canoe build, and made the comment: "This is the coolest thing anyone in our family has ever made.....including Grandpa Jackson". Grandpa Jackson was a carpenter, woodworker, and woodworking teacher his entire adult life. Made countless heirloom quality pieces of furniture. I've built 30+ houses, made numerous pieces of furniture. Can't express what that simple little comment meant to me. Sure hope this thing floats when I'm done, and paddles half as nice as I hope it will.
Now I have to hurry up, and take my time.
Now I have to hurry up, and take my time.
Yeah, stripperguy. The strips are bead & cove. Even though I got the B&C real close to centered (within .010") I'm also keeping the strips all oriented so that what was up on the router table, is the outside of the hull. So far atleast, they're fitting together real nice. Sand it? Hadn't planned on that. Just kidding, yeah, I'll be sanding it. After I scrape it with a cabinet scraper. I've got a ton of extra scraper blades, so I'll grind an assortment to match different curves for the inside, and make several different curved pads to go on the orbital sanders. I'll start with 3 different curves, on 3 sanders and go from there.
I'm still a ways off from sanding. Hoping to put the house & yard chores aside for most of the day tomorrow, and get more progress than I got today. Did such a good job rebuilding 3 windows yesterday, wife found 3 more that "I could do"...Lucky me.
I'm still a ways off from sanding. Hoping to put the house & yard chores aside for most of the day tomorrow, and get more progress than I got today. Did such a good job rebuilding 3 windows yesterday, wife found 3 more that "I could do"...Lucky me.
I also applied strips with the milling reference surface side to the forms. Any milling error/variation was on the exterior where it was easier to deal with when fairing.
You're doing great and it's fun to follow your progress. Thanks for taking the time to share your build with us.
Rick
You're doing great and it's fun to follow your progress. Thanks for taking the time to share your build with us.
Rick
I used to joke that the key to successful home ownership was to have as many unfinished projects as possible.
If you accidentally finish one, then start two more!!
Anyway, nice progress on the hull, are you planning to paddle it this season?
You surely have plenty of experience with woodworking and such, have you much experience with laminating?
The thought of glassing the hull is what stops many would be first time builders from ever starting.
Just be sure to use a slow enough hardener, and it really helps to have a set of clean hands nearby, even if it’s just to take photos.
Many years ago in a fortune cookie I read "House finished, man dead" By that, I should live quite a while yet!
Started having the hull spring off the forms when I removed the clamps and belts. Thanks, Jim, for clarifying that stapleless doesn't necessarily mean no staples whatsoever. Added a few, sparingly as needed to draw back to the forms. Using an electric staple gun, didn't want to bury the staples in the hull, so I stapled over some short pieces of zip ties. Worked well, and will help keep staples visible when it's time to remove them, and hopefully make pulling them without marring the hull easier.
My goal is to have it finished for wild rice season, which is end of September, early October. Figured how cool would it be to harvest rice for the first time, in the first stripper I ever built. Not going to rush it. It gets done, when it gets done. I have a couple other canoes, including a wood & canvas that's older than I am. Useable, but could use a restoration. Perhaps after I finish this one.
I've done quite a bit of glass work, repairing boats, windsurfer boards, trailer fenders, etc. Never laminated a whole canoe before. I had intended this would be a project for my wife and I. She's also a Tech Ed. teacher, and fairly handy. So far, the extent of her involvement is shooting a couple videos.
That gap prior to stapling looks worse than it was. At the worst spot, it was about 1/8". Hopefully my "Prospector" won't end up a "Kliffy Special". Paddling in circles.
Back to the waiting game. Now that I'm getting faster at stripping, and am confident in a good clamp procedure, I'm going to switch back to TB2, with a shorter work time. Less waiting between strips. And the two at a time was short lived; I'm getting into a bit of a twist now.

A dot or two of hot melt glue could secure a wood block to the inside of the hull at a station form where the hull is springing. The hull can be pushed back tight to the form and the block screwed to the station form to secure it. This is a technique I've read about, but not personally tried. Might be worth a try. I've had good luck with hot melt glue for temporary attachment in different applications.
Similar threads
- Replies
- 32
- Views
- 3K
- Replies
- 164
- Views
- 11K
- Replies
- 7
- Views
- 1K