Spent the last few hours going through Brian's (Cruiser) Solo Tripper Build thread again. Realized just how much of that thread I forgot to take advantage of in my build. That's a great thread to read, and re-read throughout the process.
-
Happy National Sunglasses Day! ☀️🕶️😎
You are using an out of date browser. It may not display this or other websites correctly.
You should upgrade or use an alternative browser.
You should upgrade or use an alternative browser.
First stripper build: Prospector-16 Help & comments appreciated
- Thread starter Kliff
- Start date
Getting back to the question of whether to put and extra layer, Over or Under, I decided to do a test.
Two layers, of 6 oz E-glass, overlapping each other.
Anytime you are in doubt about something ? Set up a test !
I wetted both layers, with some Table top epoxy, that a Club member had left over from a small project he was doing.
The test pieces were small, 5" x 5" in rough size. Measuring any difficulty in actually wetting, would have required much bigger pieces.
Results ? I could definitely see where the two layers overlapped. I could slightly feel the extra layer thickness.
Now if I would have added Fill coats ? maybe the ridge between the two layers would have disappeared ? If sanded ? Would I have gotten into the top layers weave ? That is speculative.
If in doubt ? Do this test yourself !
To me ? I will always add the extra layer on top. And feather the edge.
Even on my older hulls ? I can't see where the extra layer is.
At this point I have proven my point to my satisfaction !
Sorry for the thread interruption Kliff !
Jim
Jim: Your posts are anything but an interruption. Very informative.
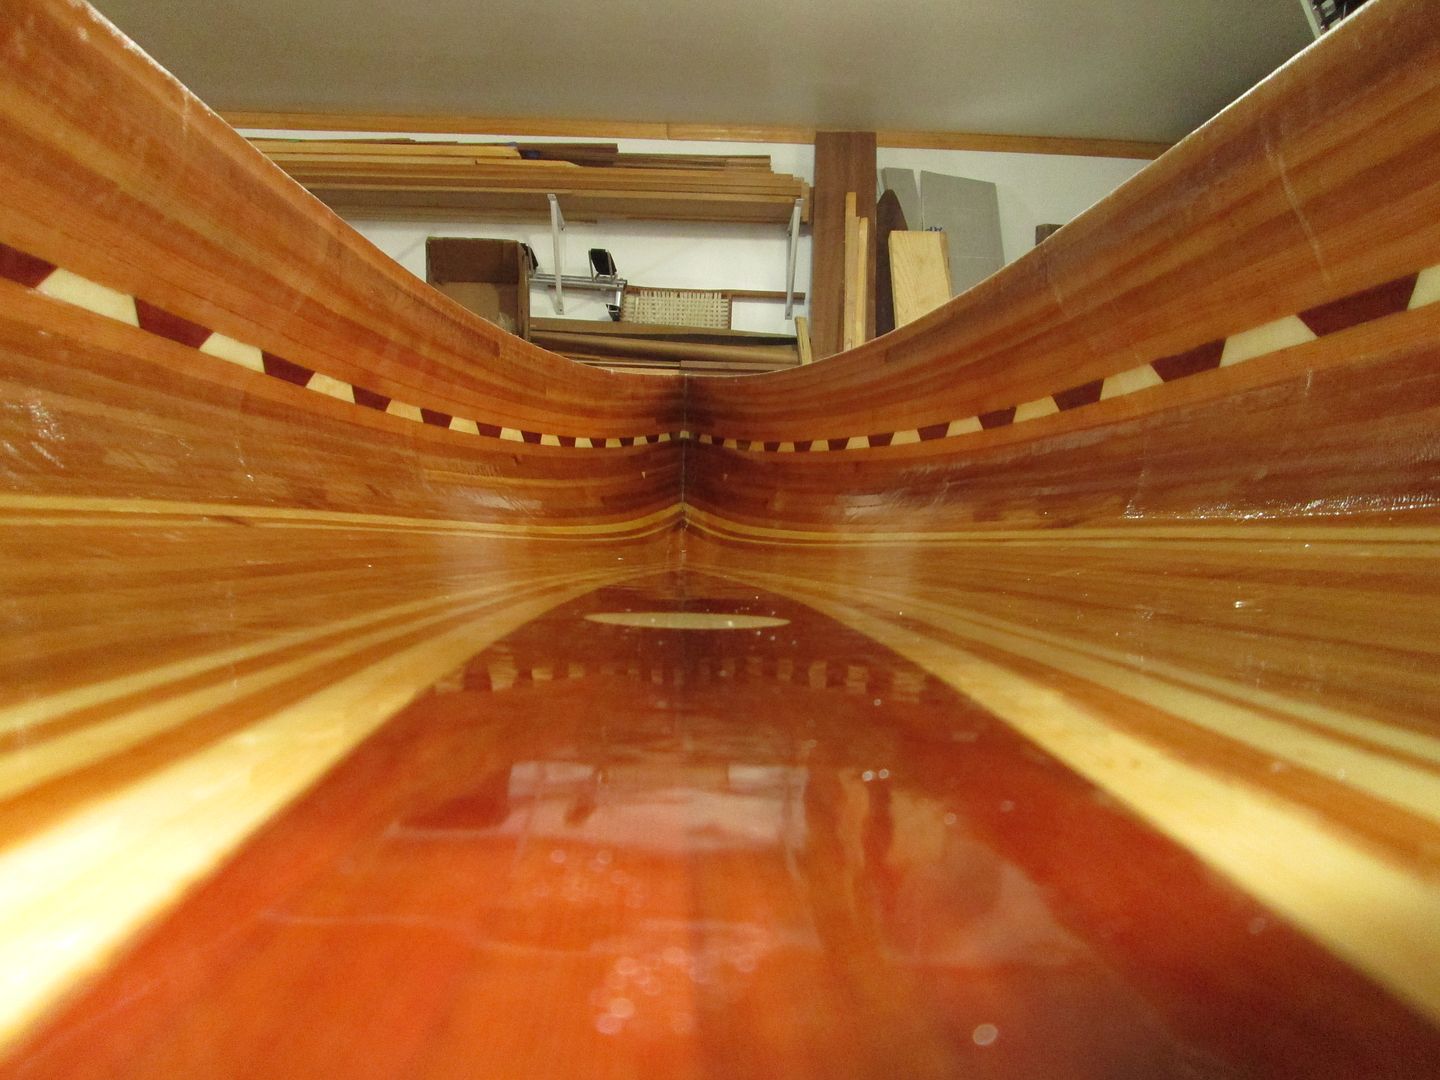
Finally had time to pull the canoe off the forms. Did a final scraping on the ridges for second layer and stem strip transitions. I believe it will sand out nicely, and be good to varnish. Had one large bug commit suicide on my final coat, might have to touch up the epoxy there, but I can do that while working on the gunwhales.


I sure wish someone had warned me about Titebond being so difficult to scrape. Oh, wait. That was in Cruiser's Solo build thread. A very thorough explanation of properties and charactaristics to look for. Can't believe I ignored that. Before my next build, I'm going to take Jim's advice, and TEST. I have a half dozen or so different wood glues, for different applications. I'm going to do some simple strip glue-ups, intentionally leaving generous squeeze out. Do my best to monitor skin time, set time, and evaluate clean-up. I went with Titebond original, 2, 3 for superior strength and water resistance. Both factors totally unnecessary.

For scraping, I'm using a glue scraper that can hold blades I'm making. I have a BUNCH of cabiinet scraper blades that are some type of tool steel. Some are O1, others are ?????. I cut the scraper blades into 3/4" wide strips, and I'm shaping & sharpening using a pedestal belt grinder I use for sharpening, with 600 grit belt. Goes quick. I still need to sharpen every 15 minutes or so. That TB is hard on the blades. The blade shown I ground two slightly different curves on each side of the blade, and I'm only using half the blade at a time, to just remove the high spots, and glue. I did notice the Titebond gets a bit easier to scrape later in the day, as the temp got into the mid 80's, and high humidity. After I get it "rough clean" I'll shape a couple new blades to match the curvature in different spots, and to a final scrape before sanding.


If I can get the expected work time in the evenings this week, I'm hoping to be glassing the inside next weekend. And if you're wondering why there seems to be so much shaving from the two little accent strips, well, that's a bit of an oops. I cut those first, on the tablesaw, when I was planning on 1/4" strip thickness. When I set up the circular saw, I went with 7/32. Scraping those is a breeze, compared to the glue.
I've got a couple quesitons about glassing the inside stems, but I'll get back to that later.
Finally had time to pull the canoe off the forms. Did a final scraping on the ridges for second layer and stem strip transitions. I believe it will sand out nicely, and be good to varnish. Had one large bug commit suicide on my final coat, might have to touch up the epoxy there, but I can do that while working on the gunwhales.
I sure wish someone had warned me about Titebond being so difficult to scrape. Oh, wait. That was in Cruiser's Solo build thread. A very thorough explanation of properties and charactaristics to look for. Can't believe I ignored that. Before my next build, I'm going to take Jim's advice, and TEST. I have a half dozen or so different wood glues, for different applications. I'm going to do some simple strip glue-ups, intentionally leaving generous squeeze out. Do my best to monitor skin time, set time, and evaluate clean-up. I went with Titebond original, 2, 3 for superior strength and water resistance. Both factors totally unnecessary.
For scraping, I'm using a glue scraper that can hold blades I'm making. I have a BUNCH of cabiinet scraper blades that are some type of tool steel. Some are O1, others are ?????. I cut the scraper blades into 3/4" wide strips, and I'm shaping & sharpening using a pedestal belt grinder I use for sharpening, with 600 grit belt. Goes quick. I still need to sharpen every 15 minutes or so. That TB is hard on the blades. The blade shown I ground two slightly different curves on each side of the blade, and I'm only using half the blade at a time, to just remove the high spots, and glue. I did notice the Titebond gets a bit easier to scrape later in the day, as the temp got into the mid 80's, and high humidity. After I get it "rough clean" I'll shape a couple new blades to match the curvature in different spots, and to a final scrape before sanding.
If I can get the expected work time in the evenings this week, I'm hoping to be glassing the inside next weekend. And if you're wondering why there seems to be so much shaving from the two little accent strips, well, that's a bit of an oops. I cut those first, on the tablesaw, when I was planning on 1/4" strip thickness. When I set up the circular saw, I went with 7/32. Scraping those is a breeze, compared to the glue.
I've got a couple quesitons about glassing the inside stems, but I'll get back to that later.
Forgot to mention. All the dark spots around the scraper pictured are sweat drops. I'm saving time by raising the grain while I scrape.
You're doing awesome, this is were you need to channel your inner patience. I don't think I have ever heard anyone print or say they enjoyed the inner finishing part. However, as the driver it's only that part you ever see, so take the time to do a good job.
I find that sometimes when I am paddling, I look at the inner hull and just sort of grin ... knowing you built and scraped and sanded and glassed and varnished every square inch of what you are looking at, is a very powerful moment. You are in the home stretch now, the "giggling to yourself" starts after the inner glass goes down, be careful not to let anyone see that part (lol).
I find that sometimes when I am paddling, I look at the inner hull and just sort of grin ... knowing you built and scraped and sanded and glassed and varnished every square inch of what you are looking at, is a very powerful moment. You are in the home stretch now, the "giggling to yourself" starts after the inner glass goes down, be careful not to let anyone see that part (lol).
Are you planning to build any sort of end chamber flotation?
Bulkheads and a deck are my favorites for many reasons…flotation, strength, convenient foot step for beaver dams, and to hide a multitude of sins.
Some guys leave their stems open and on display.
Also, if leaving the stems open, some guys glass all but the last foot or so, and piece in the last bit after the full wet out. This makes for easier stem glassing.
As cruiser alluded to, it can be quite a head trip using the boat that you built yourself. It’s addictive for sure.
Nice workmanship along the way.
Did you weigh it yet?
This is when you realize the importance of minimal glue application !
Once I realized that epoxy would seep into any voids, left from not enough glue ! I started using less wood glue !
We have all made some sort of scrapers !
How nice it would be to find a curved Carbide scraper of at least 3" span ! Yours looks pretty close.
Saddles look great !
Hull looks very natural next to your log home !
Last edited:
Last edited:
I don't know why you guys keep calling it a "flotation chamber". Seems more like a "no need to scrape, sand, do a good job on the stem glass" wall.
Looking at all of the clean-up, and thinking about trying to get that glass done nice, is starting to sway my opinion. I might go with flotation chambers, strictly for the added safety they provide")
I didn't weight it at this point, because I have no idea how that would relate to finished weight. I also figured, what am I going to do about it? If there's a way to predict final weight based on weight at this point, I'd love to hear it.
Jim: you said you like a pencil lead size bead. I went with a carpenter's pencil lead size I guess. It looks like I just filled the cove.
Looking at all of the clean-up, and thinking about trying to get that glass done nice, is starting to sway my opinion. I might go with flotation chambers, strictly for the added safety they provide
I didn't weight it at this point, because I have no idea how that would relate to finished weight. I also figured, what am I going to do about it? If there's a way to predict final weight based on weight at this point, I'd love to hear it.
Jim: you said you like a pencil lead size bead. I went with a carpenter's pencil lead size I guess. It looks like I just filled the cove.
Brian: Call me nuts, but so far at least, I am enjoying the inner clean-up. Keep in mind, I've only gotten as far as rough scraping about 1/3 of the hull, and there's a long way to go. By the end, I'm sure I'll be glad it's over. This is also my first build, and I've been anticipating the inside for quite a while now. Also, as you said, this is the part you see every time you paddle it. Seeing it start to clean up, the fact that there are few flaws that will need filling, starting to look at which end is bow/stern, all exciting.
Well, I had hoped to glass the inside this past weekend, but family stuff didn't give me as much time to work on the canoe as I had hoped (and planned). While I don't mind the sanding yet, and I keep reminding myself of Cruiser's advice to channel my inner patience, I am cursing my poor decision to use Titebond. That glue doesn't clean up well. I made a few sanding pads for the 1/4 sheet palm sander, with aluminum backer plate, and chunks of foam from interlocking work-out mats. They worked really well both on the sander, and when hand sanding in the stem area.


One stem area left, at 80 grit. Then 100, 120, 150. Once clean up is done, the last 3 grits should go relatively quick. Thankfully, the glassing gods are keeping the weather good for the forseeable future.


And yeah, I need to clean the work area again before glassing.
One stem area left, at 80 grit. Then 100, 120, 150. Once clean up is done, the last 3 grits should go relatively quick. Thankfully, the glassing gods are keeping the weather good for the forseeable future.
And yeah, I need to clean the work area again before glassing.
")

Jim, you do realize that post qualifies as rubbing salt in the wound, lol
I rarely sand the inside with anything finer than 80 grit, usually 60 grit is OK.
When you wet out the inside, there is no need to add any covering coats. In fact, covering coats will only make the inside more slippery under foot and heavier on your shoulders, while not increasing the strength by much at all.
With the inside wet out only, you'll barely see any cross grain scratches from sanding with rougher grits.
Yeah, Cruiser. I saw Jim's post, and started wondering how many has he breezed through in the time it's taken me to get about half done with one. He's probably saying to himself (and maybe others are too): "I should just go there and finish the dang thing so this idiot will stop posting this painfully slow progress.
Well stripper, I just finished with 100 grit. Every time I think I'm done, I change the angle of the spot light, and see another scratch or two. Perhaps I'm going way over board on the quest for near perfection. I keep the thought in mind: "I'd rather do it and realize later it was unnecessary, than not do it and wish later I had". Given this is what I'll be seeing every time I paddle, I don't want to wish I had sanded just a little bit more. Yeah, I was planning on only wetting the cloth, and doubling the football area. So, given the weave will be visible, I'm confident the scratches will not.
That being said, I believe I might be nearly done. Just a little bit of clean-up where the inside stem meets the strips. Right where it makes the turn, and the top of the stem is even with the strips, that little tiny corner there is a pain to clean. Glassing that area is going to be a pain, I'm pretty sure. At least for now, I'm not planning on flotation chambers. That could change after I glass the inside.
Questions about glassing the inside: A couple people posted when they cut the glass for the inside, they lay it out on the outside of the hull. That seems to make a lot of sense.
Do you cut the glass to go up the sides of the stem at all (at least the bottom part, before the turn) or stop the cloth where the strips meet the stem?
Do you add a bias strip over the stem?
Do you cut the glass to go up the sides of the stem at all (at least the bottom part, before the turn) or stop the cloth where the strips meet the stem?
Do you add a bias strip over the stem?
Filling the weave on the inside, on the plus side, makes it easier to clean, and more water proof. Not to mention looks better !
Any imperfections, such as outgassing , or resin weeping into cracks or holes are remedied with extra fill coats. Giving more protection to the Substrate.
I disagree with the theory that just wetting out the cloth, is as strong as when the weave of the cloth is filled.
Take two pieces of cloth and lay them on some plastic. Wet them both out. Then fill the weave of one. Let them cure a few days then check to see which one flexes the most !
I know the answer !
As far as slipping ? I have filled the weave on all the insides of mine, and have yet to feel they were slippery !
Last edited:
Rookie advice, for what it's worth. Watch episode 22, "Sheathing the Hull Interior" of the CanoeCraft Workshop series on YouTube. Glassing the interior is not as difficult as you imagine, but you need a clear plan before starting. The video in particular addresses glassing the stem area nicely. We've glassed the inside of exactly 1 canoe (still unfinished, another story) and chose to do it with 2 pieces of fiberglass. Best as a first timer to only have to worry about 1 stem at a time I think.
- Joined
- Aug 10, 2018
- Messages
- 2,394
- Reaction score
- 8,445
Thought no one, ever, I'd bet. Personally, I'm enjoying your progress and learning a little more with each post & each thread. If you want really painfully slow progress, my first build has been stuck just past the planning stages since shortly after I joined this forum. I need to remedy that soon.I should just go there and finish the dang thing so this idiot will stop posting this painfully slow progress.
You are doing fine Kliff ! My first took me 9 months.
Glassing the interior isn't a lot of fun either. To me ? It seems I'm more Rushed ! Wet out the main area first, and leave the ends for last ! It's easy to spend too much time on the ends !
Remember it's YOUR canoe, and you are the only one that matters ! If you are happy ? That's the main thing !
For the interior glass ? I generally lay the cloth on the outside, and rough trim . Seems the easiest to me.
Nothing wrong with laying it in, in pieces ! I have several boxes of scraps I Swear I'm going to use them in just that manner some day ! Nothing Wrong with that either !
My intent of posting the pic of my untouched interior, was Not to make you feel Bad ! Merely incentive for the Next one !
I was fortunate enough to join a Tour of the shop of one of the best builders I've ever seen, from Wisconsin. I'm still trying to match his quality of work !
Similar threads
- Replies
- 42
- Views
- 3K
- Replies
- 170
- Views
- 13K
- Replies
- 7
- Views
- 1K