• Happy Weed Appreciation Day! 🌱🌿🌻

DIY No-Sewing Spray Covers

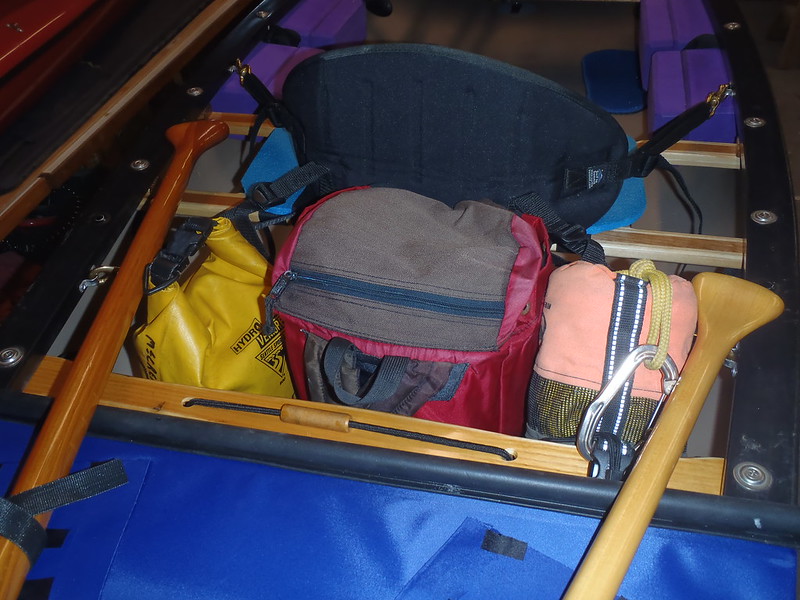
Mike, I really like the idea of leaving space behind the seat/ rear thwart for gear and throw bag. There's far more positive reasons for the space than for the extra cover of 8-12 inches. Having never used even a partial covers I'm sure I'll see improvement.

Jeff
 
"I would not use Dual Lock for most spray cover applications. Next DIY cover will use only snaps, spaced 12” or so apart."

I appreciate this. I was seriously considering trying a dual lock cover.

Moreover, I did not use the prism spray cover much, in large part because of the fuss. Spacing at 12", as opposed to 8", would significantly decease the fuss so probably I would use it more. Enough to justify doing it in the first place. I will gladly trade greater ease of use for potential but very unlikely wave overwash spray cover implosion, due to the way I would be using the canoe.

Still tying to find spare time to tackle the magic spray cover project.
 
Moreover, I did not use the prism spray cover much, in large part because of the fuss. Spacing at 12", as opposed to 8", would significantly decease the fuss so probably I would use it more. Enough to justify doing it in the first place. I will gladly trade greater ease of use for potential but very unlikely wave overwash spray cover implosion, due to the way I would be using the canoe.

Dave, I have done that same too-lazy-to-fuss-with-it, and sometimes installing only the front cover for that very reason. And paid some wind-catch price for my laziness when open water was breezier than expected.

I finally got around to cutting the heat sealable Packcloth for the Fishfinder covers this morning.

The snap spacing on the bow cover will end up being 10 ¾” apart, and the on the stern cover 11 5/8” apart. Those odd spacing numbers provided evenly spaced snaps, and on the bow cover missing having a pop rivet seated at the thwart location. Five snaps per side on the bow cover, four per side on the shorter stern section.

Once I have the hems ironed, buttons and sockets installed on the covers and studs on the hull I’ll post some photos.

Eh, I might as well cut and iron some paddle pockets and pads for Velcro shaft straps while the iron is out. Arrgghh, more tricky templates to make, but it will be worth it in the long run.

As I was cutting the templates for the paddle pockets and shaft lashings a friend of my late friend Brian stopped by to toast his life with a bottle of 14 YO Resilient Bourbon and a six of Rogue Dead Guy Ale.

By the time he left I was in no shape to do further work.
 
FishFinder Spray Covers

I’m going to cover some old ground here; I know DougD is planning partial covers for his Courier and his Rob Roy, and needs some encouragement to give it a try.

I may have found a simplified template pattern. Or may have effed it up, I really won’t know for certain ‘til I iron the hems; if it works, yippie, much easier pattern. If not, I can fix it

Never mind. I had pulled out the template for the FreeFire covers to remind myself of the foldover cuts and realized those were oddball complex for a reason. That reason being that I incorporated a 4’ hem along the sides, so the snaps and Dual Lock were situated on the black side stripes, and a 1” hem on the ends. That variation on hem dimension made the template overly complex.

No need for that excessive side hem on the FishFinder; I used a 1” hem all the way around, with the snaps seated an inch below the outwale. Having the same size hems made the foldover end cuts much simpler.

If I could offer one single piece of advice about DIY’ing covers it is “Go slowly and thoughtfully. Cut the template, walk it over to the canoe and tape it in place to check your design work. Same for the cut out material, check the fit before you hem it and check again before the buttons and sockets go on”.

Having just finished ironing the hems I will amend that advice if making spray covers from heat sealable material. When using heat sealable material, for covers or custom dry bags or anything else, the single most important element is to set a clock with a sweep second hand on the ironing table. 30 seconds of pressing a hot (linen setting) iron against every inch of a heat sealable stem takes a lot longer than you think.

Even with an eye on the second hand I was tempted to move along too quickly, and had to go back and re-iron some lifted sections. After ironing each hem I allow it to cool and then try to lift the edge all the way along with a fingernail. If I find any place liftable, usually an inch long area at most, I hit it again with the iron.

As before I needed to cut out a narrow slice in the middle of each side to accommodate for the slight hull-conforming curve in the cover material, and I laid a piece of clear Tenacious Tape across that V slice for extra strength.

P1140001 by Mike McCrea, on Flickr

While I had the Tenacious Tape out I laid a little square at each corner; probably not needed, can’t hurt.

The next DIY cover, for the FishFinder, will likewise be partials. I won’t know the actual snap spacing until I have made the Visqueen template; it will be at least 10” spacing, if not 12”.

The easiest way to figure out the snap spacing is to first mark any thwart locations that end up under the cover, so the pop rivets & back up washers are not obstructed (I just put a piece of duct tape on the outside of the hull a few inches below the outwale as an avoidance notice) and then tape the cover in place, making sure the hems are even all the way around below the outwale.

I taped the covers on upside down; I still needed to add the little squares of Gorilla tape on the bottom of the button & socket locations, to thicken the cover material so those snap parts seat firm and unjingly. Upside down my Sharpie dot snap locations were on the side I needed to see when laying the tape squares and later melting the holes for the buttons and sockets.

Taped in place, with snap location Sharpie dotted at each end, the bow cover had 43” between those fore and aft snap locations. 14” spacing seemed a bit wide, but 10 ¾” snap spacing was perfect, evenly spaced at 10 ¾”, 21 ½” and 32 ¼”. Five snaps on each side of the longer bow cover.

The stern cover had 35” between fore and aft snaps. 11 5/8” gave me even spacing and four snaps on each side of the shorter stern cover.

Time to lay some little squares of Gorilla tape. I had a new batch of snap rivets, so I did the usual test; ironed a hem on some Packcloth scrap, laid down two-ply and three-ply Gorilla Tape squares, melted the holes and test seated buttons & sockets. Three-ply Gorilla tape was the firmly seated button and socket winner once again.

1” squares of three-ply Gorilla tape on all the Sharpie snap marks. Just because I continue to find uses for it I used the hard roller to press those Gorilla tape squares down firmly.

P1140004 by Mike McCrea, on Flickr

With the window exhaust fan on I melted the 18 holes through the G-tape squares and cover material. While I have some faith in the tenacity of the hard rolled Gorilla tape thickening patches a little bead of E-6000 adhesive sealant around the perimeter of each tape patch can’t hurt.

P1150009 by Mike McCrea, on Flickr

There will be a short intermission while I allow that E-6000 to set up. Please visit the concession stand while you wait. . . . .

. . . . .The buttons and sockets went in firm and stoutly anchored, and this time I didn’t seat them facing in the wrong orientation ;-)

P1150010 by Mike McCrea, on Flickr

Now for the rewarding part, tape the covers evenly in place, press the sockets under the covers against some multi-ply duct tape, Sharpie dot the center of the socket impression, drill a 1/8” hole and pop rivet the studs in place on the hull.

Dayum, I am getting better at this, or at least more efficient. I only peeled off the Sharpie dotted duct tape marker before I drilled the hole once. Er, maybe twice; 2 out of 18, about my average.

A further caution, I was running low on backup washers for the 1/8” pop rivets and bought a box of the smallest I could find, the rivet pin fit in the hole with just a teeny amount of space left. I installed not one, not two, but three pop rivets and the washer simply WTF fell off not one, not two, but three pop rivets before I realized the washer holes were a teensy bit too large. So yeah, use back up washers that fit snugly on the pop rivet pin.

I may be getting better at this, but I’m still learning. Fortunately I had enough teensy washers to finish the installation.

P1150013 by Mike McCrea, on Flickr

Covers snapped in place I can mark the edge of the covers for the width of the drip baffle. I really like the stiffen-able tubular aspect of the automotive weatherstrip, and the adhesive on that stuff is crazy strong.

I had enough leftover auto weatherstrip to drip baffle the front cover at 30 ¼”, but not nearly enough for the back cover baffle at 27 ¼”. Screw it, I like that stuff, and it was worth dropping coin on another 8’ roll; I don’t think this is my last DIY cover, and I now have almost 6’ left.

Self-adhesived on the ends of the covers the drip edges, with a stiffening pipe inside, can sit at least overnight before moving on to the next steps, paddle pockets and Velcro lash straps for the paddle shafts.

P1150016 by Mike McCrea, on Flickr

As I suspected, with the covers in place the raised edge drip baffle prevented the rod handles from fully seating in the clips on the fishing thwart. No worries, those clips have short rubber “towers” at both ends, and eliminating the sternward tower angled the clips so the rods cleared the drip edge with the handles secured in the clips.

P1150019 by Mike McCrea, on Flickr
 
Had anyone tried the YKK snad? It's a self adhesive snap? https://www.sailrite.com/YKK-SNAD-Wh...ible-Base-Stud.

I'm looking for option although I realize tried and true stainless is probably the way to go.

I was curious about how it was possible to get enough adhesive on the back of a ½” diameter stud for any surety of stickem. Clicking on the link I see how; the stud is attached to a 1 ½” diameter adhesive “plate”.

It looks like those are available in white or clear, but in either case there would be a series of polka dots just below the outwale. Those would be (mostly) hidden when the covers were on, but a polka dot canoe is not my preferred aesthetic.

I put the wide black stripe on the FreeFIRE to help hide the black Dual Lock.

PB270031 by Mike McCrea, on Flickr

Better than (some ended up crooked) black Dual Lock strips highly visible on a red hull, but still kinda fugly when the covers are off.

The one (or two, three) difficulties with studs. First, finding a pop rivet tool with a recessed head that fits inside the stud. Some pop rivet tools come with such a head. If you are buying a pop rivet tool for stud seating purposes that extended nose piece, that fits inside the stud, is ¼” diameter.

The one here on the right:

PB210067 by Mike McCrea, on Flickr

I have not been able to find stainless steel snap rivets, only brass and nickel plated brass. Stainless may not have the pliability needed to snap seat without undue difficulties.

I’ve used both brass and nickel plated brass, and both have held up fine even in tidal waters. The brass did develop a patina, but still snapped securely. It does help to clean the studs occasionally, especially with boats stored outside.

The snap buttons have a neck (actually, a “post”) that goes through the hole in the fabric and seats via the flaring tool & anvil into the socket. I was told by Dan Cooke that snaps are available with different height posts, and a shorter post might not necessitate the 3-ply squares of Gorilla tape.

I have yet to find a source for snaps with a shorter post. Every snap button I have, from 3 different vendors, is 3/16” tall. Probably just as well with the heat sealable fabric; even using the 400D Packcloth I think having the socket bolstered with the Gorilla tape layers helps prevent it from tearing through the fabric when unsnapping the covers (there is no stress on the fabric while thumb pushing the sockets and studs together).

heck, while I’m talking studly, the rivets used to seat studs have a 1/8” rivet pin.

https://www.wonkeedonkeetools.co.uk/rivets/what-are-the-parts-of-a-blind-rivet

But 1/8” pop rivets are available with different length pins. A ½” long pin works with a back up washer on most composite hulls (except old gel coated woven roving stuff), but might need a ¾” long pin if backing up the studs with a mini D-ring and washer.

The ¾” long rivet pins work with most RX hulls (except vintage era RX, which was thick as heck even at the sheerline), but might need a 1” pin if using mini D-rings to back up the stud. Using the right length pop rivet is important, critical enough that I’d buy both some of each length that seems appropriate and see what works best. Too short obviously won’t work, but too long a pop rivet is almost as bad.

BTW, last post I mentioned making paddle pockets and Velcro lash straps. I did so, or more specifically, and still doing so, using the same heat sealable Packcloth. I have two words about making paddle pockets and, especially, Velcro lash straps from heat sealable fabric.

Just. Don’t.

It’ll work, but it means more peculiar templates, more cutting and ironing fussiness. I could have cut up an old dry bag – the material would glue on just as well, using Loctite Vinyl, Fabric and Plastic glue - and been done hours ago.
 
Mike thanks for the clarification on snaps. It seems that brass would be easier. I also understand the polka dot distraction that you mention.

The Northwater attachment system intrigues me but I'm not liking the visual I'm getting (in my mind) for that attachment system with the strong knuckle crease in the raven. Snaps would fit below the gunwales but above the tumblehome and not be conspicuous.
 
I had an expensive custom-made full spray cover with skirted cockpits and other doodads for my MR Explorer back in 1980, which I used about ten times before ditching it forever as too heavy, too clunky and too dangerous in whitewater.

The only point I'm making for this thread, however, is that I put the snaps underneath the wooden outwale per instructions from the maker. Are there pluses and minuses to that versus putting the snaps on the hull? To me, one benefit was aesthetic; the snaps are virtually invisible when the cover is off.
 
I put the snaps underneath the wooden outwale per instructions from the maker. Are there pluses and minuses to that versus putting the snaps on the hull? To me, one benefit was aesthetic; the snaps are virtually invisible when the cover is off.

What was the distance between snaps? Did the snaps ever snag your fingers?
 
Originally posted by Glenn MacGrady

I put the snaps underneath the wooden outwale per instructions from the maker. Are there pluses and minuses to that versus putting the snaps on the hull? To me, one benefit was aesthetic; the snaps are virtually invisible when the cover is off.

What was the distance between snaps? Did the snaps ever snag your fingers?

About every six inches. That's about 64 snaps on a 16' canoe. Taking time to put those on and take them off every trip became too much of a hassle.

The cover was red pack cloth, and I had a strip of heavier weight dark blue cordura sewn along gunwales where the skirt would wrap around the gunwales, so as to provide greater resistance for paddle abrasion and rock collisions. The sewn cordura paddle pockets and lightweight taffeta cockpit skirts were also dark blue. I also had zip-on pack cloth cockpit covers for each of the three cockpits when they were not occupied by paddlers. These covers could be zipped off to reach gear or zipped on at night to provide complete closure against the elements and critters.

I'm not sure what you mean by snagging fingers, but I never had any problems with the under-outwale snaps touching my fingers at all.
 
I used snaps screwed in the wood gunwales and foam noodles on my Hornbeck cover:


But used velcro (some sewing required) glued on the carbon gunwales on a C4 in the Yukon River Quest:
 
"About every six inches. That's about 64 snaps on a 16' canoe. Taking time to put those on and take them off every trip became too much of a hassle"

I agree Glenn. I'm thinking of partial spray decks like on the Hornbeck yknpdlr shows here. By increasing the distance between snaps it shouldn't be too bad. I plan on using lighter weight material, again like on the Hornbeck. Although this might limit what I add onto the surface of the Spray decks.

-sorry, I'm having trouble auto-quoting from my phone
 
My spray deck was designed and built for running Sierra Nevada whitewater rivers. It was a fail in terms of weight, convenience and safety. What worked was learning how to single blade an open canoe properly.

Still, if one has wide enough wooden outwales on a flatwater canoe and wants a lightweight partial cover, putting the snaps under the outwale would seem to be an option.
 
The only point I'm making for this thread, however, is that I put the snaps underneath the wooden outwale per instructions from the maker. Are there pluses and minuses to that versus putting the snaps on the hull? To me, one benefit was aesthetic; the snaps are virtually invisible when the cover is off.

Pluses and minuses? I do see the aesthetic plus of hidden snaps, but with vinyl or aluminum gunwales, and some composite gunwales, there isn’t enough outwale lip to attach the studs underneath, so through-hull is the only option.

30 years ago a friend attended the Annapolis Boat Show, and gifted me a pack of Sailrite snap fasteners with screw in studs. Those have been well travelled since; years ago I mailed them to Doug, and years later he mailed them back. Neither he nor I ever used a single one.

Unused new in bag if anyone wants them; I’ll pay US postage.

Despite doing some wood replacement gunwales at the time there were a lot of things I didn’t like about that screw-in-under-the-outwale solution.

1)The screw shank on those gifted studs is 5/8” deep, dang near as deep as the gunwales I was making. I presume there are shorter ones than what he generously bought, but it was going to be finicky pre-drilling holes for those and not drilling all the way through the outwale.

(OK, there are shorter shanked stud screws, including in stainless steel; Sailrite carries some really handy stuff)

https://www.sailrite.com/All-Hardwar...-and-Fasteners

2)I would not want the vertical stud screws too close to the horizontal gunwale screws, or to the thwart/seat/yoke machine screws. Counting those various gunwale holes on a wood gunwaled 16’ canoe I come up with a combined total of 72 gunwale screws & thwart/seat machine screw holes in the gunwales.

Even if I spaced the stud screws 10” apart that would have meant drilling another 38 holes in the wood gunwales. Too much of a Swiss cheese wood gunwale for me in a pin or other oopsie. Especially in WW use.

3)Mostly I couldn’t see snapping the cover on beneath the outwale. I mean literally couldn’t see; I’d have to lie on my side on the ground, head next to the gunwale, to see what I was doing to orient the button/socket on the cover with the stud on the outwale.

Side story – A friend did that scoot around on the ground business helping me install a problematic IQ cover one trip. I honestly did not see the pile of dog crap near where we had set the hull. Poor Tom; that may have “flavored” his opinion of spray covers forever after.

4)That under-outwale location seems problematic for other reasons as well; standing upright, without crouching butt in the mud, attempting to fasten the under-outwale snaps, sight unseen, my typically useful opposable thumb wouldn’t be help, and attaching those snaps with my index finger makes my arthritic hand hurt just think about it.

The most common complaint about snap-fastened covers is an aching thumb. Part of that is operator error; it helps if nylon covers are stretchy damp when aligning the sockets to the studs. Part of that thumb ache can be eliminated on non-WW, non-spray skirted partial covers by increasing the spacing to the studs. For rain, paddle drips and occasional minor wave splash ten to twelve inch spacing seems sufficient.

I can understand that, after performing that under-inwale 6” spacing snap attachment for 60+ snaps each time I put the covers on, I too would have quickly developed a lasting aversion for spray covers.

I had an expensive custom-made full spray cover with skirted cockpits and other doodads for my MR Explorer back in 1980, which I used about ten times before ditching it forever as too heavy, too clunky and too dangerous in whitewater.

If you still have that custom cover, moldering in a box of musty gear, make me an offer and I’ll take it off your hands. We have a (soloized) RX Explorer, and I bet I could make it useful again by retrofitting it as less-entrapment-dangerous bow and stern partials with drip baffles.

With pop riveted studs, backed up with mini D-rings, below the outwale ;-)
 
Why not try gluing velcro to the outwale? That is what we did in the carbon C4 shown in the photo above an it worked very well on the Yukon where race rules specified a cover. We also did the same thing on a woodstrip and it held up for 6 trips down the Yukon, including two 1000 mile races. The cover can be installed or removed easily by each paddler from their seat on the water. There is a couple of great advantages beyond the obvious to having an easily removable cover. First, it traps noticeably and relatively warm air around your lower body, since the Yukon water temperature is not far above freezing. The second advantage is it offers a nice "table" to hold your food and whatever in front of you.
 
Originally posted by Glenn MacGrady

The only point I'm making for this thread, however, is that I put the snaps underneath the wooden outwale per instructions from the maker. Are there pluses and minuses to that versus putting the snaps on the hull? To me, one benefit was aesthetic; the snaps are virtually invisible when the cover is off.

Mostly I couldn’t see snapping the cover on beneath the outwale. I mean literally couldn’t see; I’d have to lie on my side on the ground, head next to the gunwale, to see what I was doing to orient the button/socket on the cover with the stud on the outwale. . . .

That under-outwale location seems problematic for other reasons as well; standing upright, without crouching butt in the mud, attempting to fasten the under-outwale snaps, sight unseen, my typically useful opposable thumb wouldn’t be help

Your other points may be well-taken, but I never had any hand or finger difficulty snapping the snaps on. It was just that there were so many. I could snap just a few on each side and then roll the hull up on its side to do the rest on that side -- or snap a few on both sides and then roll the hull upside down to do the rest. But mostly recall just snapping them all on while the hull was rightside-up.

I do recall having to mark the location of seats and thwarts on the sheet plastic template, along with my desired locations for pockets and velcro loops. I think the manufacture put the female snap heads in the fabric. I distinctly recall screwing in each male snap into the outwale by hand. That was tedious, but nowhere near as grotesque and obnoxious as the Antichris . . . er . . . Kevlar skid plates.

I really don't remember the exact snap spacing. I'll go out and measure it exactly when fortified with spider, wasp, bee, hornet, mouse and bird weapons. I don't think I've moved that canoe from under my porch in 15 years.
 
Your other points may be well-taken, but I never had any hand or finger difficulty snapping the snaps on. It was just that there were so many. I could snap just a few on each side and then roll the hull up on its side to do the rest on that side -- or snap a few on both sides and then roll the hull upside down to do the rest. But mostly recall just snapping them all on while the hull was rightside-up.

On reconsideration I’m thinking that having the snaps under the outwale might actually present one snap connection advantage. Presuming there was sufficient slack in the cover to allow you to squeeze the socket and stud together using your thumb and forefinger that might be easier than pushing against a hull mounted stud with thumb alone. Perhaps more so on thin walled composite canoes, where the sidewalls flex under thumb pressure.

Not sure about rolling a tripping canoe upside down to put the covers atop a gear load. I am gentle with my covers, especially with the less sturdy material heat sealable ones, and wouldn’t want to roll the canoe upside down even when empty, grinding the covers against who knows what, even with CCS covers.


I really don't remember the exact snap spacing. I'll go out and measure it exactly when fortified with spider, wasp, bee, hornet, mouse and bird weapons. I don't think I've moved that canoe from under my porch in 15 years.

The flatwater rain and splash partial covers on the FishFinder have a total of 18 snaps. My thumb can handle that without too much ache.

When you are sufficiently armed to crawl under the porch I’d be curious about the condition of the Explorer’s screw and snap multi-perforated wood gunwales after 15 years untouched.
 
I lacked enough scrap Packcloth for paddle pockets, and since I was cutting from the intact, left-the-angle cut roll, decided to make the pockets more spacious that the kinda small scrap material ones made for the FreeFIRE.

The angles left on the Packcloth were once again, now unsurprisingly, the same as the angles I needed for the paddle pockets. The minimal material waste appeals to my Scots heart.

First, a painter’s tape perimeter on the cover for sizing, then the usual visqueen template with fold over “hems” to iron together.

P1160023 by Mike McCrea, on Flickr

An easy way to make sure the hems are straight and even is to fold the template material over a thin yardstick and temporarily tape the edges down.

P1160022 by Mike McCrea, on Flickr

Then pull the yardstick out, clamp the fabric at the ends of the fold overs, remove the tape and get to ironing. Once the middle of the fabric is ironed remove the clamps and iron to the ends. Scotch tape works fine for that purpose, better than painters tape; just remember to leave little fold over tabs at one end to make it easier to remove the tape before ironing.

P1180007 by Mike McCrea, on Flickr

I wanted to try making heat sealable pads for Velcro paddle shaft straps, so another template. One shaft strap for the bow, offset from center so as to not interfere with the rods, rod holder mount and etc on the (getting crowded, glad I made it extra wide) fishing thwart. Two shaft straps, to hold two paddles or a paddle & push pole, nearer the gunwales for the back cover, so the paddles/pole lash down / \.

P1160026 by Mike McCrea, on Flickr

The paddle pockets and lash straps, attached with Loctite Vinyl, Fabric and Plastic flexible adhesive would have been wayyyyy simpler if I had some scrap dry bag type vinyl. But I didn’t, so more template making, more cutting, more ironing.

What was that I said? Much simpler? Yeah, I’m never again making DIY heat sealable paddle pockets or shaft lash straps. What a PITA; if I had it to do over again I’d cut up an old dry bag and use the fabric and pads from that.

Maybe not a yellow or orange dry bag, but I do have a couple old black ones that wouldn’t look garish on the blue covers. And, using the old pads from shoulder straps or etc, without the need for ironed fold-over hems, I could have made/used circular lash strap pads. Seriously, don’t be like Mike, use an old dry bag for paddle pockets and lash straps.

(I will pause now to bemoan friend Joel, cleaning out a gear attic, throwing old defunct dry bags out the window into a dumpster parked below. I shoulda been there dang it)

Hmmm, there must be a vendor of vinyl coated dry bag material. Of course, where else but Seattle Fabrics:

https://www.seattlefabrics.com/search.asp?keyword=vinyl+coated+material

At those prices, plus shipping, it might be less expensive to buy a cheap TexSport dry bag and cut it up. Coulda, shoulda, would; still learning.

For the Velcro lash straps I used double sided Bundling strap.

https://www.walmart.com/ip/VELCRO-Brand-ONE-WRAP-Bundling-Strap-Reusable-Fasteners-for-Keeping-Cords-and-Cables-Tidy-8in-x-1-4in-Ties-Black-25-ct/22580552

That stuff is handy in the shop, and for outfitting applications. It is Velcro tenacious, but not so graspy as to need two hands to unfasten. When I suddenly want the spare paddle I want it freed one-handed right freaking now.

I had a look at the lash straps on one of our Cooke Custom Sewing covers, for Velcro length and etc before making the necessary slices in the DIY Packcloth pads and feeding the Velcro through the pad slices.

P1180006 by Mike McCrea, on Flickr

Looks like 11 ½” long, which I know is enough strap to wrap around both shafts of a double blade. With some strap buried under the pads I cut the bundling strap at 12”. And, also of note, the orientation of the CCS straps is angled; with two single sticks in a pocket the shafts are extended / \, so the lash straps are likewise angled. Still learning tricks at the feet of the Master.

It seemed too tricky to glue and clamp all three sides of the paddle pockets at once, so I glued the stem ends, wax paper covered, hard rollered and clamped. In a few hours, or tomorrow, I can unclamp the ends, glue the / \ sides and reclamp.

It is important to tape the areas on the pockets and covers where the Loctite adhesive will be (thinly) painted so the adhesive doesn’t smear out beyond the edges when compressed. I did not do so on the FreeFire pockets, and the result was ugly. Once painted with a thin coat of Loctite, pull the tape and lay the glued edges together, hard roll (optional, can’t hurt) and clamp under some boards.

P1180010 by Mike McCrea, on Flickr

Shout out again to Chip for his adhesive tests. As his experiments demonstrated, the Loctite Vinyl, Fabric and Plastic glue does the trick on the heat sealable fabric. I need to follow Chip’s lead and install shoulder straps on my beastly heavy ALPS Leisure chair dry bag.

Turning back to the lash strap pads I cut two parallel slices in the center of the pad and ran the 12” lengths of Velcro strap bundle through the slices. The Packcloth pads have the usual ironed-over hems, as well as a square of heat sealable on the backside, so they are 2X thickness all over.

To be doubly sure the tension from the lash straps didn’t tear the 2X thickness of heat sealable Packcloth I ran a bead of E6000 at the slices, and taped the perimeter with black tenacious tape. That oughta hold.

That (I hope) last of the gluing can sit while I attend to the (I hope) last cover/paddle pocket issue. I knew when I rested the paddles on the cover that the pockets needed some support below, the weight of the paddle sagged the cover, and with the snaps nearly 11” apart there was insufficient support at the blade end for my liking.

That has not been an issue with CCS covers made from 400D urethane coated Packcloth and more closely spaced snaps, and on past boats with CCS or DIY covers there was usually stem carry thwarts below the paddle pockets to help support the weight.

The Fishfinder is broad at the stems, and lacks carry thwarts.

P1180014 by Mike McCrea, on Flickr

Lacked, past tense, carry thwarts. The skinny 1 ½” x ¾” lengths of ash that I ripped, routed, sanded and varnished to the rescue once again; all I needed to do was cut them to fit, drill the holes and varnish the ends. And, of course, add webbing loops to the ends of the machine screws during final installation. The FishFinder now has 16 webbing loop tie downs.

P1180016 by Mike McCrea, on Flickr

Not only is this likely the only Pathfinder with a Conk seat, I expect it is the only 14’ 10” canoe with five thwarts. Six if you count the seat hung via with shortie spacers; I like a stiff canoe, this one oughta do it.

The FishFinder has some stem rise, so I located those paddle-support carry thwarts near the far end of the paddle pockets. But I wanted that support up at gunwale height, to lessen any paddle weight sag on the covers.

I don’t know much, but I do know that saggy covers mean puddles. That is not an issue when wearing a full-cover tunnel spray skirt, and not a big issue even with partial covers; just heel the canoe a bit, or lift the cover edge by hand to dump the puddle.

I thought about cutting strips of 1” thick minicel to bring the top of the thwart up to the sheerline. Didn’t have any 1” minicel; what I had plenty of was old ensolite pad material. More blue.

A 2-ply layer of ensolite pad, contact cemented together, cut to thwart length and contact cemented in atop the carry thwarts did the trick, providing gunwale-height paddle support.

P1190021 by Mike McCrea, on Flickr

While I had the scrap ensolite out I thought I’d try another idea, a perforated seat pad. I can foresee angler friends borrowing the FishFinder, and some folks don’t care for my preferred partially deflated ThermaRest pad.

OK, truth is I was dicking around looking for something to so while waiting for the contact cement to set up, but it was easy enough to give it a try. Seat frame sized rectangle of ensolite and a 5/8” spade bit to drill some holes.

P1190019 by Mike McCrea, on Flickr

More blue! More cow bell! Green hull with black and blue outfitting accents. Tanzanian flag colors.

OK, I’m told that the Yoga block knee bumpers are actually purple. I don’t see the color purple, but that probably explains why they smelled like Grape Nehi when I cut them up.
 
I can't wait to see the completed spray decks on the fishfinder!

As you wish. Time to re-dress and accessorize the FishFinder, to see just how it all came out.

The through hull painter loop flanges are a much better solution than tying off to the plastic deck plates, which would have been problematic given where I started the covers. And the bicycle hand bar toggle grips are the bomb. I’ll never use tubing or garden hose again; only took me 20 years to think of that.

P1130029 by Mike McCrea, on Flickr

With only 18 snaps, spaced 11-ish inches apart, the covers go on quickly and easily, and the covers roll up and fit inside an old camp chair bag for transport/storage. Yes, I put a little key tag on the draw cord labeled “FishFinder Covers”. Just like everything else in a draw cord bag stored on the gear shelves; glance at the key tag label, pull what you need.

P1200024 by Mike McCrea, on Flickr

The utility fishing thwart is a little crowded with two rods, two rod holders, compass, bungee, map pad eyes and minicel hook keeper; really glad I opted to make it 7” wide instead of my usual 5” width. Still wish that utility thwart was lighter weight than idiotic use-what-ya-got oak.

P1200032 by Mike McCrea, on Flickr

The bow cover works well in conjunction with the fishing accoutrements; the reels dangle in their allotted open space between the fishing thwart and cover, the up-angled rod clips give the FishFinder the “I mean business” look of a trawler, and the bow paddle pocket & offset lash strap holds both shafts of a (cover your ears) double blade.

P1200025 by Mike McCrea, on Flickr

Note that the lash strap around the paddle shaft lofts the cover; no wet sagging puddle action. A single paddle lash strap in the center of each cover would provide an even better arch, but I didn’t have that centered option on the FishFinder bow cover.

The stern cover, with pocket and dual lash straps, works equally well. Single blade and my old shortieshort 42” slender blade Grey Owl beavertail, once used to unobtrusively scull while duck hunting. I don’t hunt any more, but it might yet have some quiet fishing or bird watching applications.

P1200030 by Mike McCrea, on Flickr

FWIW both paddle pockets are (open interior dimensions) 7” at the narrow end, 14” at the wide end and 15” long; I wouldn’t want them any narrower, or much shorter. I probably should have looked at the pocket size on our CCS covers, but I winged it.

The with the two Velcro shaft straps in place the stern cover also has considerable arched loft. That was not design intentional; I wish I was that smart.

Having the stem thwarts foam supported up full gunwale height at the paddle pocket blade ends, combined with the length of ½” SS pipe stiffening the raised tubular drip baffle at the shaft ends really paid off. The paddles are supported at either end, held slightly above the covers, and when the lash straps are connected the covers are raised slightly arched. No sag, no drip, no cover puddles. I will use that simple, effective design strategy on any future covers.

Ending the stern cover 14” behind the seat (I actually was that smart), just aft of the stern thwart, left open space for easily accessible gear; day pack, small dry bag, throw rope.

P1200033 by Mike McCrea, on Flickr

Finished cover weight, in heat sealable Packcloth, with two paddle pockets, three lash straps and SS pipe baffle stiffeners in auto weatherstrip, including storage chair bag – 2lbs, 9oz. Note: These are short partials, albeit on a beamy 14’ 10” canoe.

That was as much outfitting fun as I have ever had; learned some new tricks and techniques, and learned a couple don’t-do-thats. The FishFinder was the third heat sealable DIY cover I’ve made, and certainly not the last.

P1130036 by Mike McCrea, on Flickr

PC110013 by Mike McCrea, on Flickr

The DIY heat sealable covers have gotten better designed, better built and more strategic each time.

The FishFinder covers, including paddle pockets and lash strap pads (never again!), used less than 2 yards of 58” wide heat sealable 400D Packcloth material, 18 snaps, two tubes of Loctite vinyl adhesive, 58” of tubular auto weather stripping, and 3 feet of Velcro. I think I’m in them for less than $40 (and a dawdling, at times puzzling, week’s work).

Perhaps, as in the past, someone will cull through my excess descriptions and assemble a sequential bullet point how-to list of steps in making DIY heat sealable covers.

Add to those bullet points the following heat sealable starter suggestion: Make a heat sealable dry bag first. A simple cylindrical dry bag for a sleeping pad or camp chair does not use much material, and what you learn - making the template, doing the ironed-over hems and etc - will be invaluable experience before turning to more material DIY covers.

dang, I really need to find another canoe to work on.

(BTW, dirt is still falling out from between the inwale and hull every time I bump the canoe)
 
Back
Top