Now that brings up an interesting question - which came first- the kayak or the canoe?
-
Gone canoeing. You should, too! 👋🏻🛶
You are using an out of date browser. It may not display this or other websites correctly.
You should upgrade or use an alternative browser.
You should upgrade or use an alternative browser.
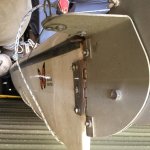
Having some free time I was looking over the rudder install and had some thoughts. If you look at the original Sawyer Loon rudder and the current Kruger Sea Wind rudder you will notice both have a small panel of aluminum well down either side of the rudder blade almost to the bottom of the boat. Because the extra material cradles the rudder blade so much more than the pintle/grudgeon design there is much less flex in the blade and far more effective rudder "power".
Having the side plates also allows a rudder blade to be mounted through a "lower" hole pivot hole. The blade stows much better when lifted
And finally I admire the over the gunnel cable mounting. Very slick. for a while that is. You will eventually cut a groove into the gunnel due to the increased friction, the rudder line hangs up and you have ugly gunnels with frayed cables. Just drill small holes and run the cable as straight as possible. You can epoxy the hole rim if you wish.
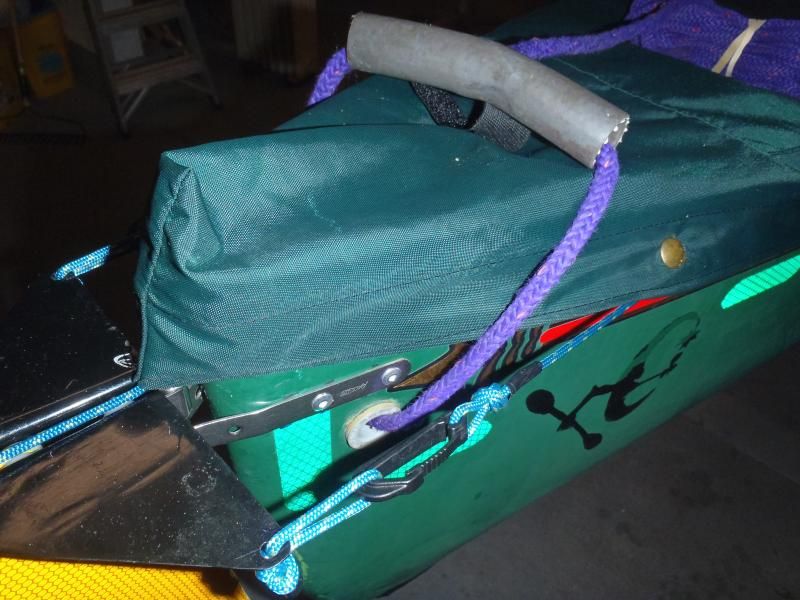
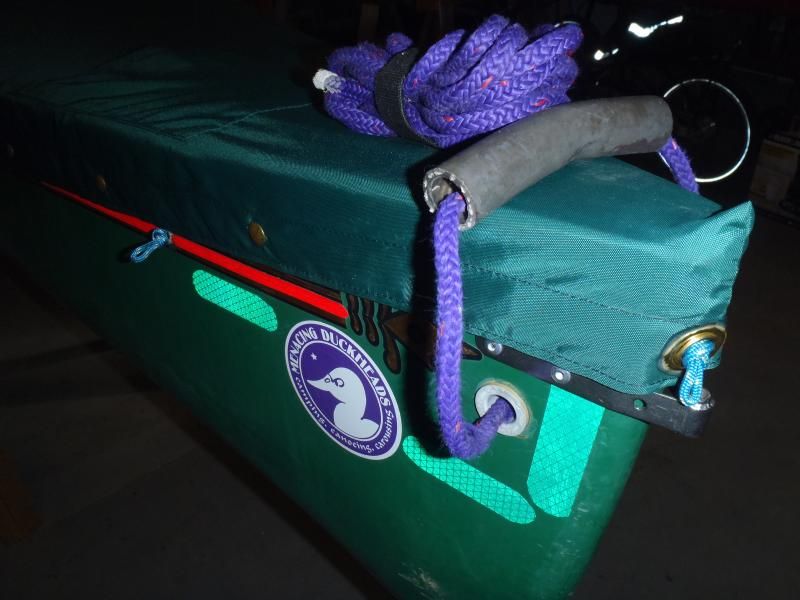
Are those Woopie slings in the Zing-it? If they are, are they just there for tension?
G
Guest
Guest
Having some free time I was looking over the rudder install and had some thoughts. If you look at the original Sawyer Loon rudder and the current Kruger Sea Wind rudder you will notice both have a small panel of aluminum well down either side of the rudder blade almost to the bottom of the boat. Because the extra material cradles the rudder blade so much more than the pintle/grudgeon design there is much less flex in the blade and far more effective rudder "power".
Having the side plates also allows a rudder blade to be mounted through a "lower" hole pivot hole. The blade stows much better when lifted
And finally I admire the over the gunnel cable mounting. Very slick. for a while that is. You will eventually cut a groove into the gunnel due to the increased friction, the rudder line hangs up and you have ugly gunnels with frayed cables. Just drill small holes and run the cable as straight as possible. You can epoxy the hole rim if you wish.
Rocky, can you post a photo of the aluminum panel on the Loon/Sea Wind rudder? I don’t understand the lower pivot hole and better stowage when lifted design enhancement.
How is that extra aluminum panel attached – welded or riveted or glued or?
The gunwales on both the Rendezous and Penobscot are aluminum, so I’m thinking it would take a lot of rudder action to cut a groove. If after some use I see any sign of that kind of damage I’ll revise the control line layout and run them through the hull as straight as possible.
Are those Woopie slings in the Zing-it? If they are, are they just there for tension?
Yes and yes. Joel is a hammocker. I know nothing about tying Woopie slings and have no Zing-it line, so at least for starters I’m going to use 3mm cord and taut-line hitches.
I’m hoping to finish up the Penobscot rudder today and get the boat out for a test paddle and sail soon, and expect to discover some enhancements to the initial experimental outfitting and installation.
G
Guest
Guest
And finally I admire the over the gunnel cable mounting. Very slick. for a while that is. You will eventually cut a groove into the gunnel due to the increased friction, the rudder line hangs up and you have ugly gunnels with frayed cables. Just drill small holes and run the cable as straight as possible. You can epoxy the hole rim if you wish.
Well dang it Rockie, you were right. But not for gunwale grooving reasons. I kind of anticipated this might be an issue but wanted to get all of the lines best-run before I dealt with it.
The rear spray deck would be problematic with the rudder control lines run over gunwale and the retraction line emerging as is from deck plate stem.
Easy fixes; a couple of angled holes below the spray deck edge drilled thorough the hull, with an angled and beveled flange to preclude the cord from sawing away at the Royalex edges and a little G\flex to hold them in place. And a grommet set in the tip of the stern spray cover to accommodate the retraction line.
I can’t move forward and reinstall the lines ‘til the G\flex has set, so completion is another day away.
Last edited:
G
Guest
Guest
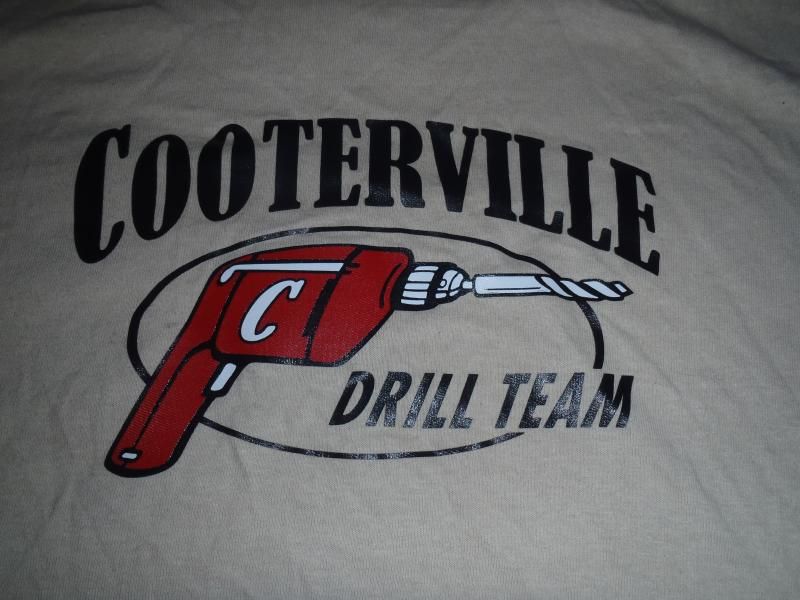
Time to put on my Cooterville Drill Team shirt and make some more holes.
The gudgeon installation was as fussy as the rest of a rudder build. I had drilled one series of bolt holes in a control arm 1/16” too far back, and the flap end of the arm prevented the pin from seating fully. Thirty seconds with a Dremel tool and that offending corner was gone.
Second bit of fussiness, the straight V sides of the gudgeon fit Joel’s sharp stemmed composite Rendezvous like a glove with a simple widening of the vee. Not so much with the more bulbous stemmed Royalex Penobscot. A little custom bending of the gudgeon arms to better wrap the blunt stems solved that.
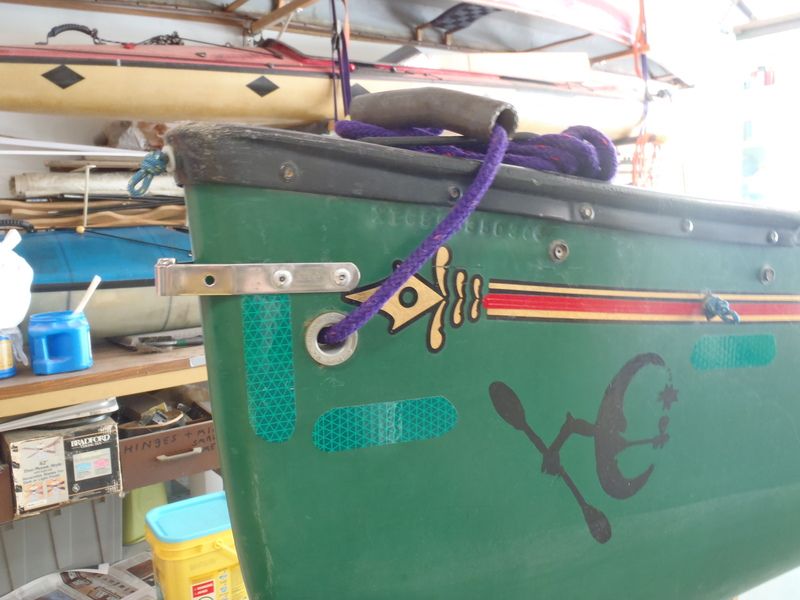
Third bit of fussiness, the ideal position for the gudgeon is right where my DIY tug eyes and painter line are already positioned. I’d rather have the retracted rudder further away from chop or waves, so above the Tugeye it is.
Last bit of fussiness. The rudder is attached with four 3/16” pop rivets, each backed up with a washer, and a larger washer as fender. I’m not Stretch Armstrong, so I can’t reach up into the canoe to hold the washers in place tight against the hull and compress the pop rivet gun at the same time.
That is a common problem, even more so when working on decked boats. As always a helping hand from the house to hold the washers in place and the rudder was attached.
Next up, I’d like a nylon flange seated in the deck plate hole for the rudder retraction line. Mostly because I have some in the shop. One 5/16” hole drilled through the end of the deck plate and a dab of G/flex to secure the flange in place takes care of that. Once the G/flex has set I’ll bevel the cord entry end for reduced wear on the line.
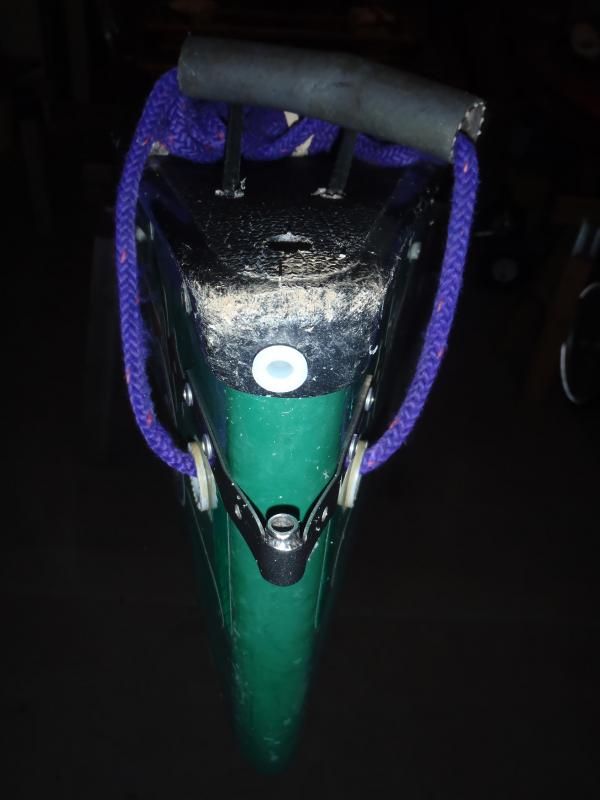
Next, I want stainless steel eye bolts on the ends of the steering bar for rudder line connections. Two holes for short-shank stainless 3/16” eye bolts, washers, lock washers and bolts, with the shank nutted inside the tube. And a center pivot hole, drilled 13/64[SUP]th[/SUP] so there is a bit of easy pivot slop.
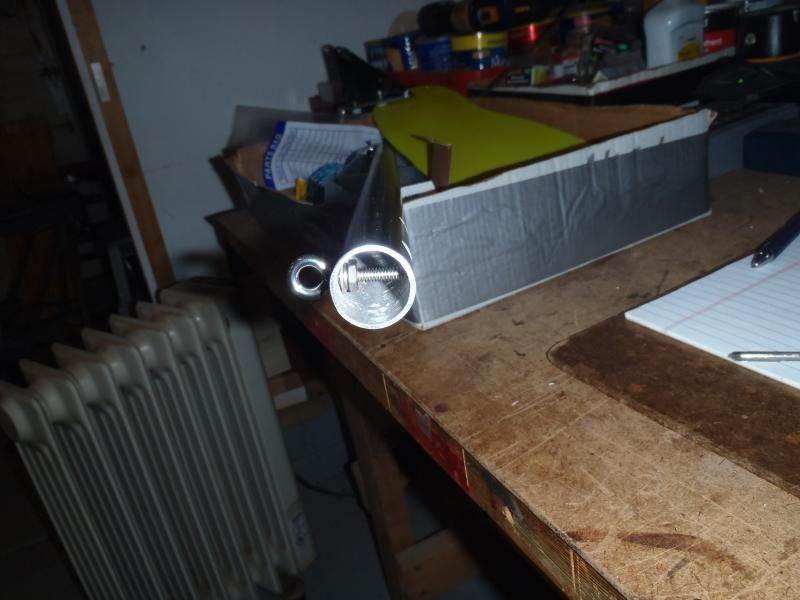
A couple of end caps to dress the aluminum tube, a dab of G\flex and the steering bar is ready.
Next, time to drill the tough holes, for machine screw holes in the stainless steel spring clamps. Those were a struggle on the Rendezvous with my old worn out drills, but I have since replaced the most common sized boat-work drills. Even so, stainless steel is still tough stuff to drill. Thank goodness for a drill press vice. (Note to self: Buy 3/16 or 13/64 specialty bits for drilling stainless steel before installing the next rudder)
I drilled and fitted a new SS spring clamp to hold the foot control bar. But without the Plasti-dip coating the clamp wants to spin on the foot brace not matter how tightly clamped. A short piece of sheet rubber between the clamp and bar provided some compression/friction grip and the bedevilment of drilling and installing the spring clamp was finally resolved.
NOTE: Those spring clamps work for the purpose of attaching the rudder control bar positioned above and slightly in front of the foot brace bar, but they are hell to work with. Drilling through the telescoping foot brace tubes at an angle would be far easier, if you can live with a non-adjustable foot brace.
That struggle over it was time for the fun part, cogitating the installation of the control and retraction lines. I couldn’t fashion Joel’s Woopie Slings and locking bromels from Zing-it line if I had a diagram and month’s to practice. I want a KISS solution, and to that end I elected to use clips and 3mm cord, and a layout in which the lines will stay in the canoe.
I have a couple of nylon clips for the control arms and a tiny S-biner that should work for the rudder; a teensy short clip so that line can retract as close to the deck plate as possible when pulling the rudder up.
Before figuring out best placement of the various rudder lines I needed fit out the canoe with seat pad and back band, sit in the canoe to adjust the foot brace bar and calculate the placement of the retraction and control lines. Gawd bless the thick foam pad on the shop floor for test fit sits.
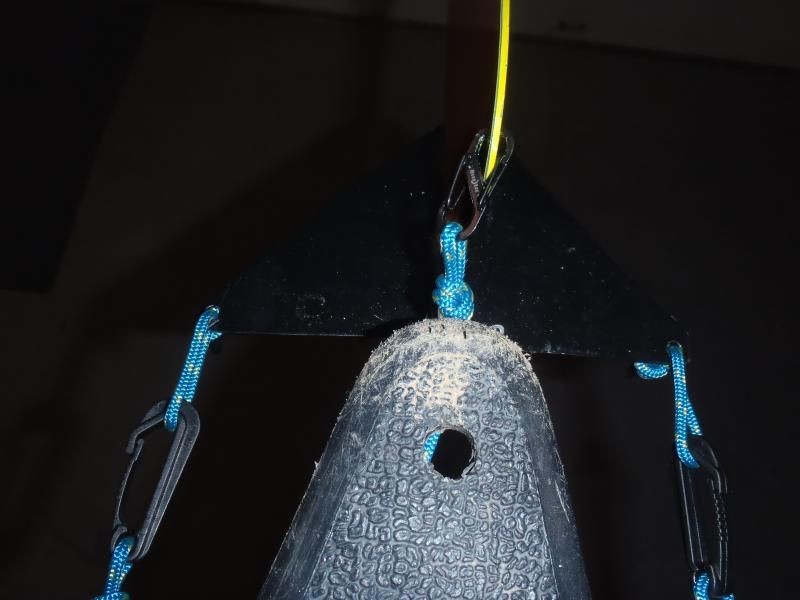
One closed cam cleat mounted on the seat truss for the retraction line, where it is out of the way and still easily accessible, with a stopper ball on the end of the line. The stopper ball is there to keep the line from pulling fully out from the closed cleat and is easier than a stopper knot to grab sight unseen.
I intend to leave the lines in place when the rudder is off to make field installation and removal of the rudder easier, so all of the lines are secured via two pop riveted in two nylon cable clamps under each inwale. Four cable clamps and four pop rivets.
The foot control lines need to angle down from the inwales, running under the seat towards the control bar, and I fortuitously have enough machine screw shank protruding under the seat to install two more cable clamps on either side. If you are keeping count that is 8 now cable clamps as line guides, four on each side.
Working without shop partner Joel I needed to build a jig to hold the rudder along the keel line to evenly adjust and tension the foot control lines.
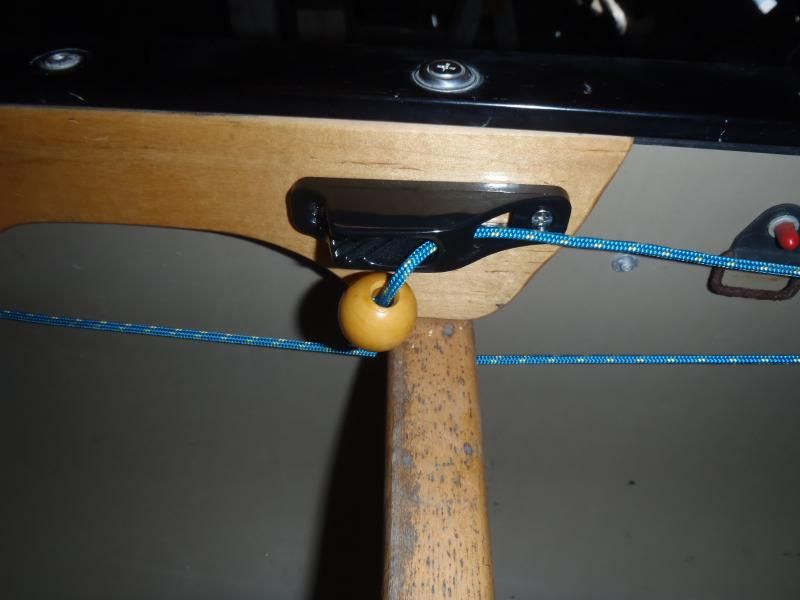
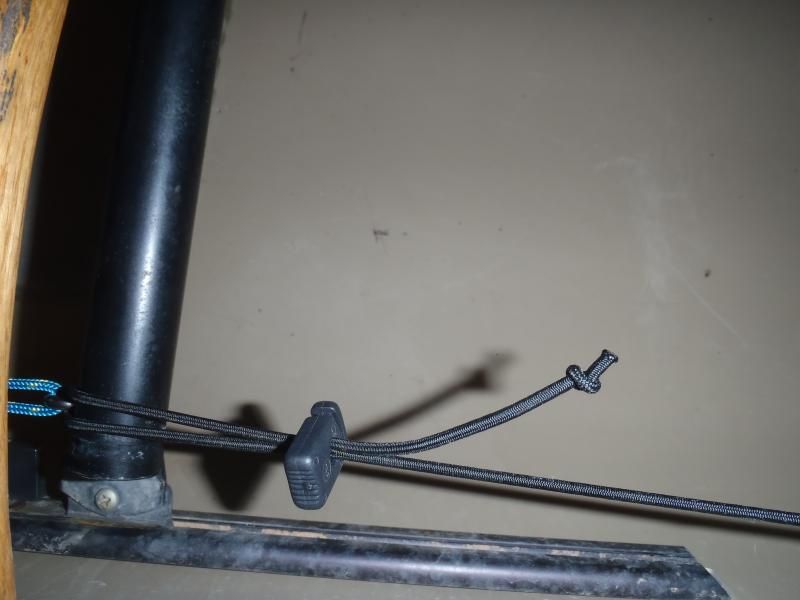
To provide adjustability on the foot control line when the brace is slid fore or aft I simply tied a taut-line hitch using the foot control bar eye bolts as the post.
Sweet. I can adjust the foot bar length and line tension from my seat with the taut-line hitches.
Beyond that, the less bending over and fiddling with canoe-on-the-ground boat outfitting the happier I am when launching. Installing the rudder is as simple as dropping in the pin, circling in the clevis and attaching the three clips. Methinks I should carry a spare clevis ring.
I ran a length of bungee forward on each side from the control bar eye bolt and back through a beefy cord lock. The taut bungee keeps the rudder straight when my feet are off the control bar and the cord locks allow me to adjust the tension.
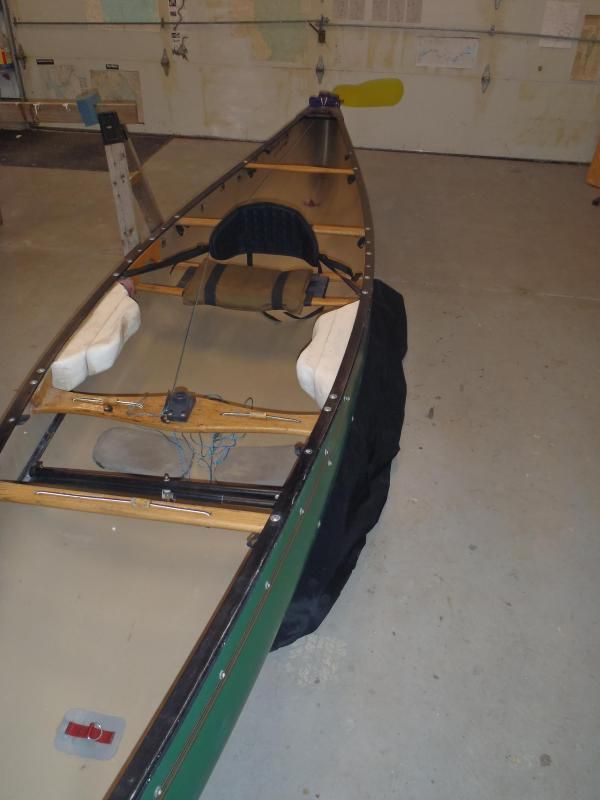
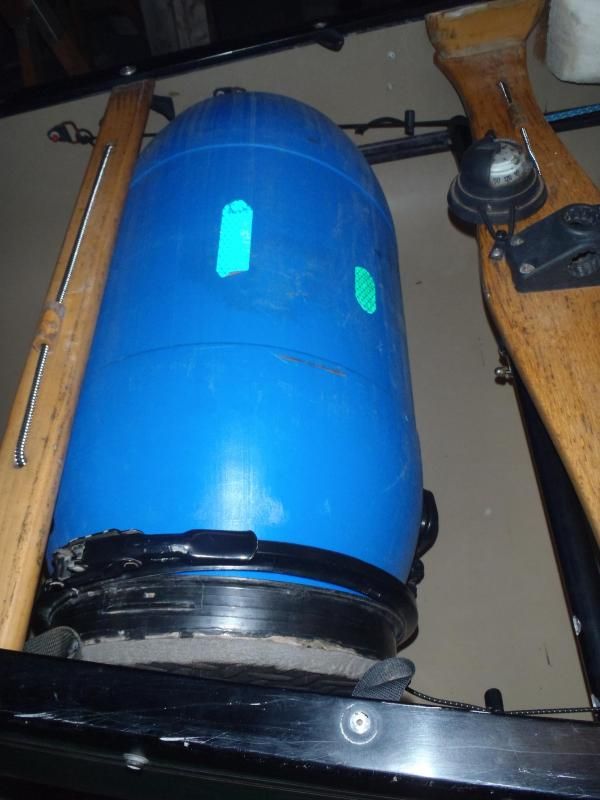
Almost done, just a couple of test fit checks. As expected the blue barrel still fits in my preferred placement between the front thwart and utility thwart without any interference. So far so good.
And, also as kind of expected, the stern spray cover does not work with the lines as currently configured. The end of the spray cover that wraps the tip of the deck will bind the retraction line and the control lines will abrade the edges of the cover at the snaps.
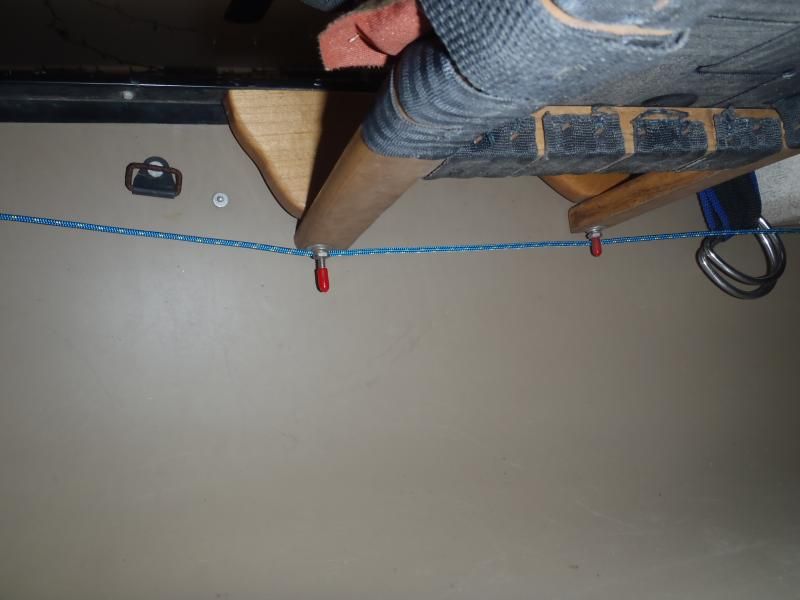
Well dang it, Rocky was right. The control lines need to run through the hull, in this case just below the edge of the spray cover. I still have a couple of nylon flanges in stock and G\flexed through the hull at an angle those should keep the cord from sawing away at the Royalex.
I beveled opposing sides the flange so it would fit more closely to the hull when installed at an angle and seated it with G\flex inside and around the hole on both sides. Once that G\flex set I flaired out the protruding flange end with a bit of PC-7 epoxy, waited some more and top coated that with more G/flex. Probably overkill, but I don’t want those flanges popping off or wearing out.
The revised control lines illustrated another installation oops. All of the clips should be attached so they remain on the rudder when it is removed. The less stuff I have hanging out the end of the canoe the happier I’ll be on swamp trips with densely overhung branches and limbs.
I needed a grommet, seated through the tip of the spray cover for the rudder retraction line and all was well. A grommet big enough to pass the loop end of the retraction cord through. A torch and a heated head of a shingle nail melts a nice sealed ½” hole for the grommet. I don’t like having sharp grommet edges against nylon, so a bead of Aquaseal/Cotol mix around the grommet edge softens the transition.
But now I can’t move forward until the latest epoxy sets up. Or can I?
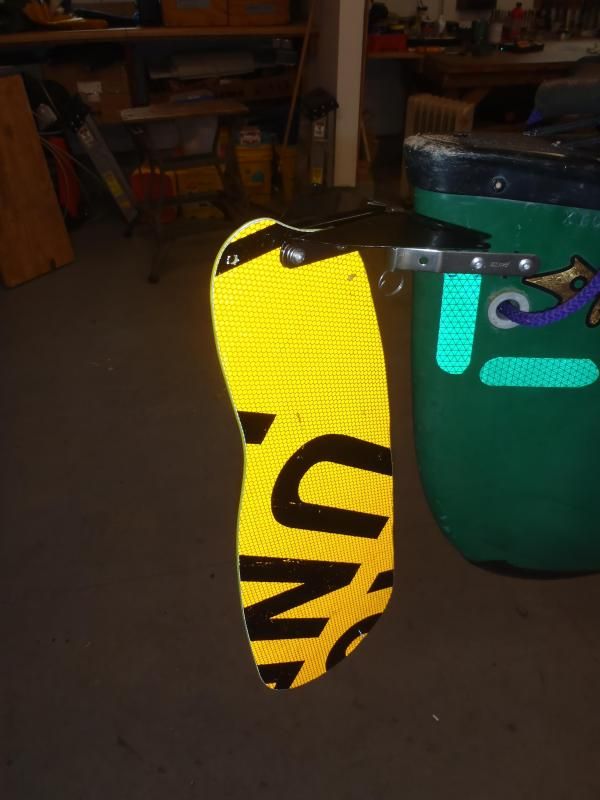
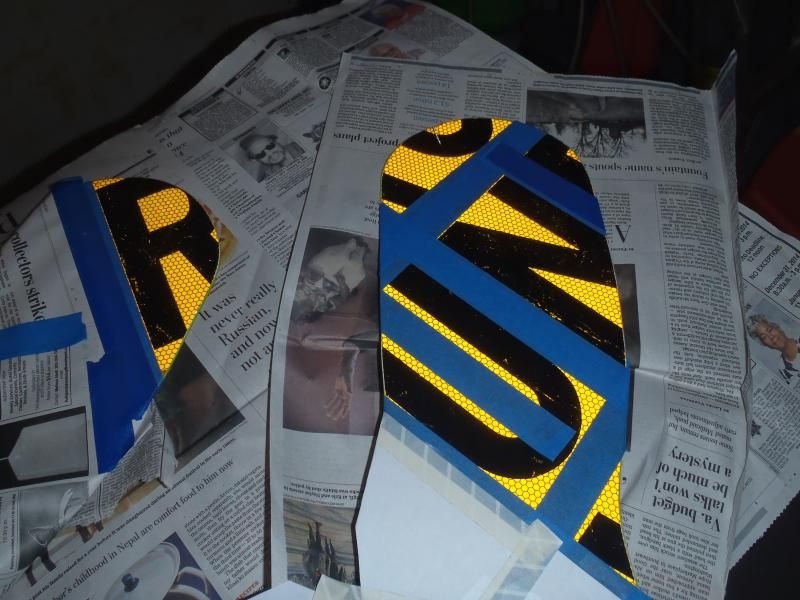
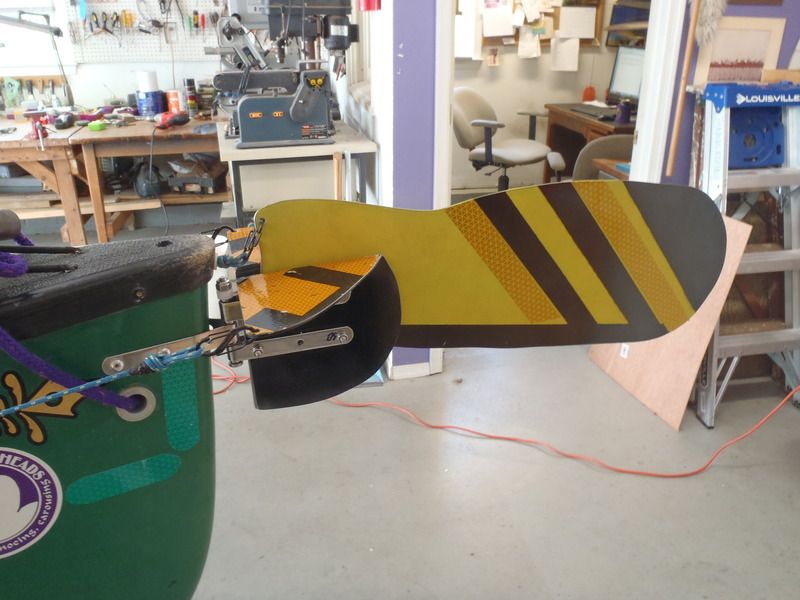
I like to have some stripes or other attention grabber on my rudders. I have some leftover lettering on the sign side that would make for bold black on yellow stripes or abstract design. If I black out a few sections on the sign side I can replicate that design symmetrically on the plain yellow side.
I’ll leave the design to chance and do some random taping and spray paint overlay.
Well, that’s random. All that’s missing is to add a few lengths of High Intensity reflective tape.
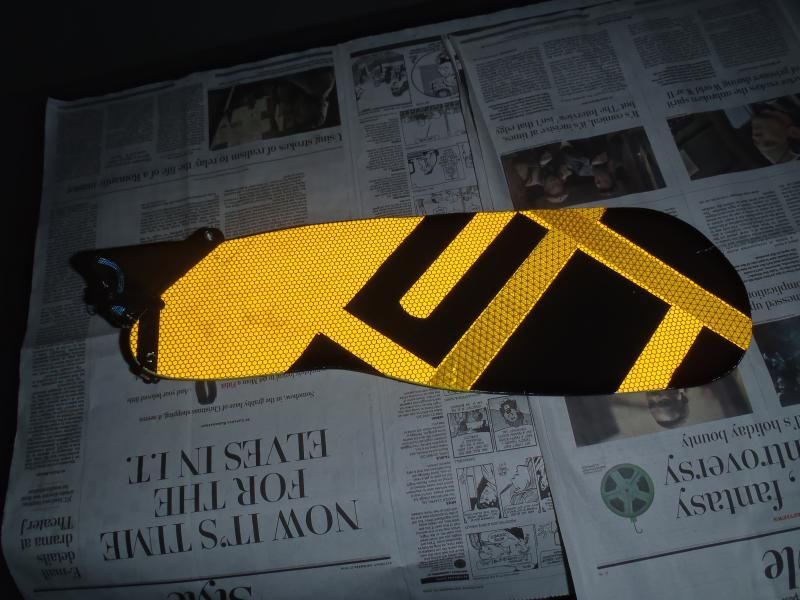
The stripes and reflective tape are more important on permanently attached rudders, to keep folks (including me) from walking into it when on the roof racks and warn cars in crowded parking lots. It may still be useful to keep me from stumbling into the rudder in camp when left installed.
With the epoxy set I beveled the entry hole of the new flanges and the control lines slide smoothly without any catch or resistance.
Time for another test fit. Rudder off:
Rudder on:

Oh yes, I like it. No more muscling a paddle blade as rudder when sailing.
The jet-boat driver on the Green River referred to the Penobscot as “The Inspector Gadget Boat”. Wait ‘til they see me next time.

The gudgeon installation was as fussy as the rest of a rudder build. I had drilled one series of bolt holes in a control arm 1/16” too far back, and the flap end of the arm prevented the pin from seating fully. Thirty seconds with a Dremel tool and that offending corner was gone.
Second bit of fussiness, the straight V sides of the gudgeon fit Joel’s sharp stemmed composite Rendezvous like a glove with a simple widening of the vee. Not so much with the more bulbous stemmed Royalex Penobscot. A little custom bending of the gudgeon arms to better wrap the blunt stems solved that.
Third bit of fussiness, the ideal position for the gudgeon is right where my DIY tug eyes and painter line are already positioned. I’d rather have the retracted rudder further away from chop or waves, so above the Tugeye it is.
Last bit of fussiness. The rudder is attached with four 3/16” pop rivets, each backed up with a washer, and a larger washer as fender. I’m not Stretch Armstrong, so I can’t reach up into the canoe to hold the washers in place tight against the hull and compress the pop rivet gun at the same time.
That is a common problem, even more so when working on decked boats. As always a helping hand from the house to hold the washers in place and the rudder was attached.

Next up, I’d like a nylon flange seated in the deck plate hole for the rudder retraction line. Mostly because I have some in the shop. One 5/16” hole drilled through the end of the deck plate and a dab of G/flex to secure the flange in place takes care of that. Once the G/flex has set I’ll bevel the cord entry end for reduced wear on the line.

Next, I want stainless steel eye bolts on the ends of the steering bar for rudder line connections. Two holes for short-shank stainless 3/16” eye bolts, washers, lock washers and bolts, with the shank nutted inside the tube. And a center pivot hole, drilled 13/64[SUP]th[/SUP] so there is a bit of easy pivot slop.

A couple of end caps to dress the aluminum tube, a dab of G\flex and the steering bar is ready.
Next, time to drill the tough holes, for machine screw holes in the stainless steel spring clamps. Those were a struggle on the Rendezvous with my old worn out drills, but I have since replaced the most common sized boat-work drills. Even so, stainless steel is still tough stuff to drill. Thank goodness for a drill press vice. (Note to self: Buy 3/16 or 13/64 specialty bits for drilling stainless steel before installing the next rudder)
I drilled and fitted a new SS spring clamp to hold the foot control bar. But without the Plasti-dip coating the clamp wants to spin on the foot brace not matter how tightly clamped. A short piece of sheet rubber between the clamp and bar provided some compression/friction grip and the bedevilment of drilling and installing the spring clamp was finally resolved.

NOTE: Those spring clamps work for the purpose of attaching the rudder control bar positioned above and slightly in front of the foot brace bar, but they are hell to work with. Drilling through the telescoping foot brace tubes at an angle would be far easier, if you can live with a non-adjustable foot brace.
That struggle over it was time for the fun part, cogitating the installation of the control and retraction lines. I couldn’t fashion Joel’s Woopie Slings and locking bromels from Zing-it line if I had a diagram and month’s to practice. I want a KISS solution, and to that end I elected to use clips and 3mm cord, and a layout in which the lines will stay in the canoe.
I have a couple of nylon clips for the control arms and a tiny S-biner that should work for the rudder; a teensy short clip so that line can retract as close to the deck plate as possible when pulling the rudder up.

Before figuring out best placement of the various rudder lines I needed fit out the canoe with seat pad and back band, sit in the canoe to adjust the foot brace bar and calculate the placement of the retraction and control lines. Gawd bless the thick foam pad on the shop floor for test fit sits.

One closed cam cleat mounted on the seat truss for the retraction line, where it is out of the way and still easily accessible, with a stopper ball on the end of the line. The stopper ball is there to keep the line from pulling fully out from the closed cleat and is easier than a stopper knot to grab sight unseen.

I intend to leave the lines in place when the rudder is off to make field installation and removal of the rudder easier, so all of the lines are secured via two pop riveted in two nylon cable clamps under each inwale. Four cable clamps and four pop rivets.
The foot control lines need to angle down from the inwales, running under the seat towards the control bar, and I fortuitously have enough machine screw shank protruding under the seat to install two more cable clamps on either side. If you are keeping count that is 8 now cable clamps as line guides, four on each side.

Working without shop partner Joel I needed to build a jig to hold the rudder along the keel line to evenly adjust and tension the foot control lines.

To provide adjustability on the foot control line when the brace is slid fore or aft I simply tied a taut-line hitch using the foot control bar eye bolts as the post.
Sweet. I can adjust the foot bar length and line tension from my seat with the taut-line hitches.
Beyond that, the less bending over and fiddling with canoe-on-the-ground boat outfitting the happier I am when launching. Installing the rudder is as simple as dropping in the pin, circling in the clevis and attaching the three clips. Methinks I should carry a spare clevis ring.
I ran a length of bungee forward on each side from the control bar eye bolt and back through a beefy cord lock. The taut bungee keeps the rudder straight when my feet are off the control bar and the cord locks allow me to adjust the tension.

Almost done, just a couple of test fit checks. As expected the blue barrel still fits in my preferred placement between the front thwart and utility thwart without any interference. So far so good.

And, also as kind of expected, the stern spray cover does not work with the lines as currently configured. The end of the spray cover that wraps the tip of the deck will bind the retraction line and the control lines will abrade the edges of the cover at the snaps.
Well dang it, Rocky was right. The control lines need to run through the hull, in this case just below the edge of the spray cover. I still have a couple of nylon flanges in stock and G\flexed through the hull at an angle those should keep the cord from sawing away at the Royalex.

I beveled opposing sides the flange so it would fit more closely to the hull when installed at an angle and seated it with G\flex inside and around the hole on both sides. Once that G\flex set I flaired out the protruding flange end with a bit of PC-7 epoxy, waited some more and top coated that with more G/flex. Probably overkill, but I don’t want those flanges popping off or wearing out.
The revised control lines illustrated another installation oops. All of the clips should be attached so they remain on the rudder when it is removed. The less stuff I have hanging out the end of the canoe the happier I’ll be on swamp trips with densely overhung branches and limbs.
I needed a grommet, seated through the tip of the spray cover for the rudder retraction line and all was well. A grommet big enough to pass the loop end of the retraction cord through. A torch and a heated head of a shingle nail melts a nice sealed ½” hole for the grommet. I don’t like having sharp grommet edges against nylon, so a bead of Aquaseal/Cotol mix around the grommet edge softens the transition.
But now I can’t move forward until the latest epoxy sets up. Or can I?
I like to have some stripes or other attention grabber on my rudders. I have some leftover lettering on the sign side that would make for bold black on yellow stripes or abstract design. If I black out a few sections on the sign side I can replicate that design symmetrically on the plain yellow side.
I’ll leave the design to chance and do some random taping and spray paint overlay.

Well, that’s random. All that’s missing is to add a few lengths of High Intensity reflective tape.

The stripes and reflective tape are more important on permanently attached rudders, to keep folks (including me) from walking into it when on the roof racks and warn cars in crowded parking lots. It may still be useful to keep me from stumbling into the rudder in camp when left installed.
With the epoxy set I beveled the entry hole of the new flanges and the control lines slide smoothly without any catch or resistance.
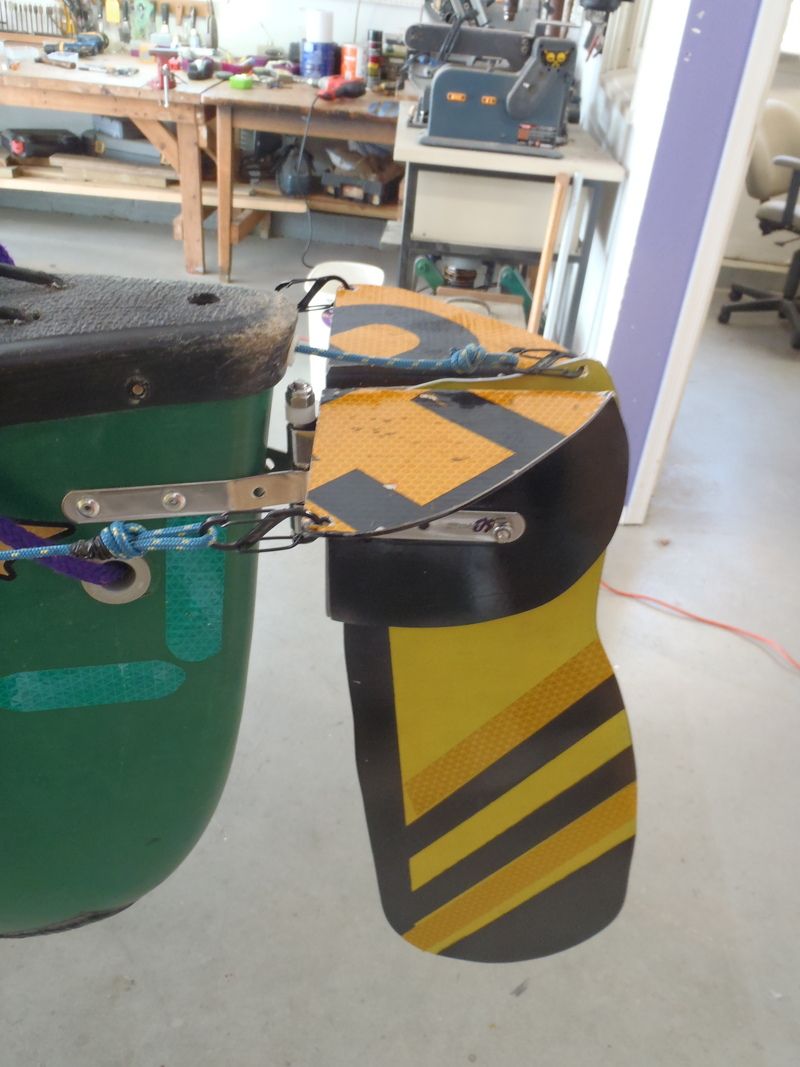
Time for another test fit. Rudder off:

Rudder on:

Oh yes, I like it. No more muscling a paddle blade as rudder when sailing.
The jet-boat driver on the Green River referred to the Penobscot as “The Inspector Gadget Boat”. Wait ‘til they see me next time.

No Title
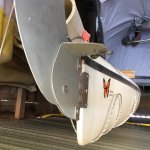
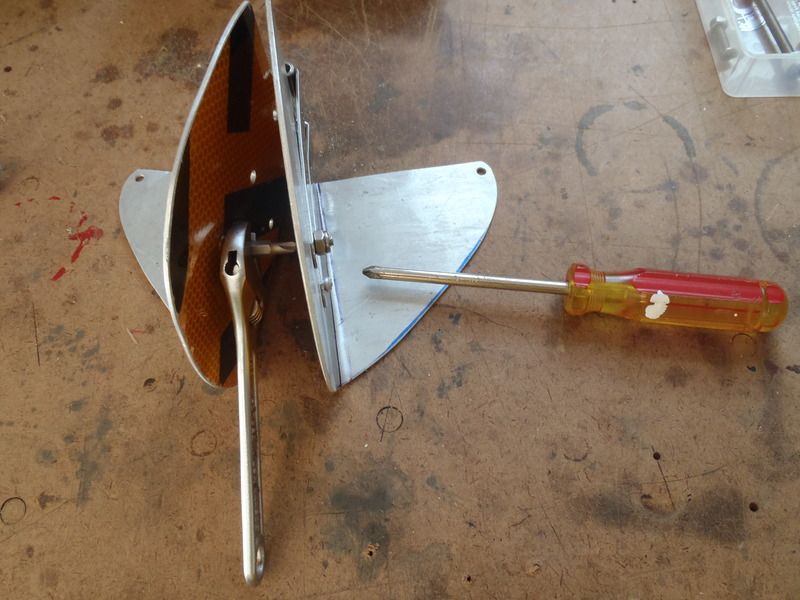
Here are some Sea Wind rudder shots. You will notice that it's not an add on piece but it is part of the rudder control wings. Had a friend try the pintle / grudgeon model on his giant Itasca and the blade wanted to flex and "fly" to the surface. Too long unsupported. The pivot bolt mounting hole being lower supports the blade in the stowed position(up) and protects the blade during the inevitable crash surf landings but it also helps during rooftop transport. There are some Baja paddling folks that feel a reflective rudder atracts toothy fish(sharky) whereas a black blade does not. If you run into your rudder a lot try drinking a bit less I guess
Here are some Sea Wind rudder shots. You will notice that it's not an add on piece but it is part of the rudder control wings. Had a friend try the pintle / grudgeon model on his giant Itasca and the blade wanted to flex and "fly" to the surface. Too long unsupported. The pivot bolt mounting hole being lower supports the blade in the stowed position(up) and protects the blade during the inevitable crash surf landings but it also helps during rooftop transport. There are some Baja paddling folks that feel a reflective rudder atracts toothy fish(sharky) whereas a black blade does not. If you run into your rudder a lot try drinking a bit less I guess
Attachments

G
Guest
Guest
Here are some Sea Wind rudder shots. You will notice that it's not an add on piece but it is part of the rudder control wings. Had a friend try the pintle / grudgeon model on his giant Itasca and the blade wanted to flex and "fly" to the surface. Too long unsupported. The pivot bolt mounting hole being lower supports the blade in the stowed position(up) and protects the blade during the inevitable crash surf landings but it also helps during rooftop transport. There are some Baja paddling folks that feel a reflective rudder atracts toothy fish(sharky) whereas a black blade does not. If you run into your rudder a lot try drinking a bit less I guess
I like the design of those rudder control wings and might try fashioning something like that for the next canoe rudder.
I don’t foresee a lot of crash surf landings in the Penobscot, or paddling it in Baja, and the rudder is removed during transport.
I probably won’t try drinking less. Hell, I’ve walked into the rudder stone cold sober.
Just remove the blade
G
Guest
Guest
Just remove the blade
On our decked hulls where removing the blade does not require tools and is a fast and easy task that is what I do. Especially during transport; when racked upside down on the truck the rudders are at ideal forehead whacking height and I have clonked them more than once when walking behind the truck.
I am more concerned about other people walking into the rudder or having a vehicle clip the rudder when parked. I try to use pull-through parking places so the boat isn’t sticking out near passing vehicles, but that isn’t always possible. I’ll back in at motels or main street parking to avoid that risk, but that sometimes puts the rudder over the sidewalk at pedestrian level.
That said, once initially installed I have never removed Feathercraft-type rudders or the Monarch rudder for travel safety, or for runs where there are overhanging branches or limbs that could become ensnared in the rudder cables or lines. On that type of waters having a rudder and lines sticking out is less than ideal.
In those guises a gudgeon and pin is easier. On the 70’s Optima the gudgeon is permanently attached, but the rudder blade is attached via a pin and is easily removable for transport.

I’m still experimenting with the ideal rudder assembly and line/cable configuration for easy installation and removal. The extra material on the control arm flaps looks promising, and I’d be interested in photos of the rudders on your open canoes if you can post some.
Wow, just sat here reading this for the last 45 min, just so cool. I'm ashamed that I can't even fix a leaky toilet! Very talented Mike, so nice.
G
Guest
Guest
Just for funsies I totaled up the various parts and pieces in the Penobscot rudder build. It seems like a lot of stuff, but most of it is available at a hardware store, and the rest from a decent outfitter.
A complete parts list:
One set of gudgeons from Duckworks (I’ve heard of folks using stainless hinges in some configuration)
http://www.duckworksbbs.com/hardware/p-g/canoe/index.htm
One aluminum sign (not stolen, a gift from a friend’s property where it was no longer needed)
One stainless steel spring clamp (or something else, drilling those holes is the hardest part)
One 3/16 or 13/64 drill for stainless. See above
One aluminum tube for foot control bar
End caps for control bar, two (or not)
Stainless steel 3/16” machine screws (round head), three 1”, three 1 ½” (or thereabouts, get extra)
Stainless steel Nylocks for above
Stainless steel washers – Dozen or so
Stainess steel fender washers, four
Stainless steel eye bolts for control bar, two
Pop rivets, 3/16” x ¼” and 3/16” x ¾” (plus or minus to fit gudgeon + hull thickness + washers)
Nylon spacers, two1/4” thick
Nylon washers – two 1/8” thick
Nylon flange – three (or not)
36’ of non-stretchy line (more or less)
Clips, three (one tiny)
Closed cam cleat, one (sized for line)
Wood stopper ball or toggle, one
Cable clamps, eight
Bungee cord (thin), couple feet
Cord locks, two
Grommet if using a spray deck, one
G/flex if using flanges
Reflective tape
Spray paint
G
Guest
Guest
I'm ashamed that I can't even fix a leaky toilet!
I much prefer futzing with boats in the shop to plumbing repairs. I have yet to flood the house messing with a boat.
G
Guest
Guest
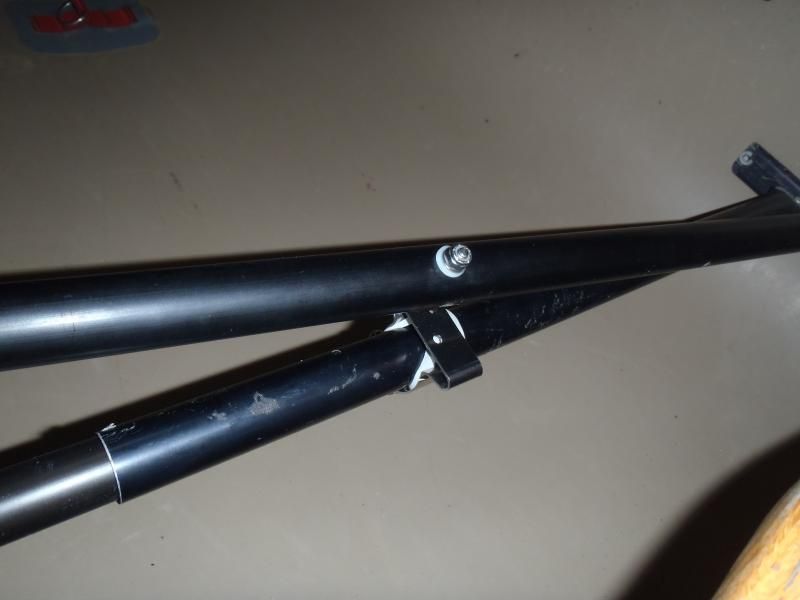
DIY Rudder Mark II
Taking some critical (re)design hints from RockyHeadlands, Joel and I spent part of a shop day fabricating a Mark II DIY rudder.
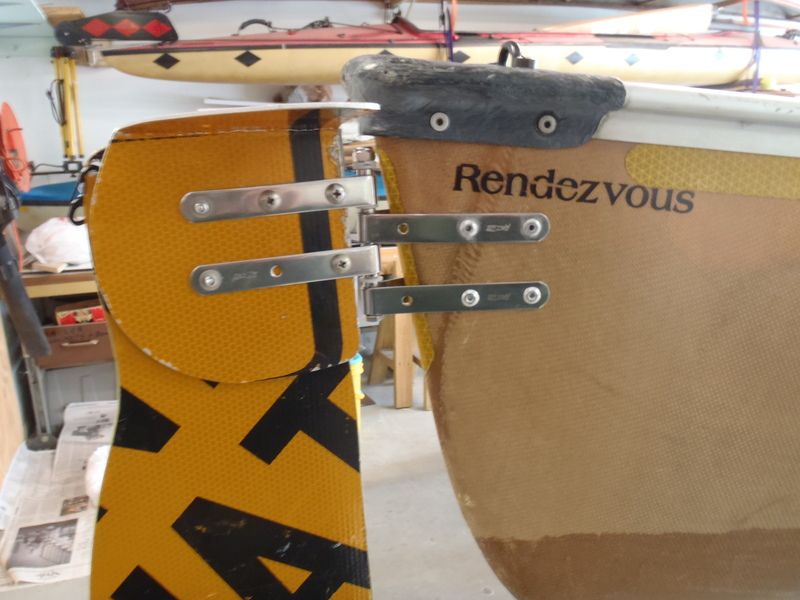
While the original Rendezvous rudder worked it had several failings. It wobbled sideways badly; in part due to having used only two gudgeons and in part to having fashioned undersized control arms, without enough shoulder to grasp and hold the rudder in a sturdy vertical position.
I will spare you the details, mostly because I largely stood aside, cut and bent metal pieces as Joel handed me the template and put away tools. Sometimes tools Joel was still using.
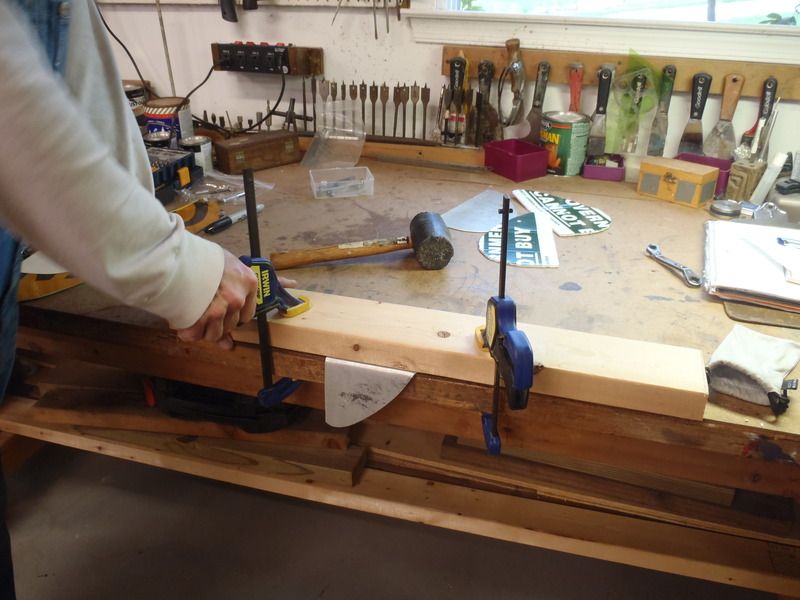
Joel had a concept for DIY a stiffer and superior control arm, and in this case one head was better than two. I couldn’t seem to grasp his concept and Joel couldn’t seem to grasp righty-tighty lefty-loosey when working upsidedown.
We did, as usual, manage to keep each other from making a mistake or two.
The Mark II incorporates a much larger and stiffer control arm vertical “shoulder”, and uses four gudgeons instead of just two. That larger shoulder also offers a lower pivot point for the rudder blade.
It was an insanely finicky, complex and evolving-as-we-went assembly process, but it is a major improvement over the Mark I rudder controls.
There are DIY’ed plastic bushings sandwiched between the control arms. Oversized “bushings”, matching the bulbous shape of the control arm’s vertical shoulders, and nylon washers between every metal-to-metal pin pivot point for a slick and soundless rudder.
Hey Duckworks Chuck – how’s about selling gudgeon pins that fit through four pintal holes? We used a stainless carriage bolt and nylock that was a tiny bit loose and over long.
While we had the Rendezvous in the shop we did some bottom work. That hull is nearing 20 years old and has seen untold thousands of miles. It has occasioned its share of scrapes and dings. We washed it, wet sanded it, washed it again, taped a water-line at the chines and laid a coat of epoxy on the bottom (I rolled, Joel followed behind and tipped it out).
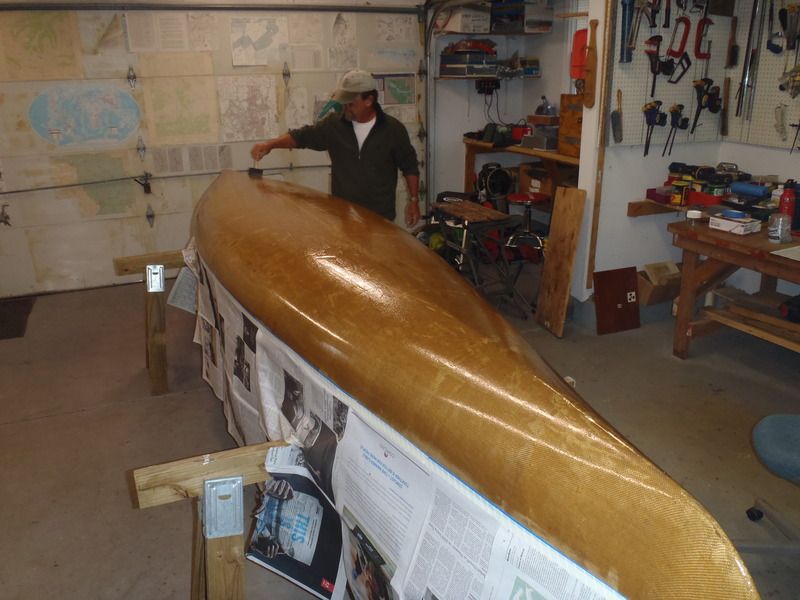
Let that cure, washed it, wet sanded it again (washed it again) and top coated the entire hull with spar urethane for some additional UV protection.
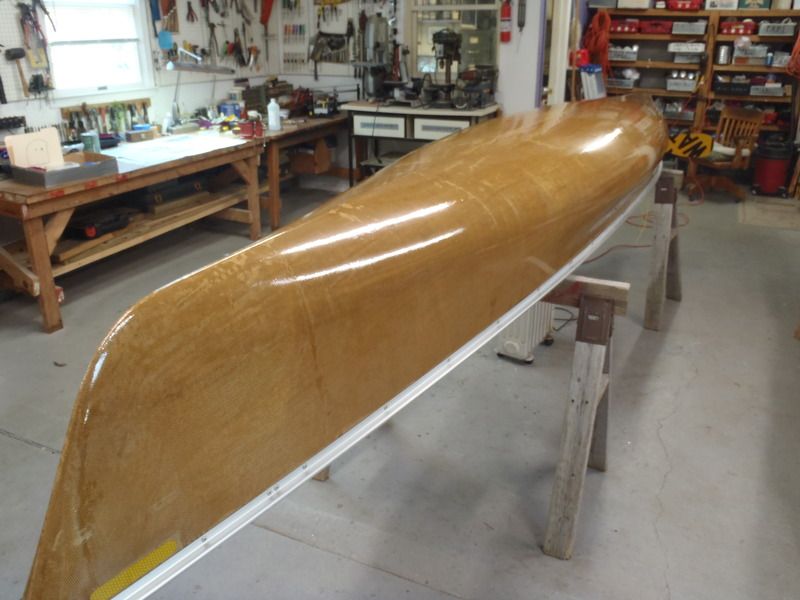
Not too shabby for a 1990’s hull.
Now I just need Joel to do some field testing before he puts one on my Penobscot. I’ll hand him tools and clean up after him.
Here are some Sea Wind rudder shots. You will notice that it's not an add on piece but it is part of the rudder control wings. Had a friend try the pintle / grudgeon model on his giant Itasca and the blade wanted to flex and "fly" to the surface. Too long unsupported. The pivot bolt mounting hole being lower supports the blade in the stowed position(up) and protects the blade during the inevitable crash surf landings but it also helps during rooftop transport.
Taking some critical (re)design hints from RockyHeadlands, Joel and I spent part of a shop day fabricating a Mark II DIY rudder.
While the original Rendezvous rudder worked it had several failings. It wobbled sideways badly; in part due to having used only two gudgeons and in part to having fashioned undersized control arms, without enough shoulder to grasp and hold the rudder in a sturdy vertical position.
I will spare you the details, mostly because I largely stood aside, cut and bent metal pieces as Joel handed me the template and put away tools. Sometimes tools Joel was still using.

Joel had a concept for DIY a stiffer and superior control arm, and in this case one head was better than two. I couldn’t seem to grasp his concept and Joel couldn’t seem to grasp righty-tighty lefty-loosey when working upsidedown.
We did, as usual, manage to keep each other from making a mistake or two.
The Mark II incorporates a much larger and stiffer control arm vertical “shoulder”, and uses four gudgeons instead of just two. That larger shoulder also offers a lower pivot point for the rudder blade.
It was an insanely finicky, complex and evolving-as-we-went assembly process, but it is a major improvement over the Mark I rudder controls.
There are DIY’ed plastic bushings sandwiched between the control arms. Oversized “bushings”, matching the bulbous shape of the control arm’s vertical shoulders, and nylon washers between every metal-to-metal pin pivot point for a slick and soundless rudder.

Hey Duckworks Chuck – how’s about selling gudgeon pins that fit through four pintal holes? We used a stainless carriage bolt and nylock that was a tiny bit loose and over long.
While we had the Rendezvous in the shop we did some bottom work. That hull is nearing 20 years old and has seen untold thousands of miles. It has occasioned its share of scrapes and dings. We washed it, wet sanded it, washed it again, taped a water-line at the chines and laid a coat of epoxy on the bottom (I rolled, Joel followed behind and tipped it out).

Let that cure, washed it, wet sanded it again (washed it again) and top coated the entire hull with spar urethane for some additional UV protection.

Not too shabby for a 1990’s hull.
Now I just need Joel to do some field testing before he puts one on my Penobscot. I’ll hand him tools and clean up after him.
Very cool Mike. I like how you painted your rudder, mind it I use your idea?
I was really confused until I saw the photo of the sail. I do not like rudders, but have always favored boats with plenty of rocker. I built a sea kayak out of African mahogany and did not put a rudder on it either. Maybe it is a good idea for sailing, but rudders on canoes for me fall in the same category as outriggers and oars.
G
Guest
Guest
I was really confused until I saw the photo of the sail. I do not like rudders, but have always favored boats with plenty of rocker. I built a sea kayak out of African mahogany and did not put a rudder on it either. Maybe it is a good idea for sailing, but rudders on canoes for me fall in the same category as outriggers and oars.
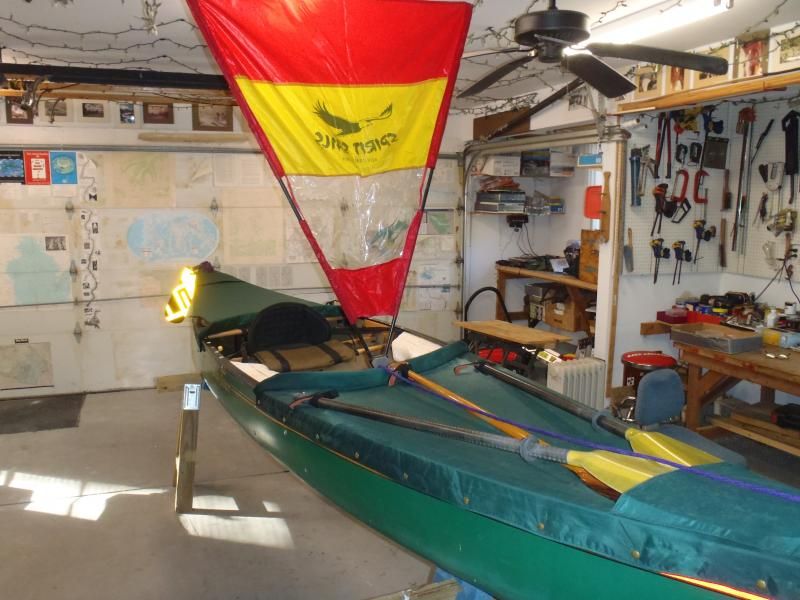
All of our tripping boats, open and decked boats, have a permanent utility thwart sail mount. Sometimes a simple downwind sail is just the ticket, and in that guise a rudder is invaluable.
Rudders are heavy, delicate, finicky and difficult to manage in tight quarters. And if I have one on the boat I’ll use it whenever it comes in handy, which includes lots of situations beyond sailing.
I’ll use the rudder on turns in moderate current, especially on big rivers where the turn is a mile long and I can just lock on to some gentle arc using the rudder and stay on the bubble line or in some wind shadow.
In the wind especially. I’ll use the rudder anytime it helps establish a comfortable wind angle or sideslip ferry, both into or running with the wind, circumstances depending. Or when I’m viewing some wildlife and want to creep up with as little noise and motion as possible.
Or when I have need or desire to have both hands free for a moment. With a small sail and a tailwind there can be a lot of hands free opportunity, and on long-in-the-seat trips I’ll take that opportunity to do “housekeeping” in the boat, take a photo, write a note, have a bite to eat or just sit and watch the world go by.
Tailwind, gentle breeze, downwind sail, open water….it’s all good.
Now skegs – yuck. Can’t use ‘em to turn, the skeg box takes up too much storage space, pebbles and debris get lodged in the skeg slot and jam the works.
That said many years ago we skegged/keeled some old glass slalom kayaks and C1’s as kid solo boats. That was likely sacrilege, but it worked.
I usually bring a bed sheet for tail winds. We just put two boats side by side and steer with a paddle. I have lashed two canoes together with long poles on the lower Snake River. It makes for a stable platform that is relaxing but the boats do not ride up and over waves quite as well.
I have often thought of lashing three canoes together and building a plywood deck on them with a mast and adding some leeboards. Roosevelt Lake in eastern Washington is the dammed Columbia R behind Grand Coulee. It runs for 184 miles through mostly forested country. I have a 1929 Johnson outboard that has been in the family since 1949.
I have often thought of lashing three canoes together and building a plywood deck on them with a mast and adding some leeboards. Roosevelt Lake in eastern Washington is the dammed Columbia R behind Grand Coulee. It runs for 184 miles through mostly forested country. I have a 1929 Johnson outboard that has been in the family since 1949.
G
Guest
Guest
DIY Rudder Mark 2.5
Shop partner Joel and I put a Mark II rudder on my soloized Penobscot. Well, I should really say that Joel did, because I didn’t remember much of the finicky assemble and disassemble multiple times sequence.
Neither did Joel, but he got ‘er done. It was still an extremely finicky process getting all of the parts and pieces to align just so, with lots of disassembly and mico adjustment to get things aligned and realigned.
Joel’s Rendezvous is a lightweight kevlar skin coat hull with thin material at the stems, and even using oversized Kruger style control arms it necessitated using four gudgeons, two on the boat, two on the control arms, to firm up any side to side play or sway when the rudder is deployed.
The basic parts and pieces, sans any machine screws or pop rivets.

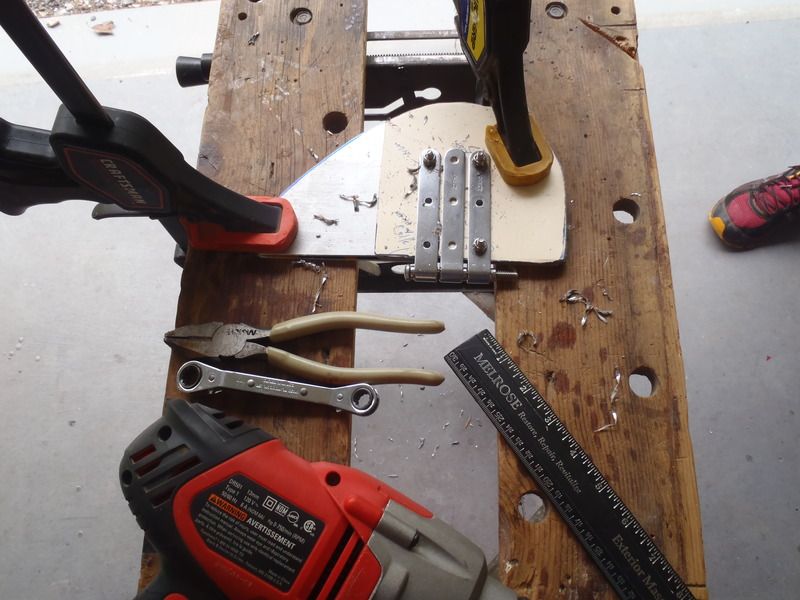
The DIY full sized plastic “bushings”, drilled full of matching bolt and pop rivet holes, are critical pieces in removing any wobble in the gudgeon/control arm sandwich.
Add a couple of pop rivets and a half dozen properly sized SS machine screws and nylocks. Assemble all of that. Then repeatedly disassemble, reassemble and repeat until everything fits and functions smoothly.
The stems of the Royalex Penobscot are much thicker than the Rendezvous, and using three gudgeons in combination with the Mark II control arms seems to have eliminated most of the sway.
I have a fourth gudgeon, already bent for the Penobscot stems, but a test paddle as it stands is in order to see if I need it.
These DIY canoe rudders are the most finicky and precision assembly required outfitting I have even done to a canoe, but once the parts and pieces have been assembled, disassembled, reassembled and . . . ACCKKKK DAMNIT TAKE IT APART AGAIN. . . ‘til they fit perfectly and precisely the thing is done and the whole shebang comes off by removing one gudgeon pin and three control clips, so what is left is unobtrusive on the canoe.
I still need to replace the control and retraction lines with 2.2mm Zing cord and have 180 feet on the way; I need to replace some tarp and parawing lines as well.
http://www.amazon.com/Samson-Rope-180ft-Average-Strength/dp/B006JS1VNC
Shop partner Joel and I put a Mark II rudder on my soloized Penobscot. Well, I should really say that Joel did, because I didn’t remember much of the finicky assemble and disassemble multiple times sequence.
Neither did Joel, but he got ‘er done. It was still an extremely finicky process getting all of the parts and pieces to align just so, with lots of disassembly and mico adjustment to get things aligned and realigned.

Joel’s Rendezvous is a lightweight kevlar skin coat hull with thin material at the stems, and even using oversized Kruger style control arms it necessitated using four gudgeons, two on the boat, two on the control arms, to firm up any side to side play or sway when the rudder is deployed.
The basic parts and pieces, sans any machine screws or pop rivets.

The DIY full sized plastic “bushings”, drilled full of matching bolt and pop rivet holes, are critical pieces in removing any wobble in the gudgeon/control arm sandwich.
Add a couple of pop rivets and a half dozen properly sized SS machine screws and nylocks. Assemble all of that. Then repeatedly disassemble, reassemble and repeat until everything fits and functions smoothly.

The stems of the Royalex Penobscot are much thicker than the Rendezvous, and using three gudgeons in combination with the Mark II control arms seems to have eliminated most of the sway.

I have a fourth gudgeon, already bent for the Penobscot stems, but a test paddle as it stands is in order to see if I need it.

These DIY canoe rudders are the most finicky and precision assembly required outfitting I have even done to a canoe, but once the parts and pieces have been assembled, disassembled, reassembled and . . . ACCKKKK DAMNIT TAKE IT APART AGAIN. . . ‘til they fit perfectly and precisely the thing is done and the whole shebang comes off by removing one gudgeon pin and three control clips, so what is left is unobtrusive on the canoe.

I still need to replace the control and retraction lines with 2.2mm Zing cord and have 180 feet on the way; I need to replace some tarp and parawing lines as well.
http://www.amazon.com/Samson-Rope-180ft-Average-Strength/dp/B006JS1VNC
G
Guest
Guest
I usually bring a bed sheet for tail winds. We just put two boats side by side and steer with a paddle. I have lashed two canoes together with long poles on the lower Snake River. It makes for a stable platform that is relaxing but the boats do not ride up and over waves quite as well.
I have often thought of lashing three canoes together and building a plywood deck on them with a mast and adding some leeboards. Roosevelt Lake in eastern Washington is the dammed Columbia R behind Grand Coulee. It runs for 184 miles through mostly forested country. I have a 1929 Johnson outboard that has been in the family since 1949.
We’ve done a small tarp affixed to bowman held sticks or paddles with two boats lashed together, but it is a cumbersome and time consuming built and needs a few feet of space between the two hulls to perform well. For an easy and rudimentary tandem canoe sail we just used golf umbrellas held horizontal in the bow with better (or at least easier) success. When my sons were young and we paddled tandem canoes they became adept at angling a golf umbrella in the bow. (HINT – Hold on to the slider release sleeve and button with one hand in strong winds)
Those tandem Grumman catamaran rigs rented by Texes or Tag-Along seemed to me horribly awkward, and when I’m paddling I want to be able to escape other people, not be trapped a few feet away.
A friend has plans and dreams of building a trimaran boat deck configuration, consisting of something like a square stern Grumman 19 with a kicker and a living platform across the top, with a releasable off-to-explore sea kayak outrigger. The other outrigger could be a 2[SUP]nd[/SUP] sea kayak, or a large ama with hatches. That rig could carry a (probably literal) ton of gear, food and water.
I like the mast idea, and so will he. It probably necessitates carrying a long tiller, but in a rig like that, if the opportunity arose, the ability to sail and conserve fuel would be worth it. There should be ample room to stow a mast, furled sail and tiller strapped to the deck.
Put a tent or rainfly-able screen house on the deck, with a couple of hinged panels over the Grumman for gear storage access. Motor it or when possible, or better still sail it, as a tiny-house live aboard with gunkholing kayak attached.
I need to keep an eye out for a cheap 19 or 20 foot square stern. I want to help build it.
Back to sailing - I am absolutely sold on the value of a small, easily deployed and managed downwind sail in solo craft. Even without a rudder.
Similar threads
- Replies
- 0
- Views
- 104
- Replies
- 98
- Views
- 14K
- Replies
- 3
- Views
- 458