• Happy Birthday, Liberace (1919-87)! 🤵🏻🎹🕎

Composite Bloodvein build

Remind me of your layup again. Looks like it served you well.

I don't quite remember; it's probably buried in this thread somewhere. Lots of partials with extra cloth below the water line as well as some extra full width blankets in the center 1/3. If I remember right there are 9 layers of cloth in the center of the boat below the water line. The thinnest parts of the boat only have 3 layers. On the thickest part of the hull, from the outside in, it's s-glass, carbon, carbon, maybe more carbon, kevlar, kevlar, probably some more kevlar, maybe another layer of kevlar, and e-glass. I really need to start writing this stuff down.

Alan
 
I forgot a couple things.

The spray decks were really nice for protecting the packs. No paddle drips on the front pack and it was nice, after paddling in the rain all day, to have mostly dry packs; except for the bottom that was in contact with the hull. To keep the the gear pack off the bottom of the canoe I started storing my yoke underneath it. This kept the pack completely dry and raised it just proud of the gunwales, which kept an arch in the spray deck.

The bungee cord hook attachments worked fine. I was able to mix and match pack locations and there was always enough stretch so the decks fit tight. Easy to do/undo.

Another good design change from version 1 to version 2 of the Bloodvein was to bring the outwales all the way to the stems and wrap them around. On version 1 I stopped the gunwales at the float tanks in order to save weight and work. But with version 1 I'd sometimes ship water over the bow that I thought outwales would have deflected. And indeed that seemed to be the case with version 2. Quite often when going through large waves the bow would plunge into a wave and the outwales wrapping around the stem seemed to deflect it away rather than letting it spill unimpeded into the boat.

The original:

20150725_002 by Alan, on Flickr

Version 2.0:

20160403_003 by Alan, on Flickr

Outwales wrapping the stem on V2.0:

20160403_002 by Alan, on Flickr

Alan
 
Another good design change from version 1 to version 2 of the Bloodvein was to bring the outwales all the way to the stems and wrap them around. On version 1 I stopped the gunwales at the float tanks in order to save weight and work. But with version 1 I'd sometimes ship water over the bow that I thought outwales would have deflected. And indeed that seemed to be the case with version 2. Quite often when going through large waves the bow would plunge into a wave and the outwales wrapping around the stem seemed to deflect it away rather than letting it spill unimpeded into the boat.

I think extending the outwales to the stems looks better.

As to water deflection, there are techniques that whitewater boat builders have used, which are somewhat effective if of dubious aesthetics. One way is to have a large deck that overhangs the hull. The hull can be sculpted up in an arch to meet the overhang. More cheaply, John Berry (Millbrook Boats) would glue 18" long wedges of triangular foam under the bow outwales of his long decks to serve as water deflection barriers. These were lightweight, would eventually come off, but could be easily replaced.

I eventually removed both the foam deflection strips and the decks from my John Berry boats to reduce end weight, deciding that water intake avoidance was more a matter of paddling skill than bow design and that my inflated end bags served the same purpose as decks.

Even on flatwater canoes I would prefer not to have decks. I see no purpose for them, most of them are ugly, they promote under-deck and inwale water rot when the boat is upside down on racks or storage, and I want to minimize swing weight on all canoes as much as possible. Since I don't build boats, however, I have to live with the decks that the builders annoyingly put there.

Marc Ornstein (Dogpaddle Canoe) makes very short carbon fiber end caps with a drain hole, which make a lot more sense to me than decks. They weigh almost nothing and protect the nose of the canoe while also draining under-deck water.

Mike Galt used no decks at all and his canoes were gorgeous.

Raj2GkF0nEyzF7x7gVsaWrzTpEgm0kRFPLTJ2hSQ3L4BeqWOHjo9PKdWL3yfuE6tvpQ2KYlSAdQtPA=w2880-h1620-no


Just some thoughts for your next project.
 
I remember adding powdered Graphite, from System Three to their Clear Coat resin to fill the weave on the bottoms of a few boats. While it provided scratch protection, it would bubble if left out in the hot Summer sun light for a month, as a friend found out !
That steared me away from it. I still have a few hulls with it on. It does slide over rocks much better than plain varnish coated epoxy !

Dynel, plus some Graphite mixed resin as a fill coat might be worthy of consideration.

I have Dynel skid plates installed on several boats with West Epoxy 105/206 and G/flex mix, most often with graphite powder and a dab of black pigment added to the mix for the most opaque of black. I have not seen the bubbling, and those boats are stored year round on an outside rack. But I have never used graphite powder over wood, only composites and RX. Maybe the powder interferes with any residual wood outgassing?

Dynel is incredibly abrasion resistant. It is the bomb for skid plates. For a combination of abrasion and impact an underlayer or two of S glass would not hurt, but I have rock smashed the Dynel skid plates more than once with no cracks or failures.

The downside to using Dynel is that it swells up thick and rough textured when saturated with epoxy. Covering it and compressing it with release treated peel ply eliminates both of those issues. A single layer Dynel skid plate compressed with peel ply is all but flush with the hull. I just lay the peel ply on and compress it with my palm repeatedly, over the course of a couple of hours as the epoxy sets up.

I know of no materials mix that works better than Dynel and G/flex for easy to install and durable skid plates. Straight G/flex would be superior, but I mix the G/flex with regular West Epoxy 50/50, mostly to stretch my G/flex supply, but also to make the epoxy less viscous in application.

Some further skid plate discussion here:

http://www.myccr.com/phpbbforum/viewtopic.php?f=49&t=45187
 
It's worth a try ! Thanks Mike.
​ I'm in the market for some Dynel ! Oh and some more peel ply. I've been usingpeel ply for small patching jobs, and it worked great. Still nervous on full hulls.

​ My friend left his canoe sit on top of a Van in direct sun light, for over a month, one summer. The bubbles were the size of your fist.
​ He actually added a coating, of epoxy and graphite to his finished canoe. I assume he sanded the varnish, before applying.
 
The spray decks were really nice for protecting the packs. No paddle drips on the front pack and it was nice, after paddling in the rain all day, to have mostly dry packs; except for the bottom that was in contact with the hull. To keep the the gear pack off the bottom of the canoe I started storing my yoke underneath it. This kept the pack completely dry and raised it just proud of the gunwales, which kept an arch in the spray deck.

I am a huge fan of custom/purpose designed partial spray covers. Maybe the “partials” specificity is because I am uncomfortable when wraptrapped in a full spray skirt, I don’t like the entry/exit complications (or potential entanglement), much prefer to have some open area in front of the seat for between the knees gear, and for getting in and out, especially at awkward landings. And I really want an open space behind the seat for reach behind and retrieve day gear accessibility on the fly.

Spray covers are valuable beyond just keeping rain out. On thick swampy trips (or simply scooting under head high strainers. . . . “Oh crap, that’s lower than I thought” as I peel off bark and beetles with the back of my PFD) the partial covers help keep the foliage and critters out of the canoe. Busting through dense wood and brush in summer deposits a lively insectarium of leaves, twigs and bugs inside the hull. That debris is fugly on smushed on gear and worse when puncturing floatation bags.


In no-shade open water baking sun trips even partial covers shade the gear load and keep the underside cooler, especially if the water temperature is well below the air temperature. That alone is a boon on open waters and desert rivers.

I’m looking forward to the spray cover functionality design on the Bloodvein III. Rain sheltered “awning” for Sadie? Map case attachment? Paddle pocket? That is a big blank canvas on top to work with.


Maybe a little raised lip along the open ends of the covers to help drain water over the gunwales? The partials CCS made for two of our canoes have a Blackfeather-ish raised lip (strip of thin minicel sewn into the hem) that drains rain and paddle drips over the gunwales perfectly.
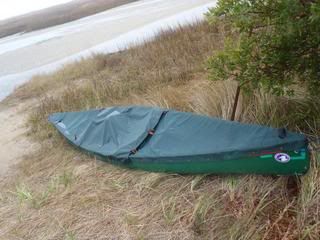
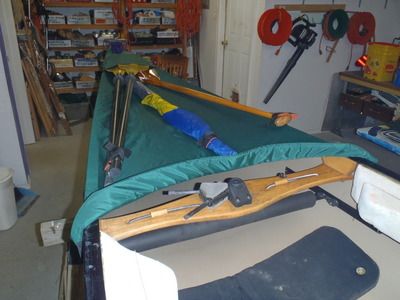
Bow partial


Stern partial


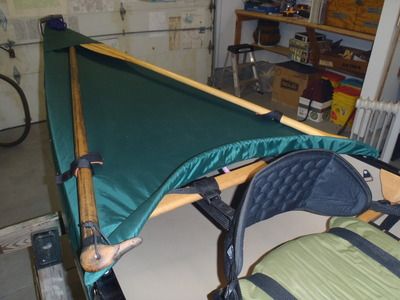
Gawd bless a paddle pocket and strap or three. Double, bent single and sail on the bow, straight single and hiking staff/boat hook/push pole/tarp pole on the stern. More choices than I am ever likely to carry on a single trip.

Center storage cover installed. Probably unnecessary for true wilderness tripping, but if I am daytripping from a site I like having the paddling gear encased in the canoe dry and ready to go. Especially if it is a long trek into camp; I really don’t need to haul my paddles, PFD, seat pad, back band, spongebailerthrowbag up to camp to keep them dry and contained. And then haul them all back down the next morning.

A partial partial cover to occlude the open area(s) of the hull is worth an extra ounce or two as an in-camp storage cover.

 
That boat hook hiking staff:

The hiking staff with a “boat hook” ducks bill is as multifunctionally handy a piece of gear as exists; for hooking gear just out of reach inside the hull, recovering yardsale gear when a companion swims, grabbing a friend’s gunwale for an eddied out muckleup, assistance staff/hook on difficult landings, spare tarp pole, shallows push pole.

Treking poles seem a little frou frou to me, but when sucking oxygen at higher altitude I hook my pack to the boat hook duck’s bill and hang suspended in the shoulder straps, wheezing wishing I had spent more time acclimatizing.

A 5 or 6 foot length of closet rod, shod with a copper pipe end cap and boat hook head can serve all manner of uses. Tie a short loop of line around the head for easy tarp pole use.

Or, Alan, ya know, a near weightless carbon fiber tube dressed up in the same manner.
 
Dynel and release treated peel ply

I'm in the market for some Dynel ! Oh and some more peel ply. I've been usingpeel ply for small patching jobs, and it worked great. Still nervous on full hulls.

I have no clue about doing a “full hull” using either material. That would probably mean an entire schedule of peel ply partials, with some cut on the bias, to accommodate all of the hull curves. That is way too much cogitation for my pee brain, and even my shade tree fill coats, rolled and tipped out on S glass come out OK.

Dynel would be unnecessarily heavy if used as a full (outer) cloth, but as a lay up schedule, as partials on the outer stems, Dynel would be hard to beat for abrasion resistance where it matters (and happens) most.

For single source ordering of both Dynel and release treated peel ply (Thanks Pete, I need to restock soon):

pblanc said:
Jamestown Distributors sells both plain weave Dynel fabric and a good quality treated release fabric:

Dynel:
http://www.jamestowndistributors.com...bric+%2F+Cloth

Peelply:

http://www.jamestowndistributors.co...ame=WEST+System+Vacuum+Bagging+Release+Fabric


Release treated peel ply; not the green pull nylon stuff that is a timing hassle. Unless you really need an uncured chemical epoxy attraction for installing additional top fabrics the “green pull” stuff is a PITA.

I time my shop work and prep so that the actual epoxy/cloth/peel ply application is the last thing to be done. I may check it a few times during the night, but I’m not pulling the peel ply ‘til next morning.
 
Last edited:
The trouble I had with the green peel ply, was getting it to conform to the hull shape, in such a big job.
Alan suggested cutting it into strips, it might help. But for now, I'll stick with small areas, or flat areas, for the peel ply.
Thanks for the links Mike !

Jim
 
Even on flatwater canoes I would prefer not to have decks. I see no purpose for them, most of them are ugly, they promote under-deck and inwale water rot when the boat is upside down on racks or storage, and I want to minimize swing weight on all canoes as much as possible. Since I don't build boats, however, I have to live with the decks that the builders annoyingly put there.

Marc Ornstein (Dogpaddle Canoe) makes very short carbon fiber end caps with a drain hole, which make a lot more sense to me than decks. They weigh almost nothing and protect the nose of the canoe while also draining under-deck water.

Mike Galt used no decks at all and his canoes were gorgeous.

I couldn’t disagree more. Ugly is in the eye of the beholder, and an inset scalloped wood deck is a bit of craftsmanship beauty. I do hate teensy deck plates. Or, in winkier nomenclature “deck caps”

For bow wave and splash protection I’d rather have a well designed bow and trim going in, but a large deck plate holds other function for me. I love a sizable deck plate. OK, the giant 20 x 12 inch plastic Mohawk WW deck plates (ummm……finding one to weigh) are close to a pound apiece, but in carbon fiber that is mere ounces.

I like a big deck plate for bow splash in waves. I like a big deck plate for the opportunity to drill ½ inch drain holes just at the stems, big enough that a spider egg sack or tree seed fluff can’t occlude the drain hole. Long enough deck plates to drill that big drain hole and still drill 4 holes for an over/under/over Z of bungee to hold the painter lines secure above or below the decks. Maybe with a cross thwart grab handle hidden incorporated, a la some Nova Craft decks.

Of course using bow and stern stray covers largely eliminates all of those large deck plate advantages. I can’t secure the painters accessibly, or even get to a carry thwart to grab one end.

Easily resolve with a painter keeper on the covers, and a hand kindly grab handle incorporated on the painter loop.


With spray covers occluding much of the gunwales there isn’t a lot of boat edge to grasp at the stems, so an external grab handle on the painters is welcome. Even so I bring the bowline back to an open cleat on the utility thwart, so I can have line in hand while exiting the boat.


At any kind of awkward steep or windswept landing having the bowline in hand as I clamber out, especially when I fall on my arse and the boat starts to float away, is advantageous.
 
Finally getting around to cleaning up the boat post-trip. If you remember this is what the hull looked like when I got home:

20161017_002 by Alan, on Flickr

I taped off the bottom of the hull, by eye so the line is a bit wavy, sanded the bottom, and then applied one coat of very thick epoxy (colored black). The application was with a squeegee and the thickened epoxy does a nice job of filling, or at least mostly filling, the deep gouges with one coat. Perfection went out the window long ago so this will be good enough. After a week or so I'll sand it lightly and re-varnish.

20161128_002 by Alan, on Flickr

20161128_003 by Alan, on Flickr

Alan
 
I like the way that new epoxy looks on there. That canoe bottom looks like it came straight off the racks from the rental shop! It really shows how rough the trip actually was!

Jason
 
I taped off the bottom of the hull, by eye so the line is a bit wavy, sanded the bottom, and then applied one coat of very thick epoxy (colored black). The application was with a squeegee and the thickened epoxy does a nice job of filling, or at least mostly filling, the deep gouges with one coat. Perfection went out the window long ago so this will be good enough. After a week or so I'll sand it lightly and re-varnish.

Colored and thickened with what?

Black pigment? Graphite powder? Both?

There is something to be said for a two-tone white waterline bottom. At least the inevitable white bottom scratches don’t stand as visible, and it can help with trim line check if far enough up the chines.
 
Colored and thickened with what?

Colored with graphite powder and thickened with cabosil.

I thought about the 2 tone with white but I'm not real crazy about the look and keeping it black was so much easier. It's a lot easier to cover black with black and a wavy transition line isn't so noticeable either.

Alan
 
No Way ! I couldn't spread Water that thin !

It helped that it was only up about 4" instead of the entire hull. I mixed up 4 ounces and had extra left in the cup I'd scraped back off. With the squeegee there's nothing to get soaked up in the roller and I tried to scrape off everything that wasn't filling a scratch.

Alan
 
Back
Top