• Happy Weed Appreciation Day! 🌱🌿🌻

Bell Yellowstone Solo Rebuild

Joined
Jul 6, 2021
Messages
643
Reaction score
555
Location
The Hereford Zone along the Mason-Dixon Line
I have enough boats in the shop right now, two still in progress and another arriving next month. Plenty of fall/winter projects. And there I was whining that I needed a boat to work on; best finish up the two I started months ago.

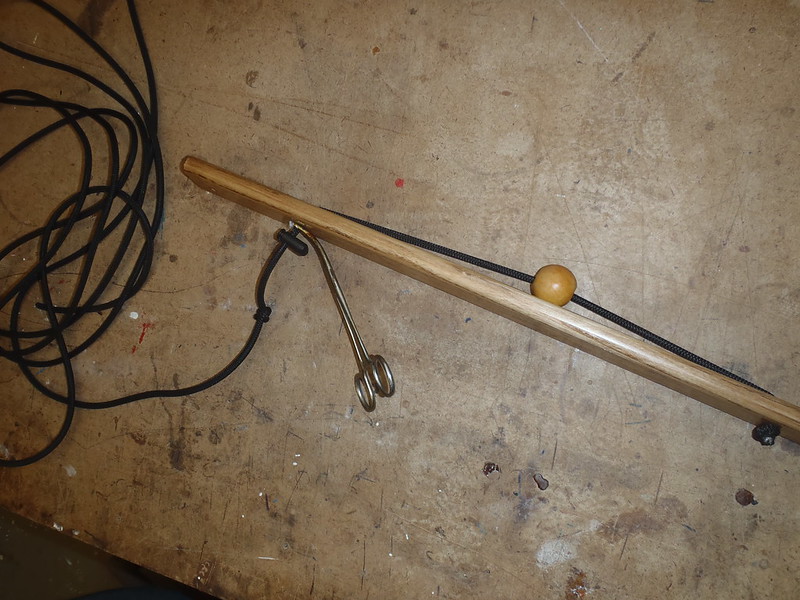
I’m in no rush to work on the Yellowstone Solo, but wanted to get semi-started while it was still scrub-a-dub hose and brush weather. I opted to bring it home sooner rather than later for another reason as well; there were just enough pieces of inwale left to transport the canoe inverted on roof racks without wobbling like a bowl of jelly or damaging the naked Royalex.

PA310005 by Mike McCrea, on Flickr

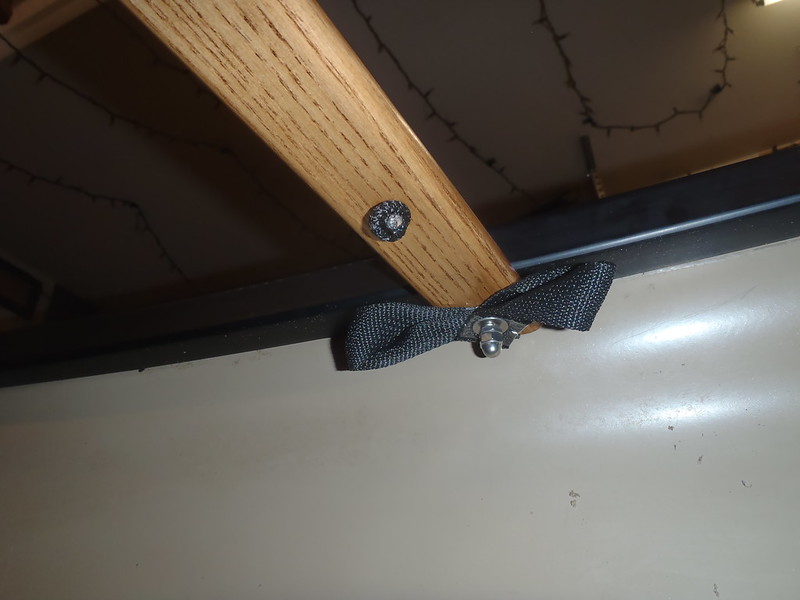
The remaining gunwale pieces and screws were all still there when I got home, didn’t lose any tire flatteners on the highway, and I’ll save those screws of course. Not that I’ll ever do wood gunwales again.

But, even before removing the screws, I needed to wash it. I can’t stand having a dirty boat in a crowded shop, I know I’ll be leaning over it or brushing against it, and then contaminating whatever paint, varnish, epoxy, etc I’m working on. So the YS got (sharps carefully) scrub brushed with the screws still sticking out.

PB010008 by Mike McCrea, on Flickr

I wasn’t leaning over, screws poking belly, to wash the inside. Later for that, after the YS is upright in the shop and the few remaining pieces of inwale and screws have been removed.

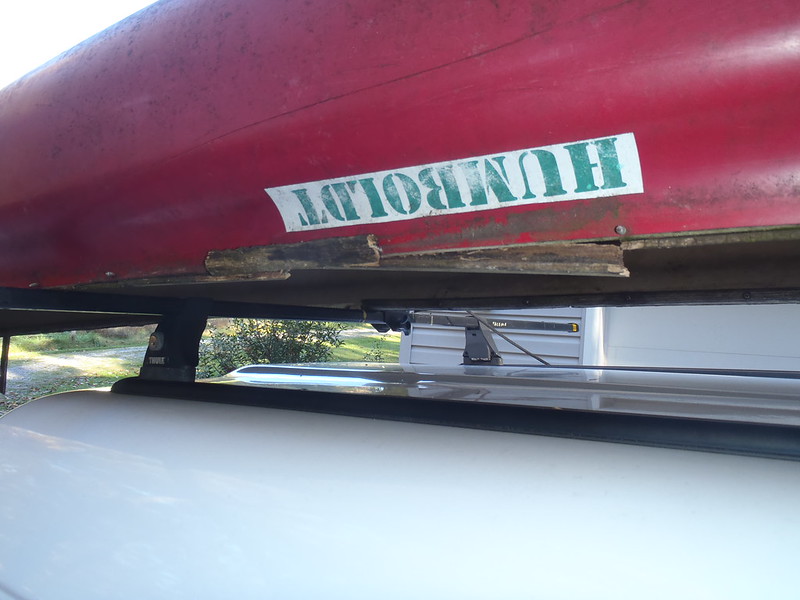
Last permit is from 2007 and has a 2001 HIN. It was a solo canoe review boat, so probably the first year for the RX Yellowstone Solo. One oddity, common on fresh-from-the-factory roof racked Royalex hulls, it sports a series of small dimples in the Royalex. Right where the belly line rope hitches pressed against the still soft RX foam core when tied to the roof racks. Our fresh from the factory RX Wilderness sports a series of those hitch dimples as well.

Really fresh RX (maybe T-formex?) might be better rack secured for the first year or so using cam straps. I hate cam straps.

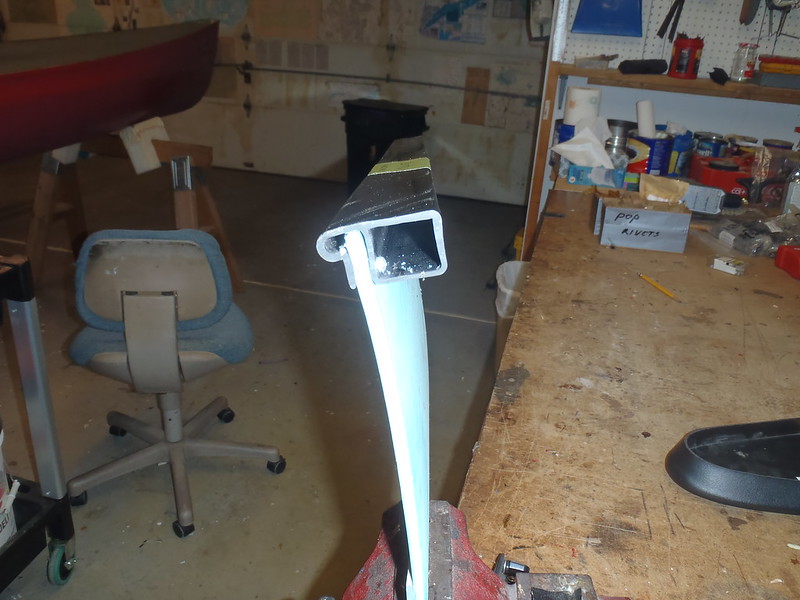
Washed, up close and personal and OH NO! The stems are worn. Whatever shall I do? If only there was some lightweight, un-gurgling flush fitted, incredibly abrasion resistant material I could install. I’ll have to ask around for suggestions. Maybe Glenn knows.

PB010009 by Mike McCrea, on Flickr

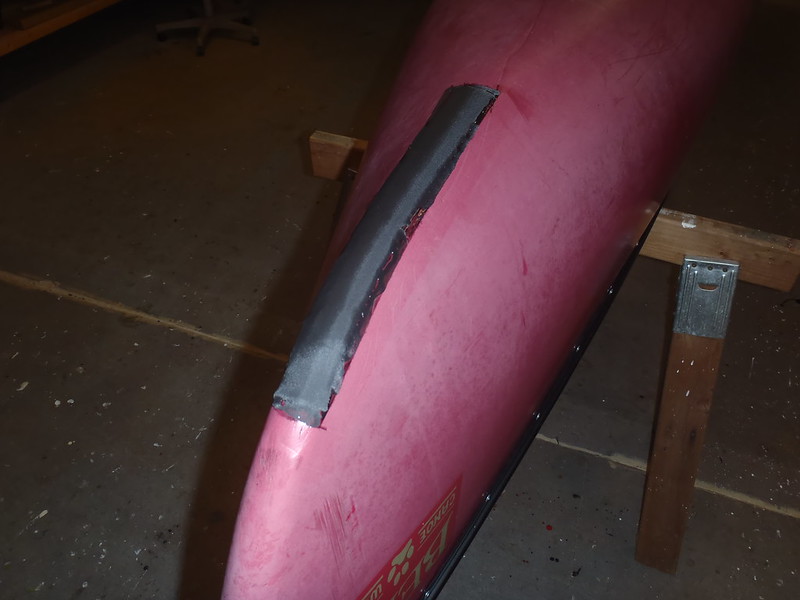
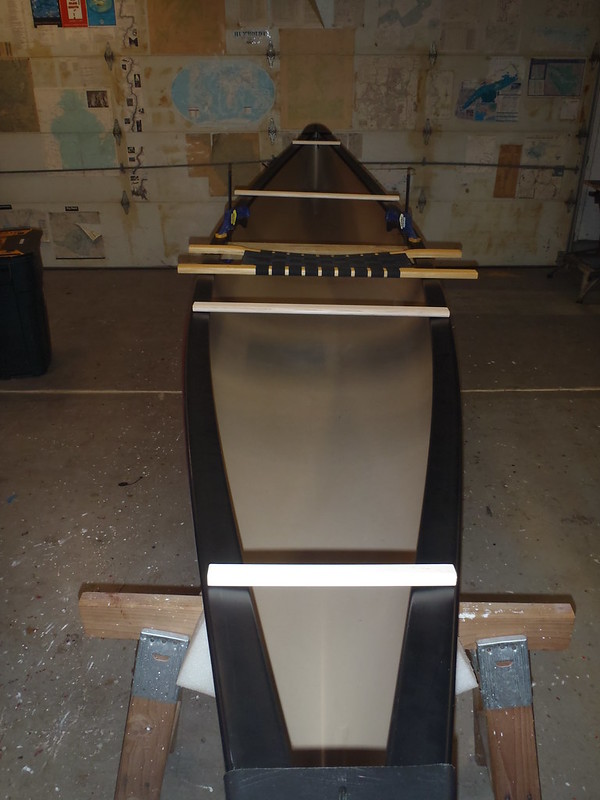
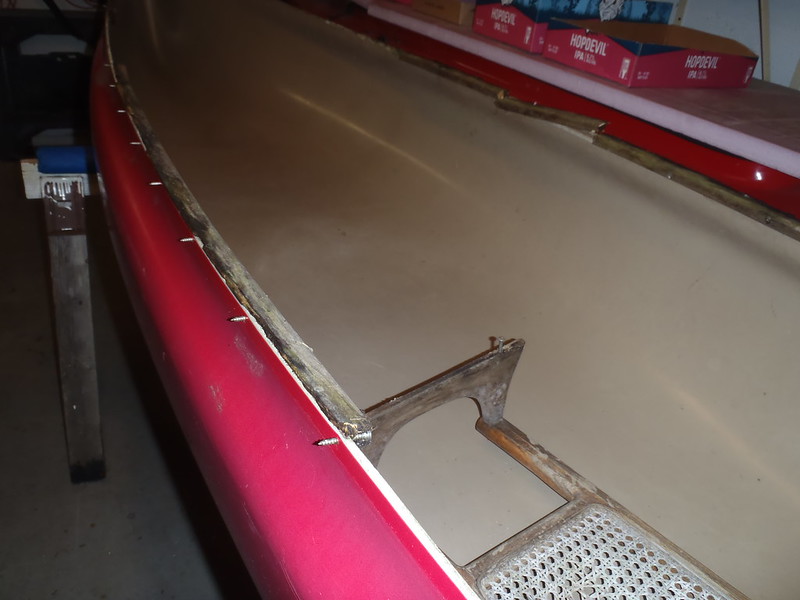
With the outside cleaned and the YS back in the (getting boat crowded) shop this is what was left of the still attached wood gunwales. Eh, that’ll buff right out.

PB010014 by Mike McCrea, on Flickr

The seat was half dangling free when I pick it up, and I pulled it out before racking the canoe for the drive home, so it didn’t become highway debris. The seat may be salvageable, the truss drops are rot decayed gonners.

PB010013 by Mike McCrea, on Flickr

The YS is a good kneeling canoe, especially with a skilled paddler. That’s two strikes against me. I may need to have a talk with Conk when I get to the seat stage, but I have a long ways to go before then.
 
Mike,

The Bell YS is a great boat. I had a RX one for many years and sold it for $500 dollars to make room for a Hemlock SRT. I have regretted it though and just gave the same person a Dagger Reflection 17 for free to make room for a Northstar Phoenix in IXP to replace the YS. Man it‘s a viscous circle! I’m too big to trip with the YS but for rivers in the PA area it was a really fun day trip boat. Being RX was icing on the cake since rocks and beat downs are standard on the local rivers. My buddy may actually give up kayaks all together after spending time in the YS. Luckily for me though he’s always offering to let me paddle it. Good luck, look forward to seeing a YS reboot.

Barry
 
Per a Bell catalog 2001 was the first year for the Yellowstone Solo. At that time Bell was still calling it the Royalex Wildfire. I wouldn’t be tripping in a Yellowstone Solo with my weight and typical gear load; speced at 650lbs with 6” of freeboard Bell none the less lists an “Optimum load” of 160 to 280 pounds.

It was a perfectly sized day tripper for Brian. Here it is floating in 3 inches of water.

EK_0043 by Mike McCrea, on Flickr

And floating on calmer, warmer waters.

EK_0001 by Mike McCrea, on Flickr

Brian was a craftsman (except for maintaining wood brightwork). The paddles in those photos are both Brian-made. While I was in his gear room I saw one of his finest creations. A 10 or 12 foot long Poling Paddle; a pole with three inches of shoed pole tip, then small blades; suitable for poling or paddling while standing.

When I test paddled the Yellowstone Solo I was unimpressed. Perhaps because it was factory stock un-outfitted, without my usual comfort touches of a foot brace, back band and knee bumpers. Those touches will be included in the rebuild, and my impressions may change.
 
Exterior scrubbed clean(ish) the Yellowstone Solo joined the other boats in the shop, and I removed the screws and bits of mulch rotted intact inwale. Fortunately there were just enough pieces of soggy inwale still attached to show where the seat and front thwart were originally positioned, those locations now marked inside the hull.

PB010015 by Mike McCrea, on Flickr

Once it has new gunwales I may change those locations a bit. This is what remained of the stored-outside unmaintained YS brightwork in total. The thwarts were missing entirely; I didn’t even see thwart-shaped piles of mulch on the ground under the canoe.

PB010018 by Mike McCrea, on Flickr

Unsurprisingly – sadly unsurprisingly - several gunwale screw holes on either side barely caught even a bit of the lip along the sheerline. Half holes at best; if that were a fish it would have thrown the hook at first strike.

PB010019 by Mike McCrea, on Flickr

More than “several”. I had to stop and count the sheerline holes that were halfsies (or less) in the sheerline lip.

PB010021 by Mike McCrea, on Flickr

Three in a row on one side, Five in a row on the other. Some of those may have been drilled so close to the sheerline edge that they simply wore through or pulled out; most of the holes in the sheerline were dang close to the edge.

And those gunwales aren’t even that skinny; ¾” deep counting the top rabbet. New hires, or Friday afternoon on the Bell shop floor?

Also a reminder to be careful lifting by the gunwales. Seriously, five freaking missed screws in a row, spaced at 6” apart? That’s thirty inches of gunwale not attached to the hull! I’m thinking back to one of Brian’s high water capsize and self-recovery episodes. It’s a wonder he didn’t rip the gunwales off.

I guess manufacturers don’t think anyone who cares will ever see those sloppy miss-drilled gunwale holes, but that “who will ever see?” craftsmanship does not inspire confidence. Not just Bell; I’ve seen miss drills on MRC and other manufacturer’s wood gunwaled canoes. Not every one, but not uncommon.

If some shade tree mechanic has already regunwaled a canoe once before get ready for some WTF catawampus holes. That could be the case with vinyl or aluminum gunwales, but those don’t rot off to reveal their secrets.

At least with thwarts or yokes on a new or seemingly sound used boat it is easy enough to take them out, check the hole locations and put additional coats of varnish on the often poorly sealed butt ends.
 
I’m not sure why or for whom I’m rebuilding the YS. Well, the why is that idle hands are the Devil’s workshop, and I need engaged hands (and mind) shop projects. It doesn’t keep the Devil away, but he and I are shop familiar and friendly; even my shop beverage of choice is Victory Brewing’s “Hop Devil”.

Not knowing the “for whom” – I’d like to keep the Yellowstone Solo in Brian’s paddling “family” – I will not reinstall wood gunwales. So it’s either aluminum or vinyl. Aluminum would have to be a two piece inwale/outwale system, for an un-crimped when sheerline bent channel.

https://northwestcanoe.com/shop/ols/products/aluminum-gunwale

But that 2-piece system is not designed for RX thickness sheerlines. I’ve been told by knowledgeable re-gunwalers that the inwale L piece would protrude awkwardly beyond the lip. So vinyl gunwales it is, perhaps with pricey plastic deck caps. Ca-ching $$$ ouch.

And still more money; picking up vinyl gunwales means a trip to Blue Mountain Outfitters, and I can spend cash just looking through the lazy Susan bins at the end of the counter for oddball, hard to find outfitting parts and pieces. Like ¼” hole cable clips, the hole in most hardware store cable clips is too small for a 3/16” pop rivet, and they are much flimsier than the outfitting cable clips BMO carries.

There is a tradition of “Stump the Band” with BMO parts and pieces needed; I’ll need to make a list before I head BMO way:

Vinyl gunwales & maybe deck caps

Wenonah adjustable foot brace

Couple of Northwater double-d ring pads (plus a couple to have as shop stock)

3/16” (actually ¼” hole) pop rivet-able cable clips X 30 (plus some extra)

Flange washers, size small

I’m out of marine quality bungee, best get lots, in different widths.

BMO is stocked with everydamnthing rebuild and outfitting wise, and is rarely stumped. Kinda looking forward to that visit, it has been too long.

I have a shop supply of hefty thick ash thwarts I made years ago that need only sanding and varnishing. Those will probably continue to need sanding and varnishing; something lighter weight would be better for my sub-50lb rebuild desires.

What the heck, I weighed the naked Royalex hull. 31lbs, speced at 44lb. It likely won’t be 44lbs when I’m done with it, but anything under 50lbs would be pleasing.
 
I’d like to use well fitted black plastic deck caps with vinyl gunwales, but sizing deck caps is tricky in several ways. Not just getting the stem vee angle correct but also, less critically, getting the end “lips” properly slanted for stems with layout /, recurve \, or vertical stems |.

Fortunately I have leftover vinyl gunwale pieces, and some old deck plates and end caps. I’ve noticed that some Royalex Bell canoes have oddly broad stems, a more bulbous U than the pointier \/ found on some RX hulls. Maybe for ease in releasing shouldered tumblehome on a RX hull from the mold? More moving water wave buoyant? Proprietary replacement? Dave Yost likes big plastic butts and he cannot lie?

I tried different sets of vinyl deck plates from MRC and OT Royalex canoes. Nope, these were too narrow on the Yellowstone’s bulbous stems.

PB060001 by Mike McCrea, on Flickr

(Excuse the dust; years in storage before I got a cyclonic dust extractor for the shop sanders)

Nope, not these either, shorter in length but not Platypus billed. Not even worth trying to fit the vinyl gunwales in those profile matching deck plate channels.

PB060003 by Mike McCrea, on Flickr

Much as I generally dislike them, a simple deck “cap” would be preferable. I have a deck cap to try; all kinds of wrong, too wide a vee, too large a gap at the stem. Even with some heat gun induced bending those aren’t happening.

PB060006 by Mike McCrea, on Flickr

PB060008 by Mike McCrea, on Flickr

These old Mohawk WW canoe deck plates fit well, even with the gunwales properly slid up into the deck plate channel. But they are big, heavy, and ugly.

PB060004 by Mike McCrea, on Flickr

Just in case I can find something that kinda sorta fits deck cap wise at BMO I Sharpie traced the YS stems naked, and with vinyl gunwale scraps slid in place.

If I can’t find a deck cap I am convinced will fit – they are too pricey to buy, try and, nope, set aside – I have some options; cut the ugly Mohawk deck plates down to deck cap size, paint them black and call ‘em good enough, or try the Kydex route.

In any case the YS will have those fugly vinyl gunwale ends hidden from view. And get stem carry handles, so no one is tempted to “help” carry the YS by grabbing the caps.

I need to remember to internal knot painter loops at the stems before the deck plates go on, when the stems are open for easy access and visibility, and I kinda want a bicycle handbar grip on the painter loops at each end.

Egads, more outfitting weight!
 
nice to see this one coming together. Opinions seem to bifurcate on the performance of this hull. Some reports cite thwart width as a factor. Mine is stock from 2002 and is a bit less than 45# with end loops and end bag lacing. It has an entirely different and more charming personality with a tripping load.

Incidentally, these are bringing dear money on the used marketplace.

I generally prefer the symmetrical rocker of the composite wildfire, but for shallow flatwater river use and the icy months in Minnesota, I enjoy mine as a reasonably efficient and responsive workhorse of compromise.

A photo from a summer run on the lovely Kinnickinnic river in western Wisconsin.
 

Attachments

  • FF039A1B-8B32-43D7-879D-C8BF6B8605D6.jpeg
    FF039A1B-8B32-43D7-879D-C8BF6B8605D6.jpeg
    212.1 KB · Views: 13
I don’t foresee the Yellowstone Solo getting used as a tripping canoe; we have plenty of those. And while I don’t see me paddling it very much; it would make a fine day tripper for my wife or younger son, and we are short one suitable day tripper canoe.

Everything from seat to thwarts will go back in OEM locations, and other than pad eyes of a back band, minicel knee bumpers and a foot brace I won’t add much else to it. Eh, D-rings bow and stern, and it needs Dynel skid plates. I pick up the D-rings and foot brace yesterday. And more.

I love visiting Blue Mountain Outfitters. As always I got everything on my rebuild list for the Yellowstone Solo. Including Nova Craft vinyl gunwales and, freaking serendipity, Wenonah deck caps that will fit perfectly on that bulbous end stem vee.

Yeah, those winky plastic caps were $20 apiece, for a triangle of molded plastic that I would have thrown away if they came as edge protectors on a piece of shipped machinery. But the alternative was cutting down those fugly scarred up Mohawk deck plates and painting them black, or heat gun forming Kydex across a mold, so yes please, ring them up. Brian’s Yellowstone Solo deserves my best efforts.

I had brought deck plates to BMO that sorta fit (old Mohawks), end caps that didn’t fit and traces of the stem vee both with and without vinyl gunwale scraps. After a search super-customer-service Mary found two sets of mighty close deck caps. Both were deck caps from Wenonah models, and a Rendezvous cap seemed the closest fit; the other was similarly bulbous nosed but had a touch wider vee shape.

Playing around in my shop test fitting those Rendezvous deck caps was a minor revelation. I have lots of cut-off vinyl gunwale scrap pieces from previous Royalex re-gunwalings, so I slipped a couple onto the YS stems to see how those deck caps would fit over the wales.

The Rendezvous deck caps, fitted over those vinyl gunwale pieces, were very close and certainly do-able, but something seemed oddly catawumpus. I had never noticed this before, but my scrap pieces of vinyl gunwale have different top widths, and I had slid on one of each.

Some were 1 5/8” measured across the top, some were 2” wide across the top. With a couple pieces of the wider gunwale slid in place the Rendezvous deck caps fit almost perfectly.

The Nova Craft gunwales are a hair over 2”, and the Rendezvous caps should fit even better on those. Fan-freaking-tastic. Gotta remember to move the HIN plate, which would be hidden under the deck cap edge, and to tie through-hull painter loops while the stems are easily accessible.

I also got the foot brace, Northwater double-D rings, cable clips for lacing cord, flange washers and quality bungee, some of that as shop stock that was running low.

Better than that, I got to spend a couple invaluable hours talking parts and pieces, outfitting and canoes with some folks who really know their stuff, down to deck cap minutia. One manufacturer – I should have written down which one – only uses one size deck cap on all of their canoe models. That would sure make repairs and replacements easier.

If BMO wasn’t an hour plus up the inter-State I’d live there. Seriously, if you are driving I-81 or I-83 past Harrisburg, Blue Mountain Outfitters is a 10 minute detour. If you need gear, parts/pieces, paddles, a new canoe or just sage advice BMO is worth a stop.

https://www.bluemountainoutfitters.net/

While I was there the staff was unwrapping a bunch of just delivered Northstar models.

https://www.bluemountainoutfitters.net/Pdf_files/canoe_web.pdf

A couple staff were outside unwrapping a Northwind. As I walked past to my truck I waved my receipt at them and said “Thanks, just put it on my truck, I’ll tie it down”.

Dammit, they know me too well there.
 
With the vinyl gunwales and deck caps on hand I needed only measure the 16’ 6” long Nova Craft wales for how much I needed to cut off. 13’ 8 ½ needed in gunwale length for the Yellowstone Solo, and you better believe I measured that length several times before cutting off the excess. For reference I marked how far back along the sheerline the deck caps fit when seated; those will get pop riveted in place after the gunwales are attached.

Un-pop riveted laid in place everything looks sharp.

PB110001 by Mike McCrea, on Flickr

The HIN plate, which would have been covered by the new deck cap, has been drilled out and relocated visible. Eh, twice; I installed it upside down the first time. It was, after all, a Friday afternoon canoe. With the ends open I knotted painter loops are neatly tied inside the stems.

If you look closely you can see where Bell slapped a “Yellowstone Solo” logo overtop a “Wildfire” logo in 2001. I left those logos on, but heat gun removed the partial permit sticker and “HUMBOLDT” declaration, which would have been half hidden under the vinyl outwale.

There are Brian memories in those stickers, and up on the mostly-map garage door of fame and fascination they go.

PB110004 by Mike McCrea, on Flickr

Also looking closely I found where Bell had oopsie installed the HIN plate on the bow left, caught the mistake and moved it to the stern right. A Friday afternoon Bell build for sure.

With a one-piece vinyl gunwale it is hard to tell if the wale is fully depth seated before drilling and riveting, so I slid a short piece of the cut off Nova Craft gunwale in place fully seated and pencil marked the bottom of the outwale along the hull sheerline. If the bottom of the outwale hits that line it is fully seated.

To be certain that I was using the correct length pop rivets I test riveted a scrap section of gunwale onto a scrap piece of Royalex. 3/16” (5mm) x 5/8” (15mm) pop rivets are perfect. I bought a bag of a hundred 3/16” pop rivets from Amazon. WTF, why won’t they in the 3/16” hole I drilled?

Checking them in the drill gauge they are not 3/16” mandrel, but 13/64”. I could drill holes that size, but now I’m not sure I trust them, and will use up the 3/16” rivets I have on hand (I had three pop rivets left at the end, and a bag of 100 weirdos)

PB110008 by Mike McCrea, on Flickr

With the gunwales cut to size the installation was easiest done as a two-person job. I drilled the holes, one of my sons trailed alongside and squeezed the pop rivet tool 50 times. I can seat 3/16” dia pop rivets with a hand tool, but after hand squeezing a half dozen my hand hurts. Ah, to be young and strong again.

Or to be old and weak and have a pop rivet gun for the shop air compressor. Not worth spending $50+, even for a cheapie; I’m not sure when I’ll rivet gunwales again – it has been years – and it’s not my aching hand that can’t firmly grip a beer for days after.

Our other RX and vinyl gunwaled canoes have pop rivets spaced every 6 or 7 inches. These Nova Craft vinyl gunwales have no aluminum inserts; certainly not necessary on a 14’ long non-WW day tripper. I put a set of non-insert vinyl gunwales on a vintage glass Explorer 20 years ago, and that oft abused canoe is still going strong.

I went with every 5 inches for the pop rivets, the vinyl gunwales RX hulls we have are riveted between 6 and 8 inch spacing, and 5” worked out evenly spaced between the deck caps.

31 pop rivets spaced along the gunwales on each side oughta hold. At least the holes won’t be drilled 1/32” from the sheerline edge this time. 62 aluminum pop rivets can’t be that dang heavy.

A couple tricks besides having a son with strong hands to squeeze the pop rivet tool. It helps to put slip both sets of gunwales in place and run cam straps around the canoe and sawhorse legs. That keeps the hull from moving around as it is drilled and riveted, and helps keep the gunwales fully seated.

PB110009 by Mike McCrea, on Flickr

Helps to cut a little spacer measuring stick for pop rivet spacing, in this case for 5” distance.

PB110011 by Mike McCrea, on Flickr

And, I know I continue to sing praises for this little thing, it helps to have the shop cart holding the drill, rivet tool, rivets, spacer stick, rubber mallet, etc. I just pulled it along beside me, as I scooted along in the wheeled shop chair, gunwales at eye level.

PB110013 by Mike McCrea, on Flickr

Start to finish just under an hour to pop rivet both gunwales on. I could feel Cooper’s hand starting to shake on the last couple rivets.

Before I installed the deck plates I drilled a few holes there as well, a drain hole at the tip, big enough that twig or spider egg sack can’t occlude it. And holes for painter line bungee. Not enough space for my preferred over/under/over bungee Z pattern to hold the painter lines, so a single line of bungee will have to do.

Deck caps slid in place, gold Sharpie inwale traced on the underside and I know how much space I have to work with. Single bungee line, through a stainless Sgt. Knots cord locks for easy tensioning.

PB120016 by Mike McCrea, on Flickr

PB120017 by Mike McCrea, on Flickr

The Rendezvous caps fit perfectly on one stem, the other needed a teeny bit of tapped in wedge help.

PB120019 by Mike McCrea, on Flickr

Released from the cam straps, with vinyl gunwales and caps installed, the seat and thwart-less YS is only 24 ½” inches wide at center sheerline. The thwarts, to be installed with tongue depressor spacers at the ends so the brightwork isn’t pressed hard against the sheerline edges, will bring it back to the OEM 27” specs.

I’m going to try to remember to weigh the YS at every rebuild and outfitting stage. The pop riveted vinyl gunwales and deck caps, painter bungee and stem loops added 10lbs, now 41.4lbs. Of course I never weighed the Yellowstone Solo with OEM gunwales and brightwork.

PB120022 by Mike McCrea, on Flickr

I marked that balance point, just to see how it changes with seat and thwarts. Come on sub-50lbs, or thereabouts; that would still be the lightest canoe we own, Royalex or otherwise.

With the gunwales and deck caps installed I can flip the YS over and have a look at skid plate needs. It does need stem protection added; that canoe saw a lot of shallow water daytrips. And some bow on landings; it’s a Royalex canoe, not a Faberge Egg.
 
The Yellowstone Solo was due for skid plates, with narrow areas worn through the vinyl skin, but still smooth, not run ragged rough into the foam core.

PB010009 by Mike McCrea, on Flickr

Narrow enough that Dynel sleeve would work, providing two layers of Dynel with perfect unraggedy-cut edges. Snip, snip, the fabric pieces, wider and longer than the visible wear areas, were ready to install.

To help smooth out the cloth and better impregnate the sleeve layers with epoxy I want release treated peel ply. In rolls, so also snip, snip. Four snips, cloth and peel ply both cut and ready to install, with tape and paper mask on the stems.

PB140002 by Mike McCrea, on Flickr

Everything else prepped and laid out on the bench. Go dog go!

PB140003 by Mike McCrea, on Flickr

Stop dog stop! Almost forgot to set out the G/flex. 50/50 bottom coat mix of West 105/206 and G/flex 650 with black pigment, lay the Dynel sleeve, top coat using the remainder of the epoxy mix, with a thimble’s worth of graphite powder stirred in.

PB140005 by Mike McCrea, on Flickr

Maybe 5 minutes to paint the two epoxy-mix coats. And then lots of wait around time and babysitting. As the epoxy begins to set it the cut ends of the two-ply Dynel sleeve need to be pushed down with a popsicle stick until they lay flat and flush. I should have put more beer in the frig.

Wait for the epoxy to seep in/soak through/drips to stop, pull the tape & paper mask.

PB140009 by Mike McCrea, on Flickr

The epoxy has barely begun to firm up and already the Dynel is standing tall edged and rough surfaced. If allowed to fully cure without peel ply the Dynel surface harden rasp-like rough. Application of release treated peel ply will knock down those abrupt edges and smooth out the surface of the Dynel.

More wait time after laying the peel ply to hard roller compress the surface every hour or so.

PB140011 by Mike McCrea, on Flickr

Plenty of wait time for a beer.

The epoxy and graphite powder outer coat is slippery. I rolled a canoe back upright with graphite powdered skid plates, not thinking the snot slippery skids were directly over the sawhorse bars. It shot off onto the shop floor like a watermelon seed. Tougher, more UV resistant and slipperier; graphite powder every time. A little dab will do ya (same for black pigment)

Peel ply pulled the next morning. Much smoother and nearly flush, a single layer of 5oz Dynel would be unnoticeably flush, but in this case a narrow strip of Dynel sleeve was easier to install, and provided a double layer, which increases impact resistance.

PB140013 by Mike McCrea, on Flickr

I’ll let that cure for a week, then re-tape it and paint it black to neaten the edges.

The laminated seat and other brightwork arrived and I can flip the canoe back upright, cut everything to length, drill the holes and install with machine screws. And then take everything back out and varnish, including the cut butt ends and inside the drilled holes.
 
I’m not painting this one. It is UV faded, but perhaps not as badly as appears in the photos. It was so heavily dirt encrusted that I scrubbed it with DougD’s “Magic Mix” of 50/50 straight vinegar and Dawn.

When it is fully finished I’ll wash it with a car “wash & wax” product, and then wipe it down with 303. It won’t be new canoe shiny, but should be less dull, and a bit more UV protected.

I got around to cutting, drilling and installing the brightwork today. Tomorrow I can take everything back out and begin doing the (multiple) spar urethane coats, including heavily coated butt ends and pipe cleanered inside the drilled holes. That always seems a one-step-forward, one-step-back process, but at least everything re-installs easily once seal coated.

I have another spar urethane task that has been waiting in the wings, but that is another peculiar propulsion of sorts thread.
 
With the skid plates on I could flip the Yellowstone Solo over and commence with installing the brightwork; two thwarts, two carry handles and a seat on truss hangers. Not just any thwarts, seat and hangers; a laminated ash and basswood Conk seat, hung on walnut truss drops.

http://www.hemlockcanoe.com/conk-seats.html

I had no consideration of a flat bench seat, but I had to think hard about a double-contour vs front contour Conk seat. We have wide webbed double contours in several canoes, but the straight back rail and contoured front rail is equally comfortable, and the natural forward slope is perfect for our usual multi-point seated stance (back band, foot brace, knee bumpers) without angle cutting the truss hangers.

Getting the correct cant angles on truss drops has bedeviled me before; no dumdum, that’s not quite what you wanted, keep cutting them shorter and shorter and soon you’ll have kneeling height drops. Straight cut truss hangers, 1” of canted deflection on the front rail, dumdum issue comfortably solved.

Those may be the finest and best constructed wood & webbing canoe seat made, from the easy-on-the-thighs front edge round over, down (er, inside) to the joints; not the usual biscuit joinery, but a floating multi-ply tendon (whatever the heck that means) in each rail-to-strut joint, with mechanically stretched drum tight polypropylene webbing.

I weighed a Conk seat and a same sized webbed seat that came out of some canoe; the Conk was nearly a pound lighter. In the long run, for a seat unlikely to ever fail, any keeper canoe is worth it.

The thwarts are likewise laminated ash/basswood/ash for strength and similar light weight, the carry handles are slender solid ash.

First step was to bring the sheerline back to OEM 27” at center. I had marked the balance point when I weighed the YS suspended on a single cam strap after gunwale installation, and clamped a spreader board in at that marked location. And then measured stem to stem to discover that center hull is, duh, actually 3” forward of that balance point.

With the bow 2” higher (18 ½”) than the stern (16 ½”) that strap hung balance point was not at measured distance center hull. That single hung strap is still a good technique for finding the balance point on the finished canoe, before the (last thing installed) strap yoke goes in.

I wanted that spreader board at center hull not just to take the sheerline out to 27” wide at midships, but also because the OEM seat was, by a Yellowstone Solo owner’s helpful measurements, positioned with the front seat edge 3” aft of center, and the thwarts each positioned 27 ½” from distant from that center point. I needed to have a center hull reference point from which to work.

With the spreader board in place and all of the brightwork laid across the gunwales in OEM locations it all looks good, and I see no reason to relocate anything from factory locations.

PB170002 by Mike McCrea, on Flickr

Thwarts and carry handles first. Since those are not bearing suspended weight atop I’ll use smaller (3/4” dia) flange washers. Installed with a tongue depressor between the brightwork butt ends and side of the hull; pressed tight against the edge can prove squeaky business.

That brightwork gap is a Catch 22; more room for dirt and crud to lodge, hastening bacterial rot, but that gap also provides some breathing room, so the ends don’t stay smushed together damp forever. I wash and rinse out my boats after long or muddy trips (a good idea for invasives in any case), careful to hose blast those butt ends and dislodge debris, so I’ll take some breathing room to help dry out the ungunked brightwork ends.

With the thwarts and carry handles end-angle cut to size and shape the installation was easy enough, albeit with a lot of finicky measuring and re-measuring, tapping each piece 1/8” back and forth until all measurements along the sides to center hull were even.

Like the pop rivet spacer stick it helps to have a gauge for the depth of the inwale. I cut (well, found already cut) a scrap of square ash that exact depth; laid it against the edge of the inwale, scribed a pencil line and presto, a visible width-of-inwale line for centering flange washers and drilling holes through the gunwales.

Thwarts in, holding the sheerline spread in place, the seat installation was next. Well, truss drops next; same technique, but holes drilled in that marked inwale overhang leaving enough space for wide (1”) flange washers. With no aluminum inserts along the top edge of the vinyl gunwales I want wide flange washers to help spread the paddler weight on the seat.

A trick to holding the seat drops in place while working with the seat; tight fitted rubber washers slid up along the machine screw shank ends hold everything elevated, for easy measurment across the hull to cut the seat frame rails to length. I should be able to remember that seat frame nomenclature by now, but, a reminder.

The long gunwale-to-gunwale members are the rails; short bits are the struts

I rail at those who strut such knowledge.

PB180004 by Mike McCrea, on Flickr

Cutting the seat rails to length is a tricky business, I’d like them as long as possible, so the drilled holes are not too close to the butt ends. With a slab sided hull measuring for that max rail width is easy, but with the Yellowstone Solo’s shouldered tumblehome and more curvaceous ( ) sides, if I cut the rails near full bulge width I can’t fit the seat in the hull, even with the spreader brace removed and the sheerline forcibly pulled open.

FWIW, with the thwarts and carry handles installed removing that clamped-in brace didn’t change the sheerline width much at all; the thwarts alone are keeping the sheerline dimensions at OEM spec. I had hoped so; I didn’t want too much stress on the truss hangers and seat.

The widest length I could (barely) fit inside the hull was 27” front rail, 26” aft. The OEM Bell seat was cut at 24 ½” wide, with the holes drilled less than ¼” from the ends. Thankee, me likee those holes further away from the rail edges.

No one in our family are regular kneelers, most often paddling seated with a foot brace and back band, so I cut the truss drops as deep as I could using 6” machine screws while leaving room for washers and nuts and cap nuts. The truss drops are 4” deep, plus ¾” inwale depth, plus an inch of deflection on the front rail contour. Should be plenty stable for a slender not-me sitter.

PB180011 by Mike McCrea, on Flickr

Those familiar with my paddling “style”, try to imagine me precariously seated on shortie-short kneeling drops. Am I sopping wet in your imagination? I would be.

PB180013 by Mike McCrea, on Flickr

With the brightwork installed the YS is getting to be a right pretty canoe. A few coats of spar urethane and that woodwork will shine.

PB180009 by Mike McCrea, on Flickr

Now I get to clamp the spreader board back in place, take everything out in reverse order, marking each piece bow/stern and right/left. And re-drill all of the machine screw holes 1/32” larger, so there is no squeaky too-tight fit once the inside of the holes have been urethane multi-coated with a pipe cleaner.

I’m not putting a utility sail thwart or too much other frou-frou in the Yellowstone Solo, but I will drill and chamfer the bow thwart for a run of miscellaneous bungee keeper, one end through a Sgt. Knots cord lock for tensioning adjustment.

Time for a few days of spar urethane work and some light sanding between coats. And some other painting; the now epoxy-cured skid plates, and the shop Gogetch.
 
Cleaned up really nice!

I am thinking on the marathon canoe that I am working on I will use the graphite on the bottom up to the water line. Hoping it will help with the rocks and overall wear and tear on the bottom.
 
I am thinking on the marathon canoe that I am working on I will use the graphite on the bottom up to the water line. Hoping it will help with the rocks and overall wear and tear on the bottom.

Clint, if you haven't yet seen it, although this thread concerns wood canoes, the discussion of graphite on the bottom may be of interest:

 
I opted to use Minwax Helmsman Spar Urethane to seal the brightwork. In part because I have a nearly full can, in part because a long duration varnish/urethane/oil experiment showed that Helmsman spar urethane holds up in long term UV and weather exposure as well or better than other finishes when left unmaintained.

https://myccr.com/phpbbforum/viewtopic.php?f=49&t=40923

And in part because it dries fast enough that I can lightly sand and recoat the next day. Plus, at least hereabouts, it is ubiquitously hardware store available.

The Conk seat was stained light walnut before the seal coats and webbing went on, so I stained all of the other brightwork light walnut, and got everything to match well enough color wise. A single rub of stain on the thwarts, three on the ash handles, and the all of the brightwork is walnut-ish. Not as dark as the walnut seat drops, but I had no dark walnut stain.

PB180002 by Mike McCrea, on Flickr

Might as well stain and then urethane a couple hardwood dowels with pegged ends, soon to be more purposeful peculiar if not perfect.

PB180003 by Mike McCrea, on Flickr

Stains rubbed in, time to urethane the unsealed brightwork, the cut butt ends and inside the drilled holes. Conk must spray his seal coats on the seat frames, or know some brush man’s magical incantation; his finish is fine furniture freaking flawless. I’ll try my best, but my sloppy brushwork spar urethane applications will not come close.

Urethane coat #1 painted on and drying. Dammit, I really need to remember to remove the loose bristles before starting to paint; cheap chip brushes, maybe why my finish work is sub-par. Waiting for the spar urethane to dry it was Miller time. Well, at least Yuengling Chesterfield ale time.

And time to do some prep work. When the brightwork is going back in place I plan install 14 webbing loop tie points on the machine screw shank ends; two each on the carry handles, four each, paired facing fore and aft, on the thwart ends, two on the machine screws at the backside of the seat. Stoutest tie points imaginable for gear or float bags, with no additional holes drilled in boat or brightwork.

Got out the propane torch & putty knife and to hot cut/seal the webbing and a 20-penny nail to melt/seal perfect 3/16” holes. Once again, go dog go, make some melted webbing smoky shop stank.

Once again, stop dog, stop. No need to proceed, the last time I made webbing loops I made 20 extra. Put everything back away dog. While everything is out and on the bench always do a production run dog.

Dang, the bench is clean again, and I gotta get up into something in the shop. There are only a couple things left on the exterior. As on every boat, reflective tape bow and stern. Nearly the last of the High Intensity reflective tape, so small pieces, 2” pieces each side of the bow and stern ---, another 2” piece | vertical on each stem. The YS should wink back bright under a flashlight at any angle.

The YS already has a Duckhead sticker on stern right, holding up well after 20 years. It needs a new one on the left for symmetry. Only a couple Duckhead stickers left; Brian’s Yellowstone Solo is worth Duckheading both sides.

And the shop Gogetch. Usually painted in black, but the last one was done in bright blue, which I kinda liked.

The usual paper Gogetch photocopy sized to fit, backed with carbon paper and outlined on the hull. An easy paint by numbers job, especially if someone else does the painting.

PB190006 by Mike McCrea, on Flickr

Like the Duckhead stickers, shop Gogetch on both sides of the bow, for a visible declaration coming or going. A reverse Gogetch image on the other side, so both pipe smoking moon faces are facing in the same direction. Eh, towards the stern? Maybe they are backpaddling? I should have switched that orientation around, maybe next time, at least they are both right side up.

PB190008 by Mike McCrea, on Flickr

With the Gogetches (Gogetchii? What say the Passamaquoddy?) hand painted the YS could go gunwales down for some light sanding and topcoat on the skid plates.

I dithered about topcoating the Dynel sleeve skid plates with black paint vs laying a thin coat of the epoxy mix with graphite powder and black pigment. It will use less than an ounce of the toughened epoxy mix, help fill in some semi-craggy edges, and I can later apply paint over that epoxy coat. Vice versa epoxy over paint, not so well adhered.

Retaped, and ends shaped.

PB200009 by Mike McCrea, on Flickr

And lightly top coated. Worth a couple minutes to smooth and reshape the rectangular sleeve Dynel skid plates with another toughened, blackened epoxy coat.

PB210011 by Mike McCrea, on Flickr

Still a bit see through and sloppy edged, a topcoat of black paint will resolve that, and provide additional UV protection.
 
Brightwork lightly sanded spar urethane coat #2 went on, and like a good boy I immediately cleaned the brush and put everything away. Oh wait, what’s that; the seat and hardwood dowel projects were hanging in a different place. Oopsie, everything back out.

That second coat was as good as I have ever achieved with spar urethane. Maybe I am finally getting better.

Next day, third and final coat of spar urethane, not forgetting to do all of the pieces at once this time, including the seat and dowel rods. Coat #3 was good, but not quite as perfect as coat #2; I’m not getting better, just getting lucky sometimes. Another day of waiting before I can reinstall the brightwork.

The dowel rods could use a 4th coat for potential use abuse, but I really want to get the brightwork back in the Yellowstone Solo and see what it weighs dressed before turning to minor outfitting.

Next day, with everything already cut, drilled, test fitted and removed to urethane reinstalling the brightwork goes quickly. Same places, same machine screws and other hardware

I had chamfred the holes for a single run of bungee through a cord lock tensioner on the bow thwart, and that most easily goes on before the thwart goes in. I like having a little spacer on the bungee, so it is easy to pick up without digging beneath with finger tips. Gloved hands are even worse for grasping taut flush-seated bungee off a thwart.

PB210014 by Mike McCrea, on Flickr

My supply of urethaned balls were not farsightedly stained light walnut, but what are ya gonna do?

The SS machine screw ends are admittedly my washer and nut heavy preference involved. Under the thwarts and seat first a wider washer, so there is more beef pressed against the webbing loops or seat rails, then a smaller washer, a lock washer, a nut and a cap nut, all sized for 3/16” stainless steel.

I could have used Nylocks, plastic caps or thread protectors, but had proven quality stainless in the shop. Thank goodness; stainless cap nut are now $1.25 apiece and I used 12 of them. All of the other stainless was likewise “shop stock”; I probably don’t want to calculate the actual cost of the new stainless hardware.

PB210016 by Mike McCrea, on Flickr

With everything back in the Yellowstone Solo it is once again an elegant canoe, reborn with better quality (and lighter) brightwork.

PB210017 by Mike McCrea, on Flickr

PB210018 by Mike McCrea, on Flickr

PB210019 by Mike McCrea, on Flickr

The moment of truth. Speced at 44lbs with wood gunwales (I never weighed it with OEM wood gunwales intact). 31 lbs as a bare naked Royalex hull. 41.4lbs with pop riveted vinyl gunwales and deck caps. Add narrow 2-layer Dynel skid plates, two carry handles, two thwarts, wide webbed seat on truss drops, 14 tie down webbing loops and a lot of stainless. . . . . . . .

. . . . . .barely a blond hair under 45lbs on the hanging shop scale. Gawd bless lightweight laminated brightwork. If I had installed my thick clunky (still unsanded) DIY’ed ash thwarts and a leftover bench seat the weight would easily have been pushing 50lbs. If nothing else that tale of the scale is inducement to install minimal outfitting.

But there are some things I will not do without, even in a canoe not meant for me. Nylon pad eyes for a clip-in back band, adjustable foot brace, minicel knee bumpers, D-rings and a handful of cable clips (or mini SS D’s) for lacing in float bags or top lashing gear and, finally, last thing after the hanging scale balance point is marked, a roll-up strap yoke.

That shouldn’t total more than a couple pounds; worth every ounce and then some for comfort, efficiency and safety.
 
Back
Top