• Happy National Zipper Day (pat. 1913)! 🤐

Any input on how to fix this?

Joined
Sep 28, 2015
Messages
292
Reaction score
61
Location
Orangevale, CA
Couldn't resist buying another Wenonah Spirit II. This one was builtin 92 (ish); the layup is Kevlar and it has a white gel coat. The hull shows quiet a few spider cracks, but generally the canoe is in good shape.

Issue #1:
There is one hole in the bottom (see photos), and I'd like to fix it. The hole is about the size of half a penny, and the depth of the indent is about the thickness of a penny or maybe a little more. No more than 1/8" though. The location is right adjacent from one of the foam ribs on the inside of the boat, which would explain why the canoe doesn't leak. What would be a simple (although not as simple as ductape) and good way to fix this? Detailed descriptions are much appreciated!

Issue #2: A 6" piece of the outside gunwale on the port side is missing. The rest of the outside gunwale is a bit weathered, but a little sanding and Watco will do wonders I hope. You guys have any suggestions on how to replace only the 6" (or such) length of wood? I was thinking of replacing a piece of a length that reaches 2" on either side past the next screw hole. Some good way to join old and new gunwale?
 

Attachments

  • photo3684.jpg
    photo3684.jpg
    174.1 KB · Views: 0
  • photo3685.jpg
    photo3685.jpg
    184.6 KB · Views: 0
  • photo3688.jpg
    photo3688.jpg
    503 KB · Views: 0
Someone else who knows what they're talking about will probably come along but until then here's what I'd do.

Is there any damage to the inside of the hull from that puncture? I'm guessing not and will go with that assumption for now. What I'd do would be fill the hole, flush with hull, with thickened epoxy and then put a layer of 6oz. fiberglass over that after scuffing the gel coat to get a good bond.

For the gunwale I'd replace the whole works. If one section is rotted off I'd be very leery of the rest of it. If you simply replace 8" of the gunwale you have two butt joints that offer no strength whatsoever. If you just want to patch it I think the best way would be to remove the gunwale and cut scarf joints for the replacement piece.

Alan
 
I would do as Alan says with the hull and I would replace the wood also. From the last picture the wood looks too old to work with. Once the hull has alot of spider cracks and a puncture it's resale value is quite diminished from my experience, but it's a nice canoe and with new wood trim it would be a great looking rebuild.
Just my 2 cents
 
Yeah, new wood...but if you want to try a repair go for it. Make nice long scarfs and screw it back on. You will probably have to scarf new gunwales anyway so repairing the old one could work out. You will know for sure once you start taking the broken pieces off, if they are too far gone its new wood time.

You probably need an inner and outer patch on that hole, to support the spider cracked area also, not just the actual hole. That could be a bit more trouble if the rib is hiding it. I guess it all depends on how fussy you are.

Nice boat. We borrowed one off Mem and it was uber stable and quite fast.
 
I agree with Alan and Robin.

I assume the indentation/rip is through into the foam rib or core. You could try pulling it out to level, and if that works, you could fix it by first sanding through the gel coat inside the crater and a half inch around the perimeter. Then add several layers of graduated-size cloth. You'd need to fill the void in the core foam first-- press some foam into the hole and trim it as near flush as possible.

To simply 'fill' the hole, sand inside the crater through the gelcoat to rough up the Kevlar beneath-- raising the hairs. Fill it to level with West System 105-206 (or 205 for faster cure) with 403 microfibres or 406 colloidal silica filler. The colour will almost match too.

After it cures, sand it level. You could stop at this point, or you could add a couple pieces of 6 oz glass, fill the weave, let it cure and sand it level. It isn't necessary to use Kevlar cloth; it's a little trickier to cut, more difficult to wet out, and sanding is tough because Kevlar fibres don't sand off readily. The glass is plenty strong for this job.

If the hull is in good shape you could replace the gunwales, either from Wenonah, or from the usual suppliers; or, you might consider an entire furniture replacement. If the wood is in better shape than it looks, you could scarf a piece of gunwale in with (say) a 3" scarf on either side (that's about 6:1, a little stubby but plenty strong if this gunwale area is reasonably flat).

Good luck reviving this very nice design.
 
Last edited:
Nothing else to say!! Go as they said and you will be good as new!!
 
Good advice all around.

The gunwales look like they are toast and scarfing in new wood would be as waste of time. I’d regunwale the whole thing, just to do it right the first time.

I don’t know what other brightwork the canoe may have, but don’t be surprised if any wood thwarts or yoke are punky rotten at the ends.
 
No Title

photo3689.jpg photo3689.jpg photo3690.jpg photo3690.jpg 
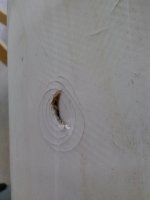
I would start by removing any and all damaged gel coat from around the hole including the cracked stuff. After you do this you will be better able to judge the extent of damage to the structural fabric (aramid in this case) where the hole is. Hopefully, the damage will be limited to the hole you already see, but not necessarily. Sometimes significant damage can underlie cracked gel coat that is still mostly intact.

Once you see the extent of damage to the structural fabric, plan to remove all gel coat from an area extending 2 inches beyond the damaged fabric in all directions. Depending on the nature of the damage, you can make this area round, oval, or rectangular depending on what works best. At the edges of the area you have denuded of gel coat, feather the edge of the remaining undamaged gel coat. You will wind up with a "dished out" area where you have removed the gel coat. This will work to your advantage since it will result in your external patch not "standing proud" off the adjacent hull once you have completed your repair. You should clearly see the fibers of the aramid fabric after removing the gel coat. You need to sand down to fibers to get a good bond with your patch. I would again attempt to feather or bevel the cut edges of the fabric around the edges of the hole. This is a bit tricky with aramid because it tends to fuzz up when sanded or abraded, but it can be done using coarse sandpaper and then trimming the raised fibers with a sharp knife.

I would debride any obviously broken fabric from around the hole. You can do this by grabbing the edge and trimming away the shards with a sharp utility knife. After doing this you should be able to judge the extent and depth of the damage to the rib foam. I would not be surprised if the foam is dirty from water exposure and you may need to clean it up or even sharply debride a little of it to make sure your epoxy bonds well.

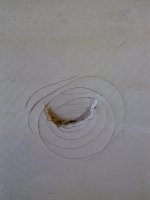
If the defect in the foam is not very large or deep you can fill it in with epoxy thickened with silica gel powder as suggested by Peach Canoe. If the defect is larger I would fill it in using progressively larger patches of fiberglass and epoxy until you have filled the defect nearly flush with the undamaged hull fabric. I would then apply a patch of 6oz/sq yd fiberglass over the filled in area that slightly overlaps the edges of the structural fabric that you have beveled. After the epoxy of that patch cures, I would use thickened epoxy to fill and fair the area over and around the patched hull to get is as smooth as possible and even with the contour of the adjacent hull. West Systems makes special fairing compound additives that makes this easier because they sand very well, but silica powder (cab-o-sil) will work. It just takes a bit more effort to sand.

Once you have things nice and smooth, apply a larger 6 oz fiberglass patch to almost fill the area from which you have removed the gel coat. You want to try to blend the edge of this patch in with the surrounding undamaged gel coat. Fill the weave of that patch completely with one or more additional coats of epoxy. You will then likely need to do a little more filling and fairing to get the patched area flush with the undamaged hull. Let that epoxy cure very well, sand it with something like 220 grit paper and wash it well. Find a spray paint or automotive brush on touch up paint that closely matches the color of you gel coat.

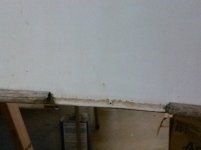
As for the wood gunwales, I have found that it is difficult to judge the soundness of the wood from a photograph. Sometimes, the wood can be very severely darkened or grayed and still be plenty sound enough to refinish. The only way you can make this judgement is to start sanding the discolored wood. When the wood is severely weathered, it is often easier to just take the gunwales off to refinish them. If you find the wood is sound, you could simply scarf in a repair segment. This does require some work, but a lot less than re-railing the whole boat. Finding 16+ foot long ash is getting pretty difficult, and even if replacement gunwales are available from the manufacturer, shipping costs are prohibitive unless you can have new gunwales shipped to a Wenonah dealer when that dealer receives a shipment of boats. You would have to wait for the gunwales to be shipped and then go pick them up at the dealer.

If that does not sound practical and you find the gunwales are still sound, you can buy an ash gunwale splicing segment from Harmony Gear: http://www.harmonygear.com/products/...tion-4-ft.html

I have used these and they are good quality ash. They come radiused but will almost certainly be larger in cross-section than your gunwales, so they will require some shaping and sanding for a good fit. Harmony sells these "kerfed" (rabbeted) or non-kerfed. If you don't know what that means, take a close look at your gunwales. Either the inwale or the outwale (probably the outwale) will have a little "lip" that extends over the top of the hull and hides it. If the lip is on the outwale side you want the kerfed variety.

Here are some photos of a Royalex canoe I repaired and reoutfitted for a friend. Believe me when I say that when I got it, the wood gunwales looked every bit as bad as those in your photo. On the port side towards the stern, both the outwale and a long segment of inwale was rotted through and beyond salvage. I used 2 of the Harmony splicing segments to replace the stern portion of the outwale, and spliced in a new segment of inwale. In the first photo if you look closely, you might be able to see one scarf joint on the left outwale and 2 on the left inwale. Actually, these scarfs are pretty easy to see since I reinforced the joints by wrapping them with a layer of fiberglass. The fiberglass prevents the underlying wood from taking up oil so it shows up as a different color. Also, this being a Royalex boat, the inwales and outwales are "sandwiched" without any kerf overlying the hull like on composites. This is a whitewater boat for which strength trumps cosmetics. That is why I reinforced the scarfs with fiberglass. For a flat water boat I would not have done so.

The second photo is a closeup of one of the scarf joints. Although many recommend long scarf joints of 7:1 or 8:1, I have found that shorter scarfs of 3:1 as shown are perfectly strong enough. I use epoxy to bond the wood segments together. The shorter scarfs are less likely to overlap gunwale screws, or on the inwale side, screw holes for mounting thwarts and seats.
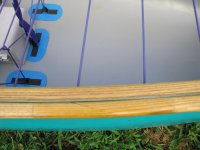
 

Attachments

  • attach41255.jpg
    attach41255.jpg
    217.4 KB · Views: 0
Last edited:
Just want to chime in on the gunwales. If you do not have the skill or tools to make new gunwales your self try EDSCANOE.com. They have knock down gunwales that have very nice scarfs and can be shipped by UPS. Just use a good waterproof glue on the scarfs. Learned on this sight about tight bond III and it works great. If Ash is unavailable in your area use clear Spruce. A little softer but works well and can be found at the big box store home improvement stores or local lumber yards.

I know it sounds like a lot of work but it is worth taking off the gunwales to lightly sand clean and oil the side that is next to the hull and use a scarf join in a patch. Search for scarf joints on this site. Do not have to be fancy but basically up to a point longer the better and make a jig to help you cut them. If the gunwales are salvageable but are stained from water try using dark walnut Watco to hide some of the water stains then if you must, use Watco teak oil on top of it. This hid some pretty nasty stains on the ash of my Wildfire that had been left sitting outside for two years by the previous owner.
 
Great stuff guys!
I'll get some filler for the hole.
I also think the wood is still strong. It just looks bad from being out in the weather.
I'll post some pics as I go along.
Thank you for all your suggestions and detail!!!
 
If you decide to scarf in a splicing section to repair your outwale, you may find this pdf file from Mad River Canoe helpful:

http://www.madrivercanoe.com/us/sites/default/files/WoodGunwaleInstallation.pdf

Most of the pdf pertains to completely rerailing a wood-gunwaled canoe, but if you scroll down you will find instructions for using the 4' splicing section as sold by Harmony Gear. Note that MRC recommends cutting the scarfs at a 30 degree angle, which would result in a scarf even shorter than 1:3.

A word about scarf joints: there is nothing wrong with using a long scarf joint such as 1:6 or greater, but it really isn't necessary when you are jointing something as thick as the typical gunwale. Longer scarfs are rather more difficult to cut accurately. A good part of the rationale behind a long scarf is to create a larger bonding surface for your glue or adhesive. A longer scarf is almost essential when you are jointing thin panels together such as 3mm thick okoume plywood as used in the construction of many wood panel canoes and kayaks. There a butt joint would result in a bonding surface only 3mm wide whereas an 8:1 scarf creates a bonding surface of greater than 24mm (almost an inch) wide. But the typical outwale is around 3/4" (19mm) thick and a 1:3 scarf creates a bonding surface 60mm (nearly 2 3/8") wide which is more than enough to secure a good bond using quality epoxy.
 
Thank you for the PDF! I took another look at the wood condition yesterday. I think it is plenty strong enough to replace just a small section. I'll order a 4' piece and splice a small part of it in. I think the canoe was set down on something that cracked the gunwale where it did, an no one treated the ends or fixed it for a while, which is why it looks so bad. I'll cut it back a few inches and go from there.

A quick followup question re. spider cracks. There are quite a few on the hull. how do you guys feel about re-painting a hull. Would I just sand the entire hull with (?) grid sand paper, and then paint? Use filler and sand paper to deal with flaked off gel coat areas? Will I need a primer? What primer/paint should I use? What will give me the best paint result? Do I need to spray the paint on, or...?

OK that is a little more than just a quick followup question. Perhaps there is a good how-to guide you can refer me to?
 
I have wet sanded a number of gel coated hulls. After proper wet sanding and buffing with a polishing compound the appearance is generally markedly improved, especially if you have oxidation of the gel coat. There are a lot of gel coat repair kits that you can buy or gel coat putty to fill in chips. Spider cracks are more difficult to deal with but you can try forcing the gel coat putty (which is a polyester material) down into the cracks with a putty knife. After it cures you wet sand the excess off the adjacent hull. White, almond, or ivory colored hulls are usually easier to deal with because the non-pigmented gel coat putty is off-white and blends reasonably well. If you buy gel coat repair putty or a gel coat repair kit, follow the directions carefully. Some gel coat material must be covered with film or wax paper to exclude air while it cures, or it may not cure at all.

Do not use gel coat putty or repair material over a repair you have done with epoxy, however. Polyester resins and gels do not reliably cure when applied over epoxy, even when the epoxy is well-cured and washed first. I would paint over the area of your repair. Spray paint is usually easier to use if you can find a decent color match. If you can't, you may find you can get a closer color match with automotive touch up paint because there are so many colors available.

Personally I would try repairing the gel coat, sanding and buffing the hull before deciding to paint it. Any paint on the hull bottom will eventually scratch off and the paint adds weight. For wet sanding I would start with either 180 or 220 grit paper and work down in stages to 1500 or 2000 grit. Then apply a polishing compound and buff, using an automotive buffer if you have one or can borrow one.

If you want to paint the hull there are many options. You can use a widely available spray paint such as Krylon Fusion so that any scratches can be later touched up with the same color. If you want something more durable you can use a one-part marine polyurethane paint such as Interlux Brightsides or Pettit EasyPoxy. Or you could use a 2 part marine polyurethane such as Interlux Perfection. The two part paints are a bit more durable but trickier to apply. The one part polyurethanes can be applied with a foam roller and immediately tipped-out with a brush.

Jamestown Distributors has a lot of "how to" videos describing the use of marine paints and other products they sell and you can find additional tutorials on hull repair, gel coat repair, and painting on youtube.
 
I took another look at the wood condition yesterday. I think it is plenty strong enough to replace just a small section. I'll order a 4' piece and splice a small part of it in.

I may have been hasty in declaring the existing gunwales toast from just a photo. If the rest of the wood is still salvageable sound scarfing in a new piece would require the least effort and expense.

Do the existing gunwales have a rabbet, a edge atop one wale that covers the hull material?

That might make things a little trickier. Ideally the piece you would scarf in would have the same gunwale profile and same depth of rabbet.

I lack the shop tools and expertise to make rabbetted gunwales with matching dimensions, and don’t know how or where you would find a section of matching rabbeted gunwale other than buying an entire wood gunwale from Wenonah and hoping the profile and rabbet matches.

Folks who have scarfed in a section of rabbeted gunwale, any suggestions?

Edit: I see that Pete's suggestion of the Harmony 48 inch ash gunwale section is available in a kerfed piece, so that should work provided the profile matches the existing gunwales.
 
Last edited:
The profile of the Harmony splicing section would almost certainly be somewhat oversized in comparison to the wood outwales that Wenonah uses, at least the ones I have seen. The "lip" or "kerf" of the rabbet might be a little longer than needed to cover the hull.

Neither is a problem. The odds of finding a splicing segment that exactly matches the profile of the existing outwale is just about nil so the best one can hope for is that the segment be oversized so it can be trimmed down to match. My suggestion would be to cut the scarf for one end of the new segment. This might be done before or after removing the existing outwale. Glue up that scarf joint using some sort of jig to keep the flat inner face of the splicing segment aligned with that of the existing outwale. After bonding the joint, trim down the splicing segment. If a lot of material needs to be removed, a block plane or spokeshave might be useful if available, but a mechanical trim sander will get it down to ballpark pretty quickly if not. Finish up by hand sanding.

Once the profile of a sufficient length of the splicing segment matches that of the existing gunwale, cut the other scarf and bond it up.

If the lip or kerf of the rabbet is a bit too long it is easily trimmed down by sanding, if necessary. If it is just a little too long it will actually get compressed down by the gunwales screws since the lip is pretty thin.
 
Took the sander to a piece of the original gunwale. There is plenty of good wood left, and it is hard and heavy, so no dry rot. I ordered a 4' ash gunwale piece as suggested. The gunwales on the boat have no kerf. I will have 4' to work with and only need an 10" piece (or so). I suppose I'll get it right after a try or two :). The previous owner told me he had the gunwales replaced once. It looks like they used some filler for the gap between the inner and the outer gunwale, where the top of the gunwales was higher than the edge of the boat. I suppose they did it to get a cleaner finish, as the boat edges are somewhat rough and fuzzy where the Kevlar shows. That filler has mostly broken away. What filler should I use? Should I add filler again? The gap depth is maybe 1/16" to 1/8". I was mildly contemplating a good outdoor caulking?
 
I would probably use wood putty. The excess is easily sanded off. You could fill the gap with epoxy thickened with wood flour or micro-balloons, but that could make it tough to get the gunwales off if you needed to. Some manufacturers did actually bond wood gunwales to their hulls, and some custom builders have done so in order to eliminate the weight of the gunwale screws.
 
Took the sander to a piece of the original gunwale. There is plenty of good wood left, and it is hard and heavy, so no dry rot. I ordered a 4' ash gunwale piece as suggested. The gunwales on the boat have no kerf. I will have 4' to work with and only need an 10" piece (or so). I suppose I'll get it right after a try or two :). The previous owner told me he had the gunwales replaced once. It looks like they used some filler for the gap between the inner and the outer gunwale, where the top of the gunwales was higher than the edge of the boat. I suppose they did it to get a cleaner finish, as the boat edges are somewhat rough and fuzzy where the Kevlar shows. That filler has mostly broken away. What filler should I use? Should I add filler again? The gap depth is maybe 1/16" to 1/8". I was mildly contemplating a good outdoor caulking?

The lack of a keff/rabbet is only good news for splicing in a scarf joint and matching the gunwale profile.

I can’t tell where the missing gunwale piece is along the sheerline, but with a scarf joint I’d be tempted to use something more than a 10 inch length.

Even without a rabbet the thin top edge of the hull material will not look bad aesthetically when sandwiched between the inwale and outwale. If you wanted to fill that wee gap a thin bead of epoxy or G/flex would seal the hull material and you could still pry the gunwales apart years later when a full gunwale replacement was needed.

If I were sealing that exposed hull edge between the wales I’d avoid the household caulks and construction adhesives.

If you go the wood putty route I’d still seal coat the putty parts with G/flex.
 
Back
Top