-
Happy National Blueberry Day! 🫐💙
You are using an out of date browser. It may not display this or other websites correctly.
You should upgrade or use an alternative browser.
You should upgrade or use an alternative browser.
Another Rebuild, '70's RX Explorer (it’s a sickness)
- Thread starter Mike McCrea
- Start date

- Joined
- Jul 6, 2021
- Messages
- 643
- Reaction score
- 1,184
OOSOBO upright again, I knew I wanted a back band, for me, for when I might (it could happen) reservoir paddle the canoe myself. For solo bow backwards especially, the only way I’ll ever be on the bow seat.
Specifically my preferred Surf to Summit Performance back band. Held unfloppy curved and vertical in position using four pop riveted pad eyes and four webbing straps, two pulling forward, two pulling back. Installing and removing that back band, swivel clipped in place, takes mere seconds.
I know from the weight bearing experiments that a single pad eye, pop riveted to the side of a vinyl gunwale, will hold 163lbs. Two pad eyes = 326lbs; those will hold just fine.
https://www.canoetripping.net/threads/canoe-outfitting-attachment-weight-bearing-experiment.107260/
 P1110033 by Mike McCrea, on Flickr
And, as in other boats, using the same four pad eyes, with zero webbing strap adjustment, bow forwards equally as well.
 P1110035 by Mike McCrea, on Flickr
That takes care of my back band needs. I, family we, like those Surf to Summit back bands, and each have our own. Eddie and Connie are nice young folks, but they’re not getting one of ours. I installed the pad eyes and will bring my own preferred back band.
https://www.surftosummit.com/collections/back-bands/products/performance-back-band
But I do want to provide a back band or seat back with the canoe (paddles too), and have just the thing. A weird Dagger seat back, a designer’s gift to Joel years ago. Joel gave it to me; I did not care for the WTF design, especially finagling with the under seat buckles. I modified it for easier installation in one of Joel’s canoes. Joel sold that canoe and gave it back to me.
I tried to give it back to Joel a month ago and he refused, claiming “I got too much stuff”. Testify, although I think his boat and gear collection has been reduced to only six locations in three States and two countries. He hasn’t gone full Marie Kondo, and all gear gives Joel joy, but it’s a start.
Enough of that fruitless trading, I modified it (again) for installation in the stern of OOSOBO. It is tall, more recliner seat back than back band, but being webbing strapped, still somewhat torso flexible for paddle strokes. I have never found rigid seat back support-suitable for actually paddling.
Call it a fishing seat back, for hauling in lunkers. It is a funky design, with straps running everydamnwhere.
 P1110040 by Mike McCrea, on Flickr
With a little further modification it sits, fits and straps nicely in the OOSOBO’s stern, swivel clipped to a couple existing under-inwale webbing loops, so no further holes drilled for attachment points were needed.
 P1110038 by Mike McCrea, on Flickr
Glad to be rid of it. Glad not to be kneeling beside the hull at a muddy launch, fumbling blindly with side release buckles that attach sight-unseen under a seat. Glad it finally found a home.
Specifically my preferred Surf to Summit Performance back band. Held unfloppy curved and vertical in position using four pop riveted pad eyes and four webbing straps, two pulling forward, two pulling back. Installing and removing that back band, swivel clipped in place, takes mere seconds.
I know from the weight bearing experiments that a single pad eye, pop riveted to the side of a vinyl gunwale, will hold 163lbs. Two pad eyes = 326lbs; those will hold just fine.
https://www.canoetripping.net/threads/canoe-outfitting-attachment-weight-bearing-experiment.107260/
P1110033 by Mike McCrea, on FlickrAnd, as in other boats, using the same four pad eyes, with zero webbing strap adjustment, bow forwards equally as well.
P1110035 by Mike McCrea, on FlickrThat takes care of my back band needs. I, family we, like those Surf to Summit back bands, and each have our own. Eddie and Connie are nice young folks, but they’re not getting one of ours. I installed the pad eyes and will bring my own preferred back band.
https://www.surftosummit.com/collections/back-bands/products/performance-back-band
But I do want to provide a back band or seat back with the canoe (paddles too), and have just the thing. A weird Dagger seat back, a designer’s gift to Joel years ago. Joel gave it to me; I did not care for the WTF design, especially finagling with the under seat buckles. I modified it for easier installation in one of Joel’s canoes. Joel sold that canoe and gave it back to me.
I tried to give it back to Joel a month ago and he refused, claiming “I got too much stuff”. Testify, although I think his boat and gear collection has been reduced to only six locations in three States and two countries. He hasn’t gone full Marie Kondo, and all gear gives Joel joy, but it’s a start.
Enough of that fruitless trading, I modified it (again) for installation in the stern of OOSOBO. It is tall, more recliner seat back than back band, but being webbing strapped, still somewhat torso flexible for paddle strokes. I have never found rigid seat back support-suitable for actually paddling.
Call it a fishing seat back, for hauling in lunkers. It is a funky design, with straps running everydamnwhere.
P1110040 by Mike McCrea, on FlickrWith a little further modification it sits, fits and straps nicely in the OOSOBO’s stern, swivel clipped to a couple existing under-inwale webbing loops, so no further holes drilled for attachment points were needed.
P1110038 by Mike McCrea, on FlickrGlad to be rid of it. Glad not to be kneeling beside the hull at a muddy launch, fumbling blindly with side release buckles that attach sight-unseen under a seat. Glad it finally found a home.
- Joined
- Jul 6, 2021
- Messages
- 643
- Reaction score
- 1,184
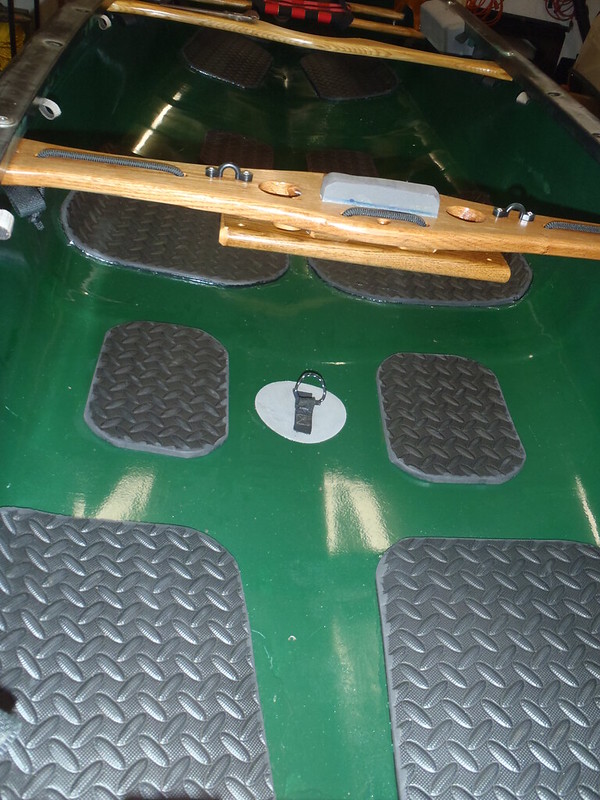
I’m kind of trying to keep this a just show up at the reservoir, unlock it and launch canoe, with minimal installation of accessories. Brian’s offspring Connie and Eddie paddle kayaks and SOT’s, have their own PFDs. I’ll throw in some appropriate single blades, but a bring-along bag of seat pads and back band add a lot of comfort, and that stuff only takes a few seconds to install.
Another test-sit-by-son showed the need for heel pads, the smutch hiding pads are all in kneeling or thigh strap pad positions, and I don’t see much kneeling in OOSOBO’s future. “Needed” for various reasons; the Topside paint could use something heel-grippy. And, while that Topside it is a durable paint, I’d rather have something semi-sacrificial under foot.
I had a virgin 21” square of dark grey exercise foam left; cut into six 10 ½” x 7” pieces those will be perfect as heel pads.
 P1110043 by Mike McCrea, on Flickr
A little corner rounding, a little edge beveling and there was more contact cement work yet to be done. Gold Sharpied around the edges and perimeter taped inside the hull, contact cement, pull the tape, heat gun, aim for the hi-vis gold outline, press & pray for alignment. Weigh ‘em down and walk away. Mere steps away, there were rewards waiting in the fresh air office that didn’t smell like contact cement.
 P1110046 by Mike McCrea, on Flickr
Ok, ok, so half the floor is now exercise foam, what of it? You could drop a sinker, or an anchor, inside that hull and the chances it would hit some foam and not scare the fish are 50/50. How’s that for a fun with leftover foam and contact cement rationalization?
With a fresh (mini-can) of contact cement the heel pads each got the three timed coats of contact cement; being exposed to footy sheer forces the heel pads will benefit from best practices.
I wish I had a leftover foot brace. Again, comfort wuss me may paddle this canoe, and I’d sure like a foot brace for the wider bow backwards solo position. I do have two old solo canoe telescoping foot brace bars, no rails or attachments, and both are too short to fit anywhere other than the bow forward location. Screw the bowman, I’m never paddling from up front.
The deep green bottom needs at least another day, maybe two, to cure before lightly sanding for a topcoat.
Another test-sit-by-son showed the need for heel pads, the smutch hiding pads are all in kneeling or thigh strap pad positions, and I don’t see much kneeling in OOSOBO’s future. “Needed” for various reasons; the Topside paint could use something heel-grippy. And, while that Topside it is a durable paint, I’d rather have something semi-sacrificial under foot.
I had a virgin 21” square of dark grey exercise foam left; cut into six 10 ½” x 7” pieces those will be perfect as heel pads.
P1110043 by Mike McCrea, on FlickrA little corner rounding, a little edge beveling and there was more contact cement work yet to be done. Gold Sharpied around the edges and perimeter taped inside the hull, contact cement, pull the tape, heat gun, aim for the hi-vis gold outline, press & pray for alignment. Weigh ‘em down and walk away. Mere steps away, there were rewards waiting in the fresh air office that didn’t smell like contact cement.
P1110046 by Mike McCrea, on FlickrOk, ok, so half the floor is now exercise foam, what of it? You could drop a sinker, or an anchor, inside that hull and the chances it would hit some foam and not scare the fish are 50/50. How’s that for a fun with leftover foam and contact cement rationalization?
With a fresh (mini-can) of contact cement the heel pads each got the three timed coats of contact cement; being exposed to footy sheer forces the heel pads will benefit from best practices.
I wish I had a leftover foot brace. Again, comfort wuss me may paddle this canoe, and I’d sure like a foot brace for the wider bow backwards solo position. I do have two old solo canoe telescoping foot brace bars, no rails or attachments, and both are too short to fit anywhere other than the bow forward location. Screw the bowman, I’m never paddling from up front.
The deep green bottom needs at least another day, maybe two, to cure before lightly sanding for a topcoat.
- Joined
- Jul 6, 2021
- Messages
- 643
- Reaction score
- 1,184
The Rustoleum Topside instructions say “Allow to dry overnight, sand with 220, apply one thin even coat per day”. I gave it several days and the first dusty swipe of not-gummed up sandpaper demonstrated that it was plenty cured. The Topside painted RX test panels, church key and nail scraped, took several day to truly harden, longer than the spray or brush enamel test panels.
220 hand sanded along the outwale edge and on the skid plates and keel strip, then the rest of the hull buzzed with the RO and 200 on a foam interstitial pad, hooked to the dust extractor cart. Bless that rig for sanding indoors.
 P1110047 by Mike McCrea, on Flickr
Wiped down, damp sponged and ready for a second coat. I still prefer wet sanding, outside with a hose, when possible. Not weather possible.
One benefit to dry sanding and a damp sponge “rinse” as opposed to wet sanding, without wet sanding and hose action, was that I could leave the tape on the outwales, and avoid repeating the semi-tricky taping of the outwale curves. The edge of that tape was paint-sealed to the underside of the outwale in places. Of course not un-taping after a paint coat means than any drips or sags that did get under the tape will be tougher to remove.
I’ll eventually know if there are drips under the tape, but not for a while. I looked at the remaining Deep Green topside and worried that a second coat was going to be wring-the-mop close. But first coats are always the thirstiest, second coats use half as much paint, and with initial paint coats both inside and out OOSOBO used more of the quart than usual.
Just made it squeezing out the last of the paint, with not enough left on the roller sleeve or foam brush to dab anywhere else.
 P1120049 by Mike McCrea, on Flickr
A third coat would look better still, and a quart of paint will usually lay three coats on a 16-ish foot canoe exterior; the first thirsty coat may use nearly half the can, but the 2nd and 3rd coats each use less than ¼. That paint coat rested unmolested for a few days. I had a bunch of other projects in the mix.
Yes, yes, I am having too much fun painting this old canoe. For $17 in Topside paint, a couple roller sleeves and a couple foam brushes that is the most bang-for-buck available in a derelict rebuild.
220 hand sanded along the outwale edge and on the skid plates and keel strip, then the rest of the hull buzzed with the RO and 200 on a foam interstitial pad, hooked to the dust extractor cart. Bless that rig for sanding indoors.
P1110047 by Mike McCrea, on FlickrWiped down, damp sponged and ready for a second coat. I still prefer wet sanding, outside with a hose, when possible. Not weather possible.
One benefit to dry sanding and a damp sponge “rinse” as opposed to wet sanding, without wet sanding and hose action, was that I could leave the tape on the outwales, and avoid repeating the semi-tricky taping of the outwale curves. The edge of that tape was paint-sealed to the underside of the outwale in places. Of course not un-taping after a paint coat means than any drips or sags that did get under the tape will be tougher to remove.
I’ll eventually know if there are drips under the tape, but not for a while. I looked at the remaining Deep Green topside and worried that a second coat was going to be wring-the-mop close. But first coats are always the thirstiest, second coats use half as much paint, and with initial paint coats both inside and out OOSOBO used more of the quart than usual.
Just made it squeezing out the last of the paint, with not enough left on the roller sleeve or foam brush to dab anywhere else.
P1120049 by Mike McCrea, on FlickrA third coat would look better still, and a quart of paint will usually lay three coats on a 16-ish foot canoe exterior; the first thirsty coat may use nearly half the can, but the 2nd and 3rd coats each use less than ¼. That paint coat rested unmolested for a few days. I had a bunch of other projects in the mix.
Yes, yes, I am having too much fun painting this old canoe. For $17 in Topside paint, a couple roller sleeves and a couple foam brushes that is the most bang-for-buck available in a derelict rebuild.
- Joined
- Jul 6, 2021
- Messages
- 643
- Reaction score
- 1,184
A few days crept past as I worked on other projects, and with the green topcoat sufficiently dry I returned to the last of the hull painting, the side accent stripes. More taping, more rolling and tipping, this time with leftover EZ-Poxy white and performance enhancer additive.
First a flexible ruler, with a hole drilled through at the desired height, for these wide stripes at the 4” mark, scribed along under the outwale edge.
 P1150003 by Mike McCrea, on Flickr
I’ll be taping and sanding above the Sharpie line; on a lighter colored hull a pencil line will work. Since the tape on the outwale remained intact, and paint sealed firm, I needed only tape near the scribe line. Scribing the line and taping, yes, again a twenty minute prep job. Eh, I forgot lightly sanding; a 30 minute job, with overtime rewarded.
A four inch accent stripe will cover most of the original fugly kevlar felt patches, with the hope that they become less apparent under white. I had the remains of a can of EZ-Poxy white left, like the Topside green I should have just enough for two coats of white stripe. I added some EZ-Poxy 3021 Performance Enhancer, still have 1/2 of that can, which needs only a few mls added to a pot of paint.
 P1160004 by Mike McCrea, on Flickr
Looks good so far, and will look even better with a second coat rolled and tipped. That can cure for a few days, so back to an upright hull and find something to do on the inside.
First a flexible ruler, with a hole drilled through at the desired height, for these wide stripes at the 4” mark, scribed along under the outwale edge.
P1150003 by Mike McCrea, on FlickrI’ll be taping and sanding above the Sharpie line; on a lighter colored hull a pencil line will work. Since the tape on the outwale remained intact, and paint sealed firm, I needed only tape near the scribe line. Scribing the line and taping, yes, again a twenty minute prep job. Eh, I forgot lightly sanding; a 30 minute job, with overtime rewarded.
A four inch accent stripe will cover most of the original fugly kevlar felt patches, with the hope that they become less apparent under white. I had the remains of a can of EZ-Poxy white left, like the Topside green I should have just enough for two coats of white stripe. I added some EZ-Poxy 3021 Performance Enhancer, still have 1/2 of that can, which needs only a few mls added to a pot of paint.
P1160004 by Mike McCrea, on FlickrLooks good so far, and will look even better with a second coat rolled and tipped. That can cure for a few days, so back to an upright hull and find something to do on the inside.
- Joined
- Jul 6, 2021
- Messages
- 643
- Reaction score
- 1,184
OOSOBO again right side up the edges of the D-ring pads were painted with a bead of G/flex, and the edges of the new heel pads beaded with E-6000. Lipstick on (no longer) a pig, I know, best practices and all that.
A little refinement to the Ensolite seat pads and a bit more modification to the Dagger seat back, so that it fits and sits better on either seat, and was easier to install. The Adirondack-style back was too tall, not strap supportive enough down low, and wanted to flop over onto the seat. That’s a nope, nope, nope.
A little hazy pondering of the issues, a little more contact cement work and another layer on the scrap blue ensolite seat pad, drilled with matching drain holes, did the trick. The seat frame and now double thick pads (while un-sat-upon) are 1 ¾” thick; no stability worries, both seats are dropped using 6” machine screws. That additional pad height positioned the bottom of the weirdo \_/ back support sufficiently below the combined frame and pad depth, and helped hold it vertical.
 P1170016 by Mike McCrea, on Flickr
Despite the bizarre multiplicity of straps that seat back’s biggest flaw was that it had no mechanism to hold it upright, and climbing into the canoe only to have the back rest fall over on the seat a split second before your butt hits was a major RUGGINFRUGGIN DANG IT design fail.
With the increased pad thickness it is also beneficially less tall, 12” high instead of 16” and the side strap attachments, lowered by 4”, are much more back and hips supportive. I love it when the magic works, even if half-a plan-unwittingly. Hope like hell Joel doesn’t decide he wants that weirdo thing back.
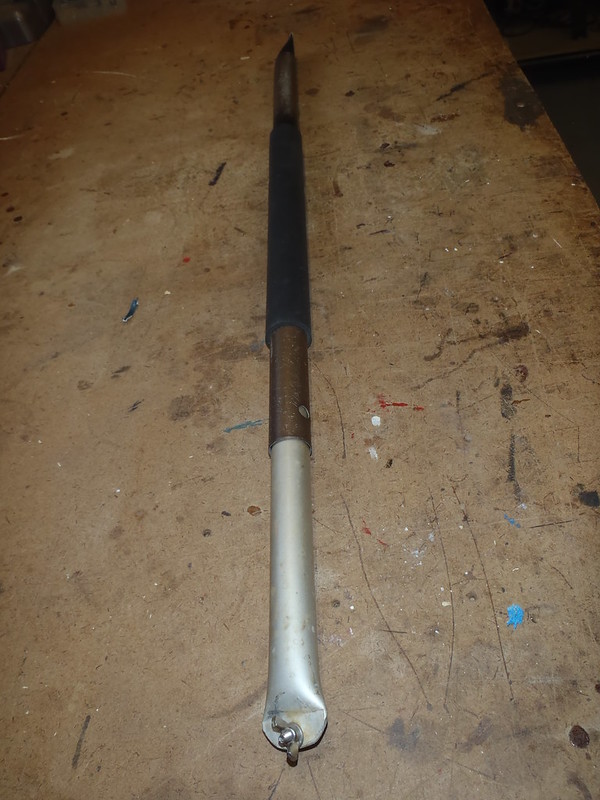
I keep saying this – there isn’t much left to do on the inside. Except for a DIY foot brace. I have a couple telescoping bars from narrower solo canoes. Both bars are too short for where most desirable, as a wider stance bow backwards foot brace. And I have no side rails on which to mount them, just the too short bars.
 P1140001 by Mike McCrea, on Flickr
But, Scot’s frugal save everything saves the day, or at least a trip to the hardware store. I also have some old aluminum paddle shaft remains. A little test fitting and the wider half of one foot brace bar sleeves perfectly inside one of the old paddle shafts.
 P1160006 by Mike McCrea, on Flickr
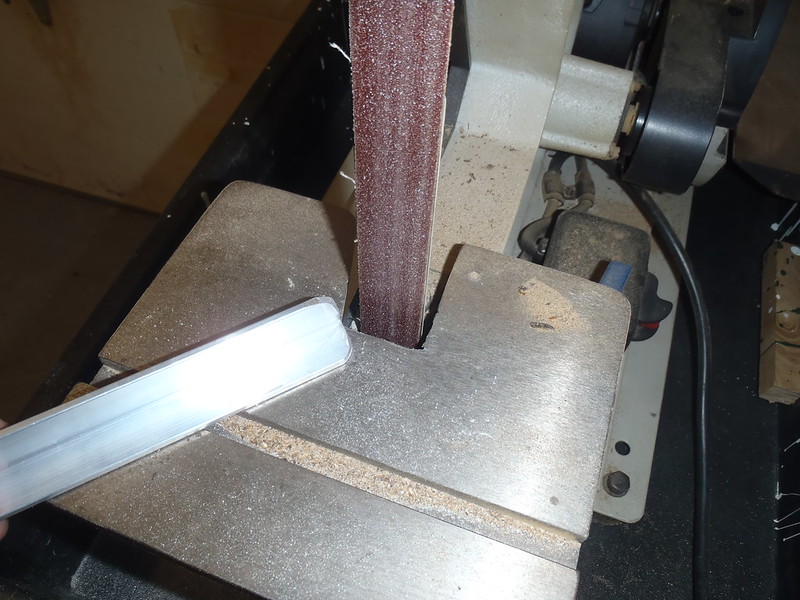
Some 1/8” aluminum L, cut to 16” lengths, corners and edges unsharpie rounded takes only a minute.
 P1160007 by Mike McCrea, on Flickr
Constituent parts and pieces cut, just need some holes drilled for 3/16” through hull pop rivets and a dozen (13 actually) holes at 1” crossbar spacing for the wing nuts.
 P1160010 by Mike McCrea, on Flickr
Copied from old-school L-bracket braces, rail length and wing nut spacing kinda from memory; with the bar center hole wing nutted it has 6” of adjustment fore or aft. That seems like a lot, but IIRC seems about the old school foot brace norm.
When OOSOBO gets paddled solo the combination of wider knee spread minicel bumpers, foot brace and seat back is the ultimate for paddling a tandem bow backwards braced-in-place seating comfort.
Standard head pop rivets work fine to secure foot brace rails on Royalex hulls, but because this is 33 year old Royalex I used flange head pop rivets (3/16” x 5/8”, with 5/8” diameter heads). Doesn’t hurt to use those on any canoe, definitely want them on thin-skinned composite boats.
 P1170014 by Mike McCrea, on Flickr
Yeah, yeah, I oopsie seated the first flange rivet overlapping the tape. How’s about you come up here and show me how it’s done? Eh, no, wait, that’s not an invitation; I work better alone. OK, sometimes I do work better with a shop partner. Doug or Joel would have spotted the flaw in the bow backwards foot brace plan.
 P1170012 by Mike McCrea, on Flickr
With the yoke installed facing the bow the carrier’s noggin would be resting on the foot brace. Not a problem, the yoke is essentially at the balance point. Yoke removed and reinstalled facing the stern, which at one time was the bow, all is well. Still learning things, sometimes after the fact.
 P1180019 by Mike McCrea, on Flickr
Y’all know what a cushioned comfort wuss I am. Some split foam pipe insulation around the bar for barefoot comfort, the good quality black stuff.
A little refinement to the Ensolite seat pads and a bit more modification to the Dagger seat back, so that it fits and sits better on either seat, and was easier to install. The Adirondack-style back was too tall, not strap supportive enough down low, and wanted to flop over onto the seat. That’s a nope, nope, nope.
A little hazy pondering of the issues, a little more contact cement work and another layer on the scrap blue ensolite seat pad, drilled with matching drain holes, did the trick. The seat frame and now double thick pads (while un-sat-upon) are 1 ¾” thick; no stability worries, both seats are dropped using 6” machine screws. That additional pad height positioned the bottom of the weirdo \_/ back support sufficiently below the combined frame and pad depth, and helped hold it vertical.
P1170016 by Mike McCrea, on FlickrDespite the bizarre multiplicity of straps that seat back’s biggest flaw was that it had no mechanism to hold it upright, and climbing into the canoe only to have the back rest fall over on the seat a split second before your butt hits was a major RUGGINFRUGGIN DANG IT design fail.
With the increased pad thickness it is also beneficially less tall, 12” high instead of 16” and the side strap attachments, lowered by 4”, are much more back and hips supportive. I love it when the magic works, even if half-a plan-unwittingly. Hope like hell Joel doesn’t decide he wants that weirdo thing back.
I keep saying this – there isn’t much left to do on the inside. Except for a DIY foot brace. I have a couple telescoping bars from narrower solo canoes. Both bars are too short for where most desirable, as a wider stance bow backwards foot brace. And I have no side rails on which to mount them, just the too short bars.
P1140001 by Mike McCrea, on FlickrBut, Scot’s frugal save everything saves the day, or at least a trip to the hardware store. I also have some old aluminum paddle shaft remains. A little test fitting and the wider half of one foot brace bar sleeves perfectly inside one of the old paddle shafts.
P1160006 by Mike McCrea, on FlickrSome 1/8” aluminum L, cut to 16” lengths, corners and edges unsharpie rounded takes only a minute.
P1160007 by Mike McCrea, on FlickrConstituent parts and pieces cut, just need some holes drilled for 3/16” through hull pop rivets and a dozen (13 actually) holes at 1” crossbar spacing for the wing nuts.
P1160010 by Mike McCrea, on FlickrCopied from old-school L-bracket braces, rail length and wing nut spacing kinda from memory; with the bar center hole wing nutted it has 6” of adjustment fore or aft. That seems like a lot, but IIRC seems about the old school foot brace norm.
When OOSOBO gets paddled solo the combination of wider knee spread minicel bumpers, foot brace and seat back is the ultimate for paddling a tandem bow backwards braced-in-place seating comfort.
Standard head pop rivets work fine to secure foot brace rails on Royalex hulls, but because this is 33 year old Royalex I used flange head pop rivets (3/16” x 5/8”, with 5/8” diameter heads). Doesn’t hurt to use those on any canoe, definitely want them on thin-skinned composite boats.
P1170014 by Mike McCrea, on FlickrYeah, yeah, I oopsie seated the first flange rivet overlapping the tape. How’s about you come up here and show me how it’s done? Eh, no, wait, that’s not an invitation; I work better alone. OK, sometimes I do work better with a shop partner. Doug or Joel would have spotted the flaw in the bow backwards foot brace plan.
P1170012 by Mike McCrea, on FlickrWith the yoke installed facing the bow the carrier’s noggin would be resting on the foot brace. Not a problem, the yoke is essentially at the balance point. Yoke removed and reinstalled facing the stern, which at one time was the bow, all is well. Still learning things, sometimes after the fact.
P1180019 by Mike McCrea, on FlickrY’all know what a cushioned comfort wuss I am. Some split foam pipe insulation around the bar for barefoot comfort, the good quality black stuff.
I’m getting used to you making holes in boats, it’s not so visceral now. On the foot brace, the ones I’m familiar with are Wenonah, they install the L-bracket upside down from the way you have, and the bar rests on the top surface rather than beneath. You don’t seem to do things randomly, so I thought I’d ask why. I realize that with rivets through the hull from the outside it, the big goobered expanded end of the rivet is inside the boat, so maybe an aesthetic choice to keep them from being prominently above the L-bracket. But then why affix the bar to the bottom of the brackets?
- Joined
- Jul 6, 2021
- Messages
- 643
- Reaction score
- 1,184
I needed to drill far fewer holes in OOSOBO than on some rebuilds, so there was that.
I was installing the foot brace from vague memory, but you surmise correctly, I wanted the big goobered end of the pop rivet, aka the rivet pin and mandrel head, out of sight, both for aesthetic reasons and because they can be scratchy sharp. I had rounded all of the edges and corners on the L bracket so there were no sharp edges exposed.
I move the bar to different holes after it was installed and it was easier to have the wing nut on top and the machine screw thread sticking up where I could see what I was doing.
Unscrewing the wing nut I held it in one hand and held the machine screw (and lock washer), still through the foot brace bar, with a finger, poked it up through the desired hole and threaded the wing nut. That adjustment seemed easier than dealing with loose pieces of hardware at each end of the bar.
I don’t know if there are structural issues with the bar and brackets mounted one way or the other. I should probably adopt Glenn’s foot brace hardware strategy and put spare machine screws, wing nuts and lock washers inside the foot brace bar.
I needed to drill far fewer holes in OOSOBO than on some rebuilds, so there was that.
I was installing the foot brace from vague memory, but you surmise correctly, I wanted the big goobered end of the pop rivet, aka the rivet pin and mandrel head, out of sight, both for aesthetic reasons and because they can be scratchy sharp. I had rounded all of the edges and corners on the L bracket so there were no sharp edges exposed.
I move the bar to different holes after it was installed and it was easier to have the wing nut on top and the machine screw thread sticking up where I could see what I was doing.
Unscrewing the wing nut I held it in one hand and held the machine screw (and lock washer), still through the foot brace bar, with a finger, poked it up through the desired hole and threaded the wing nut. That adjustment seemed easier than dealing with loose pieces of hardware at each end of the bar.
I don’t know if there are structural issues with the bar and brackets mounted one way or the other. I should probably adopt Glenn’s foot brace hardware strategy and put spare machine screws, wing nuts and lock washers inside the foot brace bar.
It is a cleaner look. And, holding a bolt on the underside with one hand and the bar and wing nut in the other hand while trying to line it all up is fiddly at best. Especially while seated in the boat on the water… this is how I yanked my L-bracket off the gunwale.
Re: stashing extra hardware in the foot bar, this works great as long as the bar pieces don’t get frozen together!!!
 Don’t let that happen.
 I stashed the leftover hardware from my Prism’s foot brace inside the bar on my Encounter, since the Prism has the updated Wenonah brace now.
- Joined
- Jul 6, 2021
- Messages
- 643
- Reaction score
- 1,184
Second coat of white stripe went on as easy as the first, and the stripe helps break up the too much green.
 P1200026 by Mike McCrea, on Flickr
White above green seems scum line bassakwards, usually the other way around, but it is now a distinctive hull, I like it more than green on green. The white stripe, once cured, will be a good location to hand paint the new name, “OOSOBO” and shop Gogetch. I even had enough performance enhanced EZ-Poxy white left from the roller squeezings to go onto the world’s finest trash can lids.
 P1190022 by Mike McCrea, on Flickr
Eh, I should have planned ahead and unscrewed the handles first. Instead I could later dig through the trash, find the empty can of white, take the lid handles off and use the last drops of paint to smear some white on that vacancy. Trash can lids aside there is a lot of similar stop-think-and-do-it-right with boatwork, realizing I could have or should have done something, and (hopefully) stopping to fix it before plowing ahead.
 P1200023 by Mike McCrea, on Flickr
Those DIY can lids are now blank canvas receptacles for various paint and epoxy leftovers, and are sure to become further decorated. I’m thinking shake the brush Jackson Pollack spatters of leftover paint. Someday my trash can lids may hang in MOMA, and people will finally sing my genius in the same hushed tones they mutter the name Julian Schnabel.
Once cured they can serve as test platforms, painting on our street address. If I like the coverage and color contrast I (eh, a steady-handed son) can hand paint “OOSOBO” and, as on every boat, the mark of the builder shop Gogetch go on the stems.
P1200026 by Mike McCrea, on FlickrWhite above green seems scum line bassakwards, usually the other way around, but it is now a distinctive hull, I like it more than green on green. The white stripe, once cured, will be a good location to hand paint the new name, “OOSOBO” and shop Gogetch. I even had enough performance enhanced EZ-Poxy white left from the roller squeezings to go onto the world’s finest trash can lids.
P1190022 by Mike McCrea, on FlickrEh, I should have planned ahead and unscrewed the handles first. Instead I could later dig through the trash, find the empty can of white, take the lid handles off and use the last drops of paint to smear some white on that vacancy. Trash can lids aside there is a lot of similar stop-think-and-do-it-right with boatwork, realizing I could have or should have done something, and (hopefully) stopping to fix it before plowing ahead.
P1200023 by Mike McCrea, on FlickrThose DIY can lids are now blank canvas receptacles for various paint and epoxy leftovers, and are sure to become further decorated. I’m thinking shake the brush Jackson Pollack spatters of leftover paint. Someday my trash can lids may hang in MOMA, and people will finally sing my genius in the same hushed tones they mutter the name Julian Schnabel.
Once cured they can serve as test platforms, painting on our street address. If I like the coverage and color contrast I (eh, a steady-handed son) can hand paint “OOSOBO” and, as on every boat, the mark of the builder shop Gogetch go on the stems.
That white paint looks good. All-green canoes are so common and so . . . all green. In fact, that white stripe is so wide that I'm not sure it's a stripe. But I can't think a word for a really wide stripe. It looks more like a two-tone canoe to me.
The thing that is now the least aesthetic, at least in pictures, is that brownish deck with broken black nose. Maybe that should be painted tartan.
As to the nuts and washers I carry inside my SRT's Wenonah foot brace, that actually saved me a lot of discomfort once. My SRT kneeling bucket seat is held on with wing nuts underneath, so I can move it fore and aft more easily along the movable seat bar. Wing nuts aren't really a good idea for such high stress places unless you check their tightness frequently, which I don't.
Once, I was semi-lost in the Sparkleberry Swamp when my seat collapsed because a wing nut had come off. I found a small patch of dry ground to fix the seat, but promptly lost the wing nut with fumbly fingers. Having extras in my foot bar allowed me to have a usable seat to get out of the swamp.
- Joined
- Jul 6, 2021
- Messages
- 643
- Reaction score
- 1,184
Glenn, I have plans for that white stripe. And, if I had anticipated the degree of care and attention that I would end up lavishing on this rebuild I could have removed the old ugly deck plates and installed new ones, I have a set of black vinyl MRC deck plates that would fit perfectly.
The scuffed up kevlar felt nose guards on the old deck plates needed a fresh coat of black paint. I haven’t been able to find a simple pint can of black Rustoleum enamel anywhere in months. I did find a pint can of green Rustoleum enamel, which will come in handy for yearly touch up work, and for - is painting ever finished? - a little something else I have in mind.
I do have G/flex, black pigment and graphite powder. And time on my hands. Gotta love how a teeny epoxy job, done right, still takes prep work, taping, and setting out of the needed materials. 30 second epoxy job, eight different things needing prepped on the bench.
 P1200002 by Mike McCrea, on Flickr
Worth the minor effort, the deck plate tips are done and now tough as nails. Without guessing OOSOBO’s finished weight I don’t see anyone I know hip-flipping it up and getting under the yoke, so feel free to grind that deck plate nose into the ground as needed.
And I will admit, the original kevlar felt and urethane resin did hold up admirably for years of abuse. So there’s a second use for kevlar felt. The other use NOT being skid plates.
 P1200004 by Mike McCrea, on Flickr
The begun out of sequence the stem loops could finally get installed. I wanted a hand grip on the loops, but almost everything in the toggle box selection of reinforced hose and bicycle handlebar grips was too wimpy flexible for grasping OOSOBO’s obesity.
 P1210005 by Mike McCrea, on Flickr
I had something much better for a heavyweight, some 3/16” thick wall rigid plastic of mystery origin, with the cupped bottoms cut off. Stamped “Corning 8441”
 P1210006 by Mike McCrea, on Flickr
I wonder from whence those came? Hey Google:
http://temp1.andbio.com/product/334...ottom-glass-centrifuge-tubes-8441-lot-of-6/#/
A ha, more “Maybe I’ll find a use someday” trash, salvaged from a abandoned microbiology lab. Anybody want to lick my centrifuge adapters? Tastes like Ebola to me.
As always, the line length and toggle were sized to pivot over the stem tips without knuckle bashing, even when gloved. I inadvertently left a shop window cracked before I went to bed. It was 7F outside when I got up, and a wee bit chilly in the shop.
 P1210007 by Mike McCrea, on Flickr
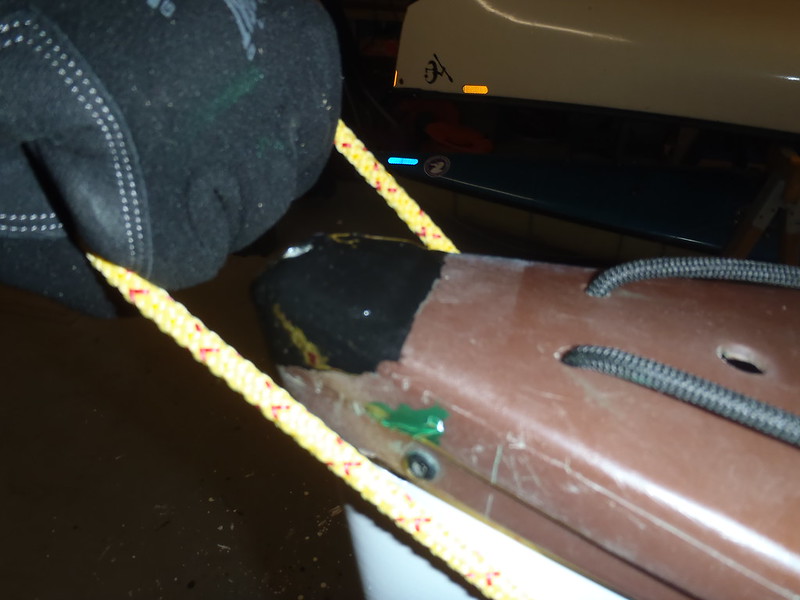
I used high quality line for the painter loops. Not so for the actual painter lines; a look through the “Junk Rope” box revealed the harsh reality of that label. It is crap rope. Old, used crap rope. That big box of nope that lived up to its label, and none of it was near long enough or strong enough anyway.
 P1210022 by Mike McCrea, on Flickr
I wanted to provide painters to be left attached to the stem loops at the launch, and not oops forgotten left at home. Not having painter lines on a canoe would feel like driving without a seatbelt, but the shop spool of floating rescue line deserves a better fate than being left upside down, inches from the dirt, eight months a year.
It can be mediocre quality rope, but I’d like it to be new, brightly colored, and both pieces 16-ish feet long, enough at each end to reach from stem to stem.
Sometimes the magic works
In a long-uninspected stuff bag of miscellaneous rope I found a couple brightly colored unused pieces, fortuitously already cut at appropriate 16-ish foot lengths. Identical color patterns, but the bow line is a reasonable 3/8” diameter and the stern line a full hawser ½” thick.
 P1210009 by Mike McCrea, on Flickr
 P1210011 by Mike McCrea, on Flickr
Stern painter overkill, but again achieving the not so hidden objective in this rebuild, more shop “surplus” goes bye-bye.
Speaking of which, time to pick out some paddles. Nothing too good or oft used, and even then everything on the back of the racks has some oddball or sentimental value, if limited desirability.
From the way back of a paddle rack, a massive oddball, 66” long, it was missing blade chunks and was refurbished into an exaggerated (and slightly irregular) Otter Tail
 P1210013 by Mike McCrea, on Flickr
66 inches? Eddie or Connie could stand up and paddle with it. That’s what I’ll tell them any way. The refurbishment of that paddle was at least accomplished silky smooth; I must have cared enough to use schedule-thinned coats of real varnish, and not just slapped on some urethane.
The other paddle has more history. A 30 year old MRC Voyager paddle. Decades ago, back when friend Joel ran the local paddleshop, two MRC Voyager paddles were crushed-box delivered with busted off blade edges. Joel tossed them, broken blade pieces and all, my way.
Those were the first half decent paddles I ever repaired; the busted off edges were pinned together using thin finishing nail rabbets, glued with some mystery white “marine” glue and clamped. After a lifetime of Feather Brands and aluminum Mohawks we had real paddles at last.
 P1210014 by Mike McCrea, on Flickr
An odd note about that long ago crude blade fix, the “repair” was ugly, but we used those finishing nail pinned & glued paddles hard for years and they are still going strong. I’ll keep the 58” one. Thanks Joel.
Those will do nicely, and fit well in the designed paddle keeps.
 P1210017 by Mike McCrea, on Flickr
But. . . .but. . . .but. . . .Brian had some very nice paddles, both store bought and hand crafted, single blades and canoe-length double blades. Those really should be used in OOSOBO, but for starters a couple back-of-the-rack relics will do.
Photo observers will note that I still need to plug the gunwale holes left from the center seat. And more tiddly stuff yet to go. Not just tiddly, but downright frou frou.
The scuffed up kevlar felt nose guards on the old deck plates needed a fresh coat of black paint. I haven’t been able to find a simple pint can of black Rustoleum enamel anywhere in months. I did find a pint can of green Rustoleum enamel, which will come in handy for yearly touch up work, and for - is painting ever finished? - a little something else I have in mind.
I do have G/flex, black pigment and graphite powder. And time on my hands. Gotta love how a teeny epoxy job, done right, still takes prep work, taping, and setting out of the needed materials. 30 second epoxy job, eight different things needing prepped on the bench.
P1200002 by Mike McCrea, on FlickrWorth the minor effort, the deck plate tips are done and now tough as nails. Without guessing OOSOBO’s finished weight I don’t see anyone I know hip-flipping it up and getting under the yoke, so feel free to grind that deck plate nose into the ground as needed.
And I will admit, the original kevlar felt and urethane resin did hold up admirably for years of abuse. So there’s a second use for kevlar felt. The other use NOT being skid plates.
P1200004 by Mike McCrea, on FlickrThe begun out of sequence the stem loops could finally get installed. I wanted a hand grip on the loops, but almost everything in the toggle box selection of reinforced hose and bicycle handlebar grips was too wimpy flexible for grasping OOSOBO’s obesity.
P1210005 by Mike McCrea, on FlickrI had something much better for a heavyweight, some 3/16” thick wall rigid plastic of mystery origin, with the cupped bottoms cut off. Stamped “Corning 8441”
P1210006 by Mike McCrea, on FlickrI wonder from whence those came? Hey Google:
http://temp1.andbio.com/product/334...ottom-glass-centrifuge-tubes-8441-lot-of-6/#/
A ha, more “Maybe I’ll find a use someday” trash, salvaged from a abandoned microbiology lab. Anybody want to lick my centrifuge adapters? Tastes like Ebola to me.
As always, the line length and toggle were sized to pivot over the stem tips without knuckle bashing, even when gloved. I inadvertently left a shop window cracked before I went to bed. It was 7F outside when I got up, and a wee bit chilly in the shop.
P1210007 by Mike McCrea, on FlickrI used high quality line for the painter loops. Not so for the actual painter lines; a look through the “Junk Rope” box revealed the harsh reality of that label. It is crap rope. Old, used crap rope. That big box of nope that lived up to its label, and none of it was near long enough or strong enough anyway.
P1210022 by Mike McCrea, on FlickrI wanted to provide painters to be left attached to the stem loops at the launch, and not oops forgotten left at home. Not having painter lines on a canoe would feel like driving without a seatbelt, but the shop spool of floating rescue line deserves a better fate than being left upside down, inches from the dirt, eight months a year.
It can be mediocre quality rope, but I’d like it to be new, brightly colored, and both pieces 16-ish feet long, enough at each end to reach from stem to stem.
Sometimes the magic works
In a long-uninspected stuff bag of miscellaneous rope I found a couple brightly colored unused pieces, fortuitously already cut at appropriate 16-ish foot lengths. Identical color patterns, but the bow line is a reasonable 3/8” diameter and the stern line a full hawser ½” thick.
P1210009 by Mike McCrea, on FlickrP1210011 by Mike McCrea, on FlickrStern painter overkill, but again achieving the not so hidden objective in this rebuild, more shop “surplus” goes bye-bye.
Speaking of which, time to pick out some paddles. Nothing too good or oft used, and even then everything on the back of the racks has some oddball or sentimental value, if limited desirability.
From the way back of a paddle rack, a massive oddball, 66” long, it was missing blade chunks and was refurbished into an exaggerated (and slightly irregular) Otter Tail
P1210013 by Mike McCrea, on Flickr66 inches? Eddie or Connie could stand up and paddle with it. That’s what I’ll tell them any way. The refurbishment of that paddle was at least accomplished silky smooth; I must have cared enough to use schedule-thinned coats of real varnish, and not just slapped on some urethane.
The other paddle has more history. A 30 year old MRC Voyager paddle. Decades ago, back when friend Joel ran the local paddleshop, two MRC Voyager paddles were crushed-box delivered with busted off blade edges. Joel tossed them, broken blade pieces and all, my way.
Those were the first half decent paddles I ever repaired; the busted off edges were pinned together using thin finishing nail rabbets, glued with some mystery white “marine” glue and clamped. After a lifetime of Feather Brands and aluminum Mohawks we had real paddles at last.
P1210014 by Mike McCrea, on FlickrAn odd note about that long ago crude blade fix, the “repair” was ugly, but we used those finishing nail pinned & glued paddles hard for years and they are still going strong. I’ll keep the 58” one. Thanks Joel.
Those will do nicely, and fit well in the designed paddle keeps.
P1210017 by Mike McCrea, on FlickrBut. . . .but. . . .but. . . .Brian had some very nice paddles, both store bought and hand crafted, single blades and canoe-length double blades. Those really should be used in OOSOBO, but for starters a couple back-of-the-rack relics will do.
Photo observers will note that I still need to plug the gunwale holes left from the center seat. And more tiddly stuff yet to go. Not just tiddly, but downright frou frou.
- Joined
- Jul 6, 2021
- Messages
- 643
- Reaction score
- 1,184
That bland white “stripe” needed something in the way of further embellishment. NOT the Native American “Whirling Log” design sequence that Old Town once appropriated. Interpretations of that symbol tended to differ in later years.
https://www.navajorug.com/blogs/news/whirling-logs-motif
Still, the tale of a log canoe, heroic misadventures and knowledge acquired sounds like the ideal tripping motif. But no, I might as well wear my Hawaiian shirt and give people the OK sign. Essentially, if I have fingers, I’m screwed.
https://www.adl.org/hate-symbols?cat_id[153]=153
(Culture mini-rant over).
OK, not a swastika. Some design that is simple and easy to tape. A design I’ve used before. Diamonds are a taper’s best friend.
 P1210028 by Mike McCrea, on Flickr
The trash can lid paint test panels were a valuable exercise. For hand painting boat names and the shop Gogetch I use carbon paper under a paper design copy, trace the outline, and painted between the lines. I made a house number carbon paper trace for the trash can lids, just to see.
Even bearing down hard with a sharp pencil, twice around every number, the EZ-Poxy with 3021 Performance Enhancer is so glossy rock solid hard that the carbon paper trace wasn’t visible enough on the trash can lid. I am increasingly impressed with the EZ-Poxy Performance Enhancer, it is glossier, harder, dries better/faster, but it negates my usual hand-painted carbon paper tracing.
I’m not freehanding the new name and shop Gotetch. The diamond shape, using a plastic stencil outline, Sharpied and taped, was also test painted (sloppily who cares) on the taped can lid. Straight taping easy and successful, so that’ll work for some flourish on the white.
 P1210024 by Mike McCrea, on Flickr
The OOSOBO name went on using leftover vinyl letters. Lotta “O”s, I had to cut the leg off a leftover Q.
 P1210025 by Mike McCrea, on Flickr
If OOSOBO isn’t getting the shop Gogetch it is at least getting one of the last Duckhead stickers. I really should look into having more of those made, and getting the shop Gogetch reproduced in vinyl.
 P1210026 by Mike McCrea, on Flickr
The flourishes required the usual prep work; stencil outline Sharpied, tape, scuff sand, paint.
 P1220031 by Mike McCrea, on Flickr
Compared to a topside paint the Rustoleum enamel was nothing to write home about coverage wise, and absolutely will need cure time, a light sanding and a second coat, so the now paint-sealed tape stays on.
With a little paint cure wait time I pondered what to do about the four ¼” gunwale holes left from the original rebuild center seat.
 P1220032 by Mike McCrea, on Flickr
I’ve epoxied caps on vinyl gunwale holes; sometimes they stay on, sometimes they scrape off, especially when sliding on/off storage racks. I went ahead and capped those holes with flange washers and machine screws. A handy shank end for some use, but OOSOBO does not need any more little under-inwale loops
Maybe some big arsed loops. The old holes are 9” on center, a folded over piece of webbing 22” long gave me an 11” loop, with melt sealed holes in the ends that will provide weirdo under-inwale “handles”.
 P1220035 by Mike McCrea, on Flickr
I have no idea what functional purpose those under-inwale handles serve, I’ll keep ya posted.
 P1220036 by Mike McCrea, on Flickr
Also, note that the once bleached white gunwale in now back to black. I took some errant white drips off the outwales, using 0000 steel wool with a bit of acetone. Whadda ya know, the bleached white came off as well. Once the painting is finished I’ll wash those and rub them down with some 303.
With the outlines already taped the second coat of enamel went on in a back on schedule 20 minutes. The perimeter tape was wide enough that a couple second ZZZZ with the RO sander and interface pad did the trick
 P1220038 by Mike McCrea, on Flickr
Diamond second coated and wait. Waiting is the hard part; I have an expectation of how the diamond flourishes will look on that white stripe, but no idea if the lines are sharp or if there are under-tape sags.
I didn’t wait long. The big reveal:
 P1230040 by Mike McCrea, on Flickr
 P1230043 by Mike McCrea, on Flickr
OK, I really like the look of that white not-a-stripe now. Glenn, it’s a band. A flourish band; I’m sure those have some traditional name, a schmeggelwus or something.
Jumping a day ahead - I’m always a day ahead, and a day behind - and wanting wrap this up, I needed to have a look at OOSOBO outside the shop, finished, outfitted and reservoir equipped.
 P1230004 by Mike McCrea, on Flickr
 P1230010 by Mike McCrea, on Flickr
The last reveal can be a guessing game contest.
 P1230001 by Mike McCrea, on Flickr
What does OOSOBO weigh? Closest guess, without going over, wins one of the last remaining Duckhead stickers. I’ll even pay Canadian postage.
I guessed 93lb. Before gutting and re-outfitting, still flakey paint and dirt encrusted, with three seats, rotting brightwork and the remaining failed outfitting it weighed 85lbs.
https://www.navajorug.com/blogs/news/whirling-logs-motif
Still, the tale of a log canoe, heroic misadventures and knowledge acquired sounds like the ideal tripping motif. But no, I might as well wear my Hawaiian shirt and give people the OK sign. Essentially, if I have fingers, I’m screwed.
https://www.adl.org/hate-symbols?cat_id[153]=153
(Culture mini-rant over).
OK, not a swastika. Some design that is simple and easy to tape. A design I’ve used before. Diamonds are a taper’s best friend.
P1210028 by Mike McCrea, on FlickrThe trash can lid paint test panels were a valuable exercise. For hand painting boat names and the shop Gogetch I use carbon paper under a paper design copy, trace the outline, and painted between the lines. I made a house number carbon paper trace for the trash can lids, just to see.
Even bearing down hard with a sharp pencil, twice around every number, the EZ-Poxy with 3021 Performance Enhancer is so glossy rock solid hard that the carbon paper trace wasn’t visible enough on the trash can lid. I am increasingly impressed with the EZ-Poxy Performance Enhancer, it is glossier, harder, dries better/faster, but it negates my usual hand-painted carbon paper tracing.
I’m not freehanding the new name and shop Gotetch. The diamond shape, using a plastic stencil outline, Sharpied and taped, was also test painted (sloppily who cares) on the taped can lid. Straight taping easy and successful, so that’ll work for some flourish on the white.
P1210024 by Mike McCrea, on FlickrThe OOSOBO name went on using leftover vinyl letters. Lotta “O”s, I had to cut the leg off a leftover Q.
P1210025 by Mike McCrea, on FlickrIf OOSOBO isn’t getting the shop Gogetch it is at least getting one of the last Duckhead stickers. I really should look into having more of those made, and getting the shop Gogetch reproduced in vinyl.
P1210026 by Mike McCrea, on FlickrThe flourishes required the usual prep work; stencil outline Sharpied, tape, scuff sand, paint.
P1220031 by Mike McCrea, on FlickrCompared to a topside paint the Rustoleum enamel was nothing to write home about coverage wise, and absolutely will need cure time, a light sanding and a second coat, so the now paint-sealed tape stays on.
With a little paint cure wait time I pondered what to do about the four ¼” gunwale holes left from the original rebuild center seat.
P1220032 by Mike McCrea, on FlickrI’ve epoxied caps on vinyl gunwale holes; sometimes they stay on, sometimes they scrape off, especially when sliding on/off storage racks. I went ahead and capped those holes with flange washers and machine screws. A handy shank end for some use, but OOSOBO does not need any more little under-inwale loops
Maybe some big arsed loops. The old holes are 9” on center, a folded over piece of webbing 22” long gave me an 11” loop, with melt sealed holes in the ends that will provide weirdo under-inwale “handles”.
P1220035 by Mike McCrea, on FlickrI have no idea what functional purpose those under-inwale handles serve, I’ll keep ya posted.
P1220036 by Mike McCrea, on FlickrAlso, note that the once bleached white gunwale in now back to black. I took some errant white drips off the outwales, using 0000 steel wool with a bit of acetone. Whadda ya know, the bleached white came off as well. Once the painting is finished I’ll wash those and rub them down with some 303.
With the outlines already taped the second coat of enamel went on in a back on schedule 20 minutes. The perimeter tape was wide enough that a couple second ZZZZ with the RO sander and interface pad did the trick
P1220038 by Mike McCrea, on FlickrDiamond second coated and wait. Waiting is the hard part; I have an expectation of how the diamond flourishes will look on that white stripe, but no idea if the lines are sharp or if there are under-tape sags.
I didn’t wait long. The big reveal:
P1230040 by Mike McCrea, on FlickrP1230043 by Mike McCrea, on FlickrOK, I really like the look of that white not-a-stripe now. Glenn, it’s a band. A flourish band; I’m sure those have some traditional name, a schmeggelwus or something.
Jumping a day ahead - I’m always a day ahead, and a day behind - and wanting wrap this up, I needed to have a look at OOSOBO outside the shop, finished, outfitted and reservoir equipped.
P1230004 by Mike McCrea, on FlickrP1230010 by Mike McCrea, on FlickrThe last reveal can be a guessing game contest.
P1230001 by Mike McCrea, on FlickrWhat does OOSOBO weigh? Closest guess, without going over, wins one of the last remaining Duckhead stickers. I’ll even pay Canadian postage.
I guessed 93lb. Before gutting and re-outfitting, still flakey paint and dirt encrusted, with three seats, rotting brightwork and the remaining failed outfitting it weighed 85lbs.
Without the seat backs, I'll guess 91 lbs.
I was thinking of the word "band" instead of "stripe", but now the burning word question to me is how one properly pronounces "OOSOBO", with or without a Hereford Zone accent.
I was thinking of the word "band" instead of "stripe", but now the burning word question to me is how one properly pronounces "OOSOBO", with or without a Hereford Zone accent.
95lbs. Nicely done! I’m sure Brian would be proud and happy to see it in use.
Bob
Bob
Not fat, big boned. I'll go 89 lbs sopping wet.
Sure looks good at any weight.
Sure looks good at any weight.
I am enjoying this soooo much. Thanx Mike.
- Joined
- Jul 6, 2021
- Messages
- 643
- Reaction score
- 1,184
The mystery weight was without seat backs, pads or even painter lines; only the permanently installed outfitting.
Pronounced oo-SO-bo.
The accent was always on the “SO”, but even more so now. I heard from SO yesterday, for the first time since I met him years ago. Not to scold me for disparaging his repairs and outfitting, and it was fun catching up, but to offer me another derelict; a Royalex SuperNova, the very antithesis of my personal paddling desires.
It needs (at least) a large Dynel diamond epoxied on to cover much of the worn bottom, currently “repaired” with Shoe Goo and spray paint, but I’ve done that before on an RX Appalachian.
My brother-in-law Scott is running WW, sometimes including downriver camper trips, in his Freedom Solo, and now longs for a drier ride. A free Supernova might be just the ticket.
SO is only a couple hours away, I might have to at least go have a look. The Supernova was originally a rental at Potomac Outdoors, SO bought it used $300 cheap, ran it hard and bought a nicer one. If I repair it for Scott it would be POSOSO.
By the stated contest rules no weight guess thus far qualifies.
Beautiful Miguel. Just beautiful!
Similar threads
- Replies
- 14
- Views
- 3K
- Replies
- 43
- Views
- 11K
- Replies
- 7
- Views
- 3K