• Happy Weed Appreciation Day! 🌱🌿🌻

Another Rebuild, '70's RX Explorer (it’s a sickness)

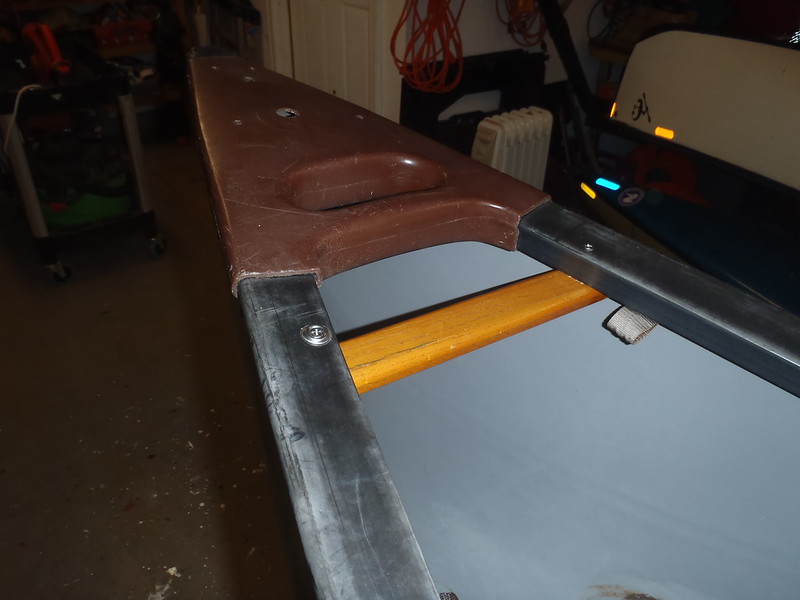
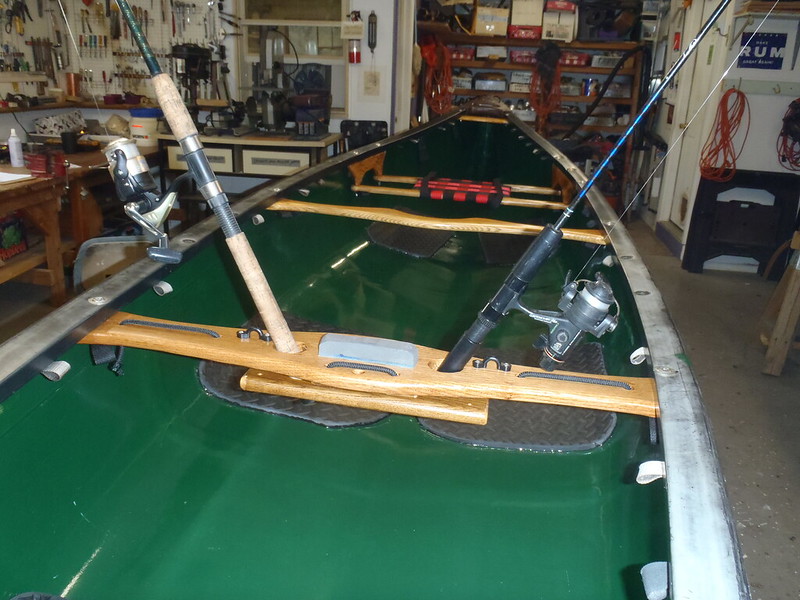
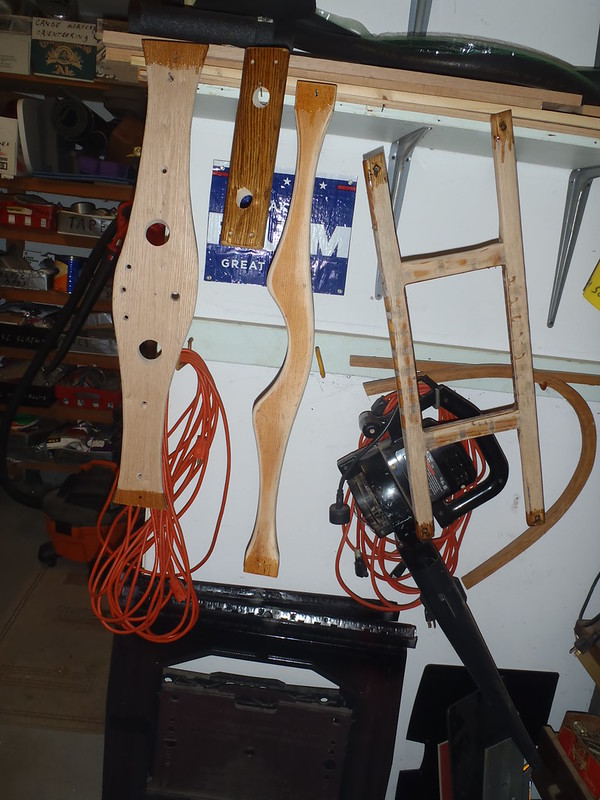
I needed to hand sand the edges and inside the rod holes on fishing thwart, and create a short bottom “shelf” to hold the ends of the angled rods outboard for paddle trolling. Turning again to the scrap thwart pile I found a likely under-shelf candidate, cut it length and spade bit drilled the holes at a matching rod angles. No sense in wasting a piece of now too short already finished wood, I cut the short shelf drops from that same rectangular thwart piece.

Fishing thwart pieces clamped in rough position on the bench, tested and approved, then taken apart for butt end sealing.

PC270017 by Mike McCrea, on Flickr

With those remaining brightwork pieces cut and sanded I turned to some minor epoxy work. First some G/flex paint over and seeped into the various sanded and cleaned interior cracks. To make certain that I didn’t miss any, after sanding and cleaning I marked those cracks with a Sharpie.

PC270018 by Mike McCrea, on Flickr

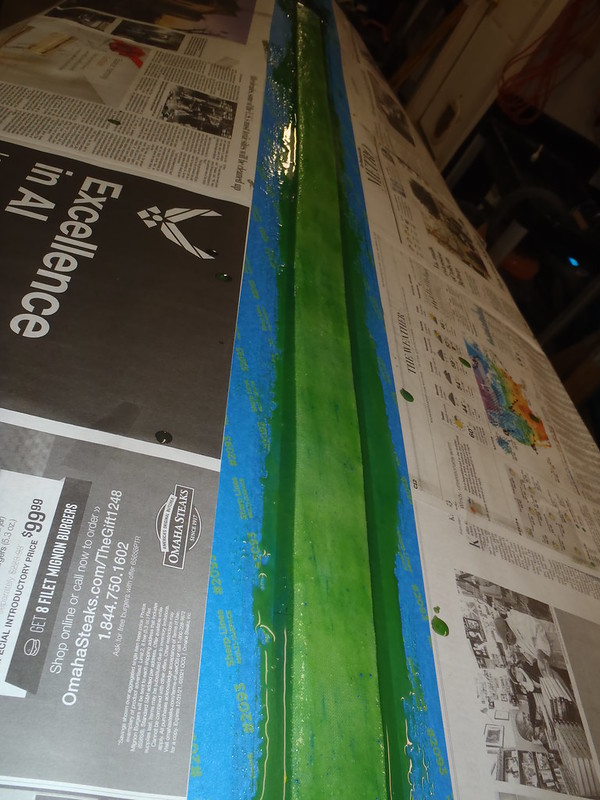
Yowza, that is a lot of teeny vinyl skin cracks. Whatever poorly install and failed adhesive was used for the thigh strap pads did no favors to the vinyl, but those cracks are only skin deep. The crack over the stern skid plate was a bit more of a crevice, I filled it first and went back to refill it again after the G/flex had seeped in.

PC280021 by Mike McCrea, on Flickr

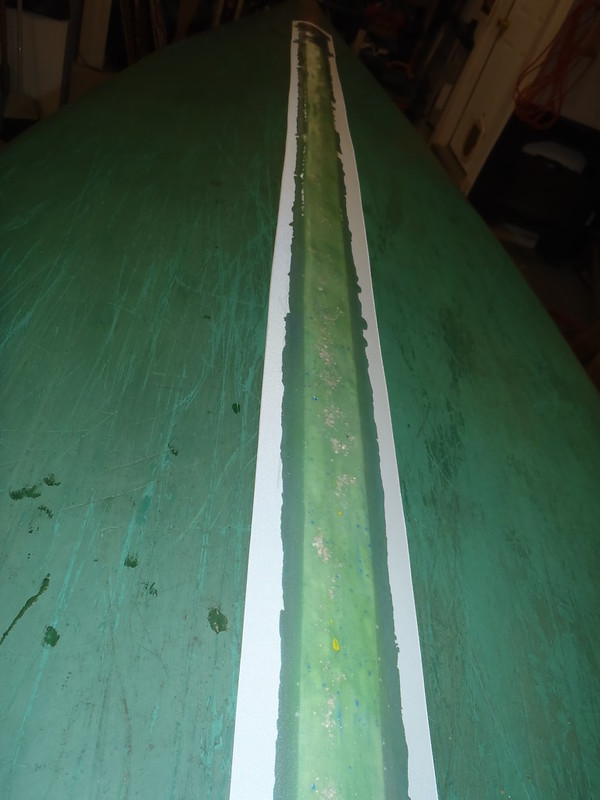
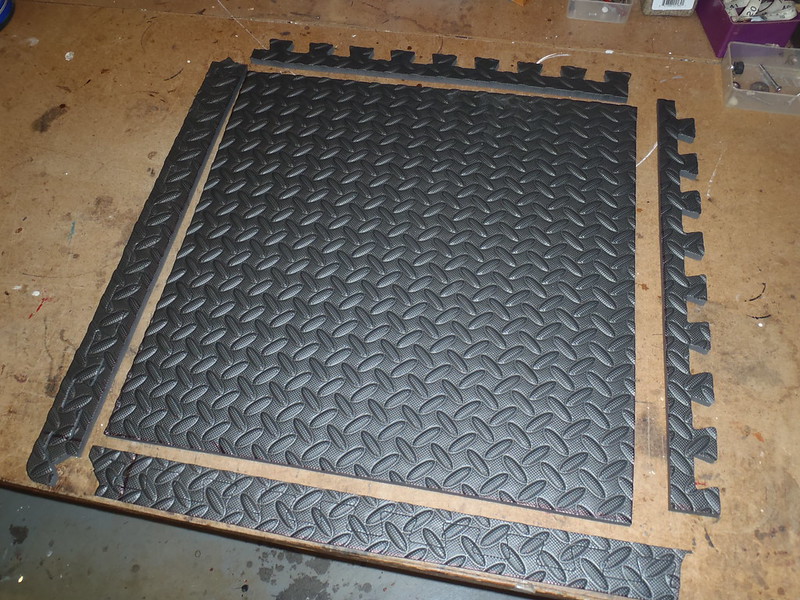
With an unknown seepage factor I was not stingy with the G/flex. Once the epoxy hardens I can sand any epoxy puddles more flush. I epoxy sealed even the most minor of surface cracks under the thigh brace pads; in part hoping that will stop any water/dirt/grit infiltration promoting future spread, but also because I plan to install some exercise flooring using contact cement, and I really don’t want to chance that adhesive creeping into any cracks and dissolving the ABS substrate.

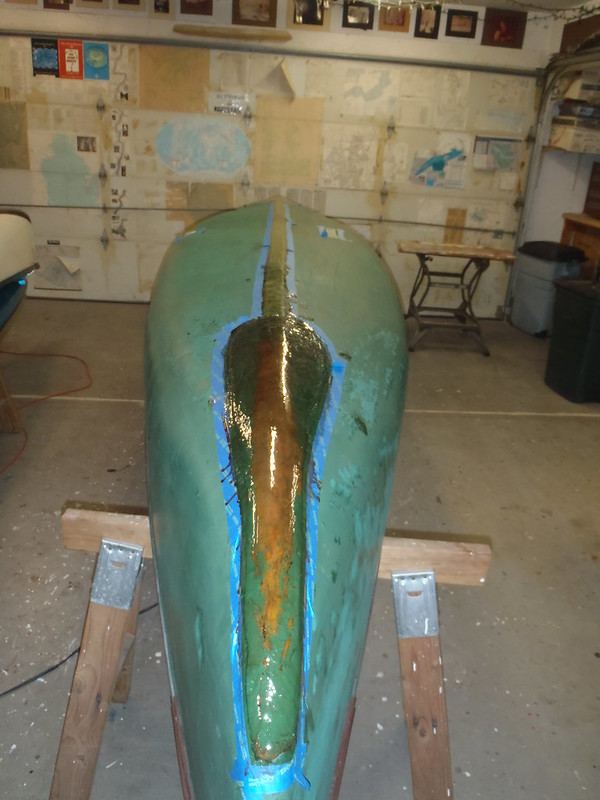
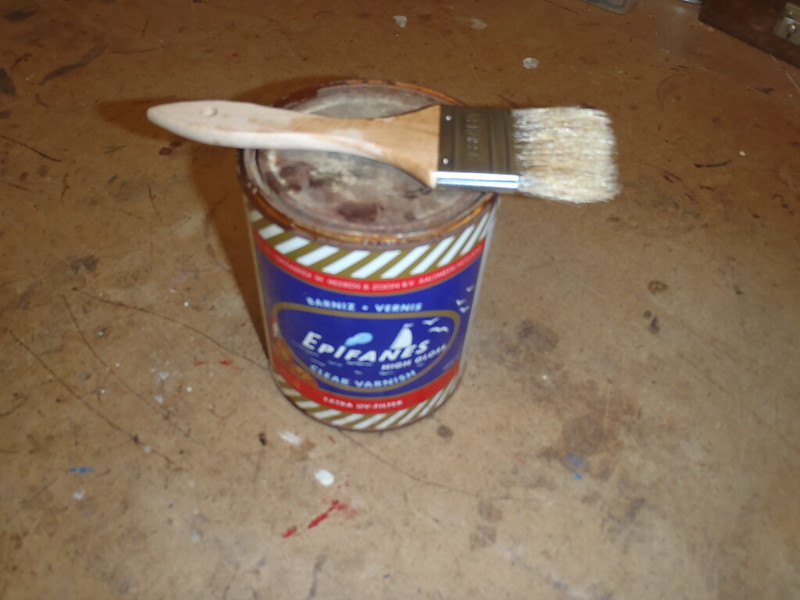
With the Explorer planned to be left upside down near ground level eight months a year I wanted some serious sealant on the prone to bacterial rot butt ends, on every brightwork piece. So, before the spar urethane coats, some epoxy resin on the sanded and newly thirsty age-dried butt ends, especially the inwale edge of the truss hangers, which had evidenced some incipient bacterial blackening, but also on the rail ends of the seats, yoke and utility thwart. All the butt ends; I do not like boats stored on or near the ground, but have no choice at the reservoir launch.

I had a small amount of G/flex left in the pot from the crack repairs, and a single pump of West 105/206 added to the leftovers made just enough to paint epoxy on all of the butt ends, plus an inch inward on the surface, where the brightwork is held moisture & dirt trapping below the inwales, or seated against other wood pieces. The truss drops got epoxy sealed too, tops and bottoms.

PC280022 by Mike McCrea, on Flickr

PC280025 by Mike McCrea, on Flickr

The brightwork can hang epoxy curing for a spell while I attend to the last, and largest, epoxy task.
 
Oops, not yet time for the largest epoxy task, and that isn’t the last of newly made brightwork. There were a couple oversights to attend to first.

Oversight #1. This is a heavy canoe, and not going to get any lighter with beefy brightwork, fishing thwart and ¼” SS hardware. It needs a couple more wood crosspieces; short carry thwarts, so that folks aren’t grabbing the beast by the beguiling handles on the pop riveted deck plates.

Easy enough, I have short pieces already ripped, routed, sanded and varnished ash in the not-really-scrap box. Before I get to urethane work I can dry fit and drill a couple of those.

PC300013 by Mike McCrea, on Flickr

Those four pieces are all that remains of some strips leftover from cutting out yokes and thwarts, that I (eh, my Uncles, I mostly watched) planned, ripped and routed in a proper shop with real woodworking tools many years ago. We might even have run them through some sanders while I was there. Finish sanded and urethane coated, I had 25 or 30 linear feet of finished ash stock, some 2” wide, some skinnier leftovers as 1 ¼” square pieces.

That was decades ago, and I have used the bejeepers out of that shop stash on various projects, to the point that there isn’t much left. I really need to make a production run of those finished at-the-ready strips, but my Uncles have aged out of shop work, or even being able to stand upright for long. Maybe three thinner strips, laminated together with a different wood as the meat in the sandwich.

But those, at the ready edge rounded, sanded and urethaned pieces will do nicely.

PC300016 by Mike McCrea, on Flickr

PC300017 by Mike McCrea, on Flickr

Oversight #2, not the largest of the remaining epoxy work, this newfound jinx was minor, but perhaps revealing. A post scrubbing glance had shown an unrepaired cold crack, a minor crack I had likely not noticed or repaired the first time around, right where an old wood gunwale screw hole would have once been.

Eh, on very close inspection, think cheaters and a magnifying glass, not just the one unnoticed crack. Ten teeny weenie cold cracks, two on one side, eight on the other. Two of those ten were on the fugly kevlar felt and E-glass tape repaired side, the side that originally sported a couple of noticeable cold cracks, the other eight tiny splits were on the unrepaired side, and all centered approximately below old wood gunwale screw holes, probably there since before the old wood gunwales were removed. I had spaced the vinyl gunwale pop rivet holes in between the Swiss cheese of old screw holes.

Best noticed and fixed now, before the eventual paint job; teeny paintbrush, medicine cup sized mixing pot and wee bit of G/flex, with a little tape dam below to catch any drips.

PC280001 by Mike McCrea, on Flickr

PC280002 by Mike McCrea, on Flickr

Having seen a vinyl gunwaled Explorer that cold cracked at each and every lacing hole drilled through the hull I’m thinking that epoxy filling old holes is worth the effort, and if the sheerline is a Swiss cheese of multiple regunwaling holes, maybe fill the holes and epoxy a strip of glass tape or etc along the sheerline edge for some belt & suspenders coverage. But I’m not taking off a gunwale to do that work now.

For what it’s worth cold crack wise that canoe, both OO & SO, originally came out of the Washington DC area, not the deep freeze north.
 
Having seen a vinyl gunwaled Explorer that cold cracked at each and every lacing hole drilled through the hull I
Drat. I was planning on drilling my RX Explorer (YAER) for lacing in airbags. Is this cold cracking at lacing holes really a thing? Is it limited to vinyl gunwaled RX hulls or does it afflict wood-gunneled RX hulls, too?

What are the other options for lacing in airbags (short of gluing in dozens of D-rings)? I supposed I could drill and lace through my wood gunnels or add a series of pad eyes but I didn't want the added expense or weight.
 
Alan, I would go ahead and drill the hull. I’ve seen hundreds of RX canoes with through hull lacing and a total of one that cold cracked that way.

Some very small percentage of RX hull cold crack, and boats that cold crack often continue to cold crack. Your Explorer, which once had rotted off wood gunwales, did not cold crack and probably never will. You could dab a little coating of epoxy or G/flex in the holes to seal the foam core, but even that is probably not really necessary.

FWIW it isn’t limited to wood gunwales/screws. For example, a RX with aluminum gunwales Prospector that cold cracked repeatedly below the pop rivets.

https://myccr.com/phpbbforum/viewtopic.php?f=49&t=39795

I once swore I would not touch a cold cracked canoe, and had forgotten that this ancient Explorer sported a couple cold cracks when I got it. Probably more than a couple; I suspect that all of the new found cold cracks were unnoticed present when I first repaired it.
 
With the interior crevice and cracks and newfound teensy cold cracks repaired I flipped the Explorer gunwales down for more epoxy work. Lots more epoxy, not that much work.

The Explorer bottom needs a 10’ long keel strip of Dynel sleeve run between the old skid plates, epoxied with a mix of 105/206 and a healthy amount of G/flex.

The Dynel sleeve is inexpensive, $1.20 a yard from Sweet Composites, and with the 1 ¾” width the epoxy amount isn’t outrageous. The G/flex in the mix got pricey, but it needs done right, and it needs done now. The Explorer’s vee bottom is worn nearly full length, luckily not into the foam core.

A 10 foot long strip of Dynel sleeve and a 12 foot strip of 3” peel ply, both in roll form. Bless the blind Connecticut squirrel that found a source for peel ply in choices of 1” to 6” width rolls, much easier to do this with long readymade strips of both Dynel and peel ply. No wasted material, two scissor snips, no cut fabric strays or unraveling frays.

There is the taping and papering part, but it is all straight lines up the center vee, fast and easy to mask, just lay the 10’ length of Dynel sleeve down on the worn centerline and tape outside the edges. I did not extend the tape job onto the existing kevlar felt skid plates, planning to lightly top coat those later with any leftover epoxy mix.

To make Dynel installation atop a bed of wet epoxy easier I rerolled the sleeve. Same with the peel ply. I didn’t have any green pigment for the epoxy mix, but I did have tubes of old yellow and blue. Worth a tinted epoxy try.

OK, it is probably best not to use ancient tubes of pigment. Both tubes of color agent were near solidifying, even once warmed and squished, and the blue resisted mixing thoroughly despite vigorous efforts. It has been a long time since I used any blue or yellow pigment, and with the undissolved blue the result wasn’t exactly a matching green. But the canoe is getting painted, so close enough.

In tinting epoxy, or more specifically tinting epoxied cloth, pigments black, white, red and (all used up) green have been handiest; probably indicative of the most common hull colors. The black pigment gets used for graphite powdered skid plates and even though a little dab will tint a sizable pot of epoxy, I’m on my third tube of black.

PC280004 by Mike McCrea, on Flickr

PC280005 by Mike McCrea, on Flickr

An abrasion resistant keel strip was as easy as painting a bed of epoxy between the tapes, unrolling 10 feet of Dynel sleeve down the keel line, pressing it down with gloved hand ‘til some wet showed through, and top coating with more epoxy mix. Wait a spell, so the epoxy top coat has opportunity to seep into the 2-ply cloth. Pull the tape & paper mask and unroll the pre-cut peel ply over the top.

If I had been adding graphite powder it would have been mixed, along with some black pigment, in with the topcoat epoxy for additional durability and slipperiness. No graphite powder in the green tinted mix this time, instead a light sprinkle of something special before the peel ply and roller compression, some fine grey dust.

PC280007 by Mike McCrea, on Flickr

Some of Brian’s ashes, so when the Explorer scrapes a rock it may leave a trace of him behind. I know he would have approved, and if a rock springs up out of nowhere, well, I did promise to spread some of his ashes. Already have in a couple memorable spots; just me and B, having fun again.

With the peel ply unrolled atop I lightly tapped down the covered edges of the Dynel sleeve with a fingertip piano riff, up one side and down the other, like drumming fingertips along a table top.

That drumbeat, while the epoxy is setting up under peel ply, helps to push down/bevel the edges of the Dynel sleeve better than hard roller alone. Without vacuum bagging Dynel wants to float on epoxy, and will “swell like an old sweatshirt”, curing with a rough surface. With release treated peel ply, a hard roller and a few hours babysitting all of that that can be overcome by hand.

PC290010 by Mike McCrea, on Flickr

As usual some rewarded babysitting wait time, hard roller action, another up and down the sleeve edges drumbeat. More wait time and repeat; it is easy to fingertip tell when the sleeve has firmed up under the peel ply.

Tomorrow morning I can pull the release treated peel ply and see what belated Santa brung me to work with.
 
Wow, newsprint. You've evidently got an abundance of it. I haven't been able to source it in years.
 
I got yer newsprint right heah, a whole recycling box full. I am a newspaper dinosaur and want a real paper to fold, crinkle, pick up and put down. There was a time when the local country store carried the Washington Post, but when they dropped newspapers I resorted to a 40 minute round trip to the next nearest place. I’m not doing that drive every day, so I pick up both the WaPo and New York Times a couple times during the week and always on Sunday.

Back to boatwork.

The Dynel sleeved vee bottom looks much better, and is now thoroughly protected with a double layer of abrasion resistant fabric. There were a few tiny crinkle voids here and there along the edges of the sleeve, where my repeated staccato drumbeat was insufficiently frequent or complete. Still learning things, that may be the flush finest Dynel sleeve keel strip I have laid yet, and being achieved on this once derelict canoe adds a touch of irony. And a touch of Brian. Brirony.

I wanted to fill those few lack of drumbeat edge gaps before the Explorer was flipped over, so a last small batch of epoxy for the bottom work.

Or a not so small batch of epoxy. My go-to 206 hardener can is running low, but I have a can of 205 fast hardener. A very old can of 205; while I last calibrated the pump on 4/19, I had not used that fast hardener in years. The first pump of 206 was dark, not quite black*, but not a tint I would want to use anywhere showy. West hardeners are not cheap. I am, and need to use it up somehow; an un-peel plied topcoat, covering the all of Kelly green Dynel and existing felt skid plates will use a couple pumps. And use – gasp – more G/flex.

PC300018 by Mike McCrea, on Flickr

*No worries about that darkened hardener, I left already old ¼ full cans of 105/205 in a friend’s barn, baking in summer, freezing in winter. I needed some epoxy years later while I was visiting, what the heck. That hardener was black, black as tar and almost as thick, and it still worked fine.

PC290011 by Mike McCrea, on Flickr

That keel skid can cure for a week or more, before getting lightly sanded. It will take a mighty scrape to scatter any Brian.

Bottom epoxy done I could flip the Explorer over once again to ponder some inside work while I commenced the first of many urethane days.
 
With the Explorer back right side up I sanded the G/flex dribbled in the various interior cracks. Even so those will show under an eventual paint coat, but they don’t need to be perfect, just flush-ish; I have enough charcoal grey exercise flooring to lay some pads with a drainage channel in the middle.

I am a fan of exercise flooring in some applications. The embossed side, here diamond tread pattern, is tougher than the smooth, easier to glue backside of that flooring, and much tougher than minicel for boot heel gouges. Plus, where else can you buy six 2’ squares of 7/16” thick foam for $20?

PC310020 by Mike McCrea, on Flickr

Waiting for epoxies to cure I did some exercise flooring prep work. The 2’ x 2’ sections come with puzzle edges, which I don’t need, but waste-not can find uses for.

First order of business was to cut off the puzzle edges and square up the foam sheets, trimmed so the snapped together edges form 2” wide strips of rugged padding. Contact cemented down those make dandy roof rack or trailer crossbar pads, padded load stops or gunwale brackets, etc.

The shop stash of those is getting out of hand, might have to foist some off on the next shop visitor, whether they want them or not.

PC310023 by Mike McCrea, on Flickr

The large squared up pieces of exercise flooring got set aside, to later be cut to size with drainage and chine curved shapes, and contact cemented in place.
 
The brightwork epoxied ends had cured, so I could lightly sand those areas for better urethane adhesion, not deeply sanded, just scuffed ‘til the bright and shiny went away. The can of computer duster because it isn’t worth dragging out the shop air compressor just to blow sanding dust from inside the drilled holes before pipe cleanering urethane inside. A split second PFFFFTTT propels a surprising cloud of dust from the holes, then the tack cloth.

PC300015 by Mike McCrea, on Flickr

Multiple coats of urethane are quick and easy, so back to working 20 minute split shift days. If I get a coat of urethane on in the morning I can sand and paint another before I go to bed. I don’t know how many eventual coats of urethane, minimum four, probably 5 or 6 for this left-on-the-ground at the reservoir canoe.

Having epoxied the ends of the brightwork there was several days delay before I could paint the first coat of urethane; anything painted on before the epoxy cures would turn a sticky mess.

Once again the weather gods, or global warming, smiled upon me and provided a spell of near 50F days. Once the epoxied ends had cured I ran radiant oil heaters under fresh coats of hanging urethaned brightwork for an hour or two each morning to help warm the shop, and ran some small exhaust fans while working.

A coat on in the pre-dawn hours, the ideal noiseless shop task with everyone else asleep. Minwax Helmsman Spar Urethane recommends “Let dry at least 4 hours, 220 sand and apply a second coat”. With a coat on before dawn, and another in the afternoon, two coats a day was easy, although sanding between coats eventually got old. But still a completed task well rewarded.

P1010001 by Mike McCrea, on Flickr

P1010002 by Mike McCrea, on Flickr

While I had brushes and such out I had an epiphany about the old can of Epifanes varnish. That never opened can, recovered from a late friend’s unheated barn supplies, is so old it had started to rust, and it was a bear to carefully pry open.

P1010003 by Mike McCrea, on Flickr

Aficionados of fine varnish are cautioned to avert their eyes, but I’m not sure I trust that aged can of Epifanes, so, dare I say it, I painted it on some new DIY garbage can lids.

P1010004 by Mike McCrea, on Flickr

By way of explanation I really do need to DIY my own trash can lids. We live off the road down in a stream hollow, but our trash collection is atop the driveway on a ridgeline. A very windy ridgeline. Round trashcans will roll into the road, and lightweight plastic lids end up somewhere over the line residing in Pennsylvania. So rectangular cans, with weighted lids.

Smeared, rolled and dabbed with leftover epoxy, urethane and paints, those lid are styling, distinctive and won’t budge an inch when thrown aside by the trash collectors. And they are multi-functional; inverted with the handle inside those make dandy little work stations, with a convenient pull-around handle. Can’t have too many flat portable work surfaces.

P1010005 by Mike McCrea, on Flickr

Post script. That ancient Epifanes set up just fine, so I kept slathering on additional coats ‘til I used the entire can. Once decorated with some leftover paints those will be some mighty nice garbage can lids
 
We live off the road down in a stream hollow, but our trash collection is atop the driveway on a ridgeline.
Tangential question: How do you get your cans up the hill to the main road?

Otherwise, the Explorer's bodily resurrection is becoming almost divine.
 
Trash cans go in the back of the truck, dropped off at the top of the hill. Unless I have parked the (2WD) truck up top for snowfall, so I can escape the driveway. In that case they get man-hauled (son-hauled) to the top strapped to a toboggan.

I had initially said something about not aiming for divine resurrection on the Explorer rebuild, but unsurprisingly, if I can make a boat more functional and look decent with very little expense I can’t help myself.

Of course I may also have said something about not describing this rebuild in nanoscopic detail, but nobody believed that either.

Back to work or I’ll have nothing to blather about.
 
A fellow rebuilder pinned the truth on the question of Why bother refurbish this wreck? I told him the story of finding it windblown on the far side of a fence, impaled on a mystery stake and needing help from Brian’s son Eddie to yank it free and push it back over the fence. When it hit the ground on the other side pieces of rotted brightwork flew out and flakey paint fell off onto the lawn.

Eddie looked at me in disbelief and said, “You’re not really gonna try to fix that are you?” I did have to think about, but only for a minute. Challenge accepted young fella.

The fifth coat of urethane went on the brightwork, and I called it good enough. It doesn’t need a Hippie fern bar’s depth of luster, just adequate UV and rot protection. Time for a larger paint job.

Before the brightwork went back in I needed un-occluded painting access to the hull; I’m not painting the interior by cutting in around installed brightwork ends. Temporary crosspiece out, bar clamp and a run of tape under the inwale edges, time to have at some interior rolling & tipping.

The insides are a lot trickier to roll & tip than outsides. The chine curves are concave instead of convex and more difficult to smoothly roll, plus there are the hard to see or reach into stems; the insides make for an awkward painting task at best.

But I am pleased enough with a single coat of Rustoleum Topside Deep Green to call it quits. As expected the old pad area adhesive shows through ugly, and those areas will be covered with exercise flooring.

P1020012 by Mike McCrea, on Flickr

A single coat of topside paint on the inside will have to do; the inside was thirsty, but I should have enough left to lay two coats of Deep Green paint on the outside, especially if I save room for a leftover white accent stripe near the outwales.

Brightwork urethane finished and dry I could put it back in. Or could have put it back in, I wanted a still open hull to install exercise flooring pads.

Those foam pads got custom cut to cover the still visible adhesive smutch left from the thigh strap pads, and to provide some cushion when kneeling. I don’t know how scuff resistant that single coat of Rustoleum Topside will prove, and may need to install heel pads as well.

Corners rounded with different curves to accommodate the bend at the chines, and provide an easy flow drainage channel along the vee bottom.

P1030018 by Mike McCrea, on Flickr

Weighted down to sit flush along the hull curves the perimeter of the exercise flooring got gold Sharpied and taped for easy contact cement application inside the hull, and the pads came back out to be edge beveled for less exposure to foot dragging sheer forces.

P1040033 by Mike McCrea, on Flickr

Edges angled with the 1” belt sander it was time for contact cement work. One coat on the hull, two on the foam (usually thee on the foam, but I was running low on contact cement) and three on the little minicel hook holder on the fishing thwart. Exhaust fans running, heat gun, sandbag weights and retreat to the fresh air office for a reward.

Contact cement coat painted on the minicel and inside the box, pull the perimeter tape, aim steady and true for the golden Sharpied outline. Dry-run hold-it-this-way, press like that practice helps; you get one shot.

If nothing else that used up the last bit of an old quart can of contact cement. Quarts sized cans of contact cement may be on a ship off Long Beach; I went to three hardware stores ISO and managed only to find pint sized cans. Better than nothing, the Explorer has a bit more contact cement work it its future.

The pads look good and hide most of the OOSO smutch.

P1050038 by Mike McCrea, on Flickr

When it came time to bead the perimeter edges of the flooring foam with adhesive sealant I had a shop surplus plan there as well; a half dozen 90% emptied tubes of E-6000 that predate the advent of the toothpaste tube squeezer keys. Time to use all of them up before opening a fresh tube. Those orphans lasted for 4 of the 6 flooring pads, and cheap-Scot’s squeezing out the last little bit from each tube hurt my fingers.

E-6000 was also gone from the shelves everywhere I checked, which was just the impetuous I needed to finally use up the dregs. Happy to have used them up and opened a shop-stock fresh tube for the last 2.
 
The fishing thwart needed assembly and dressing before installation.

P1040037 by Mike McCrea, on Flickr

Dual rod holders, suitable for trolling, needle nose/hook remover hole, some bungee with cord lock for miscellaneous keepage, a small piece of minicel as a hook and lure holder.

One outfitting touch was easier done without the carry handles in the way. The deck plates sport a variety of holes, some from my initial rebuild, others OOSO.

P1030024 by Mike McCrea, on Flickr

The two gaping WTF holes at the centerline are not my work. The worn through tips on those old deck plates, patched with – yes, kevlar felt and black paint – is my work. As is the 1/8” drain hole at the tip, sure to be instantly plugged by the back left leg of an immature field cricket. Didn’t know much back then, that hole needs drilled out wider.

I can use the four offset holes, from the original rebuild, for a new / \ of bungee. Bungee rabbit comes out of the hole and runs across the top of the deck plate, runs back in a hole, comes out again and runs down the deck plate once more.

P1030026 by Mike McCrea, on Flickr

I’ve learned at least one trick since then; bungee run and clamped underneath, slide a Sgt. Knots SS spring cord lock on the bitter end of the bungee, leave a little adjustment slack and tie another stopper knot.

P1030029 by Mike McCrea, on Flickr

Adjust the tension as needed for different painter lines. If you always put the painter in between the bungees and always grab it from the center the painter can’t end up caught under a stretching out bungee. And, when it does eventually stretch out with age and time, simply adjust the cord lock tension.

P1030027 by Mike McCrea, on Flickr

Working with painter line bungees attached I started to install stem loops. Think dummy, think; I am at steps M, N, O, P and Q on the rebuild and inadvertently jumped ahead to step Y or Z. The painter loops will be among the last steps; they would be horribly in the way when rolling & tipping paint on the outside of the hull.

Time to web a seat, I realized that the past week had been stinky stuff, urethane, paint, contact cement and etc. Stinky stuff that necessitated running shop exhaust fans, or least a fan for one-way fresh air through the shop office.

Still making stank I needed to “cut” the seat webbing to length with the usual hot putty knife blade for sealed edge sizzle straight across the weave. So many webbing color choices.

P1050042 by Mike McCrea, on Flickr

I had said “basic black” but, as homage to my initial rebuild seat webbing, opted for red and black once again. It will be a distinctive canoe.

P1050043 by Mike McCrea, on Flickr

I can never visualize what the pattern is going to look like until the remaining pieces are woven in. The length of 1” black webbing in the center was necessary for proper spacing.

P1060044 by Mike McCrea, on Flickr

With five webbing straps in one orientation and seven in the other I like how those stripes run, the solid stripes are less garish than the first rebuild’s gingham checks.

The sheet metal vice grips were awesome for tensioning the webbing. It took a bit of cogitation as to how to staple one end and then clamp down the seat frame to allow lever-stretching each piece of webbing, but it was worth the effort. My thanks to Sweetfancymoses for that suggestion; I have a pile of reusable seat frames and that tool will be used every time.

The bow seat, like the stern seat, needed a couple of loose straps to hold a pad or cushion, so a two longer lengths of 1” webbing cut/sealed. While cutting those straps I made a bunch of 1” webbing loops to attach to the shank ends of the machine screws.

Sixteen pieces of 1” x 7” webbing; eight with seal melted 3/16” holes, eight with ¼” holes for the beefy seat hardware. Ends Scotch taped together so my delicate digits are not too close to a hot nail.

P1060046 by Mike McCrea, on Flickr

The pointy end of a 20-penny common nail melts/seals a perfect 3/16” machine screw hole. For the ¼” seat hardware I used the head of a smaller nail. Nail melting those webbing holes is 10 times as stinky smoky as cutting the webbing with a hot putty knife. I had an exhaust fan running inches from the aiming block and still held my breath until each smoke cloud was evacuated.

That is a crazy amount of tie down points for a non-tripping reservoir fishing canoe, especially one that already has 26 webbing loops pop riveted under the inwale from the initial rebuild. Maybe it goes on a fishing canoe camper someday, who knows?

P1060049 by Mike McCrea, on Flickr

I must have used good quality webbing for those under inwale loops, they are dirt and grime discolored, but still rock solid.

I have no recollection of the intention behind the long dangling 2” wide webbing loops on one side; if they had been intended to tuck in a pole they would have been on opposite ends of the canoe. Backcountry bong holder maybe?

P1060050 by Mike McCrea, on Flickr

With the seat webbed and excessive why-not webbing ties made I could finally turn to brightwork installation.
 
Brightwork going back in is always rewarding. With everything drilled, test fitted and removed for seal coating the reinstallation is cake, and I was ready for a 20 minute workday.

Eh, 25 minutes. There was five minutes of confusion when I could not figure out why the holes in the stern seat frame, once test fitted, did not line up with the machine screws. WTF? Oh, yeah, I needed to put the truss drops on first. That was a too eager to finally put the brightwork back in, insufficiently caffeinated, pre-dawn faux pas.

I spared no expense in hardware. Because there was no expense in hardware; all of the SS hardware was reused from my original rebuild. And I spared no poundage; I should have weighed the over-beefy fishing thwart, it had to be 5 lbs, and beyond that every machine screw again got a flat washer or flange washer, lock washer, nut and cap nut. I’ll bet the Explorer weighs a solid 90lbs once finished, the perfect canoe to leave at the reservoir.

A curious note – The SS seat hardware, through beefy truss drops, was all still clean and thread-able, but of the three seater’s worth of twelve 6” x ¼” bolts three were slightly wanked, and one was badly bent, unscrewing from the truss woobly-wobble un-reusable. Fortunately I had the hardware from the not-reinstalled center seat and used that instead.

P1060053 by Mike McCrea, on Flickr

I know those long ¼” machine screws were straight and new when I installed them. The bent ones all came out of the bow seat, the really bent one from the side just in front of the pin-wrinkle hull damage. Brian may have had misadventures in the Explorer about which I never heard; I don’t recall the pin wrinkles from the original rebuild. He’ll never tell.

Brightwork back in and all dressed up the Explorer - which needs a new name - is a pretty canoe, at least on the inside, and there are still a few things to do there.

P1070056 by Mike McCrea, on Flickr

P1070059 by Mike McCrea, on Flickr

The inside needed swipes of green paint in a few hard to reach areas or missed areas. A couple perforated seat pads made from scrap ensolite to tuck under the keeper straps. Maybe re-install a couple of the old D-rings just for the heck of it. And, mostly, knee bumpers at every seat position.

That is enough to keep me working with the hull upright. The next steps need a forecast of warmer weather; I need to RO sand the entire outside of the hull, clean it, roll & tip a coat of Deep Green and sand again before a second coat.

P1070062 by Mike McCrea, on Flickr
 
For tandem paddling positions the knee bumpers don’t need to be very thick, just a little inwale cushion for the pushin’. I started to cut up and bevel edge some strips of leftover exercise foam when I remembered that the marvelous Mr. Conk had sent me a gift box of different size and thickness minicel knee bumpers, already cut and shaped with beveled edges.

P1070001 by Mike McCrea, on Flickr

Perfect, ready-made glue & go knee bumpers for narrower leg spread tandem positions. Thanks as always Conk.

But the symmetrical in every way Explorer can famously be paddled backward from the bow seat, and that needs wider knee bumpers for comfortable leg spread for contact. I had a son test sit on the seats, bow, stern and bow backwards, to mark the knee cushion locations. In the bow backwards orientation comfortably distanced knee bumpers needed to extend 3” out from the edge.

Fortunately I have boxes and boxes of “scrap” minicel. First 1” thick pieces contact cemented to the hull under the inwales, to bring the surface out flush, then some beveled edge 2” thick pieces to glue to the mounted-under-minicel and hard plastic inwale edge.

P1070003 by Mike McCrea, on Flickr

A little more contact cement and heat gun action and those could all rest clamped for a spell.

P1070005 by Mike McCrea, on Flickr

I’ve seen people use fewer clamps than that installing new wood gunwales, but for best results, when compressing minicel for contact cement adhesion, especially with foam pieces potentially exposed to peeling sheer forces, use ‘em if you got ‘em.

Having used some Conk gift foam I turned to some DougD gift foam. On a shop visit years ago Doug brought me some scrap blue ensolite pad. It UV decays too quickly to use for glued in outfitting, but it makes a decent seat pad to tuck under the loose webbing keeper straps on the seats.

Those pads are unnecessarily warm in summer weather, butt toasty off season though. They just need some drain holes for rainy days. A couple ensolite scraps cut to seat frame size with perforations drilled can go with the Explorer.

P1080007 by Mike McCrea, on Flickr

Still working on a new name for the Explorer and thinking “OOSOBO” (Original Owner Subsequent Owner Brian Owner).

I really wish I hadn’t given away the various (crapty) seat backs we bought over the years before we switched to Surf to Summit back bands. On the chance that I paddle it on the reservoir someday I may have to ponder at least one seat back or back band for my own comfort.

The old D-ring pads, with the rusty crusty D’s cut off, are reusable, but needed cord loops, maybe something reflective. Two of the pads have a permanent curl from SO’s placement far up in the stems. Not sure what their thinking was, those locations would have needed a stem float bag the size of a coffee can.

P1080009 by Mike McCrea, on Flickr

Don’t care, the permanently curled ones got G/flexed back in from whence they came. The better quality webbing loop pad got a cord as well, and went in near the fishing thwart, for unknown purposes. Well, for one experimental reason; that re-used vinyl pad, G/flexed at the vee, near center hull, will be exposed to copious bilge water and sand, dirt, grit. That should provide an acid test for the tenacity of G/flexed pad adhesion.

P1080014 by Mike McCrea, on Flickr

Last upright task, I touched up the Deep Green paint holidays under the inwales, more of them than I had first noticed. I should have just enough Deep Green Rustoleum Topside left to roll & tip two coats on the exterior.

Another test sit showed that the knee bumpers in each possible seat position worked well, with a comfortably degree of leg spread.

P1080017 by Mike McCrea, on Flickr
 
That was everything I could do on the inside, for now. I had timed the next task as well, for when the family was out of earshot. Not for hearing me holler “GOD DAMMIT!” in the shop, but because the next step was to RO sand the entire outside. RO sanding a hull, even with the canoe clamped firmly to horses at four inwale points, can produce a harmonic thrum; I wear ear protection in the shop for that maddening buzz.

When I RO sanded inside the hull my wife reported that it “made her teeth chatter”. If she were the cursing type she would have reported that “It $#%@ing made my teeth chatter” but her tone of voice sufficed. Last really noisily thing, best done when the family is out and about. Those of you with shops remote from the house were smarter than me.

RO sander and foam interface pad (thank you for that suggestion Alan Gage). I don’t expect, and won’t attempt, to get every trace of old spray green spray paint off, but I need to MUZUUBAZUBB the entire hull before cleaning and then rolling/tipping the first coat of topside paint.

The new Dynel keel strip and old topcoated felt skid plates first, by hand to get at the edges.

P1080019 by Mike McCrea, on Flickr

Then the entire hull, lightly RO sanded with 220. Once damp sponge wiped clean it already looked a lot better, or at least more uni-colored, but that aged Royalex can use a couple coats of Topside paint, if only for UV protection.

P1080020 by Mike McCrea, on Flickr

Of course everything is better when wet. One the hull dried it was, as desired and expected, dull.

P1090021 by Mike McCrea, on Flickr

Sanding the hull solved one missing mystery; I had looked hard, LED light & cheaters, and I could not find the HIN. Looked on the right stern. Looked on the left stern. That is because it was (is) on the left bow. When I originally rebuilt OOSOBO I paid no attention to the HIN, but I did put the new bow and stern seats back where they had been. Someone, OO or SO, had regunwaled it once with wood and had set it up backwards. Symmetrical hull, rocker, bow & stern heights, doesn’t matter.

With a readable HIN I now know it isn’t a 70’s canoe. It is barely an 80’s canoe; 1989 HIN. Somehow, between new in ’89 and when I got it in the early (mid?) 90’s OO or SO managed to rot off the wood gunwales at least once, and perform two failed attempts at outfitting, one set up backwards. I have a soft spot in my heart, and a fatter wallet, thanks to such folks.

I wish I had photos of that canoe when I received it from SO, I think, IIRC, that it had a kneeling thwart as well as bow and stern seats, hence the three (poorly attached) thigh strap pads. Still wouldn’t make sense to switch bow and stern. I have a feeling that watching SO’s shop outfitting would have been comically enjoyable.
 
On to the eagerly awaited day 21 of this bit-at-a-time rebuild, the Rolling and Tipping episode, the one where Mike tapes and paints a boat again.

I have rolled and tipped a half dozen boats in the past year, most of them multiple coats, but what really helped, time-wise, is that I have taped (and when necessary papered) those same half dozen boats multiple times. I HAVE BECOME THE TAPE MASTER!

Or at least I’m getting faster and more efficient at it each time. I can run some freaking tape, including strategic last-on, first off-runs of tape.

Back to split 20 minute shifts. No paper needed, a run of tape on the outwales and a final surface inspection, 20 minutes. Rolling and tipping, first rolling one side of the hull from keel line to taped outwale, 18” sections at a time, top to bottom, shuffling along the hull length one step at a time, then tipping it out with continuous overlapping stem-to-stem swipes of a 4” foam brush.

P1090024 by Mike McCrea, on Flickr

Then the same on the other side. After 20 minutes of prep work it took another 20 minutes to roll & tip the entire hull.

P1090025 by Mike McCrea, on Flickr

With the first coat of Deep Green Rustoleum Topside rolled and tipped the exterior looks much better.

And yet somehow worse. When it was discolored flakey paint blotchy it was so ugly that the eye wasn’t drawn as strongly to the old patches, repairs and pin wrinkles. With a shiny green coat those now stand out like a pimple at the prom. That first coat rolled and tipped still deserved walk-away rewards.

P1100027 by Mike McCrea, on Flickr

Like every other painted hull it needs a second coat, and if I wring-the-mop I may have just enough Deep Green paint left. It is very green. Stark green, and will look better with a white accent stripe painted under the outwales.

That paint coat can rest to set up and cure for a few days, or until I feel like sanding the exterior for a second coat. Before then I could flip OOSOBO over for yet more interior work.
 
Since the work effort is so diligent, precise and admirable, I can only inquire about miscellania, if not trivia and non sequituria:

will look better with a white accent stripe painted under the outwales

Or you could just use white vinyl pinstriping tape, which would obviate the need for masking tape and paint fringing issues.

I've noticed that wood-canvas restorers paint the underside of the outwale along with the canvas. They say it helps avoid water penetration into the wood, but maybe they are more concerned about the wood planking and ribs or the canvas itself.

I will not describe every step of the rebuild in nanoscopic detail.

Yes, femtoscopic detail is much more informative.

Ha! I have achieved the 20 minute work day.

Just curious, how long do you estimate it takes to photographically document, write-up, edit, and post a 20 minute workday?
 
Glenn, I have used vinyl pinstriping before. Must have found it on sale, I have several rolls left. There is a ¼” pinstripe on the Smoking Chicken canoe, separating the hull color and accent stripe.

IMG021 by Mike McCrea, on Flickr

As to why not, an agglomeration of reasons. Vinyl pin striping eventually scrapes, wears and tears, and I’m not sure how well vinyl pin striping would seat and stick over the various repair patche crinkles and pin wrinkles.

Taping and painting are not issues for me; I have become efficient at both, taping takes 20 minutes, rolling & tipping takes 20 minutes, and with an hourly shop rate of $0.00 it is affordable.

(Shop rate available only in Freeland MD, limited to boats I want to work on, workdays longer than 40 minutes require participation in the Prepaid Rewards Program, see Terms & Conditions, Section 410, Appendix IPA, other terms and restrictions may apply, depending on whether I like you or not)

But, mostly, I want 4” wide white accent stripes. That will be enough to cover the hideous kevlar felt patches I put on the cold cracks 30 years ago, and I think (hope) that those fugly patches will stand out less distinct under white than Deep Green. Darker colors show every imperfection, black being the worst. Although the black accent stripes on the FreeFire look pretty sharp.

PC110015 by Mike McCrea, on Flickr

I have ¼ can of EZ-Poxy white and some performance enhancer left from paint jobs last year and want to use it up while it is still viable. For ease of taping I will not separate the stripe from the outwale edge on this one. The paint-sealed tape on the outwale can stay in place until the white stripes are on.

Much like reading a George Will column I had to look up the definition of femtoscopic.

https://www.definitions.net/definition/femtoscopic

Well that definition was a big help:

Femtoscopic adjective

Of or pertaining to femtoscopy

And down the rabbit hole I go.

Femtoscopy noun

The study of reactions and other processes on a femtosecond basis

Femtosecond noun

one quadrillionth (10^-15) of a second; one thousandth of a picosecond

I have calculated that photographically documenting, writing, editing and posting takes 7200000000000000 picoseconds.

http://www.kylesconverter.com/time/picoseconds-to-minutes

Those precious picoseconds are when I retreat from the stinky shop to the fresh air office, befoul that office air with well deserved rewards and look up definitions. Like now.
 
I have calculated that photographically documenting, writing, editing and posting takes 7200000000000000 picoseconds.

So, two hours, about what I would have estimated. Taking photos, uploading them, downloading them, and writing and editing lengthy text takes me quite a while, but I enjoy it if it can provide information or entertainment to others.

Metric prefixes are very valuable to attach to a variety of words, as you did with "nano" +"scopic" to rhetorically describe detail that is 1000 times more detailed than "microscopic". I impetuously leaped over the prefix "pico" to "femto". Here is the entire list of metric prefixes:

Metric prefixes.jpg

I take the time to elaborate these vocabulary things because tomorrow is National Thesaurus Day.

Now, back to your regularly taped program.
 
Back
Top