I have a Taco with the 6 speed (2021) and love it, I had a new (2024) for 2 days ,,, they ruined it and I managed to get them to take it back ... so if you are thinking of the Taco manual, take a really good look and test drive first or get the last gen
-
Happy Birthday, Tim Horton (1930-74)! ⛸️🏒☕🍩
You are using an out of date browser. It may not display this or other websites correctly.
You should upgrade or use an alternative browser.
You should upgrade or use an alternative browser.
A Raven from Scratch
- Thread starter Gamma1214
- Start date
The wood shop was started from the generosity of the guy who owns the building.
Not knowing what to do with it, he was talking to a friend, and the idea, of a community work shop, came up..
Starting with the building, and over $30,00, the idea came into reality.
A Retired shop teacher and about 5 members, including me, went to work.
We have 40+ members. At $300 a year, a member has 24hr use. Family is welcome, also, so long as member is present.
Heated in the Winter, and with dehumidifiers, stays cool all Summer long. we have a shop, with top notch tools, that we are upgading, all the time.
Since we are a non profit operation, we qualify for Grant money ( comes from Casinos)
Last year we upgrade one of our three tablesaws, to a Saw stop.
I have to say we are blessed.
One thing that helps, is the work we do with Scouts, boys and girls, Church groups, and 4H. We also have adult classes, all thanks to our retired Shop teacher.
I pinch myself, every time I walk into the shop.
We make and sell things, mostly at a Christmas Market, and the money goes to our Scholarship fund.
We also do repairs for free will donations, which are really good, because people like to see us keep going.
I'm pretty much the maintenance man, as well as the Janitor.
I also operate our CNC router.
It's my home away from home !
Lastly you never have to stand in line, to use the tools.
I haven't found anything to compare !
Anyone in the area, can contact me for a tour !
Jim
That is awesome!
@Gamma1214 , I'm really enjoying this build thread. Can't wait to see how it does on the water!
- Joined
- Aug 10, 2018
- Messages
- 2,093
- Reaction score
- 6,971
@Steve in Idaho , I'm glad you're enjoying it. Lots of builders here to lend advice if you'd ever care to try one yourself (you really should IMO but, fair warning: it gets addictive and they tend to look better as you build more & learn from your mistakes)
Speaking of mistakes... I stopped at the shop to grab the seat parts and found that haste makes waste.
I also scraped the runs from under the seat support tabs and yanked the crap out of them trying to rip them off of the hull- better that they come off now than on day 5 of a 3 week trip, right?
I did not fare so well on the seat... I had skipped soaking the strips when I decided to remake the seat and, when removed from the jig, the rear (1 inch drop, 24 inches wide) seemed to be ok but the front (2 1/2 inch drop, 24 inches wide) had cracked the top Sassafras strip on one side.
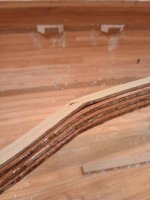
Never one to learn from failure, I decided it must have been a fluke so I mixed up more epoxy, built & buttered another stack of strips & loaded them into the jig. I was tightening the clamps gradually & watching the strips to make sure I got squeeze-out from every layer and, just before the jig was completely tightened, I heard an audible "crack" so I'm sure that I broke one of the strips again.
I'm set back at least a week now as I'll have to soak strips 3-4 days, let them dry in the jig 4-5 days and then try again. If I'm going to all that trouble (and not being certain that the rear isn't compromised by my lack of patience), I'll remake both front & rear crossmembers. A 3 week solo in Wabakimi will be no place to find out that I weakened it just enough to fail when I sat down too hard the 4th time...
On the bright side, I've got testers to be sure that my cutting / fitting methods are sound before trimming the actual seat parts and I'm convinced that the 7 layer lamination is plenty strong. The broken front support is almost 4 feet long when removed from the jig. The top strip is visibly cracked so we're down to a max of 6 layers. Just out of curiosity, I placed one end on the base of the strongback & the other on the base of the shaper (notice that I planned on only falling 5-6 inches to the floor). I then placed my posterior upon the lamination and was pleasantly surprised when it held my full weight! (a little over 200 lbs).
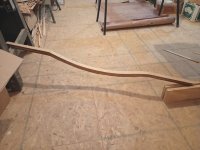
Considering that there will be 2 (uncracked) supports bearing the weight in the final seat configuration, I think it will be plenty strong enough even though it DID crack on the second test when I attempted to show my buddy how tough it was. I got my big @$$ off of it before it broke in half though so I can still use it to test fit.
Tomorrow I'll have to stop over, cut some more strips and start them soaking. Unless I'm mistaken, I'm going to have to be able to spread the gunwales in order to get the seat in & out so I'll have to widen the inner gunwale a little at the thwart location and widen the thwart a little at either end so I can bolt it in place instead of gluing & screwing like I did the last one.
I gotta get this seat right or I'll be ordering more epoxy... I'm down under 2 gallons of resin & I've started my last gallon of hardener (for any non-builders, I'm being facetious. I can easily build another whole boat with what I've got left but still... I hate wasting time & materials)
Speaking of mistakes... I stopped at the shop to grab the seat parts and found that haste makes waste.
I also scraped the runs from under the seat support tabs and yanked the crap out of them trying to rip them off of the hull- better that they come off now than on day 5 of a 3 week trip, right?
I did not fare so well on the seat... I had skipped soaking the strips when I decided to remake the seat and, when removed from the jig, the rear (1 inch drop, 24 inches wide) seemed to be ok but the front (2 1/2 inch drop, 24 inches wide) had cracked the top Sassafras strip on one side.

Never one to learn from failure, I decided it must have been a fluke so I mixed up more epoxy, built & buttered another stack of strips & loaded them into the jig. I was tightening the clamps gradually & watching the strips to make sure I got squeeze-out from every layer and, just before the jig was completely tightened, I heard an audible "crack" so I'm sure that I broke one of the strips again.
I'm set back at least a week now as I'll have to soak strips 3-4 days, let them dry in the jig 4-5 days and then try again. If I'm going to all that trouble (and not being certain that the rear isn't compromised by my lack of patience), I'll remake both front & rear crossmembers. A 3 week solo in Wabakimi will be no place to find out that I weakened it just enough to fail when I sat down too hard the 4th time...
On the bright side, I've got testers to be sure that my cutting / fitting methods are sound before trimming the actual seat parts and I'm convinced that the 7 layer lamination is plenty strong. The broken front support is almost 4 feet long when removed from the jig. The top strip is visibly cracked so we're down to a max of 6 layers. Just out of curiosity, I placed one end on the base of the strongback & the other on the base of the shaper (notice that I planned on only falling 5-6 inches to the floor). I then placed my posterior upon the lamination and was pleasantly surprised when it held my full weight! (a little over 200 lbs).

Considering that there will be 2 (uncracked) supports bearing the weight in the final seat configuration, I think it will be plenty strong enough even though it DID crack on the second test when I attempted to show my buddy how tough it was. I got my big @$$ off of it before it broke in half though so I can still use it to test fit.
Tomorrow I'll have to stop over, cut some more strips and start them soaking. Unless I'm mistaken, I'm going to have to be able to spread the gunwales in order to get the seat in & out so I'll have to widen the inner gunwale a little at the thwart location and widen the thwart a little at either end so I can bolt it in place instead of gluing & screwing like I did the last one.
I gotta get this seat right or I'll be ordering more epoxy... I'm down under 2 gallons of resin & I've started my last gallon of hardener (for any non-builders, I'm being facetious. I can easily build another whole boat with what I've got left but still... I hate wasting time & materials)
You can skip the soaking step if you cut your strips at 1/8 inch. That's what I did for the last stems I built for the Raven, and the angle was much more severe than your seats. You could skip the epoxy for the seats too if you got some titebond 3. That's good stuff.
IMO the issue (I have the same with my seat design) is that turn is actually pretty tight. Going a little thinner would certainly help as Mem suggested ... also though, as you tighten, give some time to bend, don't tighten it too fast. You will note as you start to tighten and it bends, it likes to do so slowly.
The epoxy has a long open time at that point, so you aren't in a rush, letting that wood kind of stretch into the bend may help as well.
The epoxy has a long open time at that point, so you aren't in a rush, letting that wood kind of stretch into the bend may help as well.
- Joined
- Aug 10, 2018
- Messages
- 2,093
- Reaction score
- 6,971
Thanks guys. I opted for "tried & true" and loaded more strips into the soaking tubes tonight. I'll bend them in the jigs on Saturday & glue them up sometime next week. (Just to be extra safe, I'm remaking front & rear crossmembers) In the meantime, I'll clean the shop, put the coves on the Pine & Cherry for the next build & try to get forms cut.
I guess there's nothing wrong with having 2 builds going at the same time, right? (warning to interested future builders: this can be addictive)
Realistically, I've gotta social-distance myself for 5 days at the end of the month... maybe I can have the next hull ready to glass by March 5th (my, hopefully, "cleared for normal life" date)
I'm actually planning something unique for the next one... you'll either love it or hate it but I'm itching to see how well it works.
The most builds I've had going at once was three, so you are catching up. There seems to be a move to maybe start using cedar strips for the Outers club again, going to try to find the money to build them a solo this year. Another Raven? maybe, or a cut down Pal.
- Joined
- Aug 10, 2018
- Messages
- 2,093
- Reaction score
- 6,971
Raven has been moved to the back burner (well, actually the off-loading table of the shaper) and I finished putting the coves on the White Pine & Cherry strips for the next build.
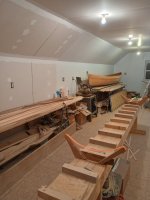
Seat strips should be ready to bend tomorrow & I'll do that in the afternoon. I'll probably let them dry at least a week, glue them together after that and they should be ready to install in the Raven shortly after I'm cleared for human contact.
During the social-distancing, I hope to be able to get the hull stripped on the next build and I picked up 2 sheets of 9/16(ish) OSB and had the local Lowe's rip them for me. I should only need 1 4x8 sheet for the new forms but I'll build a tandem soon so why not just get 2, right?
In another outstanding development, once the infeed table was cleaned off (and before being recovered by the Pine & Cherry), I found a clear Sassafras 1x8x12 (on the floor in the lower left above). It's now been replaced by a Pine board and I can use it for gunwales but it would also make some really nice paddles... decisions, decisions...
I'll start another thread for the 3rd build but I'm a little undecided about what to build. I have Merlin plans and an architect friend printed them for me but, looking at the specs, it appears to be very similar to my Freedom solo with a little more rocker (which is good) and a little less freeboard (which might not be)
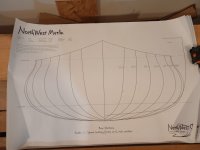

If you want something different, you could always build a traditional type canoe. The Jack's Special (Chum) is really nice, just not sure where you would acquire plans now.
- Joined
- Aug 10, 2018
- Messages
- 2,093
- Reaction score
- 6,971
Well, I thought the Freedom worked well for lakes but I'd like more rocker & freeboard. The Raven takes care of both of those but I'm not sure I need that much hull volume (but it'll likely make the trip North this summer). I have no issues building the Merlin... Nothin' good on tv anyway.
- Joined
- Aug 10, 2018
- Messages
- 2,093
- Reaction score
- 6,971
Well, the break from building was a bit longer than I'd expected but I'm back at it and ready to get this one on the water.
I'd soaked, bent & glued the seat pieces while stripping the Merlin so I put the psychedelic Merlin aside, placed the Raven back on the strongback cradles, stopped at my buddy's woodshop the other day, cut up some Sassafras for the gunwales and machined the replacement seat parts. I grabbed the discard seat rails that I'd broken earlier (cracked because I didn't soak them) and used them to test fit the real seat.
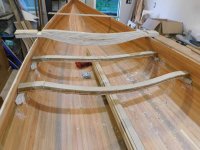
Test fitting didn't really help with fitting the actual seat pieces but, I guess, it was a confidence booster. We'd used double-sided tape on the seat supports when we cut the dados and the spreader fit tightly so I was worried about alignment once installed as the rails would then be 10-11 inches apart. I measured the distance between the dado cuts, subtracted that from the width at each station and divided by 2 in order to come up with distance from the dado to the shear.
I measured 2 or 3 times to be sure and finally made the cuts.
Those cuts gave me the width at the base of the seat supports but final fitting was needed because the hull gets narrower as it moves from center (the rear seat support is a full inch shorter than the front and they're only 11 inches apart) and the sides of the hull pull in due to the tumblehome.
I gradually fit the supports to the individual placements by using the horseshoeing rasp. When I was satisfied with the fit, I added copious amounts of wood glue to the joints, clamped everything tightly using the hull as the jig for the seat and allowed it to dry overnight.
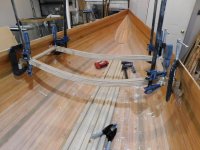
I stopped over this evening and removed all of the clamps and I was pleasantly surprised that I can (just) wiggle the seat out without spreading the hull. This was a concern because, if I did not have adequate clearance, I was going to have to thicken the gunwales and the thwart where they join each other so that they could be bolted in instead of being glued and screwed like I did on the last build.
Happily, there seems to be enough clearance so I can fix the thwart permanently.
I brought the seat home with me so, hopefully, I can sand & varnish it tomorrow and have the paracord laced onto it by mid-week. I'm hoping I can have the boat done by the end of the Memorial Day weekend.
I'd soaked, bent & glued the seat pieces while stripping the Merlin so I put the psychedelic Merlin aside, placed the Raven back on the strongback cradles, stopped at my buddy's woodshop the other day, cut up some Sassafras for the gunwales and machined the replacement seat parts. I grabbed the discard seat rails that I'd broken earlier (cracked because I didn't soak them) and used them to test fit the real seat.

Test fitting didn't really help with fitting the actual seat pieces but, I guess, it was a confidence booster. We'd used double-sided tape on the seat supports when we cut the dados and the spreader fit tightly so I was worried about alignment once installed as the rails would then be 10-11 inches apart. I measured the distance between the dado cuts, subtracted that from the width at each station and divided by 2 in order to come up with distance from the dado to the shear.
I measured 2 or 3 times to be sure and finally made the cuts.
Those cuts gave me the width at the base of the seat supports but final fitting was needed because the hull gets narrower as it moves from center (the rear seat support is a full inch shorter than the front and they're only 11 inches apart) and the sides of the hull pull in due to the tumblehome.
I gradually fit the supports to the individual placements by using the horseshoeing rasp. When I was satisfied with the fit, I added copious amounts of wood glue to the joints, clamped everything tightly using the hull as the jig for the seat and allowed it to dry overnight.

I stopped over this evening and removed all of the clamps and I was pleasantly surprised that I can (just) wiggle the seat out without spreading the hull. This was a concern because, if I did not have adequate clearance, I was going to have to thicken the gunwales and the thwart where they join each other so that they could be bolted in instead of being glued and screwed like I did on the last build.
Happily, there seems to be enough clearance so I can fix the thwart permanently.
I brought the seat home with me so, hopefully, I can sand & varnish it tomorrow and have the paracord laced onto it by mid-week. I'm hoping I can have the boat done by the end of the Memorial Day weekend.
Last edited:
- Joined
- Aug 10, 2018
- Messages
- 2,093
- Reaction score
- 6,971
As always, I appreciate your input Jim and I'll try the vertical dado (as well as the upward arching spreaders) on the next seat.
I will disagree about this seat's reliance upon the glue, however. The joint is very tight and, at least in my estimation, I will have to compress the wood in the spreader in order to have the joint fail (or stretch the Sassafras and Oak plies below and we all know how well wood stretches).
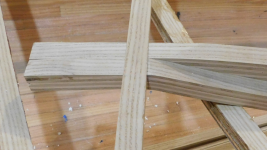
(note that the line to the right of the spreader is a pencil mark.)
In addition, I'll not be drilling anything on the seat so I won't weaken it in that manner.
Someday when I'm bored (unlikely) I may have to make a dozen or so dado'd each way and load them to failure. I'm sure someone here can tell us what a statistically significant sample size would be but, for now, I'm going with "worked fine on the Freedom Solo". (besides, it's removable if it should ever be a problem)
I will disagree about this seat's reliance upon the glue, however. The joint is very tight and, at least in my estimation, I will have to compress the wood in the spreader in order to have the joint fail (or stretch the Sassafras and Oak plies below and we all know how well wood stretches).

(note that the line to the right of the spreader is a pencil mark.)
In addition, I'll not be drilling anything on the seat so I won't weaken it in that manner.
Someday when I'm bored (unlikely) I may have to make a dozen or so dado'd each way and load them to failure. I'm sure someone here can tell us what a statistically significant sample size would be but, for now, I'm going with "worked fine on the Freedom Solo". (besides, it's removable if it should ever be a problem)
I know I'm a wood butcher, but every seat I have made, I have simply predrilled holes and butt jointed the pieces together with epoxy and two biggish screws to each joint. After 70 or more seats, none have failed yet.
Actually with the shallow mortise on mine, no screws are needed.I know I'm a wood butcher, but every seat I have made, I have simply predrilled holes and butt jointed the pieces together with epoxy and two biggish screws to each joint. After 70 or more seats, none have failed yet.
The pull of the lacing, or webbing, keeps everything in place.
If I can eliminate screws ? I do, they are always the first place, rot develops ?
Jim
I love these debates about the minutiae. @Gamma1214, yes please! I'd love to see that stress test competition and joint design faceoff.
I think you're right about the upper portion of your seat frames being in compression and expect they would hold up when loaded gradually. My one concern is that the dado is right at the location where your seat frame begins its curve. That reflex angle change probably creates just a tiny bit of a lever action across the face of the grain/laminate, with the spreader acting like a wedge. I suppose a shock load (like falling down hard into the seat from a poling position) might split your frame horizontally, along the length of your laminate and/or wood grain, starting right at the bottom the dado/mortise, on the inside the seat frame.
@Jim Dodd, Totally agreed on the fasteners! Do you angle the depth of your spreader mortise, so that the bottom is less deep than the top? That would add positive support to the joint that otherwise relied only on adhesive/friction.
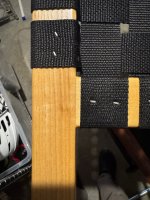
Here's a photo of a lovely @Conk frame joint on a seat I have yet to install. If I were to hazard a guess, I'd say it has an internal mortise and tenon that is otherwise invisible. Sometimes I daydream about a Festool Domino....

By the way @Gamma1214, have you noticed that this thread has 11,000 views? On behalf of the many, thanks for continuing to share your build experiments!
No I don't angle the mortise, but that would be a great option !@Jim Dodd, Totally agreed on the fasteners! Do you angle the depth of your spreader mortise, so that the bottom is less deep than the top? That would add positive support to the joint that otherwise relied only on adhesive/friction.
My mortise is pretty shallow. I fear going any deeper, as it would reduce the strength of the frame.
My seats are heavier than most commercial seats I've handled, but my seats are bigger also.
Just my tendency to make things a little stouter.
Looking at the Conk seat, there is pressure both directions, keeping the joint tight. Yes I would want something, between the pieces.
I plan to use webbing for the seats on my current build..
If what you build holds up ? That's fine ! I'm just sharing what has and hasn't worked for me !
Jim
- Joined
- Aug 10, 2018
- Messages
- 2,093
- Reaction score
- 6,971
I have noticed that and I've wondered about it. I really enjoy building these and I'm hoping that at least some of the viewers are reading with intent to start a build of their own. If that is the case, they are, hopefully, aware that the members of this forum are extremely willing and able to help (and don't get terribly offended when we won't always agree with, or listen to, the advice given).have you noticed that this thread has 11,000 views?
Regarding that, I've been re-reading Brian's explanation in post #140.- I'm wondering if I should be building the seats differently and I'm tempted to make a half dozen each way and break them except for one little issue: A fair test would include webbing the seats completely and that takes a few hours the way that I do it. (I guess I could wrap & staple webbing and even build them entirely from Aspen or Pine if the aim was to merely test the joint failure...)
Oh well, that's (maybe) for another day...
I rounded the edges of the seat frame by wrapping sandpaper around them and using it like a shoe shine rag. My understanding is that a radius is stronger than a sharp edge and, while I don't understand the physics of that (in all honesty, I've never bothered to try), I can just go along with the idea as it's more comfortable anyway.
After that, I put small pencil marks every inch from center on all 4 pieces and varnished the frame. When dry, I started wrapping and weaving the current seat using 5/32 inch paracord (I found a roll of dark red and thought it would complement the colors of the Larch & Sassafras really well). Doing it this way eliminates drilling the seat frame but, as mentioned above, it takes hours.
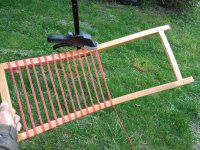
It's also hard on the hands pulling that skinny cord tight but it does make for an attractive (IMO) and comfy seat.
Now: not to discourage any would-be builders but mistakes are made. I believe that all can be remedied but some take more work than others and, in keeping with my "learn from my mistakes" demeanor, I'll share my latest.
Over the course of the past 2 days, I've got a total of about 3 hours weaving this seat. I had a 100 foot roll of paracord and I didn't use anywhere near that on my Freedom seat. This one, however, has almost 3 times the seating area so, much to my dismay, 100 feet was insufficient the way that I'm webbing it.

My options, as I see them: find more red paracord and attempt to hide the knot on the bottom of the web where I won't sit on it (I think I can hide it under the spreader bar) or take it all apart, remark the seat frame with 1 1/4 or 1 1/2 inch spacing and see if 100 feet is sufficient to get coverage with that spacing (pretty sure that it will be).
As mistakes go, this one is relatively minor and the corrective action required is pretty straight forward: "You didn't do it right so try again". Taking it apart will probably take a couple of hours so I'll be searching for red paracord during my travels tomorrow.
- Joined
- Aug 10, 2018
- Messages
- 2,093
- Reaction score
- 6,971
Note: I've been over and over why 100 feet was too short and it simply can't be. Then I remembered that I'd used "a few feet" for another project (because, of course, there was lots of green left over from the Freedom build). This recollection does not solve the immediate problem but, for future reference, a full 100 foot roll should be enough to do this seat.
Similar threads
- Replies
- 78
- Views
- 10K
- Replies
- 81
- Views
- 12K
- Replies
- 140
- Views
- 20K
- Replies
- 7
- Views
- 1K

