-
Happy First Sighting of Manatees by Columbus (1493)! 💧🐘
You are using an out of date browser. It may not display this or other websites correctly.
You should upgrade or use an alternative browser.
You should upgrade or use an alternative browser.
Canoe seat replacement parts - Drilling dowel holes
- Thread starter Robin
- Start date
Thank You Jim, perfect.
If you need mine just let me know.
Jim
Jim
It looks like dowel locator inserts will provide very exact results. But haven't we all replaced seats without such precision?
Crude but effective method: clamp the seat to the gunwales in the position you want it. If the gunwales are new, drill the gunwale and seat frame at the same time. If you are fitting into a canoe with existing gunwales, just take a pencil, put it through the the existing seat-mount hole, and mark the seat frame. And, it appears you have the old seat, so you could just put the old seat on top of the new seat and drill through the old seats existing holes.
I've installed a dozen or so seats in this manner. I'm thinking Robin and Boatman53 have installed way more seats than I have. It's so simple I'm thinking I must not understand the problem.
- Joined
- Sep 17, 2019
- Messages
- 278
- Reaction score
- 717
I believe Chip has the right answer, simply clamp the two members together and dill them at the same time. Dowel points like the ones in the pictures are designed to be used with a brad point drill bit.. Trying to drill by hand, machine bits has a tendency to "walk" or wonder just a little bit
It's so simple I'm thinking I must not understand the problem
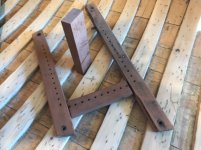
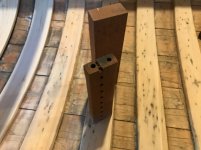
Haha, I probably didn’t explain my problem correctly. I need to make a new section for the canoe seat in the picture. The new piece will be held in place at each end with dowels and glue. I will need to drill somewhat precise holes in the new piece to match the existing holes in the old frame so I get a flush fit on the top when I insert the dowel into the new piece.
Boatman53 nailed it with his idea.
Thanks for the interest.
- Joined
- Sep 17, 2019
- Messages
- 278
- Reaction score
- 717
Boatman53, The guide you show is much more reliable for a true cut than the dowel centers. I would certainly recommend the guide over the dowel centers with the guide giving better results. The guide helps prevent the unsteady hand from moving where the dowel centers only mark the center and does nothing to help steady the drill bit. I've used a commercial one similar to that a few thousand times with good results.
You still need the center points to locate where the hole should be.
Jim
Jim
I would certainly recommend the guide over the dowel centers
You still need the center points to locate where the hole should be.
Jim
If I were to do this on a regular basis I would have both. I only need four I” holes, once those center points give me the spot to drill I’ll be good. Getting a 1” deep hole close enough shouldn’t be a problem. That’s why someone invented sandpaper and a file.
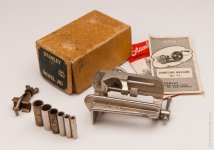
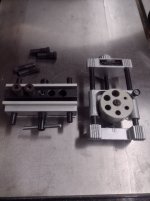
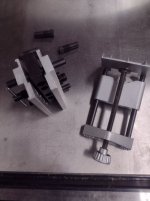
Getting the holes straight freehand is always a challenge. I've used the guide on the right with great success, but I believe it's probably no longer in production. I recently found this Harbor Freight guide on the left that comes with threaded inserts for several increments, plus the two holes on the right for 7/16 and 1/2. Both are very adjustable. The HF one is easier to use for multiple centered holes, but the one on the right can be adjusted for thicker stock and off center holes.


Trying to drill new holes that will line up perfectly with the existing ones will be difficult at best, especially if you don't have a drill press. I'd be inclined to fill the old holes either by gluing in dowels or with wood filler/sawdust mixed with epoxy. Then I'd clamp the pieces together, all accurately aligned. While clamped, drill new dowel holes through the front and rear stringers, and into the end of the end pieces. Unclamp, apply glue to the mating surfaces reclamp and then drive new dowels through the front and rear stringers, into the end pieces. Reclamp as necessary until the glue dries. A bit of cleanup, sanding and whatever wood finish you prefer and you're done, except for caning, of course.I need to make a replacement part for a canoe seat. Cutting it down to size is no problem but I’m wondering if anyone knows a simple procedure to line up the holes for the dowels. I don’t have a drill press, just hand tools.
Thanks
View attachment 151089View attachment 151090
When matching a preexisting opposing hole, I use those insets Boatman pictured above to mark the location. These jigs can be either centered on the edge of the stock or offset as needed (the one on the left requires shims to offset). Amount of offset can be matched to an existing hole by first attaching the jig on that piece and adjusting so the bit lines up with that hole. A bradpoint bit in the respective hole is used to index the jig on the punch mark before tightening the jig. Of course, matching two new holes is simply a matter of measuring and marking. It's actually quite accurate, and entirely portable.Getting the holes straight freehand is always a challenge. I've used the guide on the right with great success, but I believe it's probably no longer in production. I recently found this Harbor Freight guide on the left that comes with threaded inserts for several increments, plus the two holes on the right for 7/16 and 1/2. Both are very adjustable. The HF one is easier to use for multiple centered holes, but the one on the right can be adjusted for thicker stock and off center holes.
View attachment 151129
View attachment 151130
Just what Steve said.
Jim
Jim
Well, I went with Jim’s suggestion and picked up a set.
I went with a bigger dowel and carefully drilled out new holes with a hand power drill. Not perfect but pretty good.
I used some Titebond III and clamps.
My repair is the bottom frame, hopefully with age the new replacement part will match the old wood. With the new cane added I don’t think any imperfections will be that noticable.
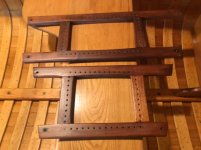
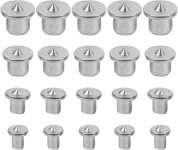
A hardware store should have dowel locator insets, they set in the existing hole with a little point to mark the new piece. If you can’t find them I have a set you can borrow.
Jim
They look like this.
View attachment 151091
I went with a bigger dowel and carefully drilled out new holes with a hand power drill. Not perfect but pretty good.
I used some Titebond III and clamps.
My repair is the bottom frame, hopefully with age the new replacement part will match the old wood. With the new cane added I don’t think any imperfections will be that noticable.

Similar threads
- Replies
- 4
- Views
- 731
- Replies
- 0
- Views
- 211

