• Happy National Audubon Day! 🐣🐦🦅🕊️

First WC and first restoration attempt

Joined
Apr 20, 2022
Messages
219
Reaction score
195
Greetings WC and B canoe folks-
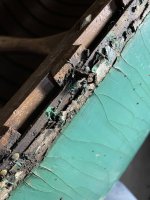
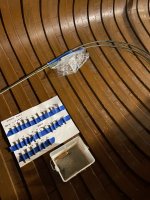
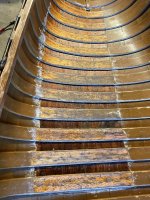
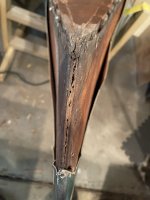
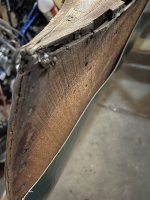
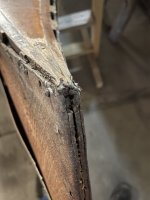
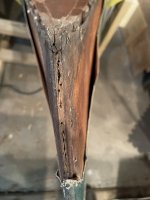
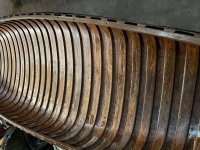
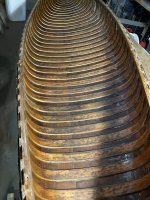
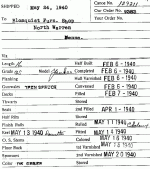
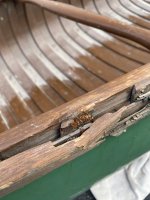
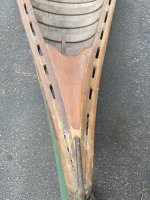
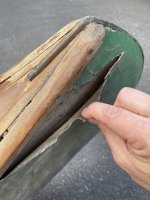
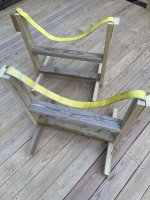
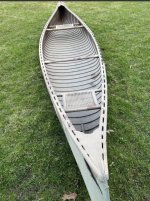
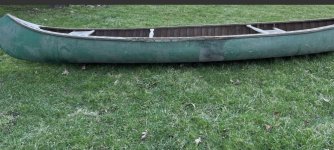
I’m a new member… name is Drew (DT). I purchased my first WC canoe this past Tuesday. I was encouraged to post a thread to hopefully share and definitely get feedback and advice on this new endeavor. It is a 1940 OTC CS Yankee 16’. I spent last night poring over the This Old Canoe (thx Robin) and setting up my cradle. I am going to begin the investigation/ note taking part tonight and taking pictures before I do anything else. Oddly enjoy going into the shop and just admiring the beauty. Here is a picture or two and the manifest kindly provided by Benson at the Wood Canoe Society.
Cheers
DT
 

Attachments

  • 8EA47D12-1A80-4A39-9F4F-03319B861502.gif
    8EA47D12-1A80-4A39-9F4F-03319B861502.gif
    85.2 KB · Views: 48
  • 6711E4E1-6C51-4E95-AC98-032EE17C10AA.jpeg
    6711E4E1-6C51-4E95-AC98-032EE17C10AA.jpeg
    118.3 KB · Views: 47
  • 14BA0A8D-C2D7-4756-AD32-4C0CA8A1A95D.jpeg
    14BA0A8D-C2D7-4756-AD32-4C0CA8A1A95D.jpeg
    186.6 KB · Views: 44
  • C7B36D17-A621-462F-A4E2-2944006C512B.jpeg
    C7B36D17-A621-462F-A4E2-2944006C512B.jpeg
    131.4 KB · Views: 46
  • 590F45DD-3839-4CE9-8826-621A115680CE.jpeg
    590F45DD-3839-4CE9-8826-621A115680CE.jpeg
    205.8 KB · Views: 46
  • 66509AE9-FAE2-43AC-A5CC-DC22D6B45444.jpeg
    66509AE9-FAE2-43AC-A5CC-DC22D6B45444.jpeg
    232.7 KB · Views: 43
  • 03571CF4-6D60-4972-8D83-1730A4C74E54.jpeg
    03571CF4-6D60-4972-8D83-1730A4C74E54.jpeg
    137.5 KB · Views: 45
Love the build records..I am amazed that the boat was essentially off the form and canvassed in a day but the fillers needed a long time to cure before finishing off. Thanks for sharing, Drew.
 
Welcome to the w/c canoe club. I'm in the middle of my second w/c canoe restoration and I can affirm your notion of "admiring the beauty". I thoroughly enjoy spending time with the details of my canoes as well! I find it interesting that although most of the w/c canoes we might find were production built, it's impressive how finely detailed they are and so completely repairable.

Being a somewhat detailed note-taker myself, I also keep for future reference the old planking tacks, rib/inwale nails, and screws I remove for future reference if replacement hardware is required. It's easy to measure the old fasteners and hardware for replacement.

Here's mine currently... It needs two planks replaced, and I made them out of western red cedar; ripped from 1/2"x 8" bevel cedar siding. It'll yield at least two full length planks ripped to 7/32", then drum sanded to final thickness to match the existing planking.

tempImageqXayhS.pngtempImagenGJK4N.pngtempImageCjVlzS.pngtempImageWs6dcp.png
 
Love the build records..I am amazed that the boat was essentially off the form and canvassed in a day but the fillers needed a long time to cure before finishing off. Thanks for sharing, Drew.
I thought the record was interesting too… like looking back in time
 
Welcome to the w/c canoe club. I'm in the middle of my second w/c canoe restoration and I can affirm your notion of "admiring the beauty". I thoroughly enjoy spending time with the details of my canoes as well! I find it interesting that although most of the w/c canoes we might find were production built, it's impressive how finely detailed they are and so completely repairable.

Being a somewhat detailed note-taker myself, I also keep for future reference the old planking tacks, rib/inwale nails, and screws I remove for future reference if replacement hardware is required. It's easy to measure the old fasteners and hardware for replacement.

Here's mine currently... It needs two planks replaced, and I made them out of western red cedar; ripped from 1/2"x 8" bevel cedar siding. It'll yield at least two full length planks ripped to 7/32", then drum sanded to final thickness to match the existing planking.

View attachment 130542View attachment 130543View attachment 130544View attachment 130545
Pat that looks awesome…funny you mention the production build, yet the detail orientation of the build…i thought it was ironic that with all that is out there in modern builds… these are still lasting and their life extended
thanks for the pics… it look great.. will be using that technique for the planks…thank you
DT
And love that shop floor! Reminds me of our family barn from my childhood
 
And love that shop floor! Reminds me of our family barn from my childhood
Its the original threshing floor of my Pennsylvania German bank barn. Lumpy and makes setting sawhorses level, but full of character! I love spending time in the barn and admiring it’s history, character, and the talent of the post & beam builders.
 
Well… I cleaned the outside and inside … rinsed and began cleaning out the screw heads and removed the stem bands and port side outwale. Some of the tacks under the outwale were still bright and shiny. Others… not so much. I found one repair on the gunwale done with a steel screw. So far the wood under the first gunwale seems good. Did find two new areas in need of attention on the planking after cleaning the inside.
 

Attachments

  • D71E9366-6E91-4369-8550-7717FB10DD0D.jpeg
    D71E9366-6E91-4369-8550-7717FB10DD0D.jpeg
    154.8 KB · Views: 23
  • 01A1BA7C-6BF3-4C97-921E-603C9E1953EF.jpeg
    01A1BA7C-6BF3-4C97-921E-603C9E1953EF.jpeg
    168.8 KB · Views: 23
Here’s what she is starting to look like under the varnish… pretty exciting
 

Attachments

  • 2E5F92E2-7B58-4FEA-9516-CE8F5635D230.jpeg
    2E5F92E2-7B58-4FEA-9516-CE8F5635D230.jpeg
    252.8 KB · Views: 27
  • 74531737-F311-4CF2-B0CF-0F6BBBE4DBA1.jpeg
    74531737-F311-4CF2-B0CF-0F6BBBE4DBA1.jpeg
    252.8 KB · Views: 26
What do your stems look like? I will re-canvas and fasten with stainless steel staples, including along the stem. Because the stems usually look like Swiss cheese from previous canvas nails and stem band screws, I fill those many holes with round toothpicks, cut in half, and dipped in yellow glue, then gently inserted point first into the holes. A day later you can easily cut them off and sand flush. My concern is that it's likely that many of the staple legs would otherwise not have a solid place to grip the stem, allowing the canvas to come loose in places. I also use toothpicks in a similar way to insert along with the gunwale screws into the original holes. Makes the screws just a little bit tighter.

The chalk marks indicate planking tack heads which need re-clinching.
tempImageiDXYuK.png
 
Great advice! Here are the stem views. I am getting close to having all the old varnish mostly (ha) removed. I am planning on washing with TSP with bleach added as per instructions to clear up the mildew on the wood. Is that appropriate? Appreciate you checking in on me. Yours looks great… can’t wait to strip the canvas and glue up the holes,
 

Attachments

  • F873D008-45F9-478E-9E60-E0AC471C1B54.jpeg
    F873D008-45F9-478E-9E60-E0AC471C1B54.jpeg
    96.2 KB · Views: 21
  • 0F51B759-AA2D-440A-ADBA-C8F7C1BD955E.jpeg
    0F51B759-AA2D-440A-ADBA-C8F7C1BD955E.jpeg
    121.6 KB · Views: 21
  • D12F7443-0D06-40AD-81F0-4B0892D86A98.jpeg
    D12F7443-0D06-40AD-81F0-4B0892D86A98.jpeg
    90.2 KB · Views: 21
  • 91B781EA-24B9-4BAC-83FA-D2586BCED9BD.jpeg
    91B781EA-24B9-4BAC-83FA-D2586BCED9BD.jpeg
    97.4 KB · Views: 21
  • B0FB8601-A912-4B6A-869D-93C54654BD66.jpeg
    B0FB8601-A912-4B6A-869D-93C54654BD66.jpeg
    212.6 KB · Views: 21
  • 8E0ABA20-84FF-4690-BF39-D34ED9EA7E57.jpeg
    8E0ABA20-84FF-4690-BF39-D34ED9EA7E57.jpeg
    188.3 KB · Views: 21
Back
Top