• Happy International Mermaid Day! 🧜🏼‍♀️

Quick(?) SOF build

Joined
Jun 12, 2014
Messages
3,908
Reaction score
1,262
Location
NW Iowa
Turns out my dad's grandson, Evan, is a natural at canoeing. 10 years old and never held a paddle before this summer when we took him out for the first time. The only advice I have him was to keep his paddle shaft more vertical and figured I'd let him make his own mistakes from there. He immediately figured out which side paddled made the boat go left or right and within 10 minutes he'd developed a pry stroke. 10 minutes after that I caught him doing a draw. Half way through to trip I let him take the stern and told him he was in charge. He did pretty good.


20140809_002 by Alan Gage, on Flickr

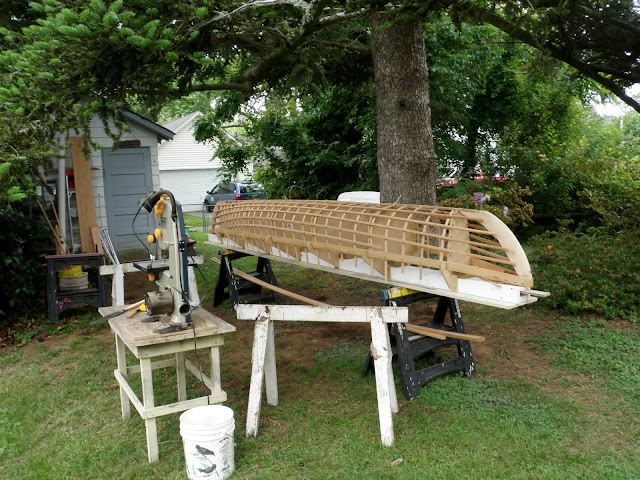
After the trip my dad told him he and his cousin could have his old 12' Dolphin tandem. I used that boat as a kid too. They've paddled it a couple times now and last time I took him out on the lake he paddled it solo while I took one of my solos. He did great but it's really heavy and really wide. I told my dad he needed to build a boat with Evan that he could actually handle but I could tell that wasn't going to get done so I took matters into my own hands. Found plans for the 12' Snowshoe at www.gaboats.com and started charging the supplies to my dad.

It's supposed to be a pretty quick and easy method but I'm not so sure about that. Woodstrip seems easier but that's probably because I've done a couple. This is all new so lots of reading and re-reading and scratching my head and trying to figure out what exactly he's talking about. Also steam bending ribs, which is new, but it went fine once I started.


20141002_001 by Alan Gage, on Flickr


20141002_002 by Alan Gage, on Flickr


20141002_004 by Alan Gage, on Flickr


20141002_003 by Alan Gage, on Flickr

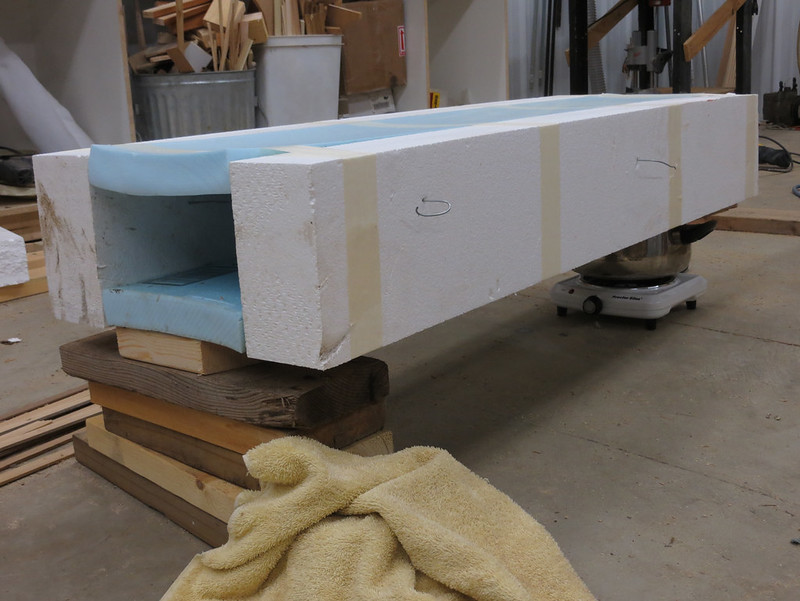
I thought building the steam box and steaming the ribs would be a pain in the butt so I kind of drug my feet but it was pretty easy once I actually got to it. The foam thickness (4") is obviously overkill but those were the scraps I had on hand. I wanted to use duct tape but masking tape was the only thing I could find at the time and it worked fine. No other fasteners required. The back of the box is sealed shut and the towel is draped over the front. On top of the pot is a 3/4" piece of plywood with a 2" hole cut in it. In the bottom of the foam there is a matching 2" hole. Line up the holes, turn on the heat, and voila!, instant steam.

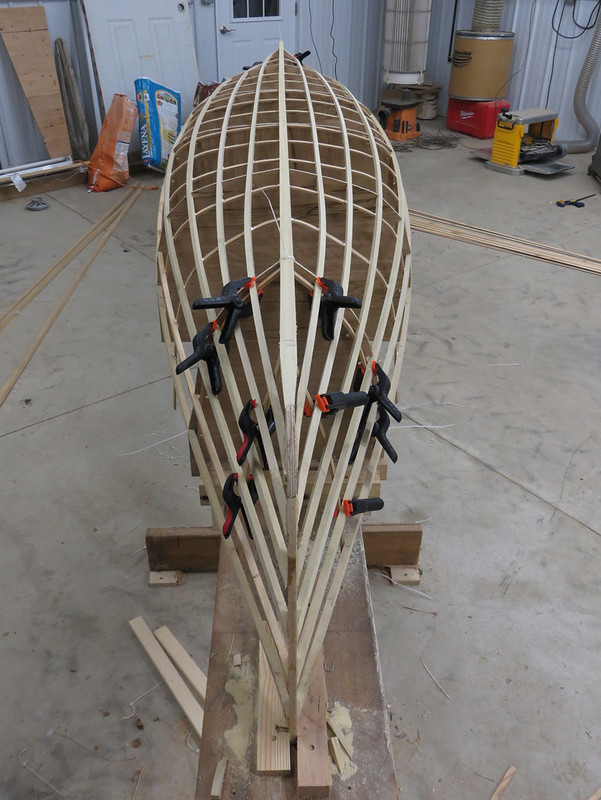
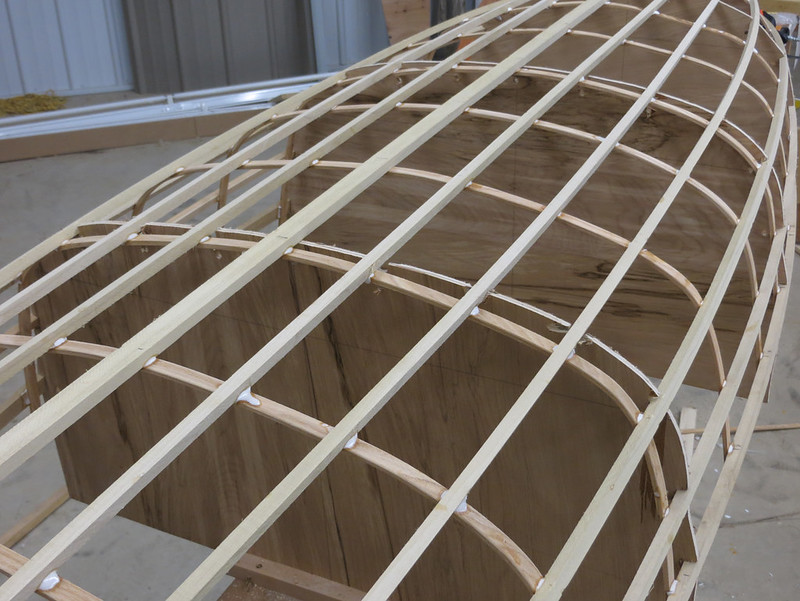
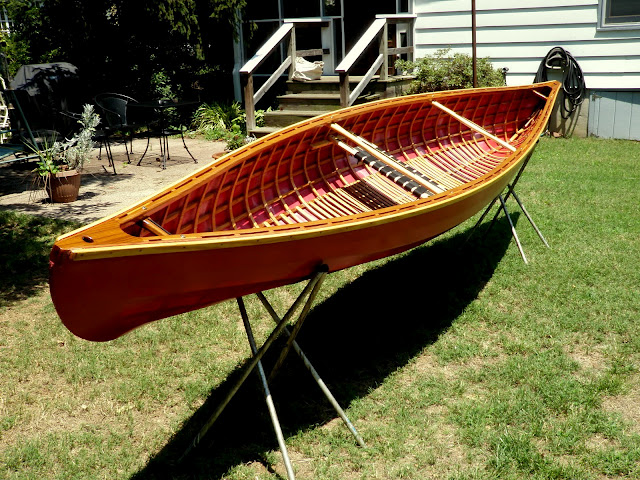
All the ribs are glued in place except for the last 4 (two end ribs on in bow and stern). I steamed and clamped them tonight. Tomorrow I'll glue. I'd really like to get it skinned and start water proofing it this weekend, but we'll see. I've got other stuff going on too which is a bit more important but I'd like to have it done by the following weekend when the county nature center is having a little "fall colors" paddle on one of the local lakes. I'm sure Evan would love to carry his own boat off the rack, plop it in the water, and paddle away by himself with a crowd watching.

Alan
 
Looks good!

One coat of varnish on the frame?
After the skin is on, it will take 2-3 coats to fill the weave. Paint or varnish? Cure times vary.

Next weekend may be possible.
 
Nice build as usual.
Canoeists are mostly made not born. This kid has natural talent that should be nurtured. I started paddling with the Boy Scouts at age 11.
 
Alan - I have been secretly planning to do one of the GABoats kits to fill my need for a pack canoe (same boat you're doing, maybe?) and store it hanging from the sun room ceiling before my wife can object. I am under the impression that the kit has you tying the runners to the ribs with aramid line that also gives angular bracing to the frame. Do your plans call for that?

Can't wait to see how your Snowshoe performs!
 
The ribs are glued to the chines. The kevlar roving is then (as I read it so far) tied to one gunwale and runs diagonal to the other side before being glued in place with the same stuff that attaches the skin (some tape that melts with heat). It's not tied off on the other side and the final step after putting on the skin is soften the adhesive with heat and to pull the kevlar string tight. It's one of those things that seems like a pain in the butt but I'm hoping will go well.

Alan
 
Alan,
If I may make a suggestion: it may be too late but it helps to end the stringers further back on the stems as in the photo below so the cloth can fair into the stems without unsightly bulges . Good looking job so far.

P5230119.JPG
 
Last edited:
Alan,
Quick work again!! My son built a Snowshoe 12 when he was 12 years old, the kit was a Christmas present that year. It ended up weighing 10 lbs.
He carried it over 3 miles to a remote pond that same year! Maybe you can get Evan involved in the build too.
 
Good point, Dave. That ship has sailed on that one but they are cut at a very steep angle so they're very thin at the front of the stem. I'm sure I can sand them back a little as well. The stems are quite narrow and I was worried about the lack of surface contact for the glue and how much stress would be on those joints. But now that I see it with all the ribs in there I realize the stress on those joints will probably be less than I imagine. Nice looking boat you've got there, what is it?

Stripperguy: 10 pounds is pretty impressive. I assumed that I wouldn't make the 12-13 pound estimate but maybe I will after all.

A couple questions for those of you who have done these before:

The plans call for an external keel and cutwater (basically a stem band) and I was wondering if that's really necessary. Doesn't seem like the keel should be needed for strength and if it were an internal keel should be stronger, or just the floor boards.

Stripperguy - what did you do for a seat? Plans call for sitting on the floor but the thought of sitting in a bathtub with gunwales in your armpits and trying to paddle with a single blade sounds nearly impossible. I can't imagine it's that unstable, especially for a 10 year old. I'm inclined to raise the seat at least 4 inches off the floor if not 6. Thoughts?

Alan
 
Alan,
I took the lines off a 15' asymmetrical solo canoe and used the front half dimensions to make a symmetrical canoe. I also stretched the diatance between forms a bit to make a 16'4" canoe and put different ends on it reminiscent of some I'd seen on a penobscott tribe bark canoe. I built it for strength for tripping so it weighs about 40 lbs and will hold me and 100 lbs of gear. There is a link in the DIY section from way back on page 1 or 2 on the build. You are correct, SOF construction technique is not necessarily quick if you do it right. I did put a strip of oak on the stems in lieu of a brass strip. No external keel but if you are using very light cloth it may be advisable to protect it from abrasion with a strip of something.
P7310006-001.JPG
 
Last edited:
Alan,
My son Josh used a piece of closed cell foam, about 3 inches thick, that rested on the floor boards, and that was it.
He did also use a full length rub strip outside of the skin, for abrasion resistance. I have used it on occasion, but I don't care for the whole "pack boat" type of seating. It sure is easy to carry, though!

Here he is between the two Preston Ponds, on our way back from Duck Hole...he was 14 on that trip.

If you study the photo, you'll see that the center thwart is a canoe strap. Josh fell on a spruce deadfall while carrying around a shallow spot. He fell on the hull, with the hull on the deadfall. He snapped the thwart, but no punctures on the skin. We were 8 miles in at the time, and this was before any formal trails were cut. He always carried some duct tape, just in case the skin was damaged.

DSCF0465.JPG
 
Last edited:
The boats in the last two photos are outstanding. We now see commercially made portable canoes with aluminum frames and nylon skin. The old skin covered kayaks and umiaks were some of the earliest boats in North American. The cedar and canvas canoes of the Golden Age were modern adaptions of the early bark covered canoes. It would be the next great frontier to see an explosion of frame and fabric boats like mylar. Stripperguy's picture is a good example.
 
Alan and Dave's work is impressive for sure...I can only take credit for setting up a steam chamber and spawning the boy (who has since become a man) that built the Snowshoe 12.

But ppine's post reminds me of my lingering desires to build a SOF for myself.
Years ago, I built a stripped (what else?) Grant pattern guideboat...hated it, mostly due to the gravity burden.
How about a carbon fiber over foam frame, with either heat shrink dacron or ballistic nylon for a skin? If I could make a SOF guideboat, I could satisfy two of my seemingly opposed needs: a boat built for big water that can easily be carried by a frail old man.
It could work.

In the mean time, Alan, what's up??
 
[QUOTEIn the mean time, Alan, what's up??[/QUOTE]

I'm still plugging away at it. Spent time doing some other projects this weekend but got some work done on the boat as well. It's off the forms and the inwale is glued in place. Decided to coat the wood with a opaque stain rather than varnish. Both because I thought Evan would like a red frame and to cover up the epoxy squeeze out that I forgot to wipe off and that I'm now too lazy to chip off with a chisel.

I must say that I'd rather be doing a woodstrip. I built a SOF kayak a few years ago with the Yost/ fuselage method where the forms are left in place, negating the need to install ribs, and I remember that going very quickly. But this one just seems to drag on. A woodstrip is a lot to sand and apply finish too but at least it's something you can sink your teeth into. With this there are so many pieces and edges that you work and work and feel like you're not accomplishing anything. Sorry to complain but I'm worn out after spending about 3 hours applying less than 1/4 quart of stain.

The good news is that the frame looks good in red and, at this point, it weighs 8.25 pounds. Tomorrow I hope to get the kevlar roving put on, or at least get a good whack at it. Ideally I'd get it covered on Tuesday but Wednesday seems more likely. Still hoping for a paddle next Saturday. I'll try to get some pics up tomorrow.

Alan
 
Alan,

I saw that a while ago...they did a much nicer job than I would do with the framework. But, I think they ended up way too heavy for me!
That's what initially got me thinking about a carbon fiber over foam frame. Just think, no tedious sanding and staining!!

That would be a pretty cool boat. When do you start? :)

What type of foam have you been using and how has it worked out? Did you do any strength testing between various foams?

Alan
 
The ribs are glued to the chines. The kevlar roving is then (as I read it so far) tied to one gunwale and runs diagonal to the other side before being glued in place with the same stuff that attaches the skin (some tape that melts with heat). It's not tied off on the other side and the final step after putting on the skin is soften the adhesive with heat and to pull the kevlar string tight. It's one of those things that seems like a pain in the butt but I'm hoping will go well.

Alan


Thanks for clearing that up for me. That actually sounds easier than what I had imagined. You guys are teasing my to pieces with these builds. I'm getting a little excited about doing one, since my shop is getting more in order of late and work space is opening up. I just need the time.....
 
That would be a pretty cool boat. When do you start? :)

What type of foam have you been using and how has it worked out? Did you do any strength testing between various foams?

Alan

Alan,
I've messed around with 2 lb/ft^3 polystyrene and 5 lb/ft^3 Divinycell, a PVC foam, made specifically for boat building. Either is a long way from 22 lb/ft^3 cedar!! MDB has even been encouraging me to build a fully foam cored canoe!

I haven't tested one foam against the other...the layups are dominated by the 50e6 psi (or more) modulus of the carbon fiber. The core is really only there to keep the inner and outer laminates separated. It needs to not fail in shear only, all other loads are taken by the laminate..

My main problem is that I have too many ideas and hobbies, and too little time to execute my grandiose plans!! I do eventually do everything I say I will, but some things get placed on the back burner...
 
By polystyrene I assume you mean standard XPS building foam? I thought I'd seen you use that before and wondered how it had worked out. I've only done a little internet searching and most seemed to poo-poo the building foam, saying it wasn't stiff/dense enough and could compress/crease within the laminate. Or that perhaps the epoxy wouldn't bond well enough. No doubt they're correct in saying something like Divinylcell is superior but I can't help but wonder if it's good enough for my purposes. Certainly it would be a good place to start experimenting, seeing has how I've already got about 5 full sheets sitting out in the shed looking for a purpose in life.

Have you played with any fiberglass or carbon sleeves yet?

Alan
 
Back
Top