This adventure was inspired by Robin and his canoe restorations. In particular, his rail replacements on different boats over the years. I wanted to see what it would take to mill rails from one of the last of our dying white ash trees. The first wave of the ash borer took out most of our ash quickly 10 or more years ago. We still have a few hanging on and this small tree died just in the last year or two. It is one of a few that looked like a candidate for clear wood at least 18’ long.


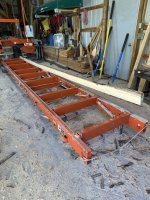
Not terribly large, maybe 12” at the small end which is the only end that matters when milling. The log ends got a wax coating to reduce splitting. The mill is not set up to handle anything this long so there was a lot of horsing around to get it up on the bed and then move it once it was there.

Ash is notorious for having a lot of stress especially when young. Running it through the mill was like watching a potato chip being made or, maybe more optimistically, the prebending of canoe rails... I was trying to quarter saw the pieces and, as much as possible, have the grain run continuously over the length of the rail. The highest quality wood in ash comes from just under the bark. The center of the log is unstable and has a lot of defects so just the outer 4 or 5 inches was usable with this log. Every piece came off the mill with a heavy bow and had to be forcibly clamped down vertically by hand as the saw head moved along the bed to keep a consistent thickness. Woodmizer doesn’t do vertical clamping, only horizontal.


Luckily, the lumber was really clear and resulted in 4 or 5 usable sets of rails.


As close to quarter sawn as I could get them given the small diameter of the log. They’ve been sprayed with a borate treatment to keep the beetles out and stickered to air dry for a year or so. They’ll get strapped tightly to reduce twisting and additional bowing. A lot of effort for a few sets of rails but a nice reminder of a beloved tree disappearing from the eastern hardwood region.
Rob
Not terribly large, maybe 12” at the small end which is the only end that matters when milling. The log ends got a wax coating to reduce splitting. The mill is not set up to handle anything this long so there was a lot of horsing around to get it up on the bed and then move it once it was there.
Ash is notorious for having a lot of stress especially when young. Running it through the mill was like watching a potato chip being made or, maybe more optimistically, the prebending of canoe rails... I was trying to quarter saw the pieces and, as much as possible, have the grain run continuously over the length of the rail. The highest quality wood in ash comes from just under the bark. The center of the log is unstable and has a lot of defects so just the outer 4 or 5 inches was usable with this log. Every piece came off the mill with a heavy bow and had to be forcibly clamped down vertically by hand as the saw head moved along the bed to keep a consistent thickness. Woodmizer doesn’t do vertical clamping, only horizontal.
Luckily, the lumber was really clear and resulted in 4 or 5 usable sets of rails.
As close to quarter sawn as I could get them given the small diameter of the log. They’ve been sprayed with a borate treatment to keep the beetles out and stickered to air dry for a year or so. They’ll get strapped tightly to reduce twisting and additional bowing. A lot of effort for a few sets of rails but a nice reminder of a beloved tree disappearing from the eastern hardwood region.
Rob