• Happy Birthday, Gene Kelly (1912-1996)! 📽️⭐🕺🏻☔

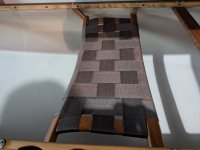
New seat design.

Thanks Alan
I’m sure Jim will chime in soonly, and maybe even include some dimensions WRT height of arch and about of droop
 
Just made it home from the BWCA tonight. I'll try and fix tomorrow.
 
Your new seat design reminds me of Swift seats. Swift seats have the hump further forward; my guess is that it is intended to help keep you from sliding forward and it also takes some of your weight off the leading edge of the seat which can be a pain point for kneelers. I'd be curious to hear how you like your design. Some folks hate the Swift seats; I like them but not enough to put Swift seats in my other solos.
PXL_20241005_144218163.MP.jpg
 
Your new seat design reminds me of Swift seats. Swift seats have the hump further forward; my guess is that it is intended to help keep you from sliding forward and it also takes some of your weight off the leading edge of the seat which can be a pain point for kneelers. I'd be curious to hear how you like your design. Some folks hate the Swift seats; I like them but not enough to put Swift seats in my other solos.
View attachment 143728

Yes, I would assume the Swift seat is intended to create more of a down slope on the front quarter/edge of the seat to make it more comfortable for kneelers. It doesn't look like it would be all that comfortable for sitters, but I've never tried one.
 
I have no problem seeing my pics. Photobucket did a recent up date. I'll try and post pics again, and see if it works.
 
I have no problem seeing my pics. Photobucket did a recent up date. I'll try and post pics again, and see if it works.

I can see them fine now so whatever you did must have worked. Thanks and hope you had a great trip!

Alan
 
I have no problem seeing my pics. Photobucket did a recent up date. I'll try and post pics again, and see if it works.

I couldn't see the pictures in your OP two days ago. There were just blank squares. I now can see them.

I'll repeat myself and Alan, much more bluntly than I usually do: For anyone in their golden years, this site will likely outlive you, and no one will be keeping your third party photo site alive after you're not. So, if you want the pictures in your posts and threads to outlive you, download them to your device and then upload them to our server. Yes, it takes about 20 seconds instead of 5 seconds.
 
Hey Jim,
Thanks for fixing those photos, I know I saw them when first posted, but they somehow disappeared
I suppose you’re busy composing a trip report from your time in the BWCA, I’m looking forward to hear about it
 
Here is a link (I hope) to my original seat thread.
canoe seat
I used the same dimensions, except I arch the braces, using the same curve as the rails.

As far as an improvement ?
I wouldn't say it's not huge, but I will make all my seats this way, and plan to replace some of my old ones.
I will also string my cord a little tighter.

I have used the same sizing on all my frames, so one portage yoke fits all.

Jim
 
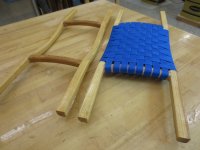
Put together a few frames, using the new design.
Picked up some Polypropylene HD 1" wide, in blue, from Strapworks.

What I like about the arched frame, is it allows the paddler to shift his weight, fore and aft, and still be comfortable.
The 1" webbing, is heavier than my Snowshoe corded seats.
More testing, up coming as soon as I have it installed.

1755525085623.jpeg
 
Hi Jim,

That is exactly my plan for seats on the current build, but I opted for 1" polyester.

I have stainless staples and have read a few upholstery blogs on doing the webbing. Any chance you have a few pics and could expand on the attachment and stretching technique you used?


Thanks
Brian
 
Just read through the entire thread. Jim Dodd....you have some skills my friend! The seat design is beautiful and makes perfect sense for shifting weight to promote comfort on those long paddles. My question is do you steam bend the wood to get that contour or do you start with wider material and work it down to your specific dimension? Once again...beautiful work. I would also like to learn more about your composite canoe build. I will dig to see if there are other threads speaking to the build. I hope to build a kevlar or some form of composite canoe in the future. I have the book "Building Your Kevlar Canoe" however I have not actively pursued anything with it at this point. I have heard some mixed feelings about the methodology used within its contents.
 
Hi Jim,

That is exactly my plan for seats on the current build, but I opted for 1" polyester.

I have stainless staples and have read a few upholstery blogs on doing the webbing. Any chance you have a few pics and could expand on the attachment and stretching technique you used?


Thanks
Brian
This is my first Webbed seat. I used Stainless 1/4" staples, from Arrow. A little spendy.
I tried 5/16" staples, but the Ash was too hard. Even a little too hard for 1/4" staples.

I pre cut, and lightly melted the ends, of the straps to prevent unraveling.
I just hand tightened, as the Poly Propylene, doesn't stretch much.
Your Polyester, may be a better choice ?
The seat seems pretty heavy compared to my laced seats. They aren't light either. Most due to the Heavy construction of the frames.
I used a lot of staples !

I need to get another pic of the underside.

Jim
 
My question is do you steam bend the wood to get that contour or do you start with wider material and work it down to your specific dimension?
No steam, just band saw cut to shape. I did pay attention to the grain of the wood. The long frames had vertical grain, for the most part.
I would also like to learn more about your composite canoe build. I will dig to see if there are other threads speaking to the build. I hope to build a kevlar or some form of composite canoe in the future. I have the book "Building Your Kevlar Canoe" however I have not actively pursued anything with it at this point. I have heard some mixed feelings about the methodology used within its contents.
I give Praise, to Jim Moran's Book, "Building your own Kevlar Canoe" ! I highly recommend picking up a copy. My difference is that I used a Stripper, instead of a foam plug.
Simply leave the ends open, to remove the Kevlar copy from the Plug.

I have a couple of threads, on the subject. I'm evolving my method, in respect to a release agent between the plug and the Kevlar copy. Other than that ? My method is the same as I did with my others.

There are other builders on this site that have done similar builds.
Do a search.
Most of them, used foam to stiffen the bottoms. I chose to use 1/8" cedar strips. I'm sold on the cedar, as I have it on hand anyway, the weight isn't much different.

I will build at least one more, as I have a bunch of almost free Kevlar.


Jim
 
Back
Top