• Happy Weed Appreciation Day! 🌱🌿🌻

Royalex skid plate removal and reapplication

Joined
Jul 17, 2022
Messages
13
Reaction score
0
Location
Wisconsin
Hello there!

My hand is being forced on a repair project that I’ve been keeping an eye on for the last year or so.

I think I have a plan but it seems prudent to get some more advice before getting any further into it.

The craft:

17’ Royalex Mohawk.

The situation:

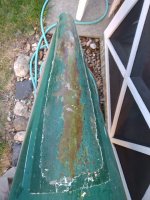
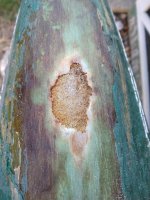
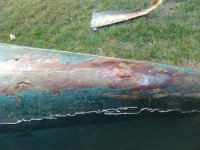
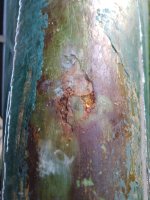
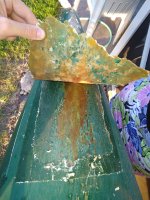
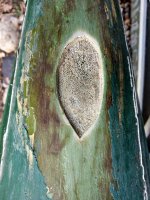
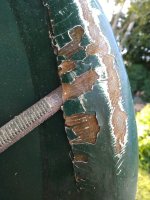
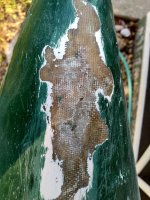
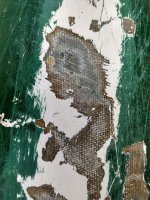
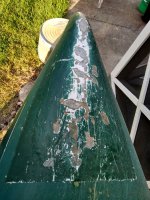
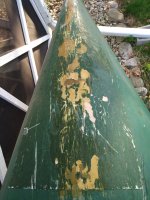
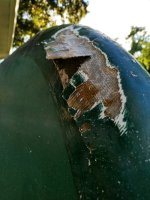
This is definitely an older canoe. It lives with me on a long term/permanent loan arrangement. When I took ownership of it, it came with DIY skid plates. After a few Wisconsin winters though, the one on the bow has started peeling off. The canoe itself seems fine underneath. Regardless, it’s time to fix it.

My plan:

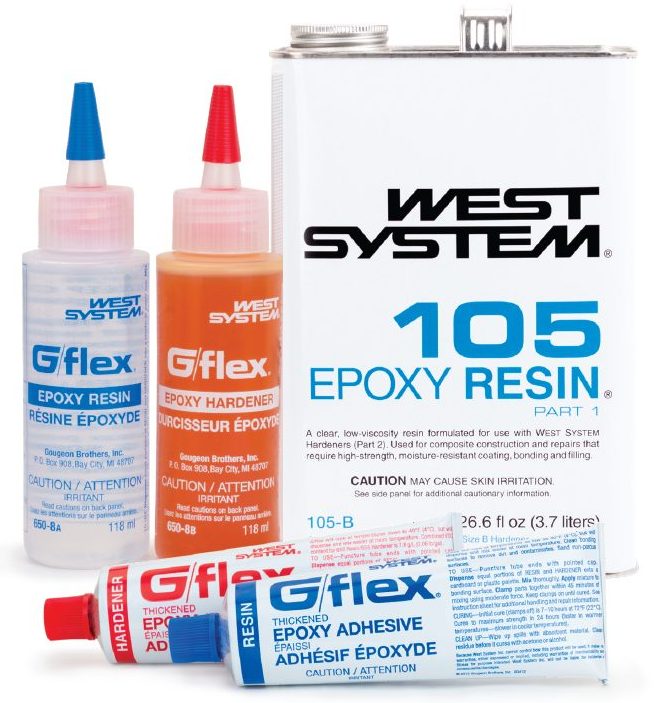
At this point, I wish to remove what I can of the existing skid plate and then to apply a new one. My intention is to follow the steps outlined in this thread:


So far I have done some exploratory sanding/rasping to see what I’m working with. The skid plate is not terribly difficult to sand/rasp back. I’m not sure how much of the existing plate I will need to remove before I can apply a new layer. My thought is that once it’s faired out I should be set. However, I fully acknowledge that I haven’t done this before and might be on the wrong track.

The reasoning:

I’ve read through a fair number of threads about pros/cons of skid plates. I can see both sides of the topic. For my uses though, bow reinforcement is non-negotiable. This canoe is used exclusively for fishing and the majority of that is done in smaller rivers which have their fair share of incredibly shallow gravel bars. Obviously an effort is made to avoid them, but given the quantity it’s a matter of when—not if—I’ll end up scraping. Not the prettiest outlook, but this is why I’m interested in taking precautionary measures to protect it.

Outcome:

Ideally, I would like for the canoe to be a little more durable then when I started. It's been good to me so far and I'd like to do what I can to keep it floating and functional. I haven't done anything like this previously. My expectations for aesthetic appearance are low. As long as it's at least on par with what's already on their I'll be satisfied.

On a final note, I started sanding before I took any photos. There was significantly more paint before I started messing with it.
 

Attachments

  • IMG_20220712_192530697.jpg
    IMG_20220712_192530697.jpg
    155.6 KB · Views: 27
  • IMG_20220712_192523845.jpg
    IMG_20220712_192523845.jpg
    139.7 KB · Views: 26
  • IMG_20220712_192513193_HDR.jpg
    IMG_20220712_192513193_HDR.jpg
    199.2 KB · Views: 28
  • IMG_20220712_192507526_HDR.jpg
    IMG_20220712_192507526_HDR.jpg
    230.4 KB · Views: 28
  • IMG_20220712_192455912_HDR.jpg
    IMG_20220712_192455912_HDR.jpg
    205.7 KB · Views: 28
  • IMG_20220712_192427077.jpg
    IMG_20220712_192427077.jpg
    159.5 KB · Views: 26
  • IMG_20220712_192909713_HDR.jpg
    IMG_20220712_192909713_HDR.jpg
    117.8 KB · Views: 25
  • IMG_20220712_192903159.jpg
    IMG_20220712_192903159.jpg
    128.8 KB · Views: 26
Well, here Is my 2Cents.

Old skid plates look to be fabric - maybe fiberglass.
I would take off as much of the skid plates as I can get off. Anything highly resistant to coming off I would incorporate into the next skid plate
Use dynel, cut on a bias, for the fabric of your next skid plate, maybe 2 layers where wear is excessive.
Use G flex for your epoxy. Thickened gflex can help fair in an old skid plate
To minimize weight gain and workload I make my skid plates to just cover the area that’s getting abused. I start by making a triangle, on cloth or paper that covers the damaged area. Use a circular object to round off the triangles ends. Once you have a template you like, you are ready to trace onto the dynel.

You've found a good link for photo documenting the repair.

if MCCrea or Pblanc chime in, listen to them as they are quite experienced
 
Last edited:
I honestly can't make any sense of the photos. There is obvious fabric showing in them but it almost looks as if the fabric is underneath the green and white. If this is a Royalex canoe, that just doesn't make any sense.

If that is not the case and the fabric is the exterior layer, I would continue to remove that material using any means possible. Chipping or wedging it off with a putty knife or paint scraper is most efficient if it works. Sometimes you will need to use a narrow wood chisel with a sharp edge. Some material may need to be removed (carefully) with a mechanical sander or grinder.

Once you have that done take some more photos and post them.
 
I started sanding before I took any photos.

Danny, I too am somewhat confused about what I'm looking at in the photos and whether that's actually a Royalex canoe.

Folks make skid plates out of Kevlar felt (which gets most of the criticism), fiberglass (S glass being the best) and other fabrics such as Dynel. The thread you linked is by Mike McCrea. He currently seems to prefer Dynel sleeves and has done abrasion tests whereby he has concluded that Dynel is the most abrasion resistant fabric. However, he usually does fairly narrow, "normal size" skid plates. Your hull damage seems to be over a much larger area than just the narrow stems and keel, so you may need bigger patches than Dynel sleeves would cover, which might incline you toward fiberglass.

I'm no expert on the comparative fabrics or prices, but just trying to help you think some things through without quite understanding the extent and depth of your hull damage.
 
Dynel is sold by the yard (1 yard = 2 pairs + bonus patch material).

I've used the sleeve version as an underlay to beef it up to rock magnet and drag style portaging level. Difficult to wet out (thickened gflex) and too narrow on their own for anything other than boats with sharp ends
 
Well, here Is my 2Cents.

Old skid plates look to be fabric - maybe fiberglass.
I would take off as much of the skid plates as I can get off. Anything highly resistant to coming off I would incorporate into the next skid plate
Use dynel, cut on a bias, for the fabric of your next skid plate, maybe 2 layers where wear is excessive.
Use G flex for your epoxy. Thickened gflex can help fair in an old skid plate
To minimize weight gain and workload I make my skid plates to just cover the area that’s getting abused. I start by making a triangle, on cloth or paper that covers the damaged area. Use a circular object to round off the triangles ends. Once you have a template you like, you are ready to trace onto the dynel.

You've found a good link for photo documenting the repair.

if MCCrea or Pblanc chime in, listen to them as they are quite experienced
I haven't worked with fiberglass before so I'm not positive what was used on the original skid plate, but that's a big 10-4 on removing as much as I can.

From everything I've read, Dynel is the way to go. I really appreciate you (and others!) reinforcing my interest in going that direction.

For durability, I think two layers sounds right. As that gets beat up, I think I should be able to do some touch ups for a while with more G-Flex.

I think I should be able to flatten out the existing plate pretty well, but should I need to thicken the G-Flex what additive do you recommend?

The upside to starting this project now is that I have a pretty good idea of where the high wear areas are. That will make it a lot easier to map out where the new plate needs to cover!
 
I honestly can't make any sense of the photos. There is obvious fabric showing in them but it almost looks as if the fabric is underneath the green and white. If this is a Royalex canoe, that just doesn't make any sense.

If that is not the case and the fabric is the exterior layer, I would continue to remove that material using any means possible. Chipping or wedging it off with a putty knife or paint scraper is most efficient if it works. Sometimes you will need to use a narrow wood chisel with a sharp edge. Some material may need to be removed (carefully) with a mechanical sander or grinder.

Once you have that done take some more photos and post them.
I think what makes it difficult to decipher is that the paint that was applied over the skid plate matches the color of the canoe very closely.

The fabric that is showing is very much a part of the skid plate and not the canoe itself.

Getting it off will take a little elbow grease but it's not a terribly large area and shouldn't be too much of an undertaking.

I am aware that prepping a surface to bond with an adhesive has guidelines. How rough do you recommend the surface be left to be ready for the next steps?

I will update the thread with progress photos ASAP!
 
Danny, I too am somewhat confused about what I'm looking at in the photos and whether that's actually a Royalex canoe.

Folks make skid plates out of Kevlar felt (which gets most of the criticism), fiberglass (S glass being the best) and other fabrics such as Dynel. The thread you linked is by Mike McCrea. He currently seems to prefer Dynel sleeves and has done abrasion tests whereby he has concluded that Dynel is the most abrasion resistant fabric. However, he usually does fairly narrow, "normal size" skid plates. Your hull damage seems to be over a much larger area than just the narrow stems and keel, so you may need bigger patches than Dynel sleeves would cover, which might incline you toward fiberglass.

I'm no expert on the comparative fabrics or prices, but just trying to help you think some things through without quite understanding the extent and depth of your hull damage.
From photos I've seen and what it looks like underneath the outer layer where I've scratched it, I'm pretty sure it's a Mohawk Blazer.

I may find some surprises as I remove the existing skid plate, but I think most of the wear and scraping has been my own doing. I'm cautiously optimistic that it will look okay underneath.

At this stage, I haven't gotten any inkling that using Dynel fabric would be a poor choice for this project. It seems to be a better option than Kevlar felt and Dynel sleeves (which I think are too narrow for my needs).
 
Dynel is sold by the yard (1 yard = 2 pairs + bonus patch material).

I've used the sleeve version as an underlay to beef it up to rock magnet and drag style portaging level. Difficult to wet out (thickened gflex) and too narrow on their own for anything other than boats with sharp ends
I think the fabric is much better suited to my needs.

The bow of the canoe is pretty wide and flat.

I'll be curious to see how easily the fabric wets out in comparison to the sleeve!
 
Before I purchase the wrong thing, in the linked thread from my original post it's stated that "The resin undercoat for the Dynel was roughly fifty-fifty West 105/206 and G/flex."

I understand that this made it easier to wet the Dynel. That makes sense. I'm not positive how necessary is it? Can I get by with just the G-Flex? How significant is the advantage when mixing?

This may be a bigger question than I realize. Apologies in advance if this is the case!
 
gflex 650 will wet out pretty easy, 655 will take a bit more effort. I generally use the 655 because it's so versatile and east to use for really small patches, cracks etc.

Article comparing the two here (scroll down to the gflex section)


You could use two layers of dynel fabric, you could also consider using a few layers of 4 oz s-glass for the underlayers and then just one layer of dynel to finish.

Not an expert but I think the s-glass is good for impact resistance but lousy against abrasion, the dynel so far for me is very abrasion resistant.. I had been using just multiple (5) layers of s-glass and needed to add one or two layers after a hard trip. The dynel addition is new relatively new for me but so far holding up well after a couple of trips.
 
I think I should be able to flatten out the existing plate pretty well, but should I need to thicken the G-Flex what additive do you recommend?
Colloidal Silica like West Systems 405 is a good thickening filler. Mix gradually into epoxy to achieve a peanut butter consistency. I also add carbon powder to give it a black color and avoid trying to match the color of the hull.

Using West System Release fabric (Peel Ply) over the epoxy will give you a nice finely pebbled finished surface and eliminate the need for sanding if you add other layers. of epoxy.

Gflex 650 is my choice for skid plates as it mixes at a user friendly 50/50 ratio

The following is a brief instruction sheet I put together for a friend who was attempting his first skid plate. This might be useful as you move forward with your project.
++++++++++++++++++++++++++++++++++++++++++++++++++++++
Materials for skid plates on Royalex hulls
  • West Systems G-Flex Epoxy
  • Colloidal Silica, for fairing
  • Dynel Cloth
  • Disposable Gloves
  • isopropyl alcohol
  • Graphite Powder(Optional), small bottle black paint (Walmart Hobby section)
  • West Systems Release Fabric (Peel Ply) (Optional)
  • Textured Black spray paint - Rustoleum (Optional)
  • 2' Blue painter tape
  • Masking tape
  • Newspaper - lots of
Here's A Brief Sequence Of Steps To Lay The Skid Plate Down.

Lay the skid plate down starting 10-12 inches down from the bow, or stern. Lightly tape in place.
  1. Lay 2 inch blue painters tape down around the skid plate - about 1/8 inch away from plate. Now remove skid plate.
  2. Sand 60-80 grit the enclosed space
  3. Clean with alcohol
  4. Re-tape any sections damaged by sanding.
  5. Using masking tape, cover the hull with newspaper to prevent epoxy drips on the hull. The masking tape should be placed on the blue painters tape, leaving some blue tape showing.
  6. Mix epoxy (add graphite power and a drop or two of black paint)
  7. Lightly paint the hull with epoxy
  8. With remaining epoxy wet out the skid plate. An easy way is to lay the dynel plate on a long piece of alum foil. Do most of your painting on the foil. Then move plate to the hull and finish off. To prevent movement I tape the foil to the hull near the damaged hull and use that as a platform to paint on.
  9. Watch things as the epoxy sets up and begins to harden, touching up things before they become set. The curves around each end of the canoe can leave small bulges in the dynel. Keep pressing them down flat with your gloved hands or popsicle stick.
  10. Lay Peel Ply (Release Fabric) over the epoxied dynel. Use a plastic scraper to smooth out all bubbles. Let peel ply cure over night before removing.
  11. If you double tape, leave the inner tape in place until after the cure. You'll have cleaner finish, but you might have to spend a little time picking off tape with a razor knife.
  12. After taking all the tape off, re-tape with newspaper and spray paint to achieve a very sharp finish lin

Here's a few things I learned while doing this 8 times one Fall
  1. Cut your skid plates on a bias to prevent stringy edges
  2. Dynel stretches a little bit when wet. So allow for that.
  3. Stringy Dynel ends might remain despite a careful cutting. After you epoxy the dynel down, go around the edge with a popsicle stick and gently push the stringy ends into alignment with the cloth.
  4. West System Release cloth (Peel Ply) will give you a very nice finish and minimize sanding. Try not to lay a fold line in Peel Ply on the epoxy; it will visibly show in the finished cure.
  5. About 3 oz of epoxy will get one 90 sq. inch skid plate down.
  6. Consider making other multiple templates from an old sheet. Put the template on your hull and look at it for a while. You'll want to decide how well it fits your boat - width, length, etc. To make another template decide the dimensions of the taper; e.g. 4 inches at the bow to 6 inches wide near the seat. Then take a yardstick and draw the taper - use something round (e.g. can of paint) to trace out a curve at each end.
  7. Use a double tape method for the epoxy. Inner painter tape, outer masking with newspaper.
  8. For a nice finished look tape close (~1/8 inch) to the dynel before you epoxy.
 
gflex 650 will wet out pretty easy, 655 will take a bit more effort. I generally use the 655 because it's so versatile and east to use for really small patches, cracks etc.

Article comparing the two here (scroll down to the gflex section)


You could use two layers of dynel fabric, you could also consider using a few layers of 4 oz s-glass for the underlayers and then just one layer of dynel to finish.

Not an expert but I think the s-glass is good for impact resistance but lousy against abrasion, the dynel so far for me is very abrasion resistant.. I had been using just multiple (5) layers of s-glass and needed to add one or two layers after a hard trip. The dynel addition is new relatively new for me but so far holding up well after a couple of trips.
That's a great comparison guide, thanks for sharing!!

I think for my purposes I'm not terribly worried about crashing into things (really needing impact resistance).

The times I have scraped it's been a very slow speed affair where I see that it's quite shallow and scrape for a foot or so before I/we can hop out.

This leads me to believe Dynel (two layers!) would be an excellent fit for my needs.
 
Colloidal Silica like West Systems 405 is a good thickening filler. Mix gradually into epoxy to achieve a peanut butter consistency. I also add carbon powder to give it a black color and avoid trying to match the color of the hull.

Using West System Release fabric (Peel Ply) over the epoxy will give you a nice finely pebbled finished surface and eliminate the need for sanding if you add other layers. of epoxy.

Gflex 650 is my choice for skid plates as it mixes at a user friendly 50/50 ratio

The following is a brief instruction sheet I put together for a friend who was attempting his first skid plate. This might be useful as you move forward with your project.
++++++++++++++++++++++++++++++++++++++++++++++++++++++
Materials for skid plates on Royalex hulls
  • West Systems G-Flex Epoxy
  • Colloidal Silica, for fairing
  • Dynel Cloth
  • Disposable Gloves
  • isopropyl alcohol
  • Graphite Powder(Optional), small bottle black paint (Walmart Hobby section)
  • West Systems Release Fabric (Peel Ply) (Optional)
  • Textured Black spray paint - Rustoleum (Optional)
  • 2' Blue painter tape
  • Masking tape
  • Newspaper - lots of
Here's A Brief Sequence Of Steps To Lay The Skid Plate Down.

Lay the skid plate down starting 10-12 inches down from the bow, or stern. Lightly tape in place.
  1. Lay 2 inch blue painters tape down around the skid plate - about 1/8 inch away from plate. Now remove skid plate.
  2. Sand 60-80 grit the enclosed space
  3. Clean with alcohol
  4. Re-tape any sections damaged by sanding.
  5. Using masking tape, cover the hull with newspaper to prevent epoxy drips on the hull. The masking tape should be placed on the blue painters tape, leaving some blue tape showing.
  6. Mix epoxy (add graphite power and a drop or two of black paint)
  7. Lightly paint the hull with epoxy
  8. With remaining epoxy wet out the skid plate. An easy way is to lay the dynel plate on a long piece of alum foil. Do most of your painting on the foil. Then move plate to the hull and finish off. To prevent movement I tape the foil to the hull near the damaged hull and use that as a platform to paint on.
  9. Watch things as the epoxy sets up and begins to harden, touching up things before they become set. The curves around each end of the canoe can leave small bulges in the dynel. Keep pressing them down flat with your gloved hands or popsicle stick.
  10. Lay Peel Ply (Release Fabric) over the epoxied dynel. Use a plastic scraper to smooth out all bubbles. Let peel ply cure over night before removing.
  11. If you double tape, leave the inner tape in place until after the cure. You'll have cleaner finish, but you might have to spend a little time picking off tape with a razor knife.
  12. After taking all the tape off, re-tape with newspaper and spray paint to achieve a very sharp finish lin

Here's a few things I learned while doing this 8 times one Fall
  1. Cut your skid plates on a bias to prevent stringy edges
  2. Dynel stretches a little bit when wet. So allow for that.
  3. Stringy Dynel ends might remain despite a careful cutting. After you epoxy the dynel down, go around the edge with a popsicle stick and gently push the stringy ends into alignment with the cloth.
  4. West System Release cloth (Peel Ply) will give you a very nice finish and minimize sanding. Try not to lay a fold line in Peel Ply on the epoxy; it will visibly show in the finished cure.
  5. About 3 oz of epoxy will get one 90 sq. inch skid plate down.
  6. Consider making other multiple templates from an old sheet. Put the template on your hull and look at it for a while. You'll want to decide how well it fits your boat - width, length, etc. To make another template decide the dimensions of the taper; e.g. 4 inches at the bow to 6 inches wide near the seat. Then take a yardstick and draw the taper - use something round (e.g. can of paint) to trace out a curve at each end.
  7. Use a double tape method for the epoxy. Inner painter tape, outer masking with newspaper.
  8. For a nice finished look tape close (~1/8 inch) to the dynel before you epoxy.
This set of instructions is fantastic!

Thank you so much for sharing.

They will be followed closely.
 
Well.

Today yielded mixed results.

Started by using my trusty screwdriver to poke around under the existing skid plate. I was pleasantly surprised to find that it was willing to come off fairly easily.

Underneath, I was less thrilled with what I found. Overall the color palette was composed of colors I have seen most frequently in bruises between the green of the canoe and how the old epoxy yellowed out. The physical condition wasn't super spongy or soft, but my guess is that some moisture had made it in just based on what I was smelling. Some of the vinyl outer layer was kinda gummy and peeled off pretty easily.

The highlight was a really funky looking spot that I'm still debating what to do with. It doesn't look good, but I also think it's the foam layer and I don't know what it should look like under normal circumstances. I think it looks like the kind of situation that should be sanded down and filled with epoxy based on what I've read.

In other news, materials have been ordered. They should be arriving soon. The timeline to finish currently seems quite reasonable, though I'm prepared for delays should circumstances change.

Photo descriptions:

1. First peek underneath.

2. Angle one of the funky business.

3. Angle two of the funky business.

4. Angle three of the funky business after some light sanding and assessment.

5. Slightly blurry photo of the what it looks like underneath where the bow skid plate was sitting.
 

Attachments

  • IMG_20220722_201157536.jpg
    IMG_20220722_201157536.jpg
    144 KB · Views: 16
  • IMG_20220722_202001049.jpg
    IMG_20220722_202001049.jpg
    153.3 KB · Views: 17
  • IMG_20220722_201225403.jpg
    IMG_20220722_201225403.jpg
    138.8 KB · Views: 16
  • IMG_20220722_201211373.jpg
    IMG_20220722_201211373.jpg
    128.6 KB · Views: 15
  • IMG_20220722_195540336.jpg
    IMG_20220722_195540336.jpg
    201.9 KB · Views: 17
my guess is that some moisture had made it in

it looks like the kind of situation that should be sanded down and filled with epoxy

I've never worked on or perhaps even seen such a moldered hull, but it would seem to make sense to dry those spots as thoroughly as possible via sun or heat gun/hair dryer before filling with anything.
 
Started by using my trusty screwdriver to poke around under the existing skid plate. I was pleasantly surprised to find that it was willing to come off fairly easily.
My, my, my, you have a project. This looks very similar to a royalex canoe I restored that was used extensively in Class II and III water. It had failing kevlar felt skid plates and when I tore, cut, rasped away the kevlar plates it looked like this. The canoe was repaired and dynel skid plates installed about 15 years ago and was returned to WW use; those dynel skid plates are still intact. Here are some suggestions:

1. The deepest oval layer is discolored foam core. You will need to clean this up and fill in the cavity with thickened epoxy.

2. Using a sharp razor knife to trim back any exposed vinyl/ABS until you find the foam core intact with the other layers. Use a sharp chisel, not screw driver, to assist in this effort, flat part chisel tip next to the hull. A razor knife cut on a beveled angle is a useful technique. I would coarsely sand the discolored foam core looking for the more white original color.

3. Think of it as 2 projects, filling the cavity first, followed by a skid plate.

4. Once you get a clean, intact foundation, paint the foam core with a thin coat of epoxy to seal the foam. Let it cure, sand and assess if you have successfully covered everything; if not repeat.

5. Using thickened epoxy fill the cavity. I would add an oval of S glass, 2 inches larger than the cavity, to the top of the filler epoxy. This will provide some structural benefit by spanning the hole in the hull.
 
Last edited:
Yes, your second and third photos show what appears to be exposed foam core. It is the brownish, granular-looking material. That might have existed when the skid plate was installed.

I would start by sanding the entire area thoroughly to remove any remaining adhesive residue and loose vinyl material. Then wash the hull very thoroughly as well. I would use Dawn dish washing detergent in warm water and a scrub brush. You can use that on the exposed foam core as well then rinse thoroughly. That will leave water in the exposed open cells of the foam core. Allow the canoe to dry in the sun, then use multiple applications of denatured alcohol to mix with and remove any residual water in the core cells before applying your epoxy.

Yes, I would use colloidal silica powder to thicken the G Flex epoxy that you use to fill in the exposed foam core. The epoxy will tend to settle down into the cells of the core so a second application is often needed. If you overfill those areas a bit you can then sand the cured epoxy fair to restore the normal hull contour.

The recommendations from West System recommend pretreating the Royalex surface with flame oxidation to enhance bonding strength. I have found that the G Flex bond strength to both the PVC (vinyl) and ABS of Royalex to be pretty good without this, but it is probably worth doing on the exposed solid areas of ABS. I would not flame the exposed foam core, however. It is easy to melt those thin trabeculae of the cells with even a brief exposure to flame. Besides, all those open cells will provide plenty of "foot" for a strong mechanical bond of your epoxy to the foam core.

I think applying a patch of S fiberglass over the areas of filled-in foam core is a good idea. I would even consider applying a patch of S fiberglass over the entire area that had been covered by the skid plate. Then apply a Dynel skid plate as Will Derness has previously described.

I use very much the same procedure as he described but I usually use brown packing paper to construct a template for my skid plate and for marking my fabric. I have found that cloth templates tend to change shape too much as you are marking the boat and the cloth. You can fold the paper template down its long central axis then trim the edges to make sure that it is absolutely symmetrical. I have always used straight, unthickened G Flex epoxy to bond fabrics to Royalex canoes. I do not usually try to wet out the fabric then apply it to the hull because in my hands that has tended to result in a mess. I apply a coat of G Flex to the hull, then immediately and carefully roll the fabric into place, then finish wetting out the fabric. This has given good results in my hands.

I am sending you a PM with a link to a public photo album on Flickr I made last year when I repaired an old Royalex XL13 canoe that had some pretty extensive stem damage with abrasion into the foam core at one end. That required filling and fairing the exposed core, then applying a patch of 4 ounce/square yard S fiberglass followed by a Dynel abrasion plate. Will Derness knows that boat does indeed float as I paddled it with him last year on a downriver trip. The steps involved in that repair were very similar to what you are looking at.
 
HA! It seemed like things were going too smoothly.

When ordering, I convinced myself that two layers of Dynel would by sufficient and opted to skip purchasing any fiberglass.

Live and learn.

Thinking 6oz should be an okay choice for the job.

I like framing this as two individual projects. That makes it a little easier to think about than one marathon. It's also helpful that the first part will be completely covered by the second on the off chance it ends up a little funny looking.
 
After pausing to wait for things to ship, I'm pleased to report supplies have arrived and work has resumed.

Last night I took a razor blade to the the mold.

I cut based on my best judgement. Looking at the before/after photos I'm confident my effort was successful.

After cleaning, applying denatured alcohol, and letting dry I applied a layer of thickened G-Flex. It took a lot more silica to achieve the peanut butter like consistency than anticipated, but we got there. I had intended to apply the G-Flex with a syringe as suggested, but ended up opting to deposit the epoxy into the cavity and spread it out with a toothpick. It was slow going but I believe went well. When finishing I opted to over-fill a little with the intention to sand it back rather than risk needing an additional layer which would slow progress significantly by adding another work day.

Today, the plan is to prep for the glass layer tonight and hopefully get it applied.
At this stage I am weighing a couple of options. Which layers should the graphite additive be used on? The outermost for sure, but is it worth using on layers further inward as well? I believe once the first fiberglass layer is semi-set (I think "green" is the technical term) additional layers (the Dynel outer layer) can be applied without compromising integrity. If this is appropriate, it would save an additional work day.

From left to right the attached photos show the afflicted area, post clean-up, and filled with thickened G-Flex.
 

Attachments

  • IMG_20220801_163518724.jpg
    IMG_20220801_163518724.jpg
    162.5 KB · Views: 8
  • IMG_20220801_171402090_HDR.jpg
    IMG_20220801_171402090_HDR.jpg
    202.4 KB · Views: 8
  • IMG_20220801_185541875_HDR.jpg
    IMG_20220801_185541875_HDR.jpg
    190.6 KB · Views: 8
Back
Top