• Happy Weed Appreciation Day! 🌱🌿🌻

Another Kite Canoe Build

Joined
Apr 21, 2015
Messages
813
Reaction score
400
Location
Livingston, Montana
Hi canoe builders, wanabee builders and other people that like this kind of stuff.

I've been meaning to start a thread for some time with my first attempt at building a solo cedar strip canoe. Starting about a year ago, I got to thinking it was time for me to build a canoe. I friend in Idaho built one a few years back, and though I didn't get to participate in the build, I got to see the finished product. He is quite the woodworker, so at the time I thought it was a little outside my ability. After I found this forum a little over a year ago I saw there were lots of different methods to get to the same place. In the end it took me many months to decide on a boat, and in the end settled on the John Winters Kite. I was looking for a do-it-all type boat that could be used for a wide variety of conditions. I live next to the Yellowstone River, so the boat needs to handle some decent sized waves, but also be good for big lake travel and acceptable in portage and paddle country. I plan to build the boat a little heavy so it can withstand some knocks on rocks.

I started on this in mid-February, just working occasional evenings. Lately I've been at it full time with a few extended breaks. I'm actually well in to the build at this point and am about ready to pull the boat off the forms, but I'll trickle out photos until I catch up to the real-time build. Thanks to all the other forum members who build canoes and share their methods on this forum. Another Kite Canoe build is in recognition of Stripperguys Kite build that I've looked through a few dozen times in the last couple months, Thanks!

This canoe will not be my first boat build. I made a skin kayak last year, finishing it during the winter and took these photos on a cold, windy day in early March on a local lake. I was surprised the lake wasn't frozen.

P1260144.JPG


Who cares about kayaks though? On to the canoe build........

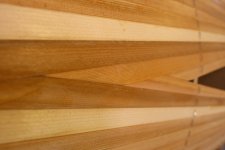
First, I cut all the strips using a skilsaw. Thanks Jim Dodd for all the details. My brother, a woodworker, couldn't believe how nice and uniform these came out. Oh, wait, the first step was to build a strongback. I bought 2 - 16", 16 foot I-beams for $50, screwed them together and used some old concrete soaked boards from last summers project (see, I'm standing on it) for the legs. The I-beams are straight as an arrow and really light too.

canoe01.JPG


Very Nice! I'm very happy with this method.

canoe02.JPG


It took me half a day, including setup and takedown, to cut almost enough strips for 2 canoes. When I was collecting wood for this project I kept finding nice 8 and 12 foot boards when visiting lumber yards in the region so I would buy them. I did buy a few 16 foot boards for full price though.

canoe03.JPG


About this same time I cut all the forms from the plans I bought from Green Valley Canoe. I used 5/8" particle board. Here's a photo of my steaming setup and the stems being formed. I plan to use only inner stems made from cedar. I would have just built this stemless, but the plans didn't have stemlines for stemless construction. Since this is my first build I thought it best to stay with the plan. Note the old Wenonah looking on wondering what's up with all this.

canoe04.JPG


Next up is the bead and cove on the cedar strips. I have one of the cheapest router tables ever made, but it was certainly up to the task once I figured out how to attach the featherboards. This operation took me a full 9 hours, including setup and takedown, which I was determined to do all in one go. It started snowing near the end of this process. I wish I had pictures of the sawdust all over the snow.

canoe05.JPG


I ended up with a nice pile of beaded and coved strips, almost enough for 2 boats. Every one of them was spot on in dimensions. Needless to say, I was quite pleased with how well this part of the project went.

canoe06.JPG


OK, that's enough for today. I'll make another post soon.
 
Welcome to the Kite club!! Let's see...there's Alan, me, Zach (from another forum) and soon you. We're talking exclusive!
I'm very pleased with the paddling performance of the Kite, and especially its versatility. However, being a 60 year old welterweight, my final build weight of 39 lbs is too much to bear for long carries. I have carried as much as 5 miles at a time, so a composite version of the same hull is on the list.

That SOF kayak looks cool, I like that construction technique, but not as much as I like strippers.

Questions:
1. What thickness did you cut your strips? Looks like you'll have a bullet proof hull.
2. Will it be finished bright, or will you paint it?
3. Have you thought about trim? Wood or composite?
4. Open stems or bulkheads (with or without decks)?

Unsolicited advice:
1. Be sure to very carefully sand the knuckle area before glassing the outside. The section is difficult to see, being beyond vertical and lacking compound curves, it shows imperfections better than you will like.
2. Paddle it without the seat in place before you locate any seat support/cleats. Depending on your weight, the design location for the seat may not be ideal for you.
2-1/2. The hull seems very sensitive to fore/aft trim, an adjustable seat is just about a given. A seat support that does not go from gunnel to gunnel is an advantage when shuttling your weight fore/aft to float up/off beaches, beaver dams, deadfalls, etc. Alan has made a floor mounted adjustable seat support, and so have I.

So, c'mon, stop teasing and let's see those photos!!
As you probably have noticed, there is a plethora of builders here, and a couple centuries of combined experience. Take advantage.
 
Great start !
I can think of no more economical, or better way to produce quality strips !
Uniformity in your strips, is to me a must, and it looks like you've accomplished that !
The grain is also right in your strips. !

Two questions. Did you plane your planks ?

And did you run your strips on the router between the bit and the fence ?

You've done a great job of keeping your strips sorted !!!

Jim
 
OH ! nice kayak as well ! I've always wanted to build a skin on frame water craft, just haven't made it there yet !

The skilsaw method amazed me too !
 
Thanks for all the kind words.

Stripperguy, I am using 1/4" thick strips and I'll keep the natural wood finish. I plan on using ash for gunwales and plan to make my own seat, which I haven't settled on a design yet. Thanks for the tip on the floor mounted sliding seat. I have rented a wenonah solo canoe in the past and liked the setup. I can probably use a bucket seat off my big 18' wenonah for a mold right? Maybe I'll just steal the seat off the wenonah for the short term. The glassing is already done, but I think I did a pretty good job on the knuckle area.

OK, on to the next few steps...............


Here I have the strongback leveled and starting to get the forms on. You'll notice a couple of the forms have small chunks of wood added near the gunwale. After I had cut a few of the forms I decided to add an inch of freeboard to the boat. I may trim it down a little bit when I mount the gunwales, but I have long arms and thought I'd like the extra height to keep things dry in big water.

canoe07.JPG


Forms all mounted with stems in place. I was lucky and only had to move a couple of the forms in the vertical direction to get it all nice.

canoe08.JPG


I got the first few strips on and it felt really good. It took me a long time to get my head around how all this stuff fit together and how it wood meet at the stem. Beveling the stem was the most confusing part up to this point. This canoe has a tapered stem, so it starts out wide and gets narrow as you approach the keel. I was pretty unsure of my next move at one point so I just kept it going. This would prove to be a problem later that was easy enough to fix with wood and glue.

canoe09.JPG


A closeup of the joint just below the gunwale.

canoe10.JPG


Once I got around the corner of the knuckle, everything was much easier. The first strip after the knuckle had to be beveled along the entire length, and the bevel angle changes as you go. I was surprised how quickly I was able to do this, and without wasting a strip. I don't know if I mentioned this before, but I have very little woodworking experience and getting past this point was really exciting. I added a light strip of pine between 2 dark strips of cedar to give the boat a little bit of a unique design.

This was about the time that I noticed that I had messed up on the spacing of one form. Since some of my forms were 3/4" particle board and the rest 5/8", I had to calculate how to change the spacing so that it all came together correctly. That being said, I must have added instead of subtracted the difference and ended up with one form about 3/4" off. No big deal, it may be why a couple forms had to be moved a little in the vertical when I was fairing it.

canoe11.JPG


Stripping the boat up to this point was quite enjoyable and went quickly. I really got a kick out of the interlocking method on the ends. The following strips were more of a bear since they go from the flat of the hull to vertical in a very short distance. Luckily my brother came to town for a visit and helped me coax those into submission. You can see in the photo that I also added strips on the bottom, or to the top of the gunwale, to bring it to it's finished height. Note in the photo how those 3 strips at the sheer don't line up with everything further up the bow. I had obviously made a mistake in beveling that stem. I moved forward anyway, but worried how I was going take care of that problem.

canoe12.JPG


OK, that's enough for today. I'll add more photos soon.
 
Nice job of gluing up the strips !
No staples between the forms? Did you use tape ?
I'm really impressed ! Looking forward to more !!

Coaxing a strip or two is normal.

Jim
 
Last edited:
Great start !
I can think of no more economical, or better way to produce quality strips !
Uniformity in your strips, is to me a must, and it looks like you've accomplished that !
The grain is also right in your strips. !

Two questions. Did you plane your planks ?

And did you run your strips on the router between the bit and the fence ?

You've done a great job of keeping your strips sorted !!!

Jim


Hi Jim, I did plane the planks. They were originally 7/8" with the standard rough side. I thought I had to plane them but after setting up the router bits, and running the strips between the bit and the fence I realized that it was an unnecessary step. I didn't plane the long boards I bought from the specialty shop though. They were only 11/16" and I didn't want to lose any more width. In the future I probably won't bother ordering those long boards. I'd rather pay 1/2 the price for shorter boards and just use but joints. The long boards did give me all those really dark strips, so I guess I can't complain too much. Thanks again for your detailed tutorials on ripping strips.

I really always wanted to build a strip canoe. The skin kayak was just kind of dipping my toes in the water of boat building. I was most apprehensive about sewing the skin on, but that turned out to be the most enjoyable part of the build to me.

Mark
 
Yup ! Well done !

I've been picking up a few 12 footers, just because I'm finding them clear. I sort through the #3 and better pile, surfaced on three sides.
Splicing is not that big of a deal with bead and cove.

Jim
 
Mark,

Reading this is like going back in time. My first build was also a SOF kayak using the fuselage method and I followed that up with a Kite. I was very nervous when I started the Kite and was not confident I'd be able to complete it successfully. Like you there was lots of head scratching and trying to figure out how all this was going to fit together and I made a few mistakes along the way because of this. But they were all easy enough to fix and I learned a lot. The next one was much easier.

You're doing great.

Alan


That's an interesting coincidence Alan. I too probably should have chosen a simpler design for my first stripper. That being said, I enjoy the challenges and if past experience holds, all the lessons learned on this boat will serve me well in the future. Thanks for your encouragement.
 
OK, where was I?

Actually we went to southern Utah for 2 weeks around this time. My wife and I spent a week canoeing the lower Green River to the Colorado confluence with some friends and another week backpacking in the Cedar Mesa canyons. The lower section of the Green River through Canyonlands National Park is only about 50 miles of paddling, but there are lots of opportunities for hiking in the side canyons and a fair amount of Anasazi ruins and pictographs to check out. This is my second trip down there and I could easily add another 3 days to the trip. Here are a few pics.

utah1.JPG

utah2.JPG

utah3.JPG

Of course I bored my friends and talked too much about my canoe build during the trip, but I really had a difficult time keeping my mind from wandering back to that subject.

As I said before, I struggled with the last few strips at the turn from the bottom to the stem. Jim asked how I kept the strips together between forms. I did indeed use the tape method with little scraps of the bead side of a strip. The index fingers on both hands are just now feeling back to normal. I think I gave myself a little tendonitis from trying to squeeze those strips together. Prior to this point I wondered why people talk about stripping with the bead side up, now I know why.

canoe13.JPG


While stripping the football area I decided to deal with the bow and stern issues. You'll remember in a previous post that I didn't quite get the shape of the stems quite right. As a result, the first strips above the knuckle didn't quite line up with the strips below. I decided to just cut ends of the strips off leaving this gap.

canoe12a.JPG


Then I just glued a triangular shaped block that I roughed out on the bandsaw into the slot. Later I planed the protrusion off and sanded the end round. Problem solved.

canoe12b.JPG


Here's the stem repair all glued up with the criss-crossed strips trimmed off the ends.

canoe14.JPG


OK, we're getting there. Notice that I used a pattern on the bottom instead of cutting a straight line. Although I now see that others use this pattern, I came by it quite by accident. I got to the point where I was supposed to start thinking about stripping only one side, then cutting the straight line along the center. Cutting that center line really intimidated me for some reason, so I just fit one end and overlapped the other. I drank a beer and stared at it for an hour and decided I could go all the way with this. I think it took longer, but it was also satisfying getting each piece to fit well. I was able to really speed things up once I realized I could use the bandsaw to do a rough cut, then sand it down for the final touch. Also, using a but joint somewhere along the strip meant that I could do one side independently of the other, then just take a little off the butt joint end to get a perfect fit.

Speaking of but joints, or is it butt joints? A couple of times I forgot to trim off the ends of my strips, which meant I had to trim them off in place on the boat. Why? Most of my boards came waxed on the ends to keep the wood from splitting. I don't know if it would make a huge difference on just a couple, but the wax would certainly keep the ends from getting glued and I'm sure the epoxy wouldn't be able to get in there either. Just a heads up for the butt joint crowd.


canoe15.JPG


A closeup of the pattern.

canoe18.JPG

And here we are with all the stripping done and a few of the staples pulled. That last strip was a PITA. I probably should have tossed my first attempt and tried again, but sometimes it's just better to be finished.

canoe16.JPG


I couldn't help starting to pull staples right away after getting that last strip installed.

On a side note: Notice inside the cockpit of the kayak on the wall. I made a greenland style kayak paddle one day while waiting for the glue to dry on some strips. I had found a nice dry cedar 2x4 at the lumber yard earlier in the winter. It's only roughed out at this point, but I'll get back to it in the near future. I hear that these paddles are much easier on the arms if you're like me and have issues with tendonitis. There is a really good .pdf you can download on the internet by a guy named Chuck Holst. All you need is a bandsaw and a block plane to make one. There's also a really good youtube video that goes right along with the Chuck Holst instructions. Just google "greenland paddle instructions" and both of these come up right there on the first page. I think it only took me a couple of hours total time to get it roughed out. I keep meaning to round off the blade tips and use some of my leftover epoxy to make epoxy blade tips. I should probably focus on one project at a time though.

And here's a side view. I'm quite please with how it came out and I like the pattern I made.

canoe17.JPG

Alright. This seems like a good place to stop for now. I'll try to get this thing completely up to date with my next post, hopefully today since I'm at a stopping point and I have questions for my professors. Thanks for looking. Mark
 

Attachments

  • canoe18.JPG
    canoe18.JPG
    87.7 KB · Views: 16
I got to the point where I was supposed to start thinking about stripping only one side, then cutting the straight line along the center. Cutting that center line really intimidated me for some reason, so I just fit one end and overlapped the other. I drank a beer and stared at it for an hour and decided I could go all the way with this. I think it took longer, but it was also satisfying getting each piece to fit well.

More deja vu. That's the way I did my Kite too and for the same reason. Cutting that center line was very intimidating. On my next two builds I ran two or three strips right down the center and then filled in on either side. On my 4th build I finally decided to try cutting the center line and it was so stupid easy that I kicked myself for not doing it sooner. It's so much faster only having to cut the miters on one side.

Also, using a but joint somewhere along the strip meant that I could do one side independently of the other, then just take a little off the butt joint end to get a perfect fit.

I still do mine this way. I don't even try to cut the miters on both ends of one strip.

When I did a boat with an inner tapered stem, the way you're doing yours, I didn't join the strips in front of the stem. Rather I beveled the side of the stem so the strips laid nice and flat against the sides and then cut them off flush. So after sanding the "inner" stem is exposed and rounded over on the face and gives the canoe that nice look of a vertically tapered stem (wider at the top). Yours is perfectly fine but won't look any different than stemless construction.

20150304_001 by Alan, on Flickr

20150320_002 by Alan, on Flickr

You're doing great work so far and you seem to have figured out pretty quickly that any mistakes can be fixed pretty easily with a little head scratching.

Alan
 
Great fun to watch another build and relive the challenges I considered in the build process. Nice looking boat. Thanks for sharing.
 
Thanks for your insight Alan.

Here's a current issue I have that I thought I should ask everyone about while the epoxy is still green and before I bring this thread up to date. I have finished what I think is my final fill coat and I end up with these little holes or divots in the expoxy all over the hull. They are as if somebody went around and poked a pushpin in everywhere. Some areas of the hull have fewer or none of these and other areas have more. I noticed them on the prior fill coat and thought they would fill, and some may have, but they seem to persist anyway. Have you seen this before? Do you have an idea what's going on? I think I'm ready to sand but I'm not sure if I need to put another coat on prior to that. It seems I've got plenty of expoxy on the hull at this point, maybe too much already with the exception of a few small patches. The temperature in the shop was in the low 70's yesterday and didn't really fluctuate during the application. Will the varnish coat ultimately fill these in after sanding? Any words of wisdom? Thanks, Mark
bubbles1.JPG
 
Last edited:
I've had those before but not to that extent. In my case it was usually caused by not enough resin used to wet out the fiberglass. I think I was going a little heavy with the squeegee and removing too much. As a result the strands remained clear but there would be a hole in the weave rather than being filled with epoxy. Other times I'd have an air pocket trapped in the epoxy and after a little sanding it would open up and cause similar looking pinholes.

Like you've found out epoxy isn't very inclined to fill those holes no matter how much you brush on. It will look like it filled them at first but in reality there's a bubble trapped in there that will soon expand, pop, and leave your hole virtually untouched. Varnish, being so thin, might fill them but it might not too. Or maybe some but not all of them.

I've found the best way to fill these with epoxy is with heat (warm shop) and a squeegee. You want the resin to be as thin as possible (warm) and pressing it with the squeegee usually seems to do the trick. It won't take much resin to do the whole hull since you're not really building a coat. Pour a little on the hull and start working on it with the squeegee. As holes start to open up hit them again with squeegee. You can move pretty fast and sometimes you might have to keep pushing resin into the same hole half a dozen times before it finally purges the air bubble and lets the epoxy in. The squeegee will leave some lines and heavy/light spots but that's ok as they aren't severe and will quickly disappear when you sand the finish flat, which you'd do anyway.

You can either do it now or sand it first and then fill in whatever holes are remaining. But you'll have to sand it one more time after the squeegee job. Or just say forget it and let the varnish do its thing. Maybe it fills them all, maybe it leaves some.

Alan
 
I agree with Alan. If the epoxy is still green, you can spread some epoxy around with a squeegee and fill those holes-- you'll have to babysit the job for a couple of hours until it stops sagging.

The other alternative is to let it fully cure for a couple of days and then lightly sand the entire hull and put on another coat-- not as bad as it sounds, and the next coat will be very thin. Sand with 220 (or the finest grit that will do the job) on a foam longboard at 45 degrees only, in both directions.

Consider using Dura Block automotive sanding blocks (or similar) with stick-on sandpaper that comes in a roll. My most used block is the 2-footer, but I also use a 30-inch on the football. They're made of 2" X 3" EVA foam, they're firm, and they flex in all directions. These longboards are thick, and very comfortable to use. Just a suggestion-- I understand everybody has their own favourite techniques.

It looks like classic out-gassing: when the epoxy warms up during cure, small micro-pockets of air trapped in the terrain of the wood (or inside the fibreglass cloth) expand into the epoxy coating. The bubble bursts, but the epoxy is too viscous to lay down and you're left with a crater.

One strategy for reducing out-gassing is to heat up the shop overnight before applying the epoxy, and then let the room cool down during the curing period.
 
Last edited:
Thanks for the tips Alan and Peach. I think my best bet is to let the thing cure over the weekend, do some sanding and go for it again next week when the temperatures are a little cooler around here. I read in other threads about having the shop initially warm and letting it cool while the epoxy sets for this very reason. That's how I did it for the seal coat, but by the time I went to wet out the fiberglass and do fill coats the weather around here got warm, which made it almost impossible to control the temperature in the shop. I'll crank the heat in the shop one evening next week to get everything warm, put the space heater under the strong-back to warm up the hull, warm up the epoxy, then turn down the heat and apply another thin coat to try and fill all the little holes, all while the shop cools in the morning. I did notice just a moment ago that almost all the out-gassing occurred on the bottom of the hull and there's relatively little on the sides, that should make it a little more manageable.

Other things that may have exasperated the issue is that I was definitely stingy on my epoxy usage on each coat, and that I started using a foam roller on the first fill coat which introduced air bubbles too. All of this in addition to the fact that I did all the epoxy and fiberglass work solo, which overwhelmed me for a little bit, especially trying to deal with that sharp knuckle on this canoe. Of course I didn't ask anybody for help, but that's just how I am.

Peach, I'll check on those Dura Block sanders. Thanks Mark
 
Back
Top