• Happy National Audubon Day! 🐣🐦🦅🕊️

Well, if I'm building a canoe....

Joined
Mar 21, 2015
Messages
451
Reaction score
24
Location
SW Wisconsin/Driftless
I might as well try my hand at a paddle as well. My last ones were a bit oversized and sort of crude, but serviceable.
I've been watching some of the paddle threads, and its time to join the fun.

100_4173.JPG 100_4174.JPG

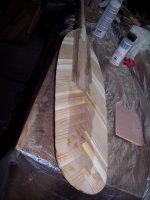
I actually managed to salvage all of this from the scrap/offcuts pile. If you think that cedar blade looks familiar, go find the shop mistakes thread. I you look closely, you will see a rather odd pattern on the hand grip piece. This was an experiment that will end up being cut back to a rather more conventional grip, more like what some of you call a 'pear.' The upper shaft/grip was pinned to the main shaft section, but I think I would rather have used something more like a finger joint.

100_4175.JPG 100_4180.JPG

When all of your small, easy to handle clamps are in use, you improvise. The Cherry shoulder piece in the left photo did get better centered while the epoxy was still open. I'm not worried about the fabric print on the blade, as I'm intending to feather it to less than its current 1/4 thickness. The blade and shoulder area will be glassed.

Lets talk numbers:

I'm 5'11" and somewhat slight (135#, wiry)

Shaft length, top to shoulder: 27" Measuring references suggested I try 29", but in experimenting the 27" seemed better.
Blade (max) is 6 1/2" x 23 3/4"
Blade area, once curves are taken into account, would be better estimated as less than 6" x 23", or 138 sq. inches.
 
I think that if you have been experimenting and the shorter is more comfy then go with that. If you're looking to use finger joints to Attatch the grip, why couldn't you start long first and cut it down later if it's too long?
 
I have not had much chance to work on the paddle between finishing up the canoe. So far, just some basic forming with hand tools. With this particular way of building a composite blade, I will need to switch over to abrasives sooner rather than later - feathering in the blade spine will be interesting.

100_4280.JPG

I tried an octagonal cross section down near the shoulder, but it never felt quite right. I'll stick with oval. The maple that I used for this one has a bit of a skew grain - runs diagonally through the piece. Just enough that there is a definite 'right' and 'wrong' way to run the planes and drawknife. That will be something that I have to watch in the future, but since its a laminate, I'm not concerned about strength.

Just for kicks and giggles, here's what I came up with the last time I built paddles: The blades are full 1/4" thickness layup. No feathering at all.

100_4281.JPG

They've served, but I had not done any research on sizing. Note the 48" straightedge included for scale. The smaller one on the right has already had the shaft cut down once, and I'll probably do so again, just to have a workable paddle - the new one is looking to take a while. Having used it a bit, the big one on the left is just insane. I'm considering cutting the blade on that one down - I think I have enough meat for a reasonable beavertail or something more like an ottertail with taper shoulders. Unless someone can suggest a reason to have a paddle with a blade 8"+ wide by maybe 25" long?
 
Decided to go ahead and trim the giant. This is what I end up with:

100_4288.JPG 100_4289.JPG

Just Sealed the edges with some resin, and blocked in the blank for a new handle. This one is for experimenting, so not worrying about long term use - no way to feather the edges without having to re-glass. Kept the shaft longer, this might be better for kneeling.
 
After some learning experiences, My new paddle is getting close to being ready for glass.

Lesson#1: There's a reason that every other paddle builder starts with a fairly meaty blade blank, even for a finely feathered blade.

100_4345.JPG 100_4354.JPG

I had not built enough into the backer to transition from the blade to the spine. Fixed that with some more appliques. Yes, its a hack that I don't want to repeat. I think I'll survive. I like how it faired out. The lower hand grip, right above the shoulder is deep, something like 1 3/8" for a good, solid grip. The shaft feathers down significantly from there.

Yes, the weird up-hand grip is going away. Its currently on my "What was I thinking?" list.

100_4359.JPG 100_4355.JPG

Of course, the appliques were not fit perfectly. So, filled them. One more reason to do it right from the beginning. I'm wondering if I went overboard on the feathering for the blade. looking down the length, the portion where you still see traces of a clear epoxy layer in the center are at 1/4" but at the edges, it's down to 1/8" this thing is currently fleexxxxy. I could probably turn the tip of the portion beyond the spine 90 degrees.

I expect that glass on the blade will stiffen it significantly, but I'm wondering if anyone has ever needed to add an extra layer of cloth down the spine? I intend this one as a deep-water paddle. I'll keep the chunkier ones for banging on the bottom of a river.
 
On my paddles, I typically put a rub strip at the end. Usually phenolic sheet, occasionally fiberglass board (1/8" thk, from MsMaster-Carr).
My blades start out the same thickness as my hulls, they're the same strips!
4 oz cloth on both sides, up and over the "spine". A few are now over 25 years old, still very stiff, glass, resin and tips are holding up pretty darn well.
 
stripperguy Thanks for the feedback. For some reason, I did not check the forum before project day on Monday, so I missed your post. I'd be interested in seeing one of your paddles, or a pointer to a thread that already has pictures. This blade was built out of leftover 1/4" strips, so I know what you mean!

100_4361.JPG 100_4362.JPG

Sanded back my putty. Not having read the above, and not wanting to take any chances, I decided to run a second layer of 6oz. down the spines. Perhaps its overkill.

100_4363.JPG

I tried something new to me. I used a disposable chip brush to lay a generous coat of resin on the cedar first, and gave it a few minutes to absorb. The glass went right on, with enough resin to wet out, and the polyester 'Peel ply' went on top of that. The off-white polyester lining fabric from walmart wets out almost clear, and you can see what you are doing. I was going to use a squeegee to smooth things down, but it was not cooperating. I ended up just using the brush to smooth stuff out. I was able to see through the polyester where pinholes would be forming, and then just brushed on some more resin from above. It would flow right through, and end in the glass, where it needed to be.

100_4364.JPG

For a bit of wear protection, I un-wove a bit of scrap cloth, and wet the strands out around the tip. Its actually wider and deeper than it looks here, not sure whats up with that.

100_4365.JPG

Overall, We'll have to see how it serves. At the end of the day, it was still soft enough that I didn't feel comfortable pulling the poly. Has anyone tried hotboxing small projects like this to get a somewhat faster cure time? I did notice one small pinhole location, but I expect that with practice, that will be reduced.
 

Attachments

  • 100_4361.JPG
    100_4361.JPG
    248.8 KB · Views: 0
As a bit of a side note, I tried out my re-profiled old paddle. Now its something like an ottertail. It works well for straightaway paddling when I can reach deep. Not so good when I'm in shallow water - can't get deep enough to apply power.

I've also noticed that it does not grab as well for not-straight paddle strokes, such as a 'duffek' or the correction at the end of a solo stroke.
 
I'll take a few photos today, and include a tape measure in some to show dimensions. My paddles have a great catch, favorable flex in the shafts (to avoid tennis elbow, so far anyway) and some are over 25 years old and still going strong. Interestingly, the phenolic tips are now wider than the blades, after years of the blades being slowly eroded away at the sides. The photos will explain it all.
 
Looks well-loved. Don't worry about the timing.

Only 14 oz? Is the entire shaft cedar?

I can see how that joint works, and I like it. I've king of got a bent shaft in the back of my mind, perhaps the next paddle...

Hopefully, I see how the glass turned out tomorrow & get a chance to finish up the shaft and hand-grip among other things.

Shaft is actually pine, two pieces of 1 inch (3/4" finish) laminated together. Just enough flex to keep the tennis elbow at bay. I also have a pair of straight shaft paddles that I keep under the deck of my sailboat. Those were originally glassed with polyester resin, later stripped down to bare wood and reglassed with epoxy. And I've got a couple little bent shafts that I made for when the kids were young...32 inch OAL. Just right for the 6 to 10 year old crowd.
 
Been a while, but I have done some work on the paddle between other things.

100_4390.JPG 100_4393.JPG

After removing the peel ply, and starting to scuff the surface. (Again, didn't get back to it while it was green) Next time, I need to remember to iron the peel ply if its been sitting in a bag in the shop! This only happened on the face that was pointing downward, the other was nice and even. A painted-on skim coat was allowed to self level. I ended up with more pinholes in the glass than I anticipated, all down between the layers. I know that these areas were fully saturated when I laid it up, so I'm not sure what happened.

100_4402.JPG

The paddle in its natural habitat. I didn't get the hand grip finished, but decided to test the blade shape. Don't worry about the pea soup, that was only up against the shore, and my camera seems to have decided to emphasize it.

The blade is much better suited to in-water retrievals, though that technique is looking to be a carefully acquired skill. The long blade has a lot of leverage for ruder-type steering, and I was able to experiment with some of the Canadian-style strokes from a rear seat position.

I have not wieghed to find the exact difference, but this paddle is noticeably lighter than my others, and seems to be balanced better. Perhaps more of a balance difference than weight difference.

I noticed that I tended to sink the blade all the way to the haft, and then some. Deep enough that the deep grip, 1 1/4" was getting into the flow and disrupting my retrieval. When really digging in to paddle, my lower hand is usually wet to the wrist. I'm wondering if that is a symptom of an issue with how I hold the paddle, or too long a shaft for my style, or what.

100_4407.JPG

And this, dear children, is why we topcoat all epoxy surfaces. That cloudiness is not scum or a film. It's UV dulling from just 2.5 hours on the water. Its thin enough that it will come out when I scuff to prep for a proper topcoat, but Woah!
 
Last edited:
Pinholes in the cloth. I'd like to nail it down as to the cause with your help !
​ The temps this time of year should be fine.

Did you work with any aerosols in the shop ? WD40, spray paint, bug killers ,etc., while glassing ?

What resin did you use?

My procedure for peel ply was to wet out the cloth, squeegee, and lay on the polyester Peel Ply, and squeegee again. I did not apply resin on top of peel ply.
Is that what you did ?

Just hoping we can figure the pinhole problem out !

Jim
 
Jim, we do sometimes use aerosols in the shed, but not right in the woodshop area, and nothing would have been used for several days at least. The shed is pretty well ventilated, and on good days, I often work with a total of 24' of garage door open on two sides of the building.

Resin was SystemThree clearcoat. Temps were in the 70's and probably decreasing a bit during the gel-up time.

I couldn't get my squeegee to work on a small piece like this, so I wet out with a 1" disposable chip brush. Firm enough to push the cloth around. I made sure that I had what seemed to be ample resin - the cloth was starting to float in some places. The peel ply was then brushed into the surface. Didn't take much, for the most part it wicked just enough resin through its pores to lay flat on its own. Since I was using a light cream, it was transparent, and in a few spots I could see where there was not enough resin to fill a cell in the weave. Brushed fresh resin over the top of the peel-ply, and it sank right through - no film left on top.

The pinholes that I see are not in the surface, but under it. Exhibit A:

100_4408.JPG

Look how these gaps are at an angle. This means that they are actually down in the lower layer of cloth, which was cut on the bias. Note, also, the slightly wavy dark line where the wood grain changes color....

100_4410_touched.JPG

Sorry for the crazy color balance. That's what I get for trying to play with contrast to get past a bunch of surface glare. These are not as deep as the last, but I still believe that they are on the underside of the upper glass layer. They certainly don't leave any edge fro a fingernail or pin to grab on.

Now, something to note: Remember that wavy line? Both of these samples are from right down the center of the blade. This particular blade glue-up is salvaged from another project. It was glassed once before, and the resin that saturated the surface at that time is still present in the thicker sections of the blade. There is no way that either of these examples are off-gassing from the cedar substrate, it was thoroughly sealed a long time ago.

Have fun with the mystery!
 
Been a bit since I posted here. I have gotten this paddle finished, and tested in the final configuration. I ended up taking even more off the shaft length than I anticipated, perhaps down to 25" at the shoulder. This significantly reduced my tendency to dip my shaft hand in the water.

I shaped sort of "Fat T grip" out of scrap, which feels nice in hand, allows me to apply some torque for feathered strokes, and allows the entire paddle to rotate in hand for what some call a "Canadian Guide Stroke." For the next paddle, I will make this grip longer/wider - I have narrow hands, and still feel that it is just a little too small.

I finished the shaft and grip with several coats of Boiled Linseed oil. This will probably need some further work over the winter, and into the spring, for a good finish. I do prefer its feel to that of a varnish surface.
100_4472.JPG
 
Back
Top