• Happy Weed Appreciation Day! 🌱🌿🌻

Utility thwart/platform in bow of tandem

G

Guest

Guest
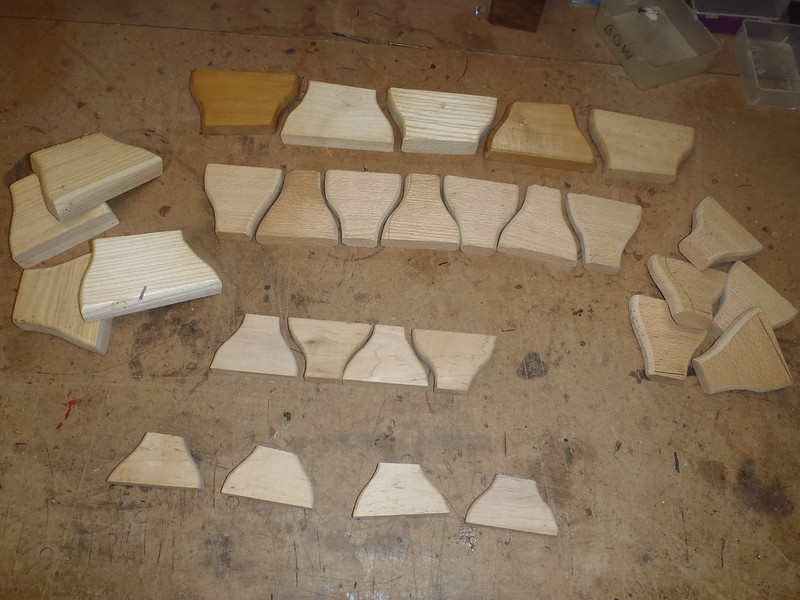
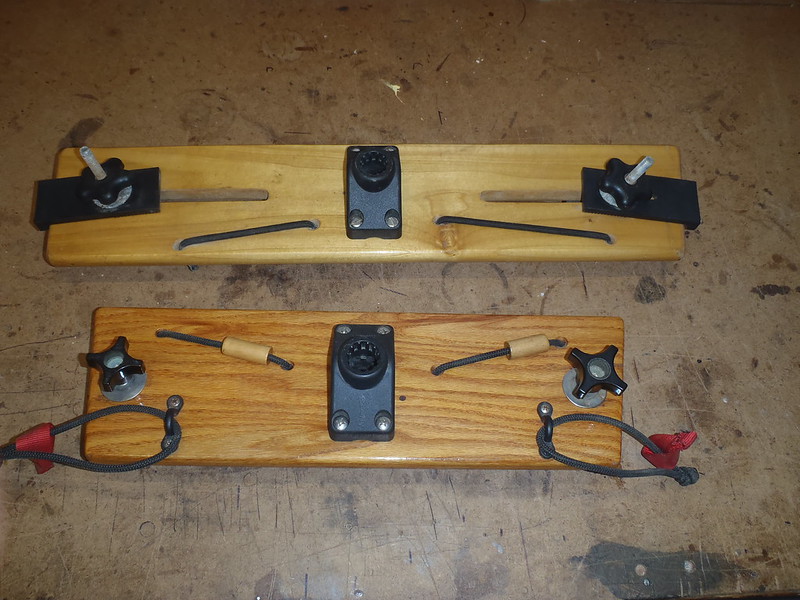
We have a utility thwart (sail mount, compass mount, map case hooks, lateral bungee to tuck misc gear under, etc) in front of the center seat in almost all of our solo boats. Early on I made them more Dr. Seuss shapely.

PB081336 by Mike McCrea, on Flickr

But decided that wider was more accommodating

P1220461 by Mike McCrea, on Flickr

And eventually went simply using to a straight length of 5 ½” wood, with more space for a mounted compass, which is good when map reading and a huge boon when sailing.

None of our big tandem boats have utility thwarts; we just don’t paddle tandem anymore and I never thought to provide one up front for bowman use.

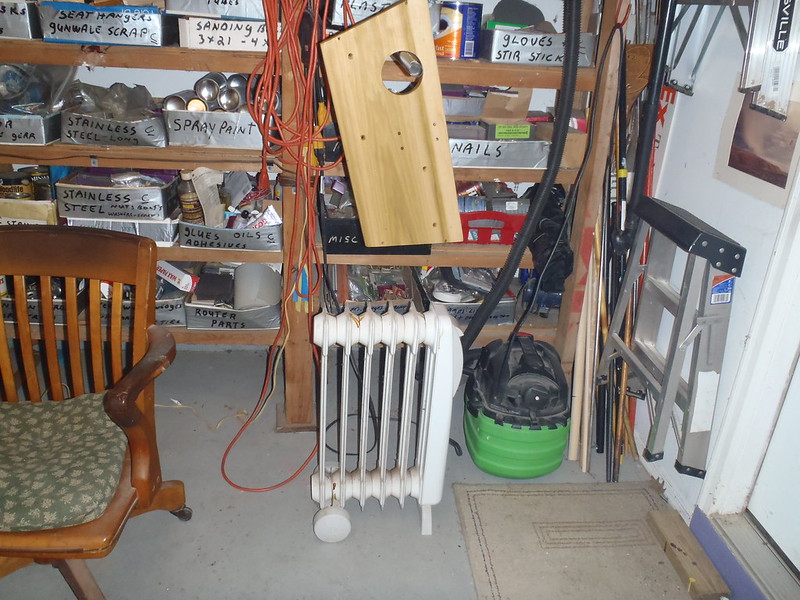
Having hauled the 20 foot Miramichi into the shop to re-install the third seat it was time to stumble down another experimental outfitting road, installing a permanent utility sail thwart in front of the bow seat. I thought about making another custom sized clamp-on, we have a couple spares.

PC071385 by Mike McCrea, on Flickr

But have come to appreciate the function of those utility/sail thwarts so much that I know I want one always available, and not “Oh heck, I forgot to bring it”.

I typically make solo canoe utility thwarts 5 ½ inches wide to accommodate a downwind sail mount and other outfitting geegaws, including a compass, but I can foresee enhanced width function in a narrower bow paddler platform. The canoe already weighs 110 lbs, what’s another pound or two; go big or go home. Or go out to the shop.

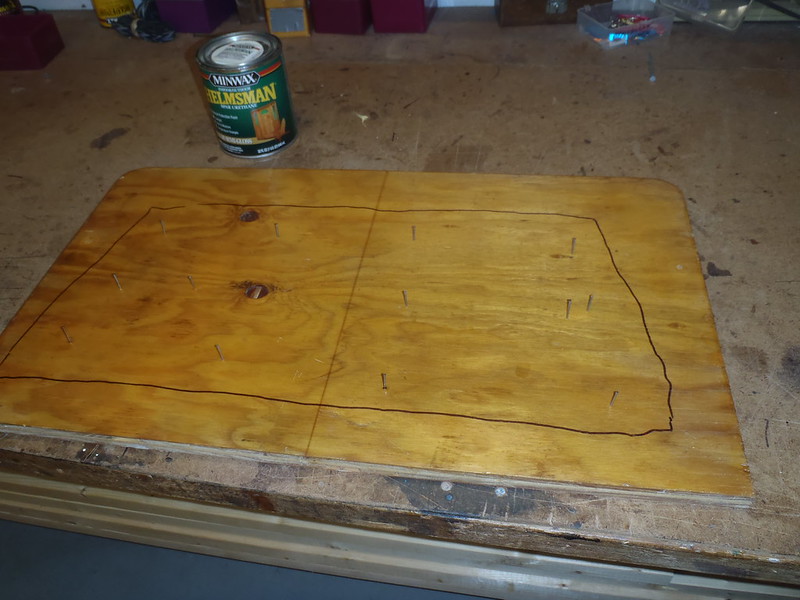
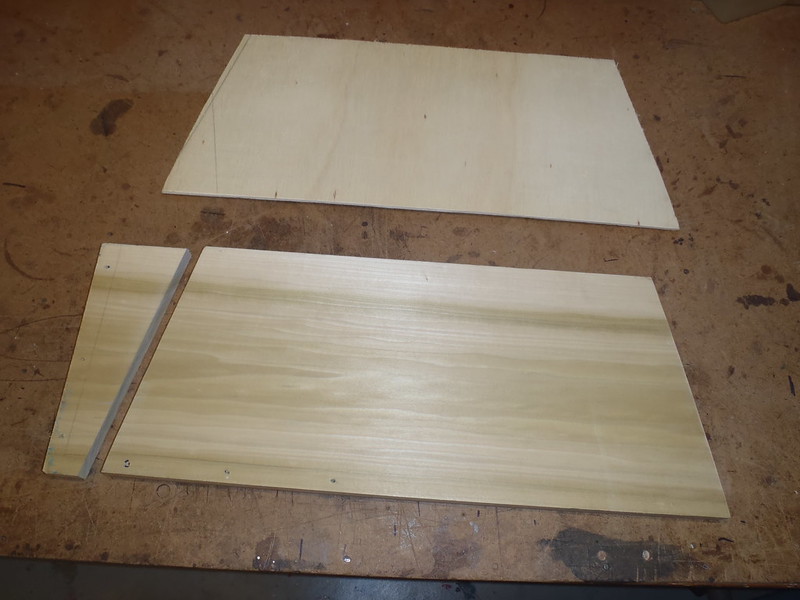
A 9 ½ inch wide utility thwart should provide plenty of outfitting expanse. First, a template cut from scrap lauan to get the size, angle and fit right before I cut any good wood.

On solo canoes I install the utility thwart at an ample leg, knee and reach comfortable, 20-22 inches from the front of the seat edge on solo boats, but with a bowman able to lean further forward while the stern is in control of the canoe, I can comfortable put the utility thwarts a few inches further forward.

That’ll do, 25 inches away from the front edge of seat, plenty of room for even lanky folk’s legs or for kneeling, and still within reach when leaning forward.

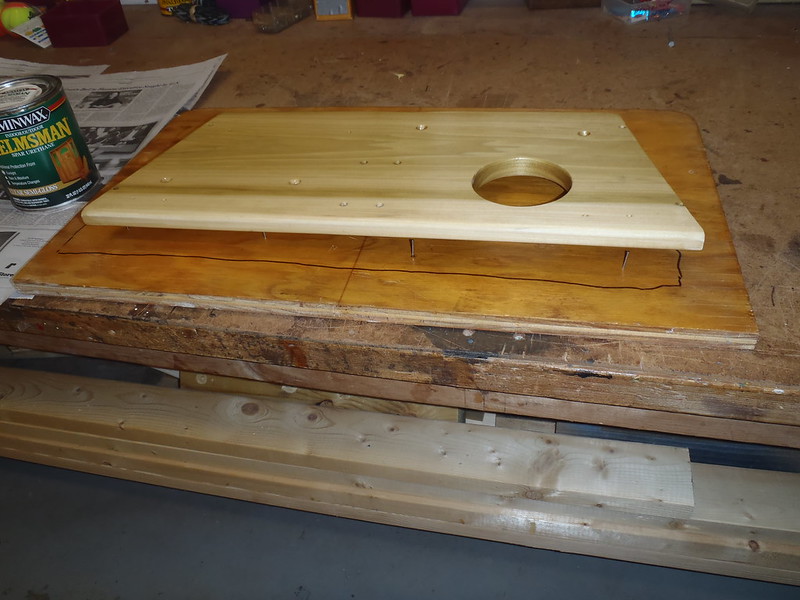
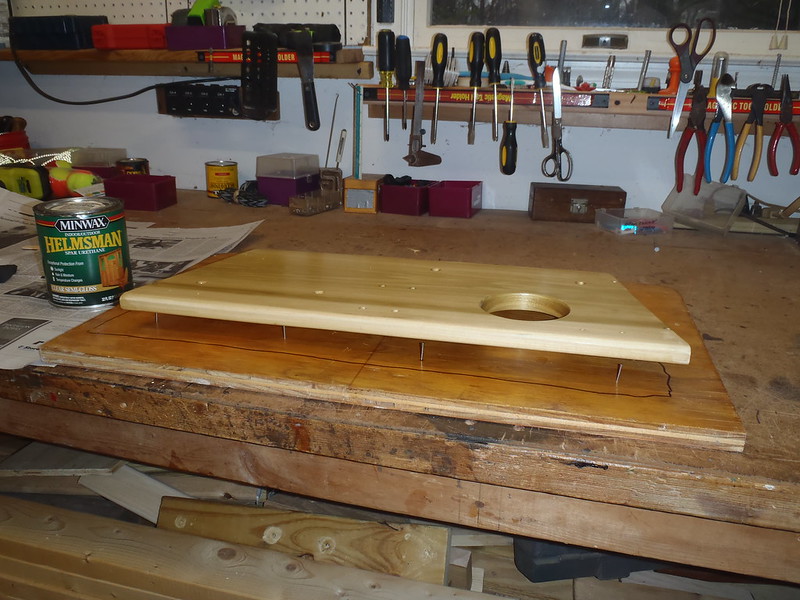
Run the edges through the router, a little sanding and drill some holes for the machine screw hardware. I am not a fan of brightwork fitted tight against the edges of the hull. The butt ends never get any air to dry out, and sometimes that tightly fit stuff squeaks.

Some tongue depressors (Craft Sticks) taped temporarily on the butt ends provides an evenly spaced 1/16” gap on either side before drilling holes for the machine screws.

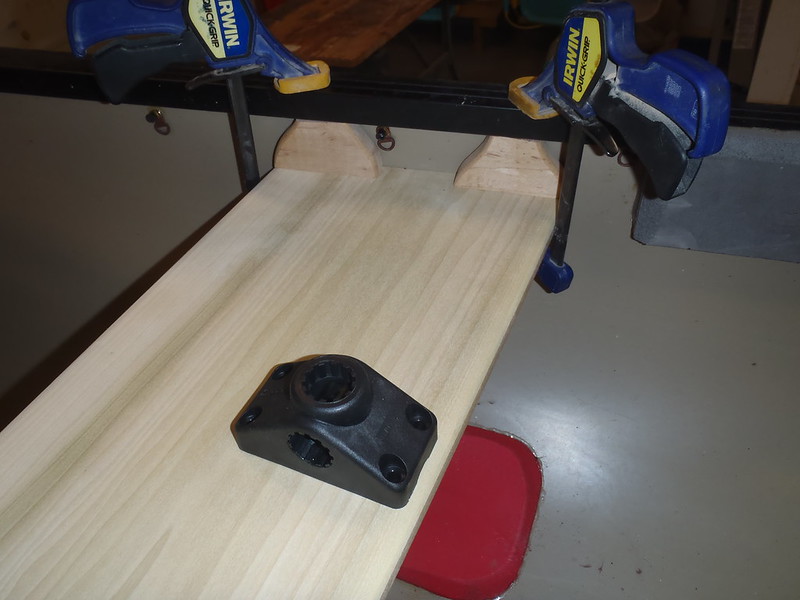
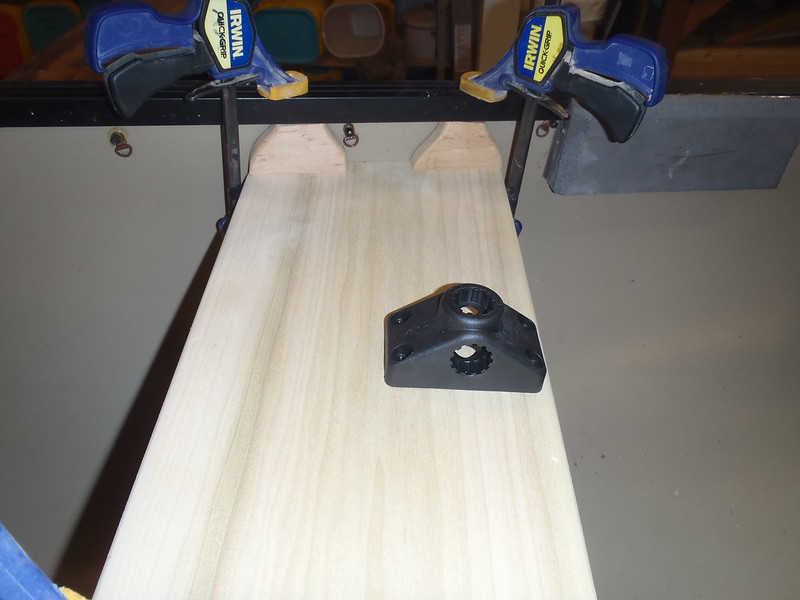
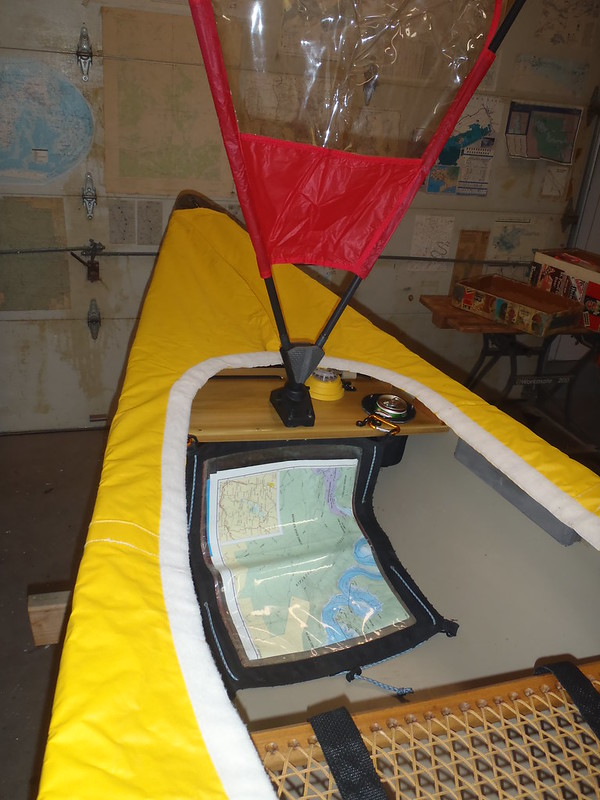
Double hung with two machine screws on each side; this utility thwart may need to withstand some sail stress. Through-inwale machine screws and flange washers temporarily installed. Time to position some outfitting in place. First and foremost, a centered base mount for a downwind Spirit Sail.

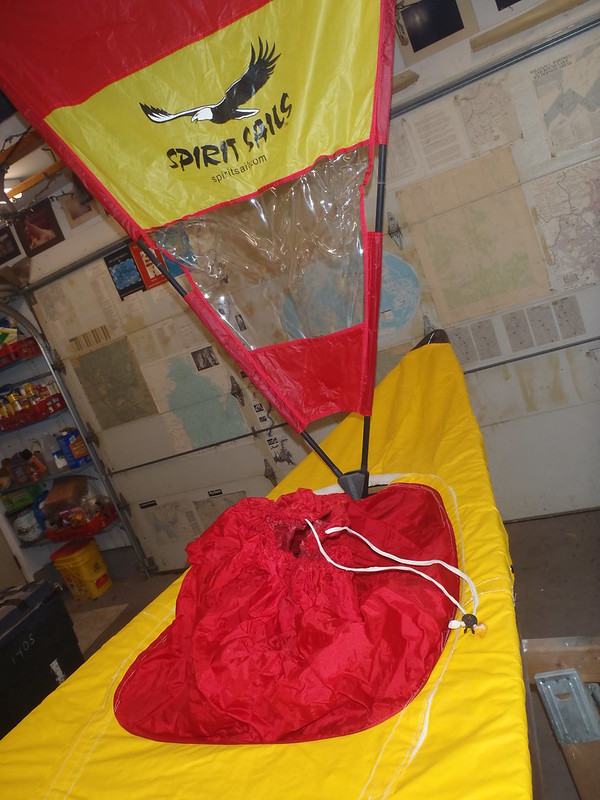
It’s a big boat (20’ long x 40” wide), it could use a big sail, and I have a large size (23.6 sf or 2.2 sqm) Spirit Sail. The large size has proven to be too much of a handful in a solo boat, at least in anything more than the lightest of winds, and that large size SS has scared the crap outa me a couple times when the wind picked up while in a solo canoe.

But it should move a big freighter along comfortably. Especially if the sail is the responsibility of the hands-free bowman while the stern attends to business. Time to figure out what else beside a sail mount I want placed where on the utility thwart, and then drill some more holes

In our solo canoes the 5 ½ inch wide utility thwarts are twice as long side to side, and even then they get crowded. With only 14 inches of thwart length in the bow I needed the extra width to fit all of the usual (and unusual) accoutrements in place

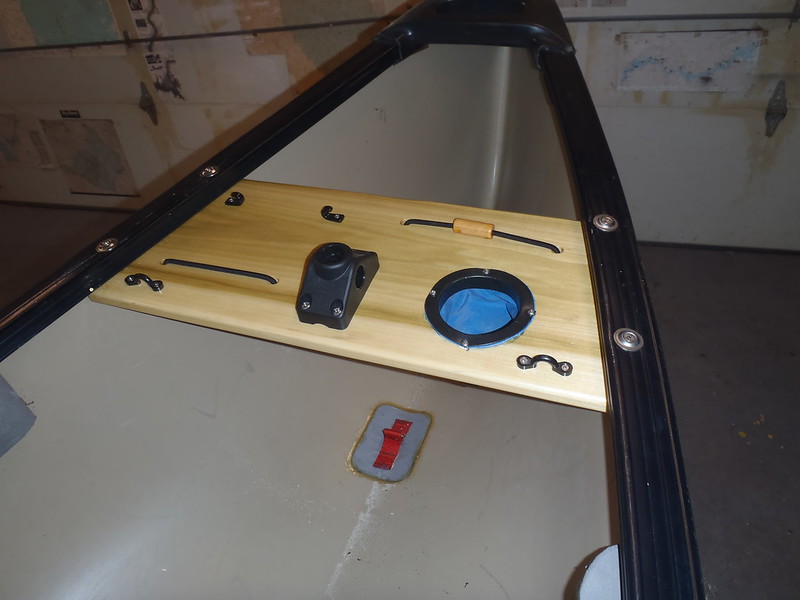
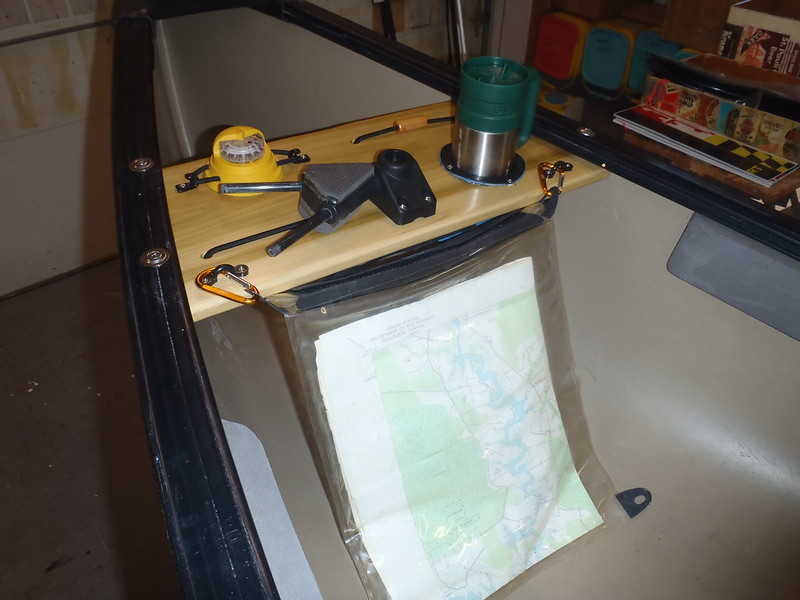
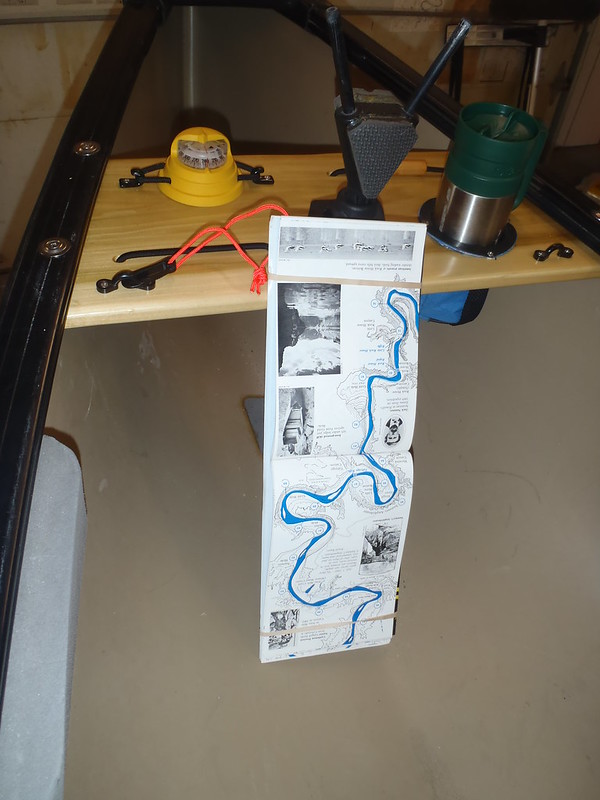
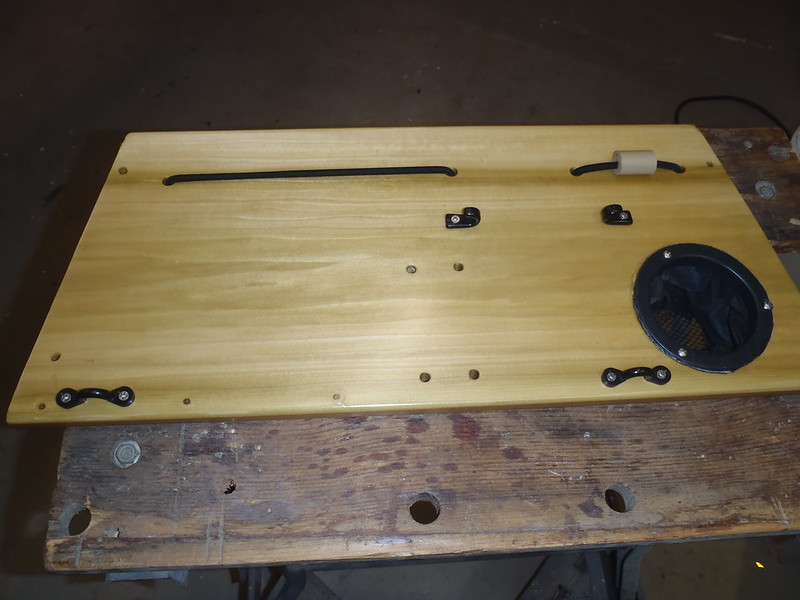
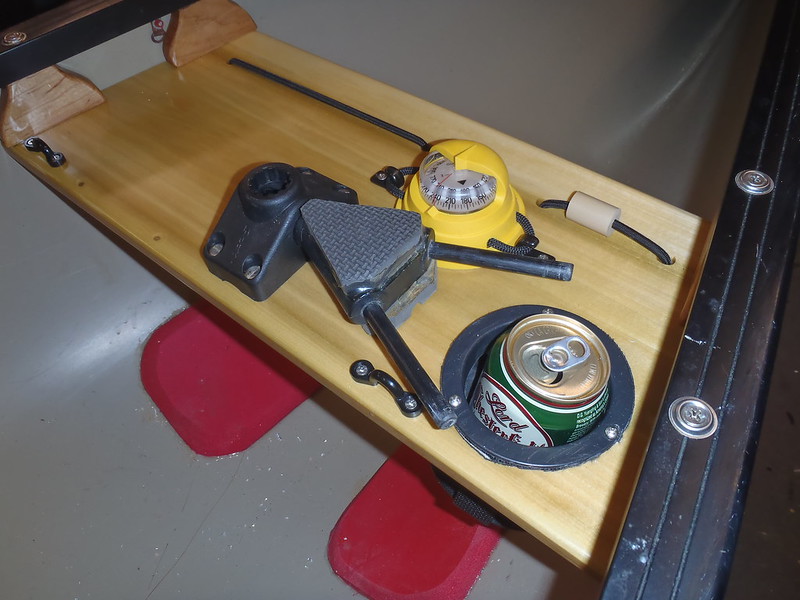
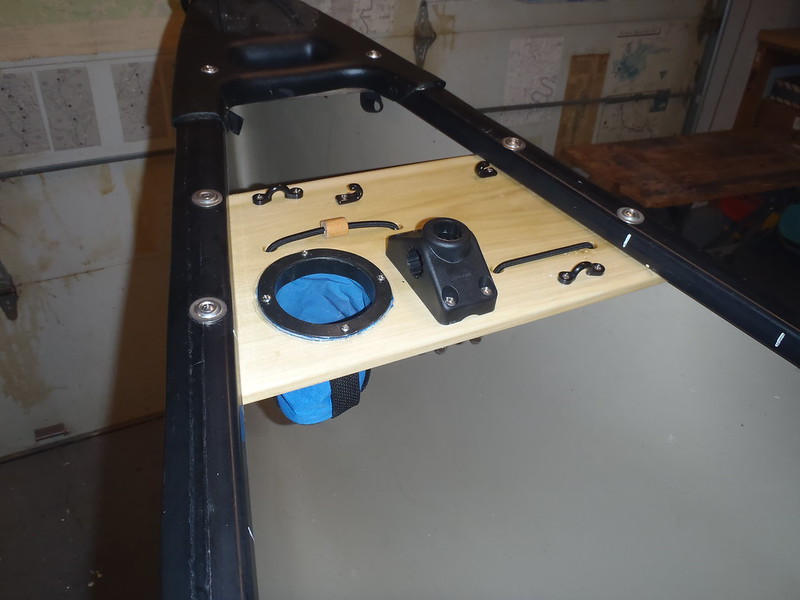
Spirit Sail base mount (which is a Scotty rod base, so the utility thwart could also be used for fishing), deck hooks to hold a compass and a run of over/under/over bungee cord for hat/gloves/sunglasses. The under bungee is handy for holding things kept out of the rain, and it is easier to pull taut and re-knot a single run of bungee than pull and re-knot tighten two short pieces when the bungee stretches out.

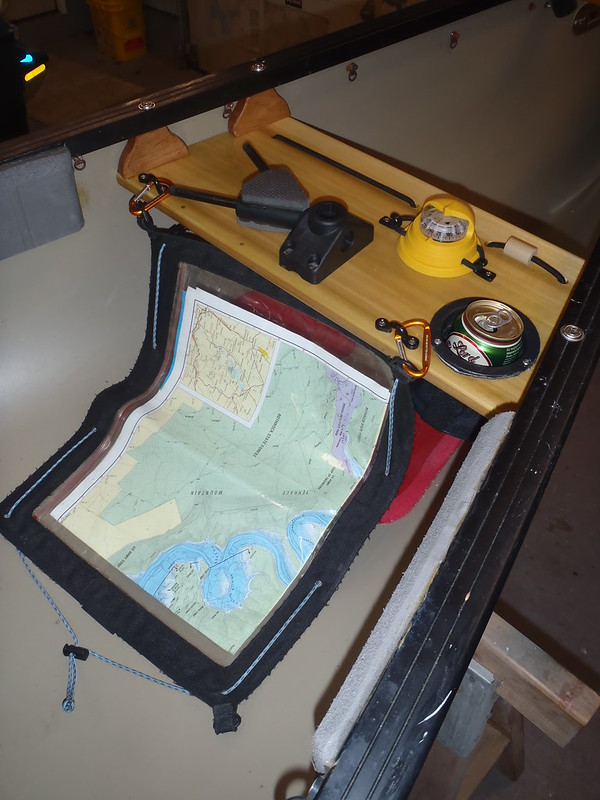
A couple of pad eyes to securely clip things to (map case, ditty bag) are always handy, with room left for a, um, circular void I have in bowman mind.

Coat of epoxy, including swabbing inside all of the through holes (drilled 1/64 larger than the hardware). Wait a few days, 220 wet sand, a couple coats of spar urethane, dress the utility thwart with the outfitting and reinstall.

PC071392 by Mike McCrea, on Flickr

PC071388 by Mike McCrea, on Flickr

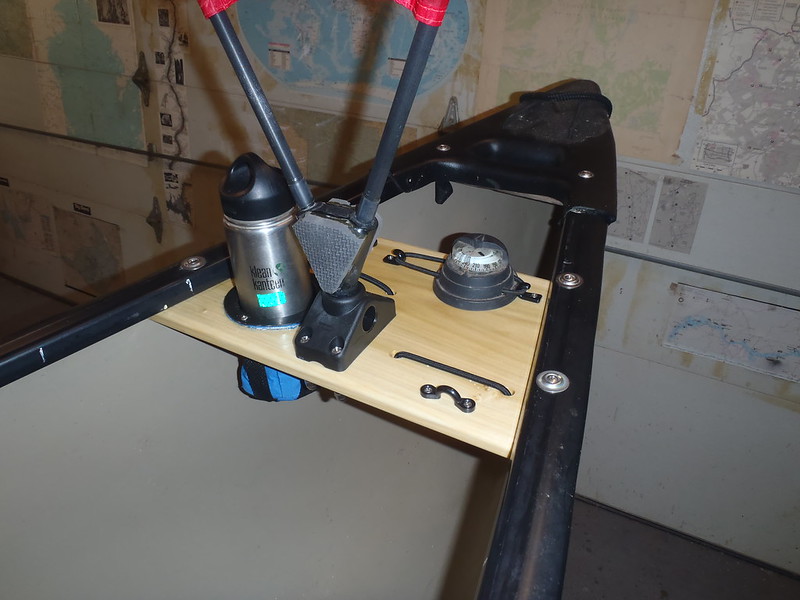
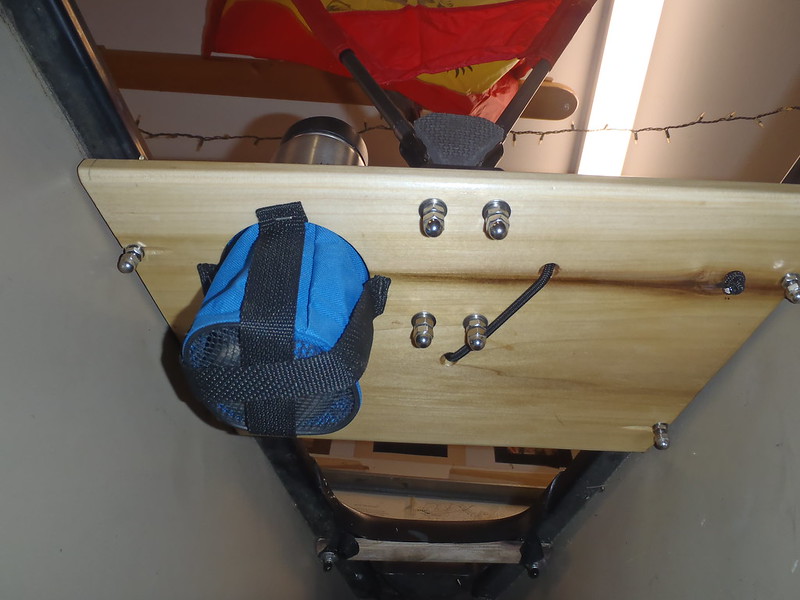
I like it. I like the bowman beverage holder. It doesn’t come close to the 14 cup holders in a Mad River Adventure 16

https://www.google.com/search?sourc...0....1..gws-wiz.....0..0i131j0i10.bcIz2NKZzfQ

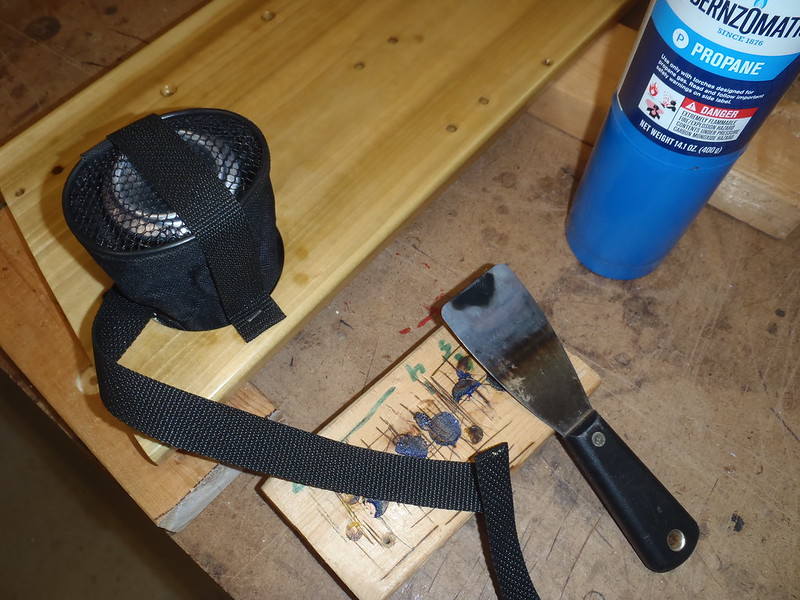
But one is enough. I added some 1” webbing straps under that beverage holder for durability sake, so the mesh bottom and nylon sleeve is not holding all the weight of a 40 ouncer.

PC071391 by Mike McCrea, on Flickr

Simple, easy and zero trips to the hardware store; I had all of the parts and pieces in shop stock. Come spring that beast is going on Craigslist, with the utility thwart and large Spirit Sail included. Custom welded aluminum motor mount, lee board and Wheel-a-Weigh Heavy Lifter cart optional.

One stroke of luck, the third (wide/heavy duty Ed’s Canoe) seat & hangers I installed had made the canoe a little stern heavy when under the yoke. The weight of the utility thwart in the bow balances it back out. Yeahhh, just like I planned it that way.

The bow utility thwart with attached accessories weighs 1.5 lbs. Oh gawd, now the Miramichi weighs 111.5 lbs. Maybe the heavy duty portage cart should be included in that sale.

I think I’ll install a bow utility thwart on the Mad River Revelation before that one goes up for sale come spring. Or not for sale, I may go all-in on outfitting that canoe and give it to some paddling inlaws.
 
thats a pretty cool idea. might be a neat thing to make a little tilted down to the paddler for map/gps reading functionality. might have to try making a removable one for my new boat coming. I need a good place for my water bottle and on-the-water supplies
 
might be a neat thing to make a little tilted down to the paddler for map/gps reading functionality. might have to try making a removable one for my new boat coming. I need a good place for my water bottle and on-the-water supplies

We have a couple of clamp on utility thwarts but, like I said, I appreciate having a that accessorized platform within reach so much that having one permanently installed works best for me; I can’t forget to bring it, don’t need to futz with installing it at the put in and (most importantly) don’t have knuckle bashing knobs and clamps sticking up atop the gunwales.

Plus those clamps are stupid pricey

https://www.essexindustries.org/aluminum-clamps/

The first permanently installed utility thwart was very Dr. Seuss shaped, just barely wide enough to accommodate the sail thwart in the bulbous center. It was also glassed in place on a composite decked canoe, so it ain’t coming out for a redesign.

The next couple I made wider, but still curve shapely, and when I discovered how much I like having an easy-to-ready deck compass two feet away those lacked sufficient room. I afterthought installed deck hooks for a compass on a couple shaped too narrow anyway. The back of the compass hangs over the edge of the utility thwart, and I often catch that compass edge when hauling a dry bag out of the canoe and wish it were wider.

The standard solo canoe utility thwarts are now straight cut 5 ½ inches wide from dimensional lumber; as simple as two straight /____\ end cuts, with no Dr Seuss curves to cut and sand. The wider solo boat length thwart laccommodates ample accessories. 9 ½ inches seems better width for the shorter bow length thwart. YMMV.

I have the MRC Revelation in the shop, and it will soon be getting a custom bow utility thwart. I am 99% certain that I’m giving that canoe to an in-law couple come spring. They enjoy paddling, and have an ancient and tonnage weight oft-repaired Blue Hole I gave them years ago. They are my age and that Blue Hole beast needs to be passed on to someone with a stronger back.

I know the bow person is short in stature, so I’m going to install the utility closer (need to find someone 5’ 6” ish to show me the sweet spot). That easy reach is especially important for handling a Spirit Sail; it takes both hands to pivot a Spirit Sail full of wind, so the mount needs to be within easy arms reach.

I have a spare (small sized) Spirit Sail lent out to a friend and will install a base mount for that. I think the in-laws would really enjoy downwind sailing, they live near a large lake, and do some coastal trips as well.

I’m going to drop that utility thwart an inch, so the top of the sail mount is below the gunwale line for easy rack sliding on/off. Most of the utility thwarts in our solo canoes are double hung on short drops, so everything attached is held below the sheerline.

P3200678 by Mike McCrea, on Flickr

So, yeah, hung tilted a little down for easier GPS/map reading, wide enough to accessorize with a water bottle holder, bungee cord and pad eyes/deck hooks to hold other on-water supplies secured near at hand.

The clamp-on utility thwarts had one early advantage, I found out exactly how far away I wanted the catch-all thwart before I installed a permanent version. My wife and son’s boats (see what I did there Steve in Idaho) have utility thwarts place at best location for their wingspan reach.

I still use a clamp-on utility thwart for that arm’s length discovery before installing a permanent version.

My favorite source for those oh-so-handy pad eyes (strap eyes) and deck hooks (lashing hooks).

http://topkayaker.com/index.php?main_page=product_info&cPath=2_133&products_id=137

http://topkayaker.com/index.php?main_page=product_info&cPath=2_133&products_id=425

Bungee cord at Top Kayaker as well.

When you get your new boat I want to see what you come up with. Like one of my old building partners would say from stepping back from any finished project “Custom work, just custom!”
 
Nice work, Mike.

I have a wide front thwart on my Old Town Pack rigged for fishing; rod holder mount, fish finder, anchor rope cam cleat, bungees for hand tools. With fore and aft soft bag anchors the little Pack makes for a nicely appointed fishing boat.
 
I have a wide front thwart on my Old Town Pack rigged for fishing; rod holder mount, fish finder, anchor rope cam cleat, bungees for hand tools. With fore and aft soft bag anchors the little Pack makes for a nicely appointed fishing boat.

I recall that fishing thwart discussion from a previous thread. Got photos, I’m curious to see what all you did outfitting-wise.

I owned an OT Pack for years, but prior to experiments with solo canoe utility thwarts. I used the Pack mostly for sneakboating and marsh duckhunting. The thwart did have a DIY gun rest installed, but little else.

For all its plebian design and put downs the OT Pack is a great little canoe for some purposes.
 
I've made a new thwart since that conversation. Wasn't happy with my original bungee pattern and I added a small "dashboard"with a velcro panel to attach a little hand-held style fish finder. I also narrowed the boat shortening the gunnel width by 1.5". Took out what little rocker it had as a 12' canoe doesn't have turning issues and a bit stronger tracking is a plus for my usage. Originally had two rod holders on the thwart, went back to a single holder after experience on the lake showed me the error of my theory ;)

I have the boat stashed up in the rafters for the winter but I'll get pics of it come early spring. I've been wanting to show off my soft bag anchor system which has worked really well, probably because it was based upon someone else's theory :)
 
Last edited:
MRC Revelation bow utility thwart

Design sized for a known-to-me shorter bow paddler/sailer, located 19 inches away from the front edge of the bow seat for easier Spirit Sail manipulation.

I needed to make another utility thwart template from scrap lauan; I am amassing a collection of those and I’m not done yet, as I perfect the design I will eventually put a utility thwart in the bow of the Cronje.

Love the scrap lauan templates; I had to recut the Revelation template and sand the edges a bit for a perfect fit. Much easier doing that with thin scrapwood than with good wood.

A little action across the route table, some RO and hand sanding work and that platform fits like a glove. I made 1” ash drops for this bow utility thwart, but test clamped it in place decided that I didn’t like the look as much as a flush-under-inwale thwart. So the top of the sail mount will stick up ½” above the sheerline. Boo hoo, it just looks better to me unhung and flush with the bottom of the inwales.

Coat of epoxy, including inside the drilled holes, wait, several coats of spar urethane. I have not been happy with my usual hung to dry spar urethane finish; no matter how fine my brush work the vertical pieces develop sags and drips. Which I have to sand off, and then the subsequent coat develops new sags and drips.

PC161433 by Mike McCrea, on Flickr

I like the durability, cost and ubiquitous availability of spar urethane, but it can make for a sloppier finish than multiple coats of varnish. I remembered years ago seeing a “bed of nails” a boatworking friend had made, a piece of plywood with hundreds of nails sticking up. In his version all of the nails were precisely grid spaced even. My tester version used only a dozen nails.

PC161430 by Mike McCrea, on Flickr

PC161428 by Mike McCrea, on Flickr

An hour on the nail bed and the urethane had self-leveled, and dry enough to then hang over the radiant oil heater with zero drips or sags. It sucks many sags and drips that it took me 20 years to try that bed of nails technique.

Naked utility thwart installed

PC171434 by Mike McCrea, on Flickr

The little spacer on the right side bungee is provided so that the bungee is easier to grab with gloved hands or stuff a sunglasses temple ear piece under. Fully dressed.

PC171437 by Mike McCrea, on Flickr

21” wide at the front edge, with pad eyes spaced to hold a map case, either the Sealline or the better quality Gaia case. Or even a rigid backboard for a waterproof Belknaps map.

PC171446 by Mike McCrea, on Flickr

The Revelation should be a well appointed canoe when I pass it along next spring. The seats still need to be refurbished (the yoke and thwarts are fine, I refinished them a few years ago), and it is one of the few canoes we own that lack skid plates, so I have some Dynel work in my shop future.
 
Bow Utility Thwart #3

That front utility thwart gets easier with each one made. And, on #3, trickier.

For #3, a bow utility sail thwart in the wonderfully outfitted Cronje, I was able to reuse the lauan template from the Revelation with minor angle modifications. And use the last piece of ¾” dimensional lumber (a 9 ¼” wide hardwood board selected but rejected for van outfitting).

I’m a use it up wood scrap whore; I needed to G/flex fill a couple of existing holes originally drilled for hinges, but I do frugal love using up what I have on hand, especially with little leftover for the woodstove.

P1180008 by Mike McCrea, on Flickr

I wanted to install this utility thwart using short drops, with the top of the sail mount below the gunwale sheerline, and wanted to preserve accessibility to the mini D-rings already installed on the pop rivet shanks from the spray cover snaps.

A sail thwart with a spray cover? How’s that gonna work you ask? I have ideas, we shall see.

First the usual, find the best location, about 20” in front of the seat edge, and test that positioning with the spray cover. Cut the 9 ¼” wide thwart from the custom shaped lauan template, run it through the router and sand it. Then some drops. With 1 ¾” drops there is still plenty of leg and foot room under the thwart, tested by sitting in the canoe on the shop floor with my size 12’s.

I wanted some drops aesthetically fancier than pegs or square wood blocks. Years ago, when I came into some ash and other good hardwood, I band sawed and routed dozens of peculiar drops in a half truss shape. The repeatable curve wastes zero wood, and needs half as many band saw cuts, which appeals to both my frugal and lazy natures, especially when making a production run.

P1190012 by Mike McCrea, on Flickr

Lots more in a box where these came from; I had access good repeatable curve patterns (different shapes needed on different depth drops), and to a really good band saw and router table, so I made bunches of stuff cut that repeatable shape; angled kneeling thwart drops, 3 1/2” seat drops, 2 ½” seat drops.

Yeah, I could have simplified them by using a \__/ pattern. What’s the elegant curve challenge in that?

Those smallest half truss drops, cut down in depth to 1 ¾” height, look mighty nice as utility thwart drops. I even cut a little angle on the bottoms to help level out the thwart to accommodate the bow’s slight sheerline rise.

P1190013 by Mike McCrea, on Flickr

I had some dither about wide end up or down; as seat drops they go narrow end down, matching the width of a wood seat frame, but to my eye, on the wide thwart, the drops looked better reversed. Custom work.

Time to drill a bunch of critical holes, first through the aluminum gunwales, and through the drops and thwart edges, starting with the initial install of the hangers, with four flange-washered machine screws through the drops, and marked starter holes on the utility thwart edges.

And then, thwart removed, drill press holed for machine screws and the usual outfitting suspects, first the sail mount, centered and towards the easy reach front of the wide thwart.

P1190014 by Mike McCrea, on Flickr


Deck hooks for map case, J-hooks for compass, some off-set over/under/over bungee cord for miscellaneous keepage and easy one-strand tightening, and, of course, the silly cup holder feature.

A little idiot proof pencil marking on the drops, so everything goes back in the correct pre-drilled position, and I can hit the drops and thwarts with a coat of epoxy and hang it all to dry for a few days.

P1200016 by Mike McCrea, on Flickr

Those utility thwart accessories required some special layout considerations, for peek-a-boo reasons that will eventually become apparent. 19 holes marked and drilled and I did an initial epoxy coat on the thwart and drops.
 
Very nice, Mike. Looking forward to seeing this utility thwart move through completion.
 
Very nice, Mike. Looking forward to seeing this utility thwart move through completion.

It’s done, and installed. Or, er, almost done. I had sized the drops specifically so that there was just enough thread under the utility thwart to get on a washer and Nylock, and dry test fitted and custom sanded everything before the epoxy and varnish coats. 4” machine screws were perfect, the Nylocks just fit.

“Were perfect”, until I tried to reinstall the finished drops and thwart after multiple epoxy and varnish coats; just that little bit of extra thickness on the tops and bottom of the drops and thwart was enough to prevent fitting on a washer, and even a (non-nylock) nut barely caught the threads. That ain’t happening, and the next longer machine screws I had on hand I the shop were a full 6 inches. Crap.

I was at my local stainless steel purveyor this morning and picked up longer machine screws. And lock washers, flat washers, (non-Nylock) nuts and cap nuts to cover the exposed shank ends. I have most of the latter washers and nuts, but I also use them a lot.

Needed four longer machine screws for the utility thwart, bought 12 of each. And 12 each of all the washers and nuts, ‘cause I’ll use that stuff eventually. And, saddly, I’m not sure how much longer my wonderful little country hardware store will be in business.

$21 worth of stainless that I can hold in the palm of my hand, but I’d rather have extra than be stopped on some boat project and make an hour roundtrip to buy more. I now have enough exposed shank to add webbing loops to the ends when I install the longer machine screws. The local diner and Case & Keg are both on the way to the hardware, so it was a win-win-win morning.

Back to the utility thwart finishing, outfitting and installation.

With the epoxy coat well cured I re-drilled all of the (epoxy clogged) holes; originally drilled 1/64” larger than the hardware and post-epoxy redrilled with the correct size, so an epoxy layer was left inside the holes.

I am happy to have those holes epoxy sealed, but I don’t want to be fighting a machine screw or bolt through a hole when I install the parts, or find the SS hardware ends all boogered with epoxy up when I try to thread a nut on the end.

And I want this peculiar thwart to be uber-sealed everlasting. With the epoxy cured, scrubbed for any possible amine blush or contaminate, and lightly sanded the first of several coats of spar urethane went on. Dried, lightly sanding and re-coated, including pipe cleanered inside the holes on the first couple coats. Future archeologists will find this thwart and wonder WTF.

About the seal coats; I like the “nail bed” for epoxy and urethane work on a large flat surface like the thwart more and more every time I use it, especially with finish urethane coats, which are notoriously sag and drip prone if hung to dry. A couple hours resting flat on the nail bed and the thwart was self-leveled perfectly and dry enough to hang overnight by the wood stove.

Finally, the second funnest part of utility thwart builds, installing all of the attachment points and hardware on the thwart. Cup holder first, top rim G/flex’ed and screwed down, with some webbing straps underneath for weight bearing longevity at the mesh bottom.

P1230020 by Mike McCrea, on Flickr

Then screw in the position-drilled locations the pad eyes and deck hooks, and run the bungee through the chamfered (Conk) holes.

FWIW, 6 x 3/4 flat head stainless steel screws precisely flat and flush fit the recessed holes in the deck hooks and pad eyes, and everything went in snug and tight.

I used a solid plastic spacer on the short bungee side; that side of the bungee is small by layout necessity and would be hard to grasp even ungloved without a little spacer. The drilled dowels or wood gunwale pieces I usually use as easy grab (or one-handed stuff things under) bungee spacers are always the first thing to need refinishing, often before the bungee needs replacing. Not this time.

P1240021 by Mike McCrea, on Flickr

I do wish I had thought to spray paint that spacer black beforehand, but I’m too near completion to stop now.

Then (what should have been) the really funnest part; installing the finished and outfitted utility sail thwart in the bow with the four half-truss drops, and stepping back to admire my work. See oopsie #1, the machine screws were, post-epoxy and urethane coats, a tiny bit too short.

That wide thwart is uber rigid, and all dressed up it looks might nice, except for oopsie #2. The Y connector that holds the sail battens only fits sideways into one side of the base for storage, and that orientation was designed into the layout of the other hardware for easiest accessibility.

Words were muttered. I had installed the Scotty Rod base mount facing the wrong way. Kinda overcrowded on the right hand side of the thwart with the Y plugged into that side. Where’s the shop sign that reads “PAY ATTENTION!”?

P1240024 by Mike McCrea, on Flickr

Easy enough; bolts out, base mount reversed and back in. Much better.

P1240026 by Mike McCrea, on Flickr

Back in the initial design phase there was that business about a spray cover. I am not a fan of full spray covers with enclosed tunnels/skirts. But the Cronje has a peculiar full tandem spray cover, with a removable bow tunnel and attached oval cockpit.

P1240030 by Mike McCrea, on Flickr

I really, really like the idea that the bowman can hop out, still skirted and showing some leg, and grab the painter line when landing. Or, leave that skirt portion off entirely for fuller freedom of movement and easier access.

In skirt-less mode the utility thwart is readily accessible, the compass is visible, and my precious beverage is sun and splash protected, as is any gear tucked under the bungee run at the front edge. I may have eff’ed up the machine screw length, and the sail mount orientation, but I got the thwart accessories layout right.

P1240035 by Mike McCrea, on Flickr

Or, skirted in foul but still sailing weather, this.

P1240032 by Mike McCrea, on Flickr

Really thinking about cutting a little Velcro’ed flap directly above the sail mount.

Just when I’m starting to get good at this I’m out of tandem canoes. It’s almost enough to make me want to paddle tandem again.

Almost.
 
The bed of nails for applying finish is a nice trick. I use it fairly often. Usually only need 3 or 4 screws run through a scrap piece of plywood depending on the shape of the piece. What I really like about it is that it allows you to finish both sides of the piece at once. The unseen side gets coated then placed face down on the nails while you brush finish on the visible side. The small marks from the screws are pretty much invisible after a few coats since they're never in the same place twice.

Alan
 
The bed of nails for applying finish is a nice trick. I use it fairly often. Usually only need 3 or 4 screws run through a scrap piece of plywood depending on the shape of the piece. What I really like about it is that it allows you to finish both sides of the piece at once. The unseen side gets coated then placed face down on the nails while you brush finish on the visible side. The small marks from the screws are pretty much invisible after a few coats since they're never in the same place twice.

Alan, coating the entire piece at once is a huge wait-and-cure time saver. And the topside self-leveling aspect even better.

I wish I could say I discovered that nail bed shop trick years ago.I did see it way back when; I just wasn’t smart enough to try it for too many years.

I did a cob-job of a nail bed just for the wide utility thwarts. And then only after I remembered that trick when the first one came out drippy sagged from hanging to dry and needed excessive sanding. Not an unusual urethane result.

That cob-job nail bed used a dozen (er, 13,) small finishing nails, not even sunk through the board point-end up, but just tapped evenly into some scrap wood. Even when allowing the epoxy coats to self-level atop the nail bed the wide thwart came off easily, and the couple little nail-head puckers on the invisible bottom quickly and cleanly sanded off .

(Thwart pushed back a bit on the platform so the nail heads show)

PC161429 by Mike McCrea, on Flickr

I effed up once, directionally confused yet again, coating the visible top side first and turning it face down while I coated (and nicely leveled) the bottom. Crap, wrong side up.

Word of warning; anything that drips through the drilled holes will glob up on the underside facing the nail bed. Not a drippage problem with the edges, which are raised available for brush tip out, or leaking through the little 3/16” holes. Yes a problem the giant cup 3 ½” cup holder void.

I am, I think, done with tandem utility thwarts for the foreseeable future, got no more tandem canoes, so I pulled the little 1” finishing nails from that board for naked no-longer-a-nail-bed storage. Easy enough to sink a few new nails positioned for the next piece.
 
Back
Top