• Happy 1st Showing of a Color Photograph (1861)! 📷🎥🏳️‍🌈

Repairing UV damaged Kevlar canoe

Joined
Mar 17, 2017
Messages
132
Reaction score
33
Location
Minnesota
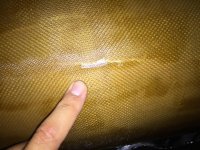
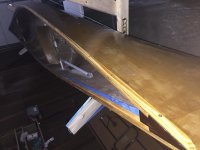
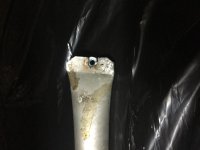
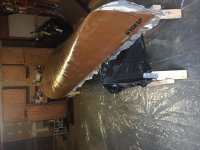
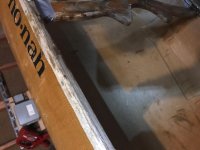
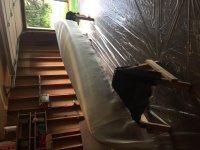
Sadly, I happen to own one of these. Snagged it off CL for $300 a couple summers ago. Gunwales are rotted and the chine cracked a bit when I was strapping it to the roof rack on the way to the BWCA last summer (held up fine with duct tape!). I figured the only option left is to give her a layer of fiberglass to add some strength, so here we go! I ordered some 4 oz 60" e-glass from Raka and have some of their epoxy left over. Sanded, removed the outwales, then laid up the glass tonight.

Has anyone ever tried this before? Also, I'm thinking of doing another light sand before a final fill coat of epoxy but I see you stripper folks seem to prefer to just go straight for the fill coat(s). Weight is a concern for me, but it has to be strong enough to last a bit longer. I'll let you all know how it turns out and holds up over our BW trip in early July.
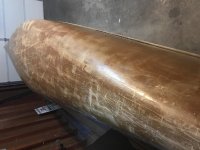
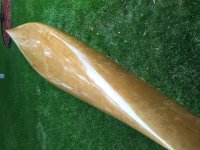
 

Attachments

  • photo7204.jpg
    photo7204.jpg
    329.6 KB · Views: 3
  • photo7205.jpg
    photo7205.jpg
    279.8 KB · Views: 3
  • photo7206.jpg
    photo7206.jpg
    252.8 KB · Views: 3
  • photo7207.jpg
    photo7207.jpg
    264.2 KB · Views: 2
Its hard to say from where I'm sitting and a cracked chine under roof rack tension is not a good sign. Regardless. depending on how deep the UV damage is your problem may be the structural integrity of the resin in the kevlar is too far gone to be salvaged by adding one layer of 4oz e-glass. That resin in the kevlar is in the process of turning to dust. The more that hull is used and flexes the more the uv damaged resin will crack and crumble. This is not like adding a 4oz skin on two sides of a wood strip core where the wood is doing a lot of work. You're laying glass over a compromised laminate. The question is how compromised is it.

Maybe one layer of e-glass will be enough to get another season or two out of it, maybe not. Worse case use it a little and if it seems a bit jiggy add another layer of glass or use S-glass which is a bit more expensive but will give better stiffness for about the same weight.
 
I agree with deerfly. UV damage is not good on a kevlar hull. With that being said, since you know how to work with glass, have you considered stripping the gunwales off and using it as a mold for a new Kevlar hull before it's too far gone?
 
Well that is all disheartening to hear, but thank you. I don't think I'll invest anymore in trying to repair it and see if I can squeeze a few more trips out of it. The bottom is actually very tough, probably due to the foam core and extra fabric there.

Sven - that has been my secret plan B :) If the glass doesn't give me the strength I need, it'll at least give it the smoothness.
 
I add my first fill coat, within 12 hrs of wetting out the cloth. After that is applied, the next ones are spaced less than 2 hrs a part, usually an 1 1/2 hrs apart. I keep adding fill coats, until there is no weave visible, in other words the surface should be smooth. Let cure for at least a week, before sanding.

Weight ? It's too late to worry about it now. Yes it will be heavier. But I believe you are adding life to the hull.

Let us know how it holds up for you !

Store it out of the sunlight, when not in use !

Good luck !

Jim
 
chine cracked a bit when I was strapping it to the roof rack

What do you mean by "cracked a bit" and what kind of straps were you using?

I had a Bell Magic and even though the hull was perfectly sound there was a lot of flex in the side of the hull due to the lightweight layup and hull design. It would compress noticeably when strapping it down and apparently the previous owner got a little overzealous at some point as one of the foam ribs was creased. Perhaps he was using ratchet straps but I think even with regular cam straps I could have damaged that hull if I pulled too hard.

Alan
 
No Title

Alan Gage - here's what I'm defining as "cracked a bit". I was using cam straps. It's not terrible and I was probably pulling too hard, but in comparison my new home built Kevlar canoe feels a bit more sturdy.
 

Attachments

  • photo7210.jpg
    photo7210.jpg
    235.7 KB · Views: 1
The glass looks a lot better in that "cracked a bit" photo than I surmised from the first few photo's. If the whole hull is about the same then one layer of glass may well be enough to get a few more years out of it before it needs help again. I would go with the one layer for now anyway and just use it, you'll know soon enough whether it needs more or not. There is little you can do to it that can't fixed either, so have fun with it....
 
The glass looks a lot better in that "cracked a bit" photo than I surmised from the first few photo's. If the whole hull is about the same then one layer of glass may well be enough to get a few more years out of it before it needs help again. I would go with the one layer for now anyway and just use it, you'll know soon enough whether it needs more or not. There is little you can do to it that can't fixed either, so have fun with it....

Or even just a “partial” layer.

The chines are the most stressed part of a hull, and the bottom is the most exposed to impact and abrasion.

Maybe epoxy some cloth on the bottom and up past the chine curve, something like a single blanket, done in partials; big belly piece and two smaller stem pieces cut on the bias to accommodate the complex end curves without wrinkling.

With 50 or 60 inch wide glass (and release treated peel ply) a single layer could be cut and hand laid on the bottom, extending up past the stressed chines.

That would be the least (initial) weight added, and you could pigment the epoxy on cloth coats to make a contrasting scrim line.

There is a cost/benefit ratio there, but I think that hull is worth trying to save.
 
I'm cautiously optimistic, but I see some good signs :) That layer of glass and epoxy really toughened up the hull - especially that fill coat surprisingly. When I took off the old gunwales, they literally crumbled in my hands. I installed new ones today and wow what a difference that made! Hardware goes back in tomorrow morning (after a night in a Coca-Cola bath) and out for a test paddle! I'll post some pics and updates tomorrow. Thanks for all the insight and advice! Hopefully I don't have to do another partial layer like Mike McCrea suggested before our trip, but that sounds like a good next step if needed.
 
No Title

Ended up spending the day out of town so no water time today. I put on a layer of epoxy on the gunwales and am making an attempt to repair a broken thwart with a nut and epoxy. One cool "feature" that resulted from my laziness is the original deck plate contrasting with the lighter southern yellow pine. Not as cool as Bell's deckplates but I'll take the free style points. Here are a few pics of the progress:
 

Attachments

  • photo7215.jpg
    photo7215.jpg
    237.3 KB · Views: 2
  • photo7216.jpg
    photo7216.jpg
    163.1 KB · Views: 0
  • photo7217.jpg
    photo7217.jpg
    209.6 KB · Views: 0
Is there any chance that you cracked the hull because there wasn't any support from the rotten gunwales vs uv damage?

Jason
 
I'm really hoping that was the case, latremorej. The previous owner said she damaged it by taking it down some rapids and there are a few stressed points on it. I'm hoping I coincidentally strapped it down on one of those points and that it was compounded by the flimsiness of the old gunwales.
 
Back
Top