What to do with a cracked rib that is not broken completely through? Sure, we could bend up a new rib but that takes a fair bit of time and material. There are other ways. We could cut out the cracked section and splice in a new piece from the inside, or, in this case, we go in from behind. Sure, we will still be able to see the crack from the inside, but we keep the original wood and colour and know it will not open further in the future.

First, remove the planking from behind the rib(s) to be repaired. We use small cutters with the nose shaped better, carefully work the tips in under the tack and pry gently. Once you have it partially out, give it a wiggle to see which way it wants to come out. When they get clinched, the tips will bend a certain way, so it is best to find which way the tip is bent with the wiggle and then turn it out of the planking and rib in the direction it wants to come out.
Once you have the planking removed you can start the process. I am still working on technique, I haven't done many like this but stepped up my game a bit today. Normally I have used a Dremel router to remove the material for the groove in the back of the rib, but with mixed results and many burned out bits. So today I made up a jig for the slot I wish to make and stepped up to a proper router, but you need to be careful setting the depth since we only want to go about half way through the rib.

So, set the jig up over the crack and remove about 5/32" of material to create a slot in the rib back. I try to have it taper out to flat on the ends but if that doesn't work with the router I finish up with a flat gouge and sand if necessary.

Once we have the groove how we want it, we need a wood filler piece. I use white cedar but you could use a thin piece of hardwood as well. The cedar is easier to shape after glueing though and if you use hardwood, you will need to pre-drill it to put the planking back on.
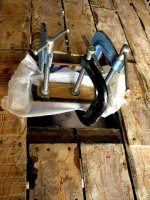
I cut a piece of new planking slightly wider and sand it down to fit snug in the groove. I then pencilled on the taper at each and and shaped it on the bench belt sander close to the finish needed, then I glue it in and clamp.

On the two present boats I have started to use T3 instead of thickened epoxy. The T3 allows for more work to be done in less time as the epoxy needs overnight to cure. I'm not certain about the issue of the T3 and water so I will do my best to ensure it is well sealed and away from water contact.


First, remove the planking from behind the rib(s) to be repaired. We use small cutters with the nose shaped better, carefully work the tips in under the tack and pry gently. Once you have it partially out, give it a wiggle to see which way it wants to come out. When they get clinched, the tips will bend a certain way, so it is best to find which way the tip is bent with the wiggle and then turn it out of the planking and rib in the direction it wants to come out.
Once you have the planking removed you can start the process. I am still working on technique, I haven't done many like this but stepped up my game a bit today. Normally I have used a Dremel router to remove the material for the groove in the back of the rib, but with mixed results and many burned out bits. So today I made up a jig for the slot I wish to make and stepped up to a proper router, but you need to be careful setting the depth since we only want to go about half way through the rib.

So, set the jig up over the crack and remove about 5/32" of material to create a slot in the rib back. I try to have it taper out to flat on the ends but if that doesn't work with the router I finish up with a flat gouge and sand if necessary.

Once we have the groove how we want it, we need a wood filler piece. I use white cedar but you could use a thin piece of hardwood as well. The cedar is easier to shape after glueing though and if you use hardwood, you will need to pre-drill it to put the planking back on.
I cut a piece of new planking slightly wider and sand it down to fit snug in the groove. I then pencilled on the taper at each and and shaped it on the bench belt sander close to the finish needed, then I glue it in and clamp.

On the two present boats I have started to use T3 instead of thickened epoxy. The T3 allows for more work to be done in less time as the epoxy needs overnight to cure. I'm not certain about the issue of the T3 and water so I will do my best to ensure it is well sealed and away from water contact.


