• Happy National Garlic Day! 🧄🚫🧛🏼‍♂️

Project Boat – Mad River Independence

G

Guest

Guest
This will run long, lots of wait time between epoxy work, paint and varnish coats. I’m already a week into it and not halfway done. Alan Gage or Jim Dodd could have built a stripper and paddled it in the time I’ve been at this refurbishment so far.

TLDR: I refurbished a 1991 Mad River Independence I first rebuilt 20 years ago. I’ve learned a trick or two since then and plan to use them all. The Independence needs some of everything except new gunwales, so I will post progress reports/photographs and put it all in one place.

1991 was the first year Mad River offered the Indy (1991 – 2002). If you know the Indy you know it’s a keeper.

That Indy has history beyond being first year of production. It was a freebie. A local paddler who lived lakeside bought it to noodle around in. She then got into whitewater, and outfitted it with floatation and thigh straps, and ran WW with it for a few years. Don’t see many Indy’s outfitted like that, and she beat the stuffing out of it, spider cracking both chines for several feet and busting the hull in one place.

She eventually bought WW boat(s), left the Indy in the dirt by the lakeside, and didn’t even look at it for a few years. When she finally did look the gunwales had rotted; just a few years with the gunwales in the dirt was enough. Not the last freebie I received from that treatment.

Most of the decayed gunwales fell off in pieces when I turned it over for a freebie looksee; I had to come back the next weekend with some pre-bent lengths of thin lumber, a battery drill and drywall screw them in place just to get that forlorn Indy home on my racks.

On the shop scale the Indy weighs 49 lbs with my oversized wood gunwales & deck plates and original-owner kevlar felt skid plates. Catalog speced at 45 in glass, down to 35lbs in kevlar and 29lbs in kev light. Of course if she had bought a KL Indy there might have been only random puzzle pieces left after her WW adventures.

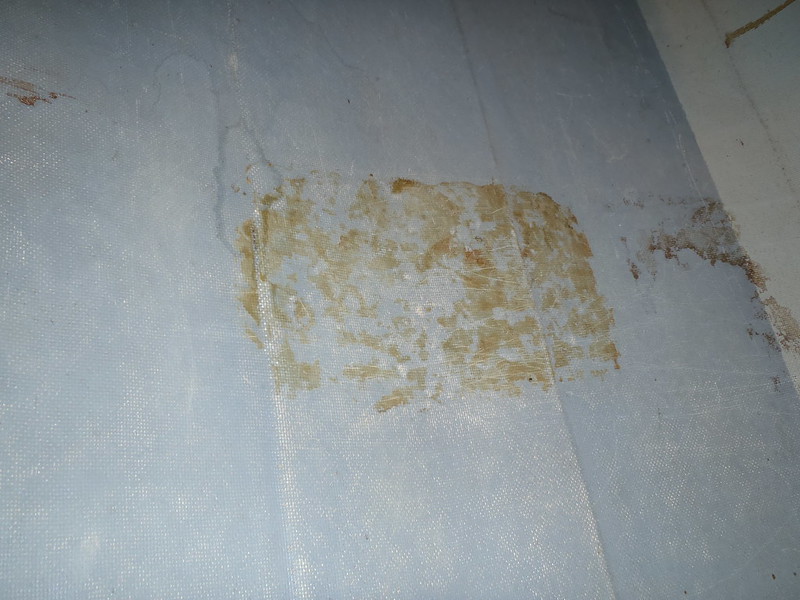
Her WW abuse, and my less-than-stellar repairs, left me with this. Poorly executed six foot long repairs on both chines. At least I tinted the resin.

PA270056 by Mike McCrea, on Flickr

PA270053 by Mike McCrea, on Flickr

A truly hideous patch on the inside. What was I thinking? What was I doing?

PA270064 by Mike McCrea, on Flickr

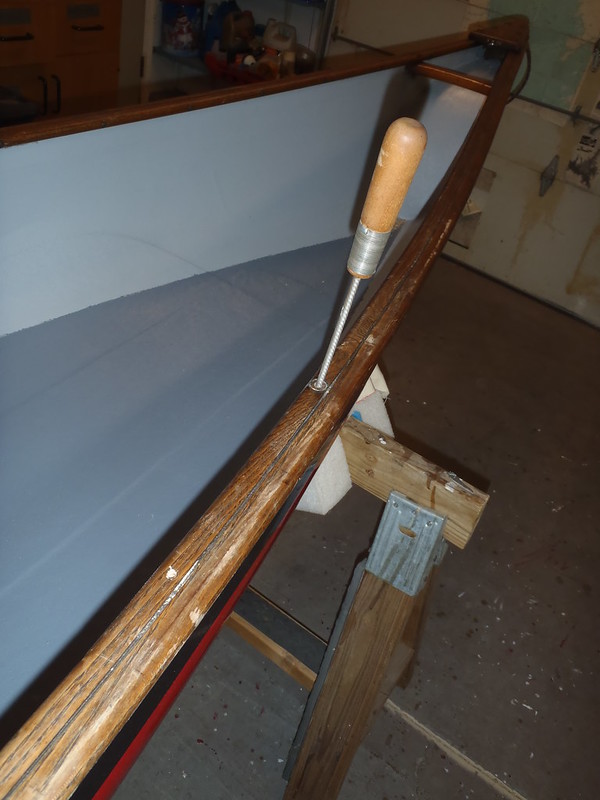
I laid some equally fugly 2” glass tape along the naked sheerline inside. I didn’t even try to hit the old holes while screwing in the new temp-transport gunwales, so there was a Swiss cheese of 100+ holes along the sheerline, and I wanted to bolster those edges before drilling yet more holes for new gunwales.

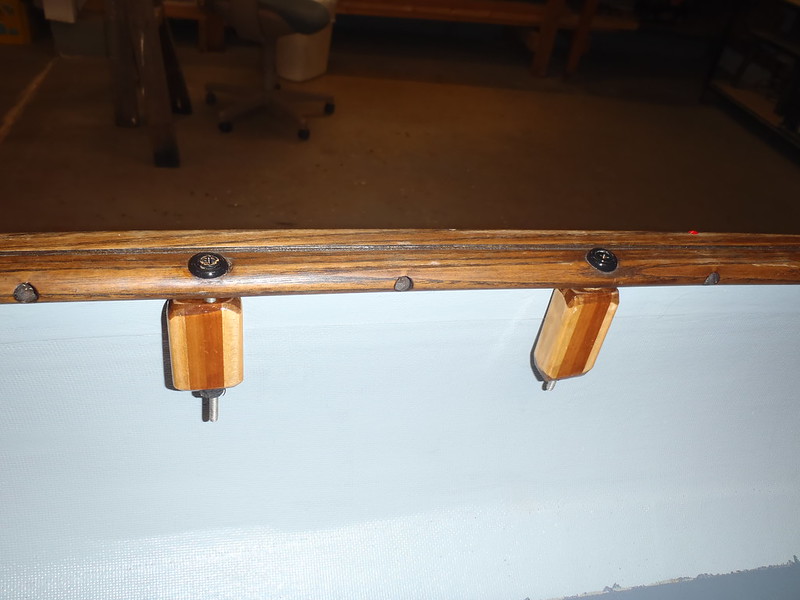
Lots of smutch on the inside where the thigh strap was glued in, and where she had dripped god-knows-what that ain’t coming off even sanding, maybe dark oil or varnish on the original gunwales.

PA270065 by Mike McCrea, on Flickr

PA270066 by Mike McCrea, on Flickr

I have a Make-Indy-Beautiful-Again plan. The Indy deserves some beautification, the bow deck plate is stamped “Reward Boat”

PA270060 by Mike McCrea, on Flickr

At the time that stampage was done for a friend who lusted after the Indy, and eventually luck bagged into his own, a purple kevlar Indy in perfect condition, in a bizarre 3-way trade. But that’s another story - a dead van traded to a mechanic for a dead antique outboard traded to a marina owner for the plum crazy purple kevlar Indy. Only Dave could pull that off)
 
First up, remove all of the MRC letters, logos and sheerline pin stripes. I’m going to wet sand and repaint the Indy with Fire Red EZ-Poxy, so all the vinyl stuff needs to be gone.

PA290003 by Mike McCrea, on Flickr

A little heat gun and razor action took care of business.

PA300008 by Mike McCrea, on Flickr

There is still some adhesive residue left on the hull, and I don’t want to paint over that. Don’t even want to clog up sandpaper with it. Acetone and a Scotchbrite pad took off the stripe adhesive residue; the Rabbit in the Ferns and Mad River Canoe letters had thicker adhesive backing and needed a second go round with acetone and 0000 steel wool to swipe the grunge off.

Residue clean. For 29 year old gel coat the Indy isn’t badly faded (indoor storage for the last 20 some years).

PA310032 by Mike McCrea, on Flickr

I don’t think I’ll be reapplying these vinyl letters.

PA310034 by Mike McCrea, on Flickr

I know some folks care about reproducing that OEM decaling. I’m never selling the Indy, and have an idea to break up the future all-red EZPoxy paint job on the exterior.

Time for some light RO work with 220. Time for some Canoe Tripping thanks.

I don’t know what I don’t know, and there’s a lot I don’t know. It took Alan Gage to introduce me to foam interface pads for RO sanders. A hard surface pad on a curved surface hull took more patience and delicate feel-the-touch than I possess. Those curve-conforming foam pads have made RO sanding work on hulls so much better and easier.

PB010052 by Mike McCrea, on Flickr

And, thanks to Conk, Alan again, and Canoe Trippers et al; a cyclonic dust extractor hooked to a shop vac is a 21[SUP]st[/SUP] century wonder. Almost no dust in the shop while sanding indoors. I cannot thank you all enough for that; hauling the canoe outside and back in between paint coats or in foul weather sucked.

PB010054 by Mike McCrea, on Flickr

Having that dust extractor on the bottom shelf of a wheel-along-beside-me cart is sheer genius. With the top shelf usually empty that cart has become a faithful paint and tool shop companion, always by my side. Whose brilliant idea was that?

Ok, even a blind squirrel. . . . .

220 interstitial foam pad sanded on the outside, smooth as a babie’s butt. Well, some old skid plate globs and patch repairs. A tad dusty, that is easy enough to wipe down with a tack cloth.

PB010056 by Mike McCrea, on Flickr

The shop vac and cyclonic dust collector is wonderful, but I have a developed a boat-workers sensitivity to both Vinylester and polyester dust.

Time for a shower and change of clothes, that was enough for one day. I’ll sand the inside tomorrow.
 
Perfect timing for this part of the rebuild to come up. A friend is rebuilding a rare early Mad River that has already been regunwaled twice. Time he gets new gunwales on there will be a lot of holes at the sheerline, so he is also going the glass tape route there.

There seems to be no such thing as ½” glass tape, so he plans to use 1” glass tape from Aircraft Spruce, which will still leave some tape edges showing fugly below the inwales.

https://www.aircraftspruce.com/catalog/cmpages/etapes.php?clickkey=18109

I want me a roll of that 1” stuff.

It was time to flip the Indy upright, or, actually, sideways first, and do a little sanding inside. HINT: It really helps to turn the cyclonic trap/shop vacuum dust extractor on before sanding; I fired up the RO and with the noisy thrum of sanding inside the hull didn’t realize that the vacuum wasn’t running.

PB020003 by Mike McCrea, on Flickr

Those sawhorse wedges are great to stabilize an upright boat, or to bolster one clamped on its side.

PB020004 by Mike McCrea, on Flickr

Why is there so much dust this time? Oh. . . . . yeah. . . .remember to turn the dust collector on next time dummy.

The Indy had float bag lacing holes along the sheerline, as well as 100 gunwale screw holes. Before installing new wood gunwales I epoxied a 2” length of E-glass tape along the sheerline to cover the abundance of old holes.

That was a long time ago, the first set of wood gunwales I had ever made, and I was kinda clueless. Those (ash) gunwales are huge, bulbous bullnosed 7/8” wide, inwales and outwales both. Again, what was I thinking?

Of course I had no peel ply at the time, don’t even know if it existed then. So the 2” glass tape is a bit weave exposed rough, and the selvage edge, despite some earlier (hand) sanding, still a bit tall.

A little RO work knocked that old E-glass tape down more flush and smooth. I gave some thought to laying another coat of epoxy over that glass tape, but even back then I did a decent cloth and epoxy job, and one target in the re-rebuild is to keep the weight down.

PB020006 by Mike McCrea, on Flickr

A coat of paint on the inside and three on the outside, and some minor outfitting additions, will add enough weight to that fiberglass hull. I used slip and scuff resistant porch paint on the inside. Light Gray satin porch and floor coating, urethane acrylic latex. A quart will be 2x what I need, but next spring I can use the rest on the bare wood floor in our shed.

The ever helpful folks at my local hardware store dispensed an ounce or two of the appropriate black pigment into a tiny Nalgene jar (Thanks Foxyotter) so I could paint the light gray first, then tint the rest of the can more charcoal for the darker football.

PB020008 by Mike McCrea, on Flickr

I am not removing the wood gunwales just to paint the canoe. I’ll cut them in just below the inwale with a brush, but I taped them as well ‘cause I won’t really be able to see what I’m doing on the underneath.

Probably not really necessary to tape the center for the light gray coat on the sides, but it will give me decent lines to retape for the charcoal football.

PB030010 by Mike McCrea, on Flickr

First coat, cut in, rolled & tipped. And rerolled/retipped. Kinda like doing epoxy work, when painting the interior of a composite canoe enough is enough; I was going back over painted areas trying to tip out some apparent drip or dribble only to discover that it was, in fact, a 29 year old resin dribble from when the canoe was first built.

Screw it, I’m done with the light grey. I could put on a second coat while the gunwales and football are taped and ready, but that is some thick, heavy paint and, since the football area is more scuff-prone, I may do two coats of darker grey there.

PB030012 by Mike McCrea, on Flickr

I know this sounds silly coming from me, and it’s only paint weight, but even in glass the Indy is one of our lighter canoes. I’d like to try to keep it that way, and it will need a bunch of outfitting for efficiency, safety and comfort.
 
Nice project.
i have been buying used canoes and fixing them up for 40 years, like a lot of people here. Mostly fiberglass and some Royalex boats. They all sell for much more than I paid for them.
Now in the middle of a cedar and canvas boat, it occurs to me that I will put 10x the labor in this boat from 1951 than all the other boats put together.
 
Nice project.
i have been buying used canoes and fixing them up for 40 years, like a lot of people here. Mostly fiberglass and some Royalex boats. They all sell for much more than I paid for them.

I have yet to sell a boat in any fashion for more than I paid. I have done well on some straight up boat-for-boat trades (Sawyer Saber for Northern Light, OT Camper for Mohawk Odyssey)

The most I have ever sold a rebuild for was $200; an early VT glass Explorer freebie, for which I bought new vinyl gunwales and deck plates and a few other parts and pieces. I rewebbing some old seats I had in stock, cut new DIY drops and yoke, and the Explorer went to a paddling friend, who uses it as his poling and general purpose canoe to this day.

I wasn’t charging a friend for spare parts or shop time. I’m good, but not fast. What’s that saying, “You can have good, fast or cheap; pick any two”.

I am not fast on the Independence rebuild, but am pleased with my efforts so far. Still a long ways to go.

Somewhere I have a list of most of the boats I have rebuilt, not including skid plate installs, outfitting and minor repairs done in the shop for - often with – the boat’s owner/friends in attendance. “Watch one, help with one, do one while I watch” mode.

If they are going to own canoes they really should pick up those skills, and only a couple shop companion friends were resistantly clueless. They were fun to watch in action though, except when one left wet epoxy on every shop doorknob. Both sides of every door.
 
The light grey coat completely hid the glass tape at the sheerline, the patch and sundry dripped smutch. I am not entirely surprised; sleezy boat flippers will porch paint the outside of badly spider cracked canoes to disguise the damage. Buyer beware.

The painters tape edge line worked well, and I retaped the darker gray football to the other side of the line before painting. Using the black pigment to tint the light gray paint to charcoal was easy enough. I sucked up some pigment in a syringe and added a little lit at a time.

PB030014 by Mike McCrea, on Flickr

The syringe was unnecessary, it took every bit of pigment I had in that little Nalgene to approach the charcoal grey, thoroughly mixing it with a drill and a zip-tie stirrer on a fiberglass rod, a wonderful little DIY invention.

PB030016 by Mike McCrea, on Flickr

Not too shabby. I’m not sure it really needs a second coat, but that one went on at dawn, and while the perimeter is still taped I can lay a second coat this evening.

PB030018 by Mike McCrea, on Flickr

(Later that day)

I skipped using a second coat of interior football paint, it is dark gray on dark gray and good enough. I had a little paint creep from using cheap tape and forgetting fully pressed the tape edges down, but no worse than MRC’s job in 1991.

PB040051 by Mike McCrea, on Flickr

Mostly I’m jonsing to lay the red EZ-Poxy on the exterior.
 
As a colour choice I'd go with Oxblood exterior if that is an option. That interior turned out well.
 
Last edited:
As a colour choice I'd go with Oxblood exterior if that is an option. That interior turned out well.

Oxblood would have made the Independence a true temptress (pun), but I am very fond of the application ease and durability of EX-Poxy paint. The vendor didn’t have EZ-Poxy Burgundy, which would have more closely matched the original gel coat color, so I ended up with Fire Red.

It is very red, not a temptress but more a streetwalker shade of red. It will look better with some eye liner.
 
Gunwales and deck plates taped, ready to roll & tip some Fire Red EZ-Poxy. The 29 year old OEM painter loops are knotted inside the float chambers and the rope still surprisingly stout; I left them in and painted around them.

PB050004 by Mike McCrea, on Flickr

The usual method; roll out half of one side, from keel line down to gunwales, rolling 18” or so at a time.

PB050006 by Mike McCrea, on Flickr

When that half has been rolled, keel line to gunwales, walk end to end (multiple times) lightly dragging a foam brush to tip it out.

PB050007 by Mike McCrea, on Flickr

Wheel the handy shop cart to the other side and repeat.

I timed it; 15 minutes per side, 30 minutes total to roll out and tip. Just like epoxy repairs, hours of prep time, minutes to do the actual paint work. It really helps to have good shop light. Or maybe bad shop light; some fluorescent glare is actually helpful in finding runs and sags when tipping out.

Unlike the thick porch paint a single coat will not cover the hull thoroughly and deeply, and it’s not worth trying a stupidly thick coat with #1. As long as coat #1 goes on smoothly, with no drips or sags or holidays, a light RO scuff sanding will make #2 coat go on quickly and easily, and final coat #3 the same.

Dang, one coat of Fire Red and it already looks fast. And very bright red. Unbroken bright red. I have a plan. Several in fact.

PB050008 by Mike McCrea, on Flickr

That first coat can cure for a day or two before I sand it, Indian summer, daytime 70F out, moderate humidity and the shop is nice and warm. Low of 46F that night and the shop is well insulated. But I stuck a radiant oil heater, set on 600 watt and dialed low, under the overturned hull this evening to keep it nicely warm ‘til morning.

PB050012 by Mike McCrea, on Flickr

EZ-Poxy has a 16 hour dry time at 70F, so I can scuff sand and get a second coat on the Indy tomorrow evening, and a third coat a day or two later. Four days just to paint the canoe. Not that I’m rushing, but I have re-outfitting plans I am eager to get underway.
 
The temperature on the min/max shop thermometer at dawn was 68F and never got much lower overnight.

PB050014 by Mike McCrea, on Flickr

I pulled the heater out and set a temp/humidity gauge on the underside of the seat. 78F and, surprisingly, 36% humidity inside the hull. The shop humidity was twice that (concrete floor). I’m attributing that low humidity inside the hull to the heater’s drying effect.

PB050017 by Mike McCrea, on Flickr

The first coat of EZ-Poxy looked good from a few feet away, but closer up were thin patches where the original burgundy showed through, and the paint layer over the skid plates was thin.

PB050009 by Mike McCrea, on Flickr

I had a bunch of other shop work to do before returning to the canoe; it got late in the day, I was tuckered out and it was still too soon to sand and recoat, I gave it a day and got on a “next morning” paint schedule. I know I need to be on my best game to paint and tip the second coat, so the following morning it was.

Next morning the 1[SUP]st[/SUP] coat was dry enough to flip the canoe over and have a look the brightwork that needs to be refurbished. I had two more coats of red EZ-Poxy planned, and a couple coats of black for an accent stripe, so a bunch of wait time coming.

I had needed to move the canoe around a bit, and flip it this way and that, and don’t like moving a canoe with too many cross members removed. I needed a new stern thwart, stained walnut, and wanted a walnut stained seat frame and foot brace/sail thwart eventually, but took out only the seat and drops, so the hull remained thwart stiffened.

Decent old contour seat, and I had done a good job of webbing it, but a test sit on the seat produced some cane cracking noises.

Or a not so good job webbing, I had simply installed the webbing directly over the old (then intact) cane. Not with SS staples, but with brass brads. At least two brads, sometimes three, on each end of each piece of webbing. Almost 50 brass brads hammered into that seat frame. They were not fun to get out. Again, what was I thinking?

PB050022 by Mike McCrea, on Flickr

Pulling at a corner of the broken cane it simply shredded. The good quality webbing was still stout. To heck with maintaining cane. Which, admittedly, I never did, kinda hard to preserve cane when it is covered with webbing.

With the webbing removed and ancient cane torn off I was disinterested in sanding, staining and re-varnishing that seat. But, it is a wide contour seat, and while I have a dozen old seats waiting on the to-be-refurbished racks, it is my only remaining contour. And it is vintage, stamped “Patent Pending”.

PB060027 by Mike McCrea, on Flickr

Guessing that “Pending” didn’t work out.

Someday I will sand down those dozen old seats in shop storage. And varnish them and web them. Not today. Not tomorrow. Not anytime soon; I need a canoe rebuild grad student for grunt work.

While the seat and drops were out I need to do something about the mix of stainless and brass hardware.

The (massive thick) deck plates, carry handles and thwart all have brass hardware and finish washers. The longer hardware affixing the contour seat & drops, and holding the combination foot brace/sail thwart, have stainless steel. The SS machine screw heads and finish washers were bright and unappealing atop the dark gunwales, so I painted them with some vinegar to etch the metal and hit them a lick with black spray paint.

PB060025 by Mike McCrea, on Flickr

At least they won’t twinkle in the sunshine, and that’ll do until I figure out what to do for a new (or refurbished old) seat. I have the two wide center seats I took out when I installed the Conk seats, but those are likewise unstained blond ash, and not contours. I’m not de-webbing, sanding, staining and varnishing perfectly good, reusable center seats.
 
Long Day, part 1

After ample dry time I could sand the first coat of EZ-Poxy

A very light RO scuff sanding. There were almost no drips or sags, just a couple little ones, and I could only see those at the perfect fluorescent glare angle. I flagged them with some painter’s tape to be certain I didn’t overlook them when sanding sans the glare angle. 600 grit on a foam interface pad made for short RO scuff work.

PB060030 by Mike McCrea, on Flickr


Second verse, same as the first, 30 minutes to roll and tip both sides, but finally working on a morning paint schedule. Second coat rolled and tipped and the Indy looks dang good.

PB060044 by Mike McCrea, on Flickr

It could pass all but close up inspection with just the second coat, but a quart of EZ-Poxy will cover the average 16 foot canoe thrice. The only hazard with doing a third coat is that - just the facts Mam – I did a superb job on that second coat, and there’s always a chance I’ll end up sloppier, saggier or drippier on the 3[SUP]rd[/SUP] with the third coat. Don’t ask how I know.

The fresh morning eyes, and good light, may have helped with that second paint coat. There are strategic timing elements to boatwork. I had my painting and sanding back on schedule; paint in the early morning when I’m at my best, heater under overnight, sand and repaint the next morning.

There are strategic dust elements to consider as well. On which I was not strategic. I had a lot of sanding to do; the old seat and drops, sand a new thwarts, new hangers for the foot brace/sail thwart combo. Can’t very well sand inside the shop with a morning painted still-wet canoe.

Improvising, I took everything out on the back deck. Four different belt sanders, two RO sanders, a selection of sanding disks, couple work benches and sundry pieces of brightwork to sand. I set up and equipped the outside shop before I started painting, so I didn’t raise a cloud of dust hauling tools outside.

PB060045 by Mike McCrea, on Flickr

Some of the new brightwork was virgin; thwarts and drops and etc from a large stash of spare parts I made years ago in my cabinetmaker uncle’s shop. Er, “we” made, I have nowhere near the woodworking tools or skills as Uncle Harwood (his actual given name).

I had access to some ash and other hardwoods at the time and we band sawed and edge routered a couple dozen thwarts, a half dozen yokes, and a large boxful of drops. A lot of various drops; shapely 2 ½” and 3 ½” drops, kneeling thwart drops, full truss drops. I left his shop with a truckload of brightwork, needing only to be sanded and varnished.

I have used up a couple dozen of the various drops, including nearly all of the full truss drops. I picked out two raw, un-finish-sanded drops to replace the blond ones on the foot brace/sail thwart; no reason to sand and stain those existing drops when I could easier make new ones, and keep the old blond ones as spares.

PB060042 by Mike McCrea, on Flickr

Dang, over the years I had already used all of the shapely ash thwarts Harwood and I made, what was left were some cruder ones I DIY’ed with a jigsaw and cheap router table, but I picked a likely one, ash I think. The curvy edge \_/ drops are . . . .maple? I pulled out a straight thwart, undoubtedly something I removed from a past rebuild, cutting the rotted ends off at the same angles, but that piece was easy to sand, and I had a stain test use for it.
 
Last edited:
Re painting a hull, I just found out recently while researching wood/canvas canoes that many restorers prefer to paint the underside of the outwales along with the hull. This helps prevent water seeping behind and into the outwales and causing rot -- both while the canoe is upside-up in the water and upside down-on a vehicle or storage racks, exposed to rain and snow. This may be less important on a non-wood hull because the outwales aren't in contact with also-rot-able ribs and planks.
 
Long day, Part II

The old contour seat? I dunno, that was going take a lot of dang sanding work. I was already worn plumb out and one arthritic knuckle looked like I was smuggling almonds under my epidermis. Wahhh, I don’t wanna.

PB060024 by Mike McCrea, on Flickr

I called a boatworker friend and said “Eh, screw it, I’m not sanding all that off, I’m gonna paint that seat frame with black EX-Poxy and call it good”. There may have been analgesic beer, or something, or both, involved it that declaration.

He convinced me that “Was going to look like heck”. Eh, what does he know, he never saw my plaid woven seat with fuchsia, orange and black webbing seats. But “In Doug I trust”, so I sanded the dang thing down to bare wood.

GOD BLESS the little 1x32 belt sander. I could fit every part of the seat frame against the sanding belt, even inside the frame.

PB070047 by Mike McCrea, on Flickr

PB070050 by Mike McCrea, on Flickr

Yeah, that will all look better once hand sanded a bit, walnut stained and varnished. But I will make an EZ-Poxy black seat someday; it’ll look like a carbon fiber frame. Or like heck, time will tell.

PB070052 by Mike McCrea, on Flickr

Before finish sanding that frame I filled the old brad holes with G/flex; I didn’t want to inadvertently sink a stainless steel staple in an old brad void, and I G/flexed the intersections of the rails and struts while I was at it; it is a very old seat frame.

PB070002 by Mike McCrea, on Flickr

I don’t mind hand sanding, but I need to be in the right frame of mindlessness (see “Beers, etc”). The concave curves on the foot brace/sail thwart drops are a PITA to sand. Small inside curves always are, and I’m pretty sure those pieces are hard maple.

PB070005 by Mike McCrea, on Flickr

It helped to remind myself that I’ll be cutting 5” or so off each end of the shapely 3 foot long thwart, so I didn’t need to do any extraordinary sanding job there. Still, those end pieces will go in the big box of ash scraps and old drops, and may come in handy some day.

PB070006 by Mike McCrea, on Flickr

Same with the seat; the bottom and inside of the frame didn’t need to be perfect, the ends of the rails will be most visible.

(Rails? Struts? Poked out from beneath the webbing Side Arms? I need a diagram of what each part of a wood bench seat is actually. Side Arms plus FreeFIRE? I bet the NSA flagged this post)

I think I originally used some flavor walnut stain for the gunwales, might have been Jacobean. Doesn’t matter, I wasn’t driving out just for stain. I had three-four-five different kinds of wood to stain anyway, so the pieces will not stain and grain identically.

I used the old straight thwart, which wasn’t going in the Indy anyway, for some stain tests with what I had in the shop.

Jacobean looked too light. “Special Walnut” looked a little light, but close enough. Better than the mix of various blond ash brightwork pieces with walnut stained gunwales.

PB080011 by Mike McCrea, on Flickr

PB080010 by Mike McCrea, on Flickr

BTW, it’s all well and good that I stained the gunwales walnut, but had I left them natural I’d be dang near done with this part by now.

Those attractive little seat drop hangers with the dark stripe?

Cool beans, I now have attractive 3” and 2 ½” laminated ash and butternut drops should I choose to use them on a future rebuild

That scrap use didn’t take long, and I’ll have a little Conk in the canoe. I cut that Conk scrap down to nearer the size I had originally installed. Those were deep for an Indy, which OEM had no drop at the back rail and a 1/2” (?) drop for some cant at the front.

The same 1 ¾” drops with a tiny amount of cant should work fine.
 
Between acquiring a new mini-project RX Pathfinder and some too brief shop time with furniture-builder friend Jane I actually managed some progress on the FreeFire.

dang, I am good, or at least getting better. The second coat of red EZ-Poxy, now cured for a full 24 hours, looked (mostly) un-sagged, un-dipped and un-blemished. So good I didn’t want to mess it up.

I dithered for a bit, with the shop garage door open and sunlight on the hull there were some tip out streaks, and one little sag, but there are also bottom scratches and skid plate epoxy drips from the original owner, and my 20 year old what-was-I-thinking patches, now reworked best I could.

The bottom wasn’t getting much better, so I wasn’t putting on a 3[SUP]rd[/SUP] coat of red on the outside, at least not right then. I still have plenty of Fire Red EZ-Poxy to recoat after the bottom and skids get scuffed up, and opened partial cans of EZ-Poxy store well, provided the rubber gasket in the lid lip is in place

The fully Fire Red Independence was going to look might dang stark with no graphics. The nearly full can of Black EZ-Poxy, used mostly as UV protection on Dynel & graphite powder skid plates, to the rescue.

A wide black stripe, starting an inch below the outwales, will have further value when I get to outfitting. I have plans. Black Dual Lock spray cover plans.

Day whatever of painting (and varnishing). I taped out the black stripe area. A boat-length run of painters’s tape along the outwale edge and a pencil line scribed at 2 ¾” from the outwale. As usual I drilled a small hole in a ruler to scribe the pencil line for the top run of tape.

PB080013 by Mike McCrea, on Flickr

A run of wider tape laid above the scribed line masked off the area for ease of rolling and tipping. Sanded between the perimeter tapes first (actually 0000 steel wool scuffing) on the red base, then rolled & tipped the first coat of black EZ-Poxy. That 2” wide stripe width was picked somewhat randomly. It will do nicely for what I have in mind, and the “Streetwallker”, I mean “FreeFIRE”, will look less garish with some eyeliner.

PB080016 by Mike McCrea, on Flickr

Two coats of black for the stripe should be plenty, that isn’t a high scuff area, especially with ¾” wide outwales.

PB080019 by Mike McCrea, on Flickr

Time to get some more urethane on the brightwork. Using ubiquitous Minwax Helmsman Spar Urethane I could manage a morning and evening coat each day. Quote the can: “Let dry for at least four hours, sand lightly with fine paper to ensure an even finish and proper adhesion of additional coats”. Two coats a day really moves things along.

Caveat: Spar urethane is much harder to lay down un-dripped/un-saggy than multiple schedule-thinned coats of quality marine spar varnish. Good quality spar varnish runs $30 - $50 a quart, if you can find it in a store. Minwax Helmsman Spar Urethane is available at any hardware or even WalMart. For $17 a quart.

And in long duration UV comparison testing Helmsman Spar Urethane fares quite well when stacked up against spar varnishes and oils.

https://myccr.com/phpbbforum/viewtopic.php?f=49&t=40923

After ample dry time I was ready to sand the first coat of black EZ-Poxy and laid down a second.

With more paint drying wait time I could cut & seal some webbing ends. The usual; propane touch, wide metal putty knife, little squibs of painter’s tape Sharpied at the measured cut lines.

PB080026 by Mike McCrea, on Flickr

It is easier to mark all of the cut lines at once, and only re-heat the putty knife blade for a few seconds in between each smoky sizzle sealed cut.

PB080028 by Mike McCrea, on Flickr

Good way to use up end rolls for painter’s tape too. Really good time to be running a shop exhaust fan in the window above the poly smoky workbench.

PB080033 by Mike McCrea, on Flickr

7” long pieces of 1” wide webbing for tie down loops because, math. The webbing gets folded over, so 7” becomes a 3 ½” long loop. An inch of so is hidden below the thwarts or carry handles. And I wanted an always-open Möbius-ish half twist, which uses up almost another inch.

I should make twenty while I’m at it, I’m out of pre-made shop stock.

Or thirty some, I just carried on measuring and marking, using up the last dregs of a nearly exhausted painter’s tape roll. Half twist and tape the bitter ends together, so my clumsy fingers are not too close to a red hot nail, easy peezy.

PB090036 by Mike McCrea, on Flickr

Then melt a sealed 3/16” machine screw (or 3/16” pop rivet) hole through the taped-together ends with a 20-penny common nail and propane torch, stinky work; turn the exhaust fan on high. It helps to have a hole-drilled piece of wood, marked with aiming crosshairs, to plunge the hot nail point into.

PB090035 by Mike McCrea, on Flickr
 
Time to pull the stripe tape. I was a little anxious about this reveal; while I thought the stripe itself would look fine after two coats of black, I had concerns about paint creep onto the outwale, or through the un-rabbeted gunwales.

Tada, perfect, no paint creep to speak of, just a teeny black drip at each stem onto the red, which is easily touched up.

PB100052 by Mike McCrea, on Flickr

PB100054 by Mike McCrea, on Flickr

Flip the Indy (FreeFIRE) right side up and see how that strip looks.

PB100056 by Mike McCrea, on Flickr

Well shucks, the canoe had been upside down for so long I plumb forgot that there was a slender thwart in front of the footbrace/sail thwart.

PB100060 by Mike McCrea, on Flickr

I could have been sanding, staining and urethaning a replacement for that thwart while I was working on the other pieces. I needed to remove the peculiarly shaped foot brace thwart, sand, stain and urethane it, easy enough to do them both at once

With no need to move the canoe for a spell I removed the last of the brightwork. With just the carry handles intact that is a big empty.

PB100001 by Mike McCrea, on Flickr

It does make for uninterrupted sanding and oiling of the gunwales. The hardware from the various pieces went into separate boxes when removed, so there was no mixing them up later.

PB100005 by Mike McCrea, on Flickr

Instead I had my hardware mix up somewhat earlier. I could not find the little pipette tip box with the seat hardware. I know it that little box did not leave the shop and it is distinctive, with the black painted heads and washers poking out of the box.

PB100007 by Mike McCrea, on Flickr

There are dozens of those handy little boxes on the back of the bench, but it wasn’t with them. Even after I had looked a dozen times.

PB100008 by Mike McCrea, on Flickr

After some mystification I discovered them in a box of webbing tools, stored in a closed door cabinet, put in that box during a benchtop clean up. Let’s just say that was not the first place I looked.

Hardware removal note #1. The canoe had 6” stainless steel 3/16” machine screw in the foot brace drops, and 4” SS in the seat drops. And 2” brass in the no-drop thwarts and carry handles. One piece of that brass was wanked and came out wobbly when unscrewed. I had considered replacing the longer stuff with brass, I like the look of brass on walnut. Having seen that bent shorty, I now think not, especially on the longer hardware.

Hardware removal note #2. With all of the brightwork except the carry handles removed, even with the oversized ash gunwales, the hull spread out an inch at center sheerline.
 
Time to cut some more brightwork to size, drill some holes and varnish again. For cutting to length and end angles I simply used the old unstained thwarts. But I had to bar clamp the sheerline back tight before drilling the ends.

PB100013 by Mike McCrea, on Flickr

Out of curiosity I weighed the old shapely stern thwart and the wider stain-test piece of straight whatever wood. 12oz for the old ash thwart, 13oz for the whatever wood. Again, screw it, no sense in sanding and staining a perfectly good ash thwart to save an ounce when I already have a piece sanded and stained walnut. That was the thwart with the wanked brass, so going a little wider at the butt ends may help.

(Someday I really want to find a trashed lightweight composite, and really try my hand at keeping the weight down on a rebuild, using a lighter weight seat, drops and thwarts. And judicious outfitting).

Eh, once clamped in place, I decided to skip using that straight stern thwart, for several reasons. There will be shapely brightwork everywhere else, and that unshapely thwart looked out of place.

An additional, much more important reason to make a new stern thwart; that thwart was further back from the seat than I would (now wiser) prefer, 21” away. I would prefer 10 – 12 inches back at most, closer support for the paddler weight on the seat while still leaving enough room between the seat and stern thwart for some easily accessible day gear.

And, finally, a most important reason. I noticed that I had originally installed that stern thwart hardware way to close to the gunwale screws, with the machine screws barely an inch away. I don’t like that too close intersection of vertical and horizontal holes and hardware. Time to grab yet another unsanded thwart from the shop stock pile and do some more finish work.

PB110021 by Mike McCrea, on Flickr

I filled the old too-close gunwale holes with G/flex, running a rat tail file inside the old holes which were coated, like the gunwales, with a mix of varnish, boiled linseed oil and turpentine. Probably not the best stick-to surface even for G/flex.

PB110025 by Mike McCrea, on Flickr

It took a couple “fills” with G/flex as it seeped and settled into the wood. Straight G/flex will be a little amber in color, which should look ok on the walnut stained gunwales. A little G/flex sucked (viscous slowly) into a small syringe and the holes were filled. The gunwale holes soaked in a crater as expected.

PB120030 by Mike McCrea, on Flickr

Another teeny squirt of G/flex left a slight meniscus crown. I painted a little G/flex on the ends of the Dual Lock test pieces as well, as a further tenacity test for spray cover use. G/flex or Aquaseal, or something is going on the ends of the Dual Lock on the cover material.

PB120027 by Mike McCrea, on Flickr

Last of the new pieces for test fitment and drilling, the scrap Conk seat drops. I laid a piece of painter’s tape lengthwise and marked the center line on each drop to make sure they were to aligned with the gunwale holes, and should seat evenly on the ends of the seat frame. Inwale pilot holes, drilled through the gunwale holes, before turning to the drill press.

PB110015 by Mike McCrea, on Flickr
 
Mike McCrea He convinced me that “Was going to look like heck”. Eh said:
The patent pending seat you are refurbishing looks like one from "Dirt Road Woodworks". I'm not sure if Dirt Road was the official name but seats and other canoe components were manufactured for Mad River by a couple of guys who had a shop on a dirt road somewhere near MRC in Waitsfield VT.[/FONT]

The contoured rails of the dirt road seats do not appear as though they were steam bent, each rail was cut to shape from a larger piece of stock. The potential for weak grain structure using this technique was somewhat lessened by increasing rail thickness through the transition point of the contour. Pressed cane 20" wide, the 1" deflection takes place over 14".

I do not care for pressed cane, but if you find it acceptable, the Dirt Road boys built a well-proportioned and attractive seat that no doubt bolsteredMad
River sales. Did you see a date stamped on the inside of one of the struts? I've seen July 1999 but not sure if it pertains to manufacture or to the patent.
 
The patent pending seat you are refurbishing looks like one from "Dirt Road Woodworks". I'm not sure if Dirt Road was the official name but seats and other canoe components were manufactured for Mad River by a couple of guys who had a shop on a dirt road somewhere near MRC in Waitsfield VT.

The contoured rails of the dirt road seats do not appear as though they were steam bent, each rail was cut to shape from a larger piece of stock. The potential for weak grain structure using this technique was somewhat lessened by increasing rail thickness through the transition point of the contour. Pressed cane 20" wide, the 1" deflection takes place over 14".

Thanks Conk, you know how I love old canoe history stuff, especially Mad River canoe history, having owned a bunch and still owning a few. MRC’s Vermont-built composite boats are still a treasure; maybe not infused/vacuum bagged/carbon/innerga, but well and skillfully built canoes.

Did you see a date stamped on the inside of one of the struts? I've seen July 1999 but not sure if it pertains to manufacture or to the patent.

I did not, at least this time around while sanding down the seat. If there was a date stamp there 20 years ago, when I brilliantly installed webbing (with brass brads) over cane, I did not notice.

The hull is has a 1991 HIN, I believe making it the first year for the Independence. I dithered long about the seat. I considered installing my remaining Conk seat, but I’m holding that in reserve for a composite solo unicorn that better suits my paddling preferences.

I thought about, actually e-mailed, Ed’s Canoe; wonderfully helpful folks who even gave me a price for a wide contour stained walnut, sans webbing when I was considering all-red everything. But you know how Scot’s frugal I am.

The FreeFIRE is better suited for my wife or younger son, who lack my girth, so that old seat should hold up fine.

It’s not like it is an all-original parts canoe, or even now thwarted/outfitted as OEM. The hull itself, the seat and maybe the carry handles are the only remaining original parts
 
It looks nice. Did you do a before and after weighing ?
How much weight did you add to the boat ?
Larry S45
 
It looks nice. Did you do a before and after weighing ?
How much weight did you add to the boat ?

On the shop scale the Indy weighs 49 lbs with my oversized wood gunwales & deck plates and original-owner kevlar felt skid plates. Catalog speced at 45

Larry, I am four or five days ahead on the refurbishment from what I have posted thus far. It takes me a while to write up each day’s work and select photos. Yesterday I finished all of the refurbishment and outfitting that would add weight, with the exception of a few snaps for spray covers, and coincidentally weighed the canoe just before I saw your post.

I did not believe the weight, so I weighed it several times, and got the same number. I even checked the accuracy of my scale by first hanging a 30lb and then two 30lb weights. The scale is dead on. I’ll save revealing that number for later; it was shocking, but in a good way.

One last piece of brightwork left, the peculiar shapely foot brace/sail thwart. I was not cutting, edge routing and sanding a new one of those weirdo shapes, so it was back to the RO and tabletop belt sanders. And dust extractor cart. I again neglected to turn on the vacuum, but only briefly. I think I need an illuminated power cord switch on the top platform. Could be a use for Dual Lock.

Some hand sanding on the foot brace thwart, some light hand sanding on everything else and it was time for another coat of spar urethane, including inside the new holes with a pipe cleaner.

Almost omitted a step; I will want a run of over/under/over bungee cord on that thwart after it has been sanded, stained and urethaned. I needed to drill and chamfer the bungee holes before staining so I can urethane inside the holes. Chamfered in the direction the bungee will be stretched for less wear and tear.

PB110024 by Mike McCrea, on Flickr

Special walnut on the two new brightwork pieces, another coat on urethane on everything, including a urethane soaked pipe cleaner inside the brightwork holes. No wood rot on my boats.

I like the way the laminated Conk seat drops look, with the dark stripe and walnut stained end bevels. I seated them on the machine screws for a fitment test. So they didn’t fall off the machine screws as I monkeyed with them I used an old trick; some little circles of rubber, cut out with a grommet punch and hole centered.

PB120032 by Mike McCrea, on Flickr

Unless you are built like a Hindu god it is hard to hold four pieces of hardware on four machine screws under the inwales when working solo, and those tight fitting little rubber gaskets do the trick. With the four seat drops held in place I came to several realizations, they were deeper than I would like, and had more forward cant than I wanted. Back to the belt sanders

PB120042 by Mike McCrea, on Flickr

BTW, I love that chunky “eraser” for cleaning sanding belts. It is starting to get stubby, but has lasted for years and cleans the belts wonderfully.

https://www.harborfreight.com/sanding-belt-cleaner-30766.html?cid=paid_google|||30766&utm_source=goog le&utm_medium=cpc&utm_campaign=&utm_content=&gcli d =Cj0KCQiA-rj9BRCAARIsANB_4ADcwUyY9Jh4SqPhhBAA36LBpE8E6f6cbHB 4mAFG0vjPyfqxh8JRw9IaAtjfEALw_wcB

There was a brief pause while I attend to a shop cart improvement. Small multi-plug with an illuminated on/off switch, attached to the side of the shop cart using Dual Lock. A single extension cord needed, or none if the cart is close enough to an outlet; plug the vacuum dust extractor and sanders etc into the cart, switch on. So that I don’t/can’t forget to turn the vacuum part on before sanding I am just leaving it switched on; nothing will run unless the multi-plug is illuminated.

PB160028 by Mike McCrea, on Flickr

The drops are now nearly uncanted flat, and 1 ¾” deep. I needed to re-stain the newly shortened ends, and add back the little bevel. The Conk drops are a little wider than the old seat frame rails, and I didn’t want a right angle edge there, so I again beveled those exposed edges down all around and again stained the newly exposed wood with Special Walnut. I like the dark walnut edging, it makes for a nice transition between the drops and the walnut gunwales & seat.

PB120036 by Mike McCrea, on Flickr

Time for more urethane on everything, Except the seat frame; it has four coats of urethane and I wanted to get started with the webbing that seat.

I used 1 ½” wide webbing this time, so 11 short pieces and 4 long ones. That is poly webbing, but thinner than most, maybe why the rolls were clearance priced cheap. Even poly it has a little stretch, so I turned to an old trick, soaking the cut webbing piece in a bucket of warm water for a few minutes before seating the SS staples on one side, stretching the wet webbing and seating the opposing staples.

PB120043 by Mike McCrea, on Flickr

I did not get nearly the amount of stretch I had anticipated on the short pieces. I should have soaked test pieces at both lengths before cutting them all. Good enough, each webbing end got two offset SS staples on the bottom of the frame, and each alternating piece got one SS staple on some stretched overlap inside the seat frame.

I let the four lengthier pieces soak for longer. I don’t know if it was the longer soak time or 2x length of those pieces, but I had enough stretch to staple the webbing ends both to the bottom of the frame and on the inside, with all of the cut ends tucked up out of the way.

PB130046 by Mike McCrea, on Flickr

Good enough. It still needs one thing. Something garish. Not flames or sugar skulls, I have none of those, but something more color coordinated. The pad keeper straps.

PB130048 by Mike McCrea, on Flickr

I really like the way a ThermaRest seat pad (the old high quality ones), used mostly deflated for good sitz-bones seat contact, cups my around arse like a bucket seat, and even mostly deflated I can still reach back, let a little more air out a few times and change pressure points.

PB130050 by Mike McCrea, on Flickr
 
Back
Top