• Happy Incorporation of Hudson's Bay Co. (1670) 🍁🦫🪓

New ribs and planking

Joined
Apr 21, 2015
Messages
815
Reaction score
402
Location
Livingston, Montana
A question for those of you who have replaced w/c ribs. Is it necessary to remove the top row of planking along the shear when replacing ribs?

My project boat needs a new inwale on only one side, and also needs most of the rib tips replaced on that same side so I know the top row of planking has to be removed over there. The good inwale side needs no rib tip replacements,but I do have those dozen or so ribs that need to be replaced. It sure would be nice to not have to mess with the planking at all on the good side.

Mark
 
Usually the top row along the sheer need to be removed to get access to the nails holding the ribs on the inwale and to again fasten the new ribs to the inwale.
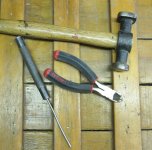
We use a modified side cutter to pull the tacks. I'll get a picture up after work tonight. I have also found it easier when removing broken ribs to use a punch and hammer from the inside to drive the tacks through the rib which makes it easier to pull the tacks and does less damage to the planking. The rib is toast anyway so anything we do to it doesn't matter at this point. I'll put up photo's later if you would like.

Karin
 
I took a closer look Karin, and it looks like some of the ribs have the nails slightly above the planking, so I may or may not be able to get away with saving the entire row of planking. Thanks for the tip with the punch, I would be interested in seeing some photos if you have the time. Also, I assume I should drive new tacks into a different place on the planking instead of using existing holes? Do you fill the old holes with something or let them go? I'll drill through the old planking first since this stuff seems quite brittle and will easily split.

Mark
 
No Title

We will drive new tacks into existing holes if there isn't much damage to the planking. Fill the old hole with a new tack, it likely won't clinch in the same direction as the original one anyway. We do use a 1/16" drill bit on the planking only near edges and ends of planks, old or new, but in the middle we don't bother. On the present boat project we had to re-clinch every tack and replace about 10% of them as they were standing proud after the tips broke off. It has been a time consuming endeavour.

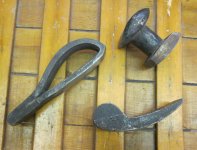
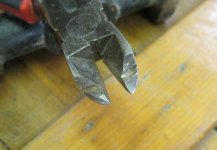
The tools we use are pretty straight forward. The side cutters were ground down to allow ease of getting under the tacks with less damage to the planking, it is a bit of an art and takes time to really get good at. The clinching irons we have used include dollies for vehicle repair and the one actual clinching iron a friend made for us. She does Pioneer blacksmithing in Washington State, old school style and after a visit to our shop a couple years ago she went home and made us two, small and large. We are still working at getting them into the ideal state but the loop design really makes it easy to hang onto.
 

Attachments

  • photo5650.jpg
    photo5650.jpg
    138.1 KB · Views: 0
  • photo5651.jpg
    photo5651.jpg
    171.9 KB · Views: 0
  • photo5652.jpg
    photo5652.jpg
    83.8 KB · Views: 0
Great info Karin. I like the shape of those side cutters, I'll have to dig out a pair and take them to the grinder. Did you flatten the back side also?

Mark
 
I,ve had good luck using a small restorer's pry bar inserted carefully between the rib and inwale to make enough space for a hacksaw blade to cut the nails holding the rib. When replacing the rib I have drilled a 1/16" pilot hole to make sure I'm not hitting the previous nail head, then driven a new nail through the planking, rib, and into the inwale. I,also, drill pilot holes when close to the edge of planking, but usually drive a new tack through a new spot. The old hole won't be seen, but that's just me.
Dave
 
I've had good luck using a small restorer's pry bar inserted carefully between the rib and inwale to make enough space for a hacksaw blade to cut the nails holding the rib. When replacing the rib I have drilled a 1/16" pilot hole to make sure I'm not hitting the previous nail head, then driven a new nail through the planking, rib, and into the inwale. I,also, drill pilot holes when close to the edge of planking, but usually drive a new tack through a new spot. The old hole won't be seen, but that's just me.
Dave

Our technique is similiar excepting we pry the rib out far enough that if you push the rib back flush with the inwale you can then use a claw hammer to pull the old nails, and if the head breaks off, a set of side cutters to grip the nail and slowly pull the nail out. Be careful as you pry the rib away as you can damage the inwale in the process. I try to not leave nails in the inwales. Drill for new holes and use silicon bronze ring nails to fasten the new ribs or if just replacing the nails in old. if the inwale is damaged enough from the nails, I may fill it with thickened epoxy so the new nails have some meat to bite into.

The nippers for tack pulling are ground down on the back side as well, remove enough material to make it easier to get the tool under the head of the tack, but not enough to weaken the jaws. The pair we use is 5 years old and were under $10 to buy and easily fits in one hand. A normal store bought tack puller works fine with any old proud tacks.

Karin
 
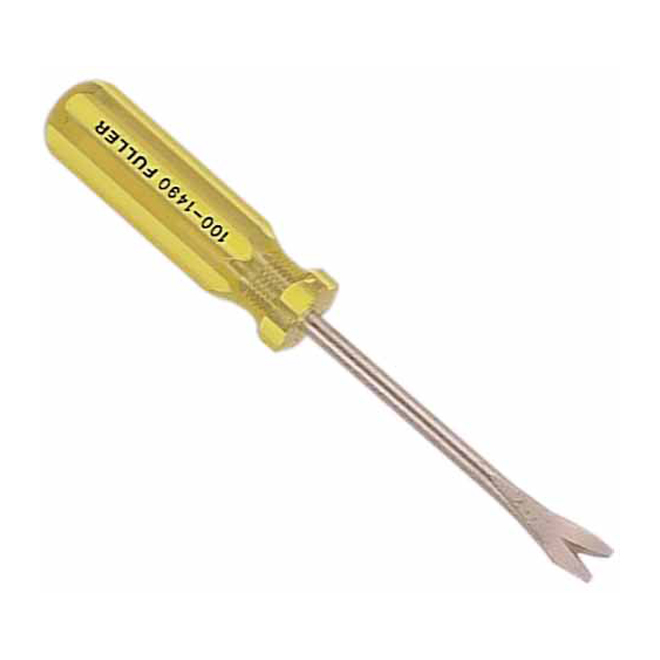
This is what I use for pulling tacks, works well but it can be dangerous. Always keep your non working hand behind the puller as it can slip forward and impale your hand.

1422138_L.jpg
 
We have one of those screwdriver type ones also but it is bulky and hard to dig them out with. I need to source some out and grind them down to be more efficient. I tend to bugger the planking taking it off. Its just not something I do well.

I am the broken nail pro though, even as far as drilling them out if needed.

Christy
 
Back
Top