-
Happy National Sunglasses Day! ☀️🕶️😎
You are using an out of date browser. It may not display this or other websites correctly.
You should upgrade or use an alternative browser.
You should upgrade or use an alternative browser.
My First Canoe Build
- Thread starter dcloots
- Start date
Wow your moving on! Yes I am watching and learning. What little I know, I think it is looking good.
I’d like to see more photos.
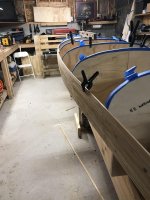
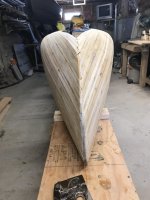
I hope I’m wrong and that its the light or an optical illusion, but to my eye something doesn’t look right with the way the strips are aligning with the strips above and below and it isn’t just one or two. Not sure if it is a form issue, a strip milling issue or something else.
If the forms are cut fair and aligned on the strongback and the strips are milled to consistent thickness with proper bead and cove, stripping the hull reasonably fair should be one of the easier parts of the job. And if it isn’t stripped pretty close to fair, you are setting yourself up for a hugely frustrating task to try to sand and fill it fair.
As much time as you now have invested you are still at the beginning, so make sure all is right before proceeding.
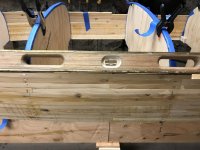
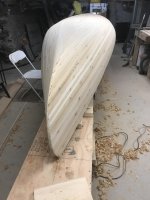
I think a lot of that picture had to do with lighting. I am level everywhere, however as I stated there are a few strips that I am not pleased with but I think this will be resolved when I hit it with the block plane and sand. I have no issue at all with taking the 1/4 strips and fairing/sanding to approx the 3/16" level to reduce much weight. One of the corrections that I made during the stripping process is reducing the amount of glue and sanding each cove side strip. The illusion of misalignment has more to do with the very thin remains from the coving of the strips. I have since started to lightly sanding those fine burrs off of each strip (cove side) and the appearance is night and day. Hey, first build...learning as I go. All in all I am quite pleased with how the strips are aligning. There have been many times where I sat and looked at the boat and some tricks were being played on my eyes. Some of the pictures in the attachments actually show that the stripping is going decently.
Attachments


Last edited:
I’m not sure why you are finding it necessary to sand what you call burrs off of the cove; those burrs are an integral part of what the bead goes into and if both bead and cove are properly milled, they fit together perfectly with no visible gap and help make a fairer hull with less filling and sanding.
However, those burrs probably aren’t necessary because I understand that people built strippers without beading/coving for many years just using square edged strips.
As the builder, you alone get to decide how you want to do things, and I am rooting for you all the way!
However, those burrs probably aren’t necessary because I understand that people built strippers without beading/coving for many years just using square edged strips.
As the builder, you alone get to decide how you want to do things, and I am rooting for you all the way!
Last edited:
I believe I cut the cove deeper than I actually wanted to which resulted in a very fine burr (not the actual cove). I am removing, by sanding, the paper thin burrs which was affecting the gluing. The cove integrity is not affected by this sanding. The joints in most cases are fairly tight with some that are not. I am taking notes as well as keeping mental notes of how to improve in the future.
dcloots.
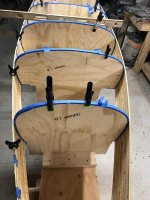
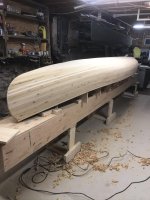
The pics with the level in my opinion really don't tell you anything.
You need to lay a long strip ( Fairing Strip) across the top of the molds to check that the molds are in alignment. This is done on the sides as well.
The term is "Fairing" This will tell you if things are in alignment much better,. The strip following the shape of the forms, should come in contact with all the forms. No gaps. When this is done, you know everything is aligned..
I know you are learning ! You might benefit from other build threads on this forum.
Keep at it, and good luck !
Jim
PS. Too late now, but for the best results the staples should go vertical, not horizontal. This will hold the strips to the forms stronger and truer.
Last edited:
Maybe make up a few of these. They will be a big help in protecting your coves, and gluing strips. Like an extra hand to hold strips in place, while stapling !
http://www.canoetripping.net/forums...ons/diy/77273-new-spring-clamps-for-stripping
I really like these ! The zip tied plastic tubing will save your coves ! If you only make a few you will want more. One inner tube is enough for a 11 or 12 clamps. Cut the tubing in 6" or 7" pieces.
Jim
http://www.canoetripping.net/forums...ons/diy/77273-new-spring-clamps-for-stripping
I really like these ! The zip tied plastic tubing will save your coves ! If you only make a few you will want more. One inner tube is enough for a 11 or 12 clamps. Cut the tubing in 6" or 7" pieces.
Jim
Part 4 of My First Canoe Build has been uploaded on YouTube if you’re interested in viewing https://m.youtube.com/watch?v=oX_vZWJaP0o&feature=youtu.be
Looking good! Keep on keepin' on!
Part 5 of the Wabnaki build has been uploaded. This has been a ton of fun when I have time to work on it.
VERY REWARDING!! Closing the Canoe Hull, PART 5
https://youtu.be/s9wamTaTcp0.
VERY REWARDING!! Closing the Canoe Hull, PART 5
https://youtu.be/s9wamTaTcp0.
Attachments
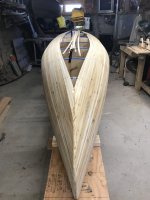
It's always fun hearing from a beginner ! How it feels as a rush comes over you when that pile of strips, on plywood forms, turns into a canoe !
We all started that way.
With the hull stripped up, sanding is the next challenge. You will be fine ! Fill staple holes, and any cracks or voids. A ROS works great with a dust collection system ( shop vac) As you feel you are done, go over the entire hull and hand sand with what ever grit you last used on your ROS. This will eliminate those pesky swirl marks left by the ROS.
You will then be facing the scariest part . Glassing the hull !
If you can find someone with glassing experience, locally ? That can lend a helping hand glassing ? That would be a big plus !
Great video by the way ! Patiently waiting for more !
Thanks
Jim
A tip about your plans on using thickened epoxy to fill cracks and such ... your comment that it will be darker is correct, but it will be MUCH darker. If you picked up some cabosil (fumed silica) or glass microspheres, they add a white component to the thickened epoxy, giving you a way to "lighten" the colour of the mix.
That sounds fancy, but the products are quite cheap and are used just like wood flour (check where you got your epoxy) ... to use them, I just add wood flour until the mix is a bit darker than the wetted wood, then add a bit of the cabosil or microspheres, which will lighten the colour, then just keep adding a bit of each to maintain the colour until you get the consistency you want.
This won't make an exact match except by luck, but it will put the colour within the normal wood colour variation and become almost invisible (you will be able to see it, but a viewer likely won't).
Brian
Wow! Looking good DC.
It's always fun hearing from a beginner ! How it feels as a rush comes over you when that pile of strips, on plywood forms, turns into a canoe !
We all started that way.
With the hull stripped up, sanding is the next challenge. You will be fine ! Fill staple holes, and any cracks or voids. A ROS works great with a dust collection system ( shop vac) As you feel you are done, go over the entire hull and hand sand with what ever grit you last used on your ROS. This will eliminate those pesky swirl marks left by the ROS.
You will then be facing the scariest part . Glassing the hull !
If you can find someone with glassing experience, locally ? That can lend a helping hand glassing ? That would be a big plus !
Great video by the way ! Patiently waiting for more !
Thanks
Jim
Thank you Jim! Thanks for the hand sanding advice. I have noticed those pesky swirls in places. I will take care of them with hand sanding.
In regard to the fiberglassing......I will be going solo on that. There is no one with experience at least that I know in my area. I went with US Composites epoxy and I have roughly 25 minutes of working time with this product. Not sure if anyone else here has used the product, but I am giving it a shot. It was clearly the most affordable product and the reviews were decent. It does blush in some cases so I will need to be weary of that.
Is there an alternate method for filling? I have definitely seen literature on microspheres but have zero experience and knowledge on how to use the product. You have provided a great outline for how to use the spheres or fumed silica and I appreciate this information greatly. I will shop for the silica. My concern however is wasting resin. Is it possible to mix the resin to thick that it affects the epoxy’s ability to cure? I have read a peanut butter mixture is the target.A tip about your plans on using thickened epoxy to fill cracks and such ... your comment that it will be darker is correct, but it will be MUCH darker. If you picked up some cabosil (fumed silica) or glass microspheres, they add a white component to the thickened epoxy, giving you a way to "lighten" the colour of the mix.
That sounds fancy, but the products are quite cheap and are used just like wood flour (check where you got your epoxy) ... to use them, I just add wood flour until the mix is a bit darker than the wetted wood, then add a bit of the cabosil or microspheres, which will lighten the colour, then just keep adding a bit of each to maintain the colour until you get the consistency you want.
This won't make an exact match except by luck, but it will put the colour within the normal wood colour variation and become almost invisible (you will be able to see it, but a viewer likely won't).
Brian
Work in small batches. It'll cure if you thoroughly mix per the manufacturer's directions and then add additives a little at a time (be it cedar flour, fumed silica) until you get to that peanut butter consistency. If you keep track of how much of what you used, you can repeat the formula over and over again.
Similar threads
- Replies
- 42
- Views
- 3K
- Replies
- 170
- Views
- 13K
- Replies
- 13
- Views
- 2K
- Replies
- 13
- Views
- 3K
- Replies
- 90
- Views
- 14K