• Happy International Museum Day!🏛️ 🖼️🏺

My first build from scratch.

Joined
Dec 11, 2016
Messages
31
Reaction score
1
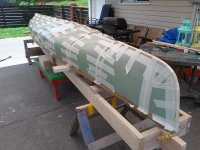
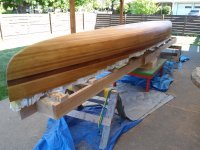
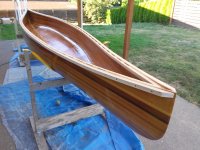
This summer I completed my first canoe build from scratch. As a recent member to the forum and a proud boat-papa I have to share my build process. This will be a bit of a dump as I have already completed the build.
I’m no one's idea of a precise or finicky wood worker so I quickly latched onto Gil Gilpatrick’s book of practical and simple canoe construction, “Building a Strip Canoe”. Anyone who can teach high school students to build canoes for years and years has to have something figured out. His book served me well throughout the build.
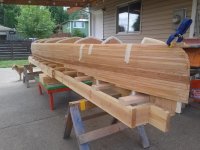
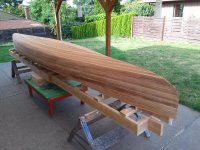
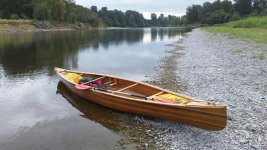
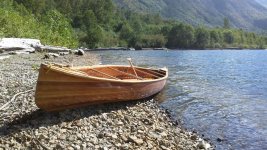
I have a preference for shallow vee hulls, ala Mad River, and have lusted after their no longer produced Independence. What I wanted, however, was an Independence with more freeboard and rocker. I’m not a small paddler, and I like to paddle large, open and often rough water, like the Columbia river when the wind is up. 2-3 foot wind chop? Yes please!
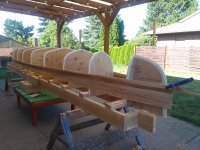
There are no plans that I could find for Mad River copy wood strip hulls, so I had to get creative. I picked up an 80’s fiberglass Malecite a year ago, and found a reference on a kayak forum for copying hull designs using strips of bending plywood. This worked quite well for getting the basic hull shapes. I cut 1inch strips of ¼” bending plywood and glued them together and taped them to the hull in 18” intervals. Viola, stations. Okay, actually, as I needed to narrow the hull by 4” and wanted more flared sides with tucked in gunnels ala David Yost designs, I had to modify the forms. In the end it worked out.
 

Attachments

  • photo5687.jpg
    photo5687.jpg
    359.4 KB · Views: 1
  • photo5688.jpg
    photo5688.jpg
    361.9 KB · Views: 1
No Title

I decided to build stemless, ala Gilpatrick, and to just butt join my strips instead of spending time with scarf joints. As I said, I wasn’t looking to build beautiful, just functional. Having modified the forms from the original Malecite, I wasn’t sure how the end forms would fit, so I just put all of the main forms in, laid in some sample strips, and adjusted the ends for a nice taper. As I kind of made this up as I went along I ended up with a boat about a foot longer than I’d originally planned, about 17’ rather than 16’.
 

Attachments

  • photo5689.jpg
    photo5689.jpg
    414.6 KB · Views: 0
  • photo5690.jpg
    photo5690.jpg
    357.2 KB · Views: 0
No Title

The trickiest part of laying the strips was definitely the ends, where the strips come together, especially as the end curves from the nose/tail to the bottom. About half way through I had one of those great “doh!” head slap moments when I realized that my bench sander was a perfect tool for getting a good fit for this part of the build. You can actually see where the joints clean up about 3/4ths of the way around the curve to the bottom.
 

Attachments

  • photo5692.jpg
    photo5692.jpg
    468.9 KB · Views: 0
No Title

Having sanded, filled and sanded again, fiberglassing went well. I’ve worked with glass and epoxy in the past. I used 6oz glass and West System epoxy. I put a 5” strip along the keel and up around the ends, a football on the bottom and around the bilges, and then a full sheet over everything else (did I mention that I’m a large paddler and I don’t baby my canoes?). I was pleasantly surprised at how easy it was to glass the reverse curve at the top of the hull for the pulled in gunnels; I’d worried that this would be a real pain.
 

Attachments

  • photo5693.jpg
    photo5693.jpg
    353.3 KB · Views: 0
No Title

Having cut down the shear and glassed the inside I added my gunnels. I'd hoped to use spruce for the gunnels to cut weight but, holy cow, spruce is really, really expensive. Switched to ash. Made scuppered gunnels because I’d always wanted them, they look great, and they provide endless tiedown points. I left the ends of the inner gunnels rough as I wasn't sure if I wanted flush or cap decks. Ended up sanding them flush and making cherry caps.
 

Attachments

  • photo5694.jpg
    photo5694.jpg
    336.2 KB · Views: 0
No Title

After lots of sanding, some varnish, and finish work, she was finished. In the end she’s nearly exactly what I’d set out for: long and fast with narrow ends yet stable and well-behaved in the rough with a flared hull and tucked gunnels. She’s a bit over 17’, 30” at the widest, 14.5” in depth with 18” ends. I’ve been very happy with her speed, she’s as fast as the Prism I had a couple of years ago but way more stable. She paddles hit and switch very well indeed yet is still reasonably maneuverable (better than the Prism by a long shot). She handles nicely with one side paddling or heeled up Canadian.
The only things off are the weight, closer to 60lb than 50 (my goal, though with the ash woodwork and extra glass no surprise) and she has a bit less rocker than I intended. As I was working from my own plans I had to try to estimate rocker in setting the forms. I didn’t take into account the greater angle of the strips where they meet at the narrow ends. This makes for taller joints by about a ½ inch which is indeed what I lost in rocker.
She’s a joy to paddle, lovely, and quite sturdy. Now, however, all I can think about are the next boat(s) I want to build. I’ve definitely got the bug.
 

Attachments

  • photo5695.jpg
    photo5695.jpg
    271.3 KB · Views: 0
  • photo5696.jpg
    photo5696.jpg
    290.4 KB · Views: 0
  • photo5697.jpg
    photo5697.jpg
    217.1 KB · Views: 0
Welcome to the forum! Very nice canoe, I like how you readjusted it to specifically suit your needs. Well done!

Jason
 
Very Nice. Turned out much better than my first build.

That is certainly a substantial canoe! I think that's the first time I've seen a 17' rigged primarily as a solo.... But the proportions look right.

Do you happen to have a width at your loaded waterline? That's generally a better comparison point when considering on-water characteristics.
 
Very nice...and a bold move! First ever build and you essentially designed your own hull too.
Already planning the next one? That's the problem with building your own boat, it's too hard to stop!!
 
Hi all, thanks for the feedback. The loaded waterline comes in right a 27". The hull flares out to 30" right before the recurve for the tucked gunnels, and the outside of the gunnels sit right at 30" as well.
At this point I'd have at least 3 more hulls in process if it weren't for the sanity check also known as my better half.
 
Nice work Portland ! And most importantly you like what you've built ! That's true satisfaction !
Glad you've joined the ranks of canoe building addicts + CBA !
​ I love making changes to canoe plans. It adds an element of excitement, that keeps me going. Besides, good or bad, you've learned something, and it never gets boring .
​ A few pointers on how TRY to INFLUENCE the better half. I tell my wife, she knows where I'm at, and it's not in a bar ! It's worked for me so far !

​ Welcome ! And Thanks for sharing your build with us ! And keep them coming !

Jim

 
Back
Top