For your interest:
I have been working on a Chestnut Prospector 16 that I lofted from the plans in the 2000 Canoe Craft edition but I have made a few changes and intend to have 38lb finished canoe. I am not done but I am fairly far into the process and figured at this point I'm confident enough to make a post. So here are some notes that I will add to with photos and more details for each stage of my process. Please note that I am comfortable with my calculations for my purposes but who knows right? This is also an experimental and underway project so no guarantee that this will result in a usable canoe.
Goals:
-38lb or less
-wide bodied stable prospector
-reasonable workmanship
-build a usable boat
-learn some new skills and derive some enjoyment out of the process.
Build resources and method:
-Combination of Ted Moores, Gil Gilpatrick, "Canoetripping.net", Guillemot Kayaks, and general recklessness as well as many other sources
Changes to Chestnut Prospector 16 plan:
1-reduced prescribed station distances from 12" to 11 7/8" for stations 1-6 but maintained station 6-7 at 12" and kept station 6 to stem measurements as originally written. I had hoped this would allow 16' dressed lumber to span the sheer without scarfs...it did not.
2-uniformly applied a 1/4 round over to all stations believing this would somewhat uniformly reduce the overall size of the hull while efficiently avoiding bruising strips. I am not sure what impact this actually had.
3-after FG application, I reduced the sheer line by 1.25" or there abouts.
4-no inner or outer stem. However I ended up cutting/planing my bow and stern areas before exterior FG until i have a gap right down my center line and massaging in and sculpting an thickened epoxy rock guard that I could shape as desired.
5-No staples (intended)
6-Followed the shearline with strips.
Build Materials:
-16' WRC cedar decking boards, ripped to north of 3/16 (0.201") with circular saw method with a small twist. I intended 3/16 but was concerned about fairing insurance.
-1/4' Bead and cove for final 0.75"x0.201" dimensions.
-60" 4oz s-glass 6522 from Sweet Composites
-West Systems 105-207 and 403 adhesive filler
-Cherry everywhere else
Layup bottom up:
-4oz s-glass exterior
-2"x30" bias cut 4oz s-glass on stems
-2"x40" bias cut 4oz interior stem strips.
-4oz s-glass interior with intended 14" overlaps at bow and stern seat positions plus a 12"x48" bonus strip centered about the yoke but not reaching up to the sheer. (overlaps were not executed as intended)
Trim and Furniture (TBDish)
-Cherry Inners and Outers: 0.320" rips, 0.75" width extending 36" from center toward bow and stern, straight taper to 0.5" at the ends. 45 degree bevel ~0.25"on the bottoms of ins and outs.
-All to be epoxied in place
-cherry yoke with epoxied sister support blocks
-cherry seats (dimensions tbd) with epoxied cleats
-Cherry deck, 2 piece book match 1/4- 5/16" thick, water fall face veneer to match inwale thickness/height. 5-7" beck from the inner "stem", 4oz s-glass on the topside.
As of this post:
-The hull is glassed, ins and outs of one side have been shaped and the other side needs shaping. No decks, yoke or seats started.
-The exterior FG fill coats were too conservative to start but a failure to tip-off has lead to subsequent coats leaving some heavy stipple or orange peel that can be sanded back (hopefully)
-I have an absolute garbage looking interior stem FG chaos job that needs clean up, and some pooling on the interior glass overlaps that should be touched up.
Here are weights so far:
Weights with a starting sqft of 61sqft
-Hull with exterior FG: 28.8lb
-interior fairing completed: 27.31lb
-Sealed interior: 28.01lb
-Glassed hull, no exterior sanding: 32.81lb
-Sheer line chop: 30.41lb (2+lb for 2x strips on either side!) Reduce area to 57.7sqft
That is where we stand atm. I will endeavour to make some catchup posts for each of the build stages from strong back to (hopefully) test paddle before the lakes freeze.
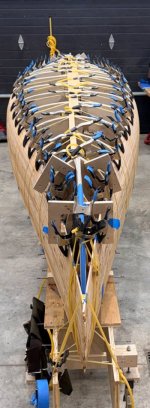
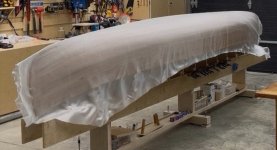
Here is a huge thanks to "jimmy clamps" and a picture of the pile strips under her veil.
Thanks!
I have been working on a Chestnut Prospector 16 that I lofted from the plans in the 2000 Canoe Craft edition but I have made a few changes and intend to have 38lb finished canoe. I am not done but I am fairly far into the process and figured at this point I'm confident enough to make a post. So here are some notes that I will add to with photos and more details for each stage of my process. Please note that I am comfortable with my calculations for my purposes but who knows right? This is also an experimental and underway project so no guarantee that this will result in a usable canoe.
Goals:
-38lb or less
-wide bodied stable prospector
-reasonable workmanship
-build a usable boat
-learn some new skills and derive some enjoyment out of the process.
Build resources and method:
-Combination of Ted Moores, Gil Gilpatrick, "Canoetripping.net", Guillemot Kayaks, and general recklessness as well as many other sources
Changes to Chestnut Prospector 16 plan:
1-reduced prescribed station distances from 12" to 11 7/8" for stations 1-6 but maintained station 6-7 at 12" and kept station 6 to stem measurements as originally written. I had hoped this would allow 16' dressed lumber to span the sheer without scarfs...it did not.
2-uniformly applied a 1/4 round over to all stations believing this would somewhat uniformly reduce the overall size of the hull while efficiently avoiding bruising strips. I am not sure what impact this actually had.
3-after FG application, I reduced the sheer line by 1.25" or there abouts.
4-no inner or outer stem. However I ended up cutting/planing my bow and stern areas before exterior FG until i have a gap right down my center line and massaging in and sculpting an thickened epoxy rock guard that I could shape as desired.
5-No staples (intended)
6-Followed the shearline with strips.
Build Materials:
-16' WRC cedar decking boards, ripped to north of 3/16 (0.201") with circular saw method with a small twist. I intended 3/16 but was concerned about fairing insurance.
-1/4' Bead and cove for final 0.75"x0.201" dimensions.
-60" 4oz s-glass 6522 from Sweet Composites
-West Systems 105-207 and 403 adhesive filler
-Cherry everywhere else
Layup bottom up:
-4oz s-glass exterior
-2"x30" bias cut 4oz s-glass on stems
-2"x40" bias cut 4oz interior stem strips.
-4oz s-glass interior with intended 14" overlaps at bow and stern seat positions plus a 12"x48" bonus strip centered about the yoke but not reaching up to the sheer. (overlaps were not executed as intended)
Trim and Furniture (TBDish)
-Cherry Inners and Outers: 0.320" rips, 0.75" width extending 36" from center toward bow and stern, straight taper to 0.5" at the ends. 45 degree bevel ~0.25"on the bottoms of ins and outs.
-All to be epoxied in place
-cherry yoke with epoxied sister support blocks
-cherry seats (dimensions tbd) with epoxied cleats
-Cherry deck, 2 piece book match 1/4- 5/16" thick, water fall face veneer to match inwale thickness/height. 5-7" beck from the inner "stem", 4oz s-glass on the topside.
As of this post:
-The hull is glassed, ins and outs of one side have been shaped and the other side needs shaping. No decks, yoke or seats started.
-The exterior FG fill coats were too conservative to start but a failure to tip-off has lead to subsequent coats leaving some heavy stipple or orange peel that can be sanded back (hopefully)
-I have an absolute garbage looking interior stem FG chaos job that needs clean up, and some pooling on the interior glass overlaps that should be touched up.
Here are weights so far:
Weights with a starting sqft of 61sqft
-Hull with exterior FG: 28.8lb
-interior fairing completed: 27.31lb
-Sealed interior: 28.01lb
-Glassed hull, no exterior sanding: 32.81lb
-Sheer line chop: 30.41lb (2+lb for 2x strips on either side!) Reduce area to 57.7sqft
That is where we stand atm. I will endeavour to make some catchup posts for each of the build stages from strong back to (hopefully) test paddle before the lakes freeze.
Here is a huge thanks to "jimmy clamps" and a picture of the pile strips under her veil.
Thanks!